Canon PowerShot G7 Design
Compact, rugged, and all-black styling reminiscent of a traditional rangefinder style camera, the Canon PowerShot G7 has enough heft and features to be taken more seriously than most consumer-oriented digital cameras. Measuring 4.2 x 2.8 x 1.7 inches (106 x 72 x 43 millimeters) and weighing in at 11.3 ounces (320 grams) without the battery or memory card, the G7 is at home in larger coat pockets and purses. The retracting lens withdraws almost flush with the camera front, preventing the camera from snagging on a pocket during retrieval. A neck/shoulder strap is packaged with the camera, so you can keep it securely around your neck or thrown over a shoulder while scooting about town. Capable of handling a wide range of exposure conditions with its array of automatic and manual exposure modes, and with more advanced features such as an external flash hot shoe and user-programmable settings, the G7 ought to please novices and advanced photographers alike. Though it doesn't offer an adjustable lens mount, you can expand the camera's zoom capabilities with accessory lens converters.
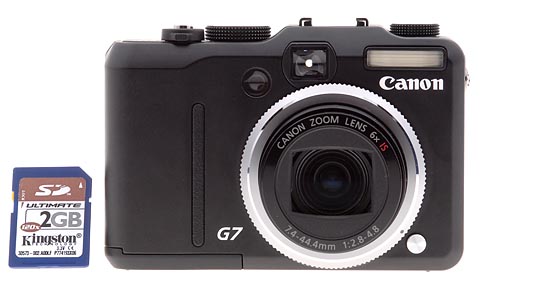
The PowerShot G7's front panel is fairly flat with the lens stowed, with only a minor protrusion from the lens itself. Once powered on, the lens extends about an inch from the silver lens ring. The built-in flash and optical viewfinder window line up above the lens, with an AF assist beam LED diagonally below the viewfinder window. A small silver button below right of the lens unlocks the lens ring, so that you can attach the accessory lens converters. The G7 has very little in the way of a handgrip, though a vertical, textured ridge gives fingers something to cling to as they grasp the camera.
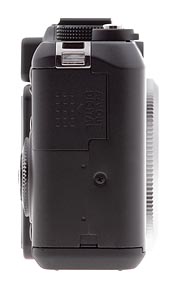
The right side of the camera (as viewed from the rear) features the connector compartment, housing the AV/Out and Digital input jacks. A springloaded sliding plastic door protects both jacks, and swings open under spring pressure. Just above the compartment is one of the eyelets for attaching the neck strap. At the very bottom of the right panel is a tiny sliding door to accommodate the cord from the AC adaptor's dummy battery, which inserts into the battery compartment.
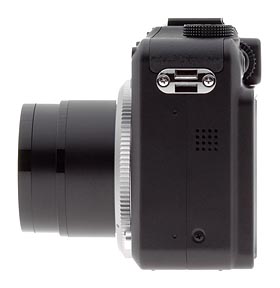
The left side of the G7 features the second strap eyelet, as well as the camera's speaker.
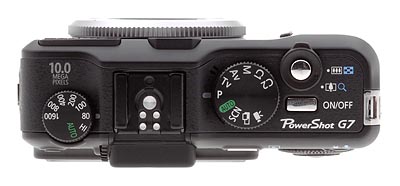
The camera's top panel has the usual Shutter and Power buttons, along with the Zoom lever, Mode dial, and ISO Speed dial. Centered over the lens is the external flash hot shoe, compatible with Canon Speedlite 220EX, 430EX, 580EX, and HF-DC1 models, as well as a variety of third party models. Almost hidden next to the Mode dial is the camera's tiny microphone.
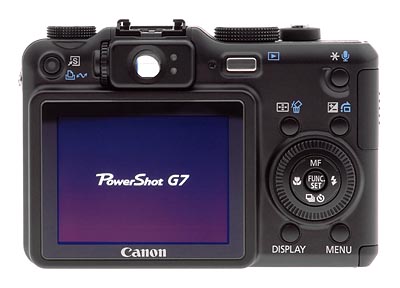
The remaining camera controls are located on the G7's rear panel, along with the 2.5-inch LCD monitor and optical viewfinder eyepiece. Two LEDs on the right side of the eyepiece light or blink to indicate camera status, such as a charging flash or autofocus operation. On the left side of the viewfinder are the Shortcut/Print/Share button and a small diopter adjustment wheel. The camera's Playback button is just above the top right corner of the LCD monitor, with the AE Lock/Microphone button to its right. Below these are the AF Frame Selector/Erase and Exposure Compensation/Jump buttons. A multi-directional rocker button, surrounded by a Control dial dominate the lower right corner. The Control dial serves as a settings adjustment tool, while the rocker button navigates menu options as well as accessing basic functions. In the center of the rocker button is the Function/Set button, which serves as a confirmation tool and link to the Function menu. Finally, below the rocker button are the Display and Menu buttons.
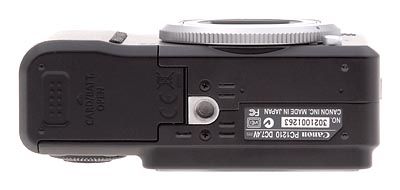
The G7 features a flat bottom panel, with a center-mounted, metal threaded tripod mount, and the battery/memory card compartment. A sliding, hinged plastic door protects the battery and memory card slots, and a small, brownish lock button keeps the battery from falling out when the compartment is open. Unfortunately, the compartment is too close to the tripod mount to allow quick battery or memory card changes, though the small cord access door on the side of the camera allows you to work on a tripod with the AC adapter.
Canon PowerShot G7 External Controls
Shutter Button: Sitting in the center of the Zoom lever on the camera's
top panel, this button sets focus and exposure when halfway pressed, and fires
the shutter when fully pressed.
Zoom Lever (see image above): Encircling the Shutter button, this lever controls optical and digital zoom. In Playback mode, it also accesses the index display and image enlargement modes.
![]()
Power Button: Behind the Shutter button/Zoom lever combo on
the top panel, this rectangular, silver button powers the camera on or off.
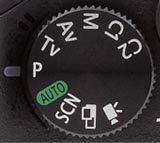
Mode Dial: Left of the Shutter button, this ribbed dial sets the camera's
operating mode. Canon divides these functions into three categories: Auto, Image
Zone, and Creative Zone. The options are as follows:
 Auto: The camera controls everything about the exposure, except
for Flash and Macro modes, image size and quality settings.
Auto: The camera controls everything about the exposure, except
for Flash and Macro modes, image size and quality settings.
- Creative Zone
 Program AE (P): Places the camera in control of shutter speed
and lens aperture, while you maintain control over everything else (i.e.,
white balance, ISO, metering, exposure compensation, flash, etc.).
Program AE (P): Places the camera in control of shutter speed
and lens aperture, while you maintain control over everything else (i.e.,
white balance, ISO, metering, exposure compensation, flash, etc.).
 Shutter-Speed Priority AE (Tv): Allows you to control the shutter
speed settings from 1/2,500 to 15 seconds, while the camera controls the
aperture. All other exposure settings are available.
Shutter-Speed Priority AE (Tv): Allows you to control the shutter
speed settings from 1/2,500 to 15 seconds, while the camera controls the
aperture. All other exposure settings are available.
 Aperture Priority AE (Av): Allows you to set the lens aperture
from f/2.8 to f/8.0, while the camera controls the shutter speed. The
maximum aperture depends on the zoom setting, ranging from f/2.8 at the
wide angle end to f/4.8 at the telephoto position. In this mode, you maintain
control over all other exposure variables.
Aperture Priority AE (Av): Allows you to set the lens aperture
from f/2.8 to f/8.0, while the camera controls the shutter speed. The
maximum aperture depends on the zoom setting, ranging from f/2.8 at the
wide angle end to f/4.8 at the telephoto position. In this mode, you maintain
control over all other exposure variables.
 Manual (M): Provides complete control over all exposure settings,
including shutter speed and lens aperture. As with aperture-priority mode,
the maximum aperture varies with the zoom setting from f/2.8 at wide angle
to f/4.8 at telephoto.
Manual (M): Provides complete control over all exposure settings,
including shutter speed and lens aperture. As with aperture-priority mode,
the maximum aperture varies with the zoom setting from f/2.8 at wide angle
to f/4.8 at telephoto.
 C1 and C2 Custom Modes: These modes recall user-set
exposure variables, set through the LCD menu.
C1 and C2 Custom Modes: These modes recall user-set
exposure variables, set through the LCD menu.
- Image Zone
 Scene: Accesses more specific preset shooting modes,
including Portrait, Landscape, Night Scene, Sports, Night Snapshot, Kids
& Pets, Indoor, Foliage, Snow, Beach, Fireworks, Aquarium, Underwater,
ISO 3,200, Color Accent, and Color Swap. (Color Accent lets you dim or
brighten a specific color in the scene, while color swap lets you pick
a color in the scene, and another color you want to swap it with in your
photos.)
Scene: Accesses more specific preset shooting modes,
including Portrait, Landscape, Night Scene, Sports, Night Snapshot, Kids
& Pets, Indoor, Foliage, Snow, Beach, Fireworks, Aquarium, Underwater,
ISO 3,200, Color Accent, and Color Swap. (Color Accent lets you dim or
brighten a specific color in the scene, while color swap lets you pick
a color in the scene, and another color you want to swap it with in your
photos.)
 Stitch-Assist: Allows you to record a series of images, either
horizontally, vertically, to be "stitched" together into one
large image or panorama on a computer.
Stitch-Assist: Allows you to record a series of images, either
horizontally, vertically, to be "stitched" together into one
large image or panorama on a computer.
 Movie: Records up to 640 x 480-pixel 30-fps moving images with
sound while space remains on the storage card.
Movie: Records up to 640 x 480-pixel 30-fps moving images with
sound while space remains on the storage card.
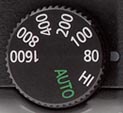
ISO Speed Dial: Located on the far left side of the camera's
top panel (as viewed from the rear), this dial controls the ISO sensitivity
setting. Options are Auto, Hi, 80, 100, 200, 400, 800, or 1,600 ISO equivalents.
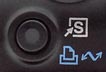
Shortcut/Print/Share Button: Positioned in the top left corner
of the rear panel, this button can be programmed as a shortcut to one of a range
of menu options (Resolution, Compression, White Balance, My Colors, Light Metering,
ND Filter, Digital Tele-converter, IS Mode, AF Lock, Create Folder, or Display
Off). When connected to a printer or Windows computer, this button lights up,
indicating that sync or printing is one button away. While the PowerShot G7
will work with any PictBridge-enabled printer, printing options are much more
impressive when the camera is connected to a Canon-brand printer.
![]()
Diopter Adjustment Dial: Tucked on the left side of the viewfinder
eyepiece, this vertical, notched dial adjusts the viewfinder to accommodate
eyeglass wearers, from -3.0 to +1.0 diopters.

Playback Button: Just above the top right corner of the LCD
monitor, this button puts the camera into Playback mode. If pressed when the
camera is powered off, this button turns on the camera and puts it into Playback
mode.

AE Lock / Microphone Button: In the top right corner of the
rear panel, this button locks exposure when pressed. When used in conjunction
with the built-in flash, this button will also lock the flash exposure.
In Playback mode, pressing this button lets you record a short audio clip to accompany a captured image.

AF Frame Selector/Erase Button: Adjacent to the top right
side of the LCD monitor, this button lets you set the AF frame. Options are
AiAF, FlexiZone, and Face Detect. In AiAF mode, the camera judges focus based
on the subject's proximity to nine focus areas arrayed in the center of the
image. FlexiZone mode lets you select a specific focusing area by pressing the
+/- button a couple of times, and then using the arrow directions of the multi-controller
to position the focus zone anywhere within approximately 60% of the central
portion of the frame. Face Detect mode means that the camera attempts to detect
a face, and bases focus on that portion of the frame.
In Playback mode, this button lets you erase the displayed image.

Exposure Compensation/Jump Button: To the right of the AF Frame Selector/Erase button, this button adjusts the overall exposure compensation when pressed while turning the Command dial. In Shutter and Aperture Priority modes, a first press of this button lets you change either the shutter speed or aperture setting, and a second press enables the Exposure Compensation adjustment. In Scene mode, the first press of this button displays the scene selection menu. And in Stitch Assist mode the first press of this button lets you set the shooting direction for panorama shots.
In Playback mode, pressing this button enables the Jump Search mode, which lets you skip through images on the memory card. Displayed along the left side of the LCD monitor is the Jump Search menu, which offers the following options for jump selection:
- Shot Date: Jumps to the first image of each shooting date.
- My Category: Jumps to first image in each user-set category.
- Folder: Jumps to the first image in each folder.
- Movie: Jumps to a movie file.
- By 10 Images: Jumps ahead 10 images.
- By 100 Images: Jumps ahead 100 images.
Command Dial: Encircling the multi-directional rocker button on the
rear panel, this notched dial serves as an adjustment tool when turned while
pressing a range of control buttons. It also controls Program Shift mode, and
is the means of setting the aperture and shutter speed in Manual mode.
In Playback mode, rotating the dial lets you select between thumbnails of captured images.
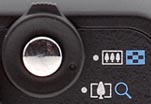
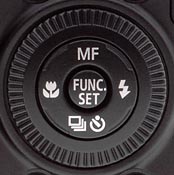
Multi-Directional Rocker Button and Func./Set Button (see image above): Dominating the lower right corner of the rear panel, this navigational button actuates up, down, left, and right, useful for navigating menu options. Outside of a menu, the up arrow activates manual focus mode, while the down arrow accesses Continuous Shooting and Self-Timer modes. The left arrow enables the macro setting, while the right arrow cycles through the available flash modes. Set within the rocker button, the Func./Set button confirms menu selections. Outside of the menu, pressing this button pulls up the Function menu:
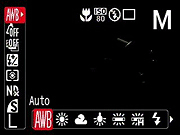 White Balance: Sets the white balance adjustment to Auto, Daylight,
Cloudy, Tungsten, Fluorescent, Fluorescent H, Flash, Underwater, or Custom.
White Balance: Sets the white balance adjustment to Auto, Daylight,
Cloudy, Tungsten, Fluorescent, Fluorescent H, Flash, Underwater, or Custom.- My Colors: Enables Vivid Color, Neutral Color, Sepia, Black-and-White, Positive Film, Lighter Skin Tone, Darker Skin Tone, Vivid Blue, Vivid Red, Vivid Green, or Custom Color picture effects. Custom effects include 5-step adjustments for Contrast, Sharpness, Saturation, Red, Green & Blue hues, and Skin Tone.
- Bracket: Enables Focus or Auto Exposure Bracketing modes.
- Flash Exposure Compensation & Flash Output: Adjusts the flash compensation from -2 to +2 in 1/3-step increments. In Manual mode, lets you set the flash output anywhere from Full to 1/64 in 1/3-step increments.
- Metering Mode: Sets exposure metering to Evaluative (default), Center-Weighted, or Spot modes. Within Spot mode, you can choose to link the metering point to the center of the frame, or to the selected AF point.
- ND Filter: Turns the ND filter on or off. If on, the filter reduces light intensity to 1/8, or three stops, to compensate for slower shutter speeds or smaller aperture settings.
- Compression (Still): Sets JPEG compression to Superfine, Fine, or Normal.
- Resolution (Still): Sets image resolution to Large (3,648 x 2,736 pixels), Medium 1 (2,816 x 2,112 pixels), Medium 2 (2,272 x 1,704 pixels), Medium 3 (1,600 x 1,200 pixels), Small (640 x 480 pixels), or Widescreen (3,648 x 2,048 pixels).
- Frame Rate (Movie): Sets recording frame rate to 30 or 15 frames per second.
- Recording Pixels (Movie): Sets movie resolution to 640 x 480 or 320 x 240 pixels.
In Playback mode, the left and right arrow keys cycle through captured image and movie files. When an image has been enlarged, all four arrows pan within the view.
When the camera is powered off, pressing this button in conjunction with the Power button enables an active clock display. Holding the camera horizontally displays the time, and vertically displays the date. (The display interval is set through the Setup menu.) Pressing and holding this button for more than one second in any camera mode also enables the clock display.

Display Button: Adjacent to the lower right corner of the LCD monitor,
this button controls the LCD display mode. Options are: image with limited information,
image with limited information plus gridlines and histogram, and no display.
In Playback mode, display options are image with no information, image with
limited information, and thumbnail with expanded information plus a histogram.

Menu Button: To the right of the Display button, this button
displays the settings menu, as well as dismisses it.
![]()
Lens Ring Release Button: Tucked under the lens on the camera's front
panel, this button releases the lens ring. Once unlocked, the lens ring can
then be turned and removed to accommodate accessory lens kits.
 Fujifilm GFX 50S Review
 Fujifilm X-T3 Review
 Olympus E-M5 III Review

Follow Imaging Resource