Pentax *ist-DPentax's first d-SLR is a winner, with good color, low noise, and excellent "hand feel," all in a compact body.<<Shutter Lag & Cycle Time Tests :(Previous) | (Next): Camera Modes & Menus>> Page 8:Operation & User InterfaceReview First Posted: 03/30/2004 |
Operation and User Interface
The abundance of external control buttons and dials on the *ist D might appear daunting at first, but camera operation is actually quite straightforward. The Mode dial on top of the camera quickly sets the exposure mode, but also provides access to ISO, White Balance, and Resolution settings. A small status display panel on top of the camera reports the main exposure variables, and helps you change exposure settings. I really liked the way the top-panel display shows which of the control dials is associated with various selections, so don't have to look back at the manual or fumble with the controls to figure it out. (Not a big deal once you've gotten accustomed to the camera, but very helpful for new users.) The LCD menu is simple to navigate as well, with only a couple of pages of settings to sort through. Experienced photographers will most likely be able to operate the *ist D right out of the box, referring to the manual only for more complex functions.
Control Enumeration

Lens Release Button: Located on the front of the camera, on the left side next to the lens (as viewed from the front), this button releases the lens from its mount when pressed.
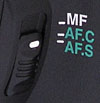
Focus Mode Switch: On the opposite side of the lens, this switch
selects between Manual, AF Single, and AF Continuous focus modes.
![]()
Manual White Balance Button: Directly above the Focus
Mode switch, this button manually sets the white balance when held
down while pressing the Shutter button. (A nice feature, it's very
quick to set the white balance, without having to resort to the
menu system.)
![]()
Flash Release Button: Tucked on the right side of the
flash compartment (when looking at the front of the camera), this
button releases the flash from its compartment.
![]()
Tv Dial: Positioned at the top front of the hand grip, just
beneath the Power switch, this dial selects a number of exposure
settings when turned while pressing a control button. In Shutter
Priority and Manual modes, this dial adjusts the shutter speed.
In Hyper Program AE mode, turning this dial adjusts the shutter
speed, letting the camera set the aperture to the correct corresponding
value, selecting from a range of equivalent exposure settings.
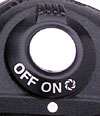
Power Switch: Surrounding the Shutter button on the top right
of the camera, this switch turns the camera on and off. A third
position (indicated by an aperture-like icon), enables a depth-of-field
preview by stopping down the lens to the selected aperture. Looking
through the viewfinder, you can get an idea of what the depth of
field might be. This third position also doubles as a trigger to
light the top-mounted LCD info display's backlight. (The use of
the power switch to trigger DOF preview like this is another very
nice user-interface feature.)
Shutter Button: In the center of the Power switch, on the
top of the camera, this button sets exposure and focus when halfway
pressed and fires the shutter when fully pressed.
![]()
Green Button: Located next to the top right corner of
the status display panel on top of the camera, this button has
a green dot in the center. In Manual and Hyper Program modes, this
button returns the exposure settings to the camera's metered selections.
Through the Custom menu, you can set this button to adjust the
exposure by changing both aperture and shutter speed to the metered
setting, or adjusting only the aperture or shutter speed. This
is a handy way to return to the default exposure if the camera
disagrees with the exposure variables you've chosen. - Yet another
great user-interface feature.

Drive Mode Button: Behind the Green button, this button
cycles through available drive modes when pressed sequentially.
Options are Single Frame, Consecutive Shooting, Self-Timer, and
Remote Control.
![]()
Flash Mode Button: Next in line behind the Drive Mode
button, this mode sets the built-in flash mode when pressed. Depending
on the exposure mode selected, flash modes are Auto, On, Off, Red-Eye
Reduction, Wireless, and Wireless High-Speed Sync.

Mode Dial: Crowning the left side of the camera's top
panel, this dial sets the main exposure mode and accesses some
exposure settings as well. Choices are:
 ISO: Enables the
ISO adjustment, either from 200 to 1,600 or 200 to 3,200, depending
on the Custom menu setting. Turning the Tv dial makes the selection.
ISO: Enables the
ISO adjustment, either from 200 to 1,600 or 200 to 3,200, depending
on the Custom menu setting. Turning the Tv dial makes the selection.
 Resolution/Quality:
Lets you adjust the image resolution and quality settings. Turning the
Av dial sets the resolution to 3,008 x 2,008 (L); 2,400 x 1,600 (M);
or 1,536 x 1,024 (S) pixels (two lower resolutions can alternatively
be selected for the (S) setting through the custom functions menu).
Turning the Tv dial sets the quality to RAW, TIFF, Best, Better, or
Good.
Resolution/Quality:
Lets you adjust the image resolution and quality settings. Turning the
Av dial sets the resolution to 3,008 x 2,008 (L); 2,400 x 1,600 (M);
or 1,536 x 1,024 (S) pixels (two lower resolutions can alternatively
be selected for the (S) setting through the custom functions menu).
Turning the Tv dial sets the quality to RAW, TIFF, Best, Better, or
Good. White Balance:
This position enables the white balance adjustment, with options of
Auto, Daylight, Shade, Cloudy, Fluorescent (white, neutral, or daylight),
Tungsten, and Manual, accessed by turning the Av dial.
White Balance:
This position enables the white balance adjustment, with options of
Auto, Daylight, Shade, Cloudy, Fluorescent (white, neutral, or daylight),
Tungsten, and Manual, accessed by turning the Av dial. Green Program:
Puts the camera into full Auto exposure mode, which eliminates all exposure
decisions except for zoom, flash, and drive mode.
Green Program:
Puts the camera into full Auto exposure mode, which eliminates all exposure
decisions except for zoom, flash, and drive mode. Hyper Program AE:
In this mode, the camera adjusts the aperture and shutter speed settings,
while the user maintains control over all other exposure variables.
Turning the Tv or Av dials adjusts the exposure based on either shutter
speed or aperture settings.
Hyper Program AE:
In this mode, the camera adjusts the aperture and shutter speed settings,
while the user maintains control over all other exposure variables.
Turning the Tv or Av dials adjusts the exposure based on either shutter
speed or aperture settings.  Shutter Priority:
This mode provides user control over the shutter speed, from 1/4,000
to 30 seconds, while the camera adjusts the aperture setting.
Shutter Priority:
This mode provides user control over the shutter speed, from 1/4,000
to 30 seconds, while the camera adjusts the aperture setting. Aperture Priority:
Opposite of Shutter Priority, this mode puts the user in control over
aperture (which varies with the lens in use), while the camera selects
the best shutter speed.
Aperture Priority:
Opposite of Shutter Priority, this mode puts the user in control over
aperture (which varies with the lens in use), while the camera selects
the best shutter speed. Manual:
In this mode, the user has complete control over the exposure. Pressing
the Green button returns to the default metered exposure.
Manual:
In this mode, the user has complete control over the exposure. Pressing
the Green button returns to the default metered exposure. Bulb: Here,
the user again has control over exposure, though shutter time is now
limited only by battery power and the length of time that the Shutter
button is held down.
Bulb: Here,
the user again has control over exposure, though shutter time is now
limited only by battery power and the length of time that the Shutter
button is held down.
![]()
Diopter Adjustment Slider: Tucked in a niche on top of the
viewfinder eyepiece, this slider adjusts the optical viewfinder
to accommodate eyeglass wearers. (Range is -2.5 to +1.5 DP. I don't
know how to translate that into normal vision, but it doesn't quite
compensate for my own 20:180 nearsightedness.)
![]()
Av Dial: Located in the top right corner of the rear panel,
this dial adjusts a variety of camera settings when turned while
pressing a control button. In Aperture Priority and Manual exposure
modes, this dial adjusts the lens aperture setting. In Hyper Program
AE mode, turning this dial adjusts the automatically selected aperture
setting, letting the shutter speed follow accordingly. In Playback
mode, turning this dial to the right enlarges captured images,
while turning it to the left accesses the nine-image index display.

Exposure Compensation Button: To the left of the Av Dial, this
button sets the Exposure Compensation from –3 to +3 exposure
equivalents (EV) in either one-third or one-half step increments
when pressed while turning the Tv dial.
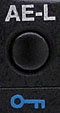
AE Lock/Protect Button: Just to the left of the Exposure Compensation
button, pressing this button locks the exposure reading until the
Shutter button is fully pressed, or the AE Lock button is pressed
a second time. In Playback mode, pressing this button write-protects
the displayed image, preventing it from being accidentally erased
or altered (except through card formatting).
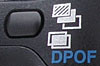
Auto Bracketing/Multiple Exposure/DPOF Button: In the top left
corner of the rear panel, this button accesses the Auto Exposure
Bracketing and Multiple Exposure modes when pressed in any record
mode. In Playback mode, this button displays the DPOF settings
menu, which lets you mark images for printing, establish the number
of prints, and select whether or not the date and time should be
printed on the image.

Menu Button: Directly below the Auto Bracketing button,
this button pulls up the settings menu on the LCD monitor. It also
backs out of settings displays and dismisses the menu screen.

Erase Button: Below the Menu button, this button displays the
Erase menu, which lets you delete individual images or all images
on the memory card (except for those that are write-protected).

Info Button: Next in line below the Erase button, this
button displays a series of information screens when pressed sequentially.
Available screens are the normal Playback display, a histogram
screen (superimposed over the captured image), and a more detailed
information display (with full exposure information).

Playback Button: The final button in the series lining
the left side of the LCD monitor, this button puts the camera into
Playback mode. Touching the shutter button or pressing the playback
button for a second time immediately readies the camera to capture
another image.
![]()
AF Button: Next to the top right corner of the LCD monitor,
this button locks the focus when pressed (similar to the function
of the AE Lock button). Focus remains locked only while the AF
button is held down.
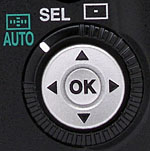
Focus Area Selector and Lock: Surrounding the Four-Way Arrow
Rocker button, this dial controls the AF area setting. The first
position (noted in green) puts the AF area selection under automatic
control. The second position, labeled "SEL," lets you
select the AF area from one of 11 AF points using the Four-Way
Arrow Rocker button. Finally, the third position locks the AF area
to the center spot only.
Four-Way Arrow Rocker Pad and OK Button: Adjacent to the lower right corner of the LCD monitor, this rocker button features four arrows. In any settings menu, the arrow keys navigate through menu selections. When the AF Area mode is set to "SEL," the arrow keys let the user pick the desired AF area setting. In Playback mode, the right and left arrows scroll through captured images, and the down arrow rotates the image anti-clockwise on the LCD display in 90-degree increments. If an image has been enlarged, all four arrows pan the view.

Follow Imaging Resource: