Pentax *ist-DPentax's first d-SLR is a winner, with good color, low noise, and excellent "hand feel," all in a compact body.<<Operation & User Interface :(Previous) | (Next): Image Storage & Interface>> Page 9:Camera Modes & MenusReview First Posted: 03/30/2004 |
Camera Modes and Menus
Record Mode: Simply turning the camera on puts it in Record mode. The Mode dial on top of the camera selects the main exposure mode, with options for Green Program (Auto), Hyper Program AE, Shutter Priority, Aperture Priority, Manual, and Bulb settings.
Playback Mode: Accessed by pressing the Playback button on the rear panel, this mode allows you to review captured images, as well as delete or protect them and set them up for printing.
LCD Menu System: The following menus are available in any camera mode,
and are called up by pressing the Menu button.
Main Menu:
 Format:
Formats the CompactFlash card, erasing all files (even protected ones).
Format:
Formats the CompactFlash card, erasing all files (even protected ones).
- Custom Function: Displays the Custom Function menu. You can choose from one of three preset Custom settings, and your changes are saved for later recall (even if the camera's main and backup batteries are later removed).
- Saturation: Increases or decreases color saturation in three steps.
- Sharpness: Increases or decreases in-camera sharpening in three steps.
- Contrast: Increases or decreases image contrast in three steps.
- Instant Review: Activates the instant review function or turns it off. Available review times are one, three or five seconds.
- Auto Power Off: Determines the period of inactivity before the camera shuts itself off. Choices are Off, 30 seconds, or 1, 3, 5, 10, 15, or 30 minutes.
- Beep: Turns the camera's beep sounds on or off.
- Date Adjust: Sets the camera's internal calendar and clock.
- World Time: Lets you set a secondary time in another city, useful when traveling to another time zone.
- Language: Sets the menu language to English, French, German, Spanish, Italian, or Japanese.
- Video Out: Establishes the video signal as NTSC or PAL.
- Brightness Level: Adjusts the brightness of the LCD display with fifteen steps from least to most bright.
- File Numbering: Designates whether the camera resets file numbering with each new memory card, or continues in a series (Serial setting).
- Slideshow: Enables an automated slideshow of captured images on the memory card, with options for playback intervals (from three to 30 seconds).
- Sensor Cleaning: Locks the mirror in the up position so that the sensor can be cleaned.
- Reset: Resets all camera settings except for those in the custom settings menu to their defaults.
Custom Function Menu:
The *ist D offers a fairly extensive range of "Custom Functions,"
which let you customize the camera's behavior in various ways to fit your
particular shooting style and needs. These are accessed via the Custom Function
Menu, reached via the second entry in the camera's main menu system. The
camera can hold a total of three separate groups of Custom Function settings,
letting you switch rapidly between completely different camera setups. (Note
though, that changing between Custom Function groups only recalls the Custom
Function settings themselves. Parameters such as white balance, color saturation,
etc, remain as they were last set on the main menu, regardless of the group
of Custom Function settings selected.)
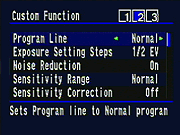 Program
Line: Sets the program mode to Normal, Hi Speed, Depth, or MTF
programs, as described earlier, in the "Exposure" section
of this review.
Program
Line: Sets the program mode to Normal, Hi Speed, Depth, or MTF
programs, as described earlier, in the "Exposure" section
of this review.
- Exposure Setting Steps: Adjusts the exposure setting increment to one-third or one-half EV step size.
- Noise Reduction: Turns Noise Reduction on or off.
- Sensitivity Range: Specifies the ISO range as Wide (200 to 3,200) or Normal (200 to 1,600).
- Sensitivity Correction: Turns the Sensitivity Correction function
on or off. If on, the camera automatically corrects the ISO light sensitivity
setting in the Hyper Program, Aperture Priority and Shutter Priority
modes if the exposure you've selected is outside the range that the
current ISO setting could accommodate.
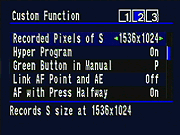 Recorded
Pixels of S Resolution setting: Changes the resolution setting
for "Small" files to 1,536 x 1,024; 1,152 x 768; or 960 x
640 pixels.
Recorded
Pixels of S Resolution setting: Changes the resolution setting
for "Small" files to 1,536 x 1,024; 1,152 x 768; or 960 x
640 pixels.
- Hyper Program: Activates or deactivates Hyper Program mode, which lets you manually adjust the exposure across a range of equivalent values.
- Green Button in Manual: Controls the operation of the Green button in Manual mode, setting it to return to the default exposure setting (P), default shutter speed (Tv), or default aperture (Av).
- Link AF Point and AE: If set to On, this function links the AF point to the Autoexposure calculation in matrix metering mode. If enabled, the subject brightness under the AF point will have increased influence on the exposure determination.
- AF with Press Halfway: Designates whether the AF operates when
the shutter button is half-pressed or not. (If disabled, the camera
will focus only when the AF button is pressed.)
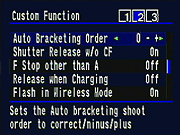 Auto
Bracketing Order: Specifies the order of Auto Bracketing shots,
whether under/nominal/over, over/nominal/under, or nominal/under/over
exposed.
Auto
Bracketing Order: Specifies the order of Auto Bracketing shots,
whether under/nominal/over, over/nominal/under, or nominal/under/over
exposed.
- Shutter Release without CF: Establishes whether or not the shutter can be released without a memory card in the camera.
- F Stop other than A: Controls whether the shutter release is disabled or enabled when the lens aperture is set to any position other than the "A" position on the lens. (The A position allows the camera to take control of the aperture, whereas if the lens is set to a specific aperture, the camera may not be able to change the setting.)
- Release when Charging: Disables or enables the shutter release when the built-in flash is charging.
- Flash in Wireless Mode: If set to On, the camera fires the built-in
flash as the master flash in Wireless mode. If Off, the built-in flash
acts only as a controller in Wireless mode. (That is, when On, the internal
flash will contribute to the exposure. When Off, the internal flash
will fire, but only for the purpose of communicating with the external
flash unit.)
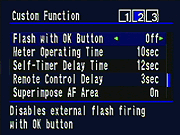 Flash
with OK Button: If set to Off, you can disable the external flash
firing with the OK button. The Test fires the flash with the OK button,
and the Modeling option fires the external flash as a modeling light
with the OK button.
Flash
with OK Button: If set to Off, you can disable the external flash
firing with the OK button. The Test fires the flash with the OK button,
and the Modeling option fires the external flash as a modeling light
with the OK button.
- Meter Operating Time: Designates how long the exposure meter setting remains in effect. Choices are 3, 5, 10, 15, or 30 seconds.
- Self-Timer Delay Time: Sets the self-timer delay to 12 or two seconds.
- Remote Control Delay: Sets the remote control delay to Zero or three seconds.
- Superimpose AF Area: Designates whether the AF area appears
in the viewfinder display.
 Use
LCD with Video Output: Allows the LCD monitor to operate when connected
to a television set, or shuts it off when the video output cable is
connected.
Use
LCD with Video Output: Allows the LCD monitor to operate when connected
to a television set, or shuts it off when the video output cable is
connected.
- Color Space: Sets the color space to sRGB or Adobe RGB.
- Reset Custom Function: Resets all Custom menu settings to their
defaults.

Follow Imaging Resource: