Pentax K-5 Modes and Menus
Capture Modes
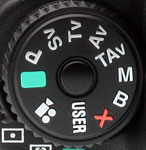
![]() Green mode: In this mode, almost all settings are controlled automatically, including the shutter speed, aperture, and ISO sensitivity. Auto-exposure lock, exposure compensation and bracketing, multiple exposures, and flash compensation cannot be set in Green mode. Nor can you shoot in Raw or Raw+JPEG formats, although there is a way around this for the last frame captured: you can visit playback mode before capturing another image or powering off the camera, and press the AE-L button to save a copy of the Raw data for the last frame, which is still resident in the camera's buffer.
Green mode: In this mode, almost all settings are controlled automatically, including the shutter speed, aperture, and ISO sensitivity. Auto-exposure lock, exposure compensation and bracketing, multiple exposures, and flash compensation cannot be set in Green mode. Nor can you shoot in Raw or Raw+JPEG formats, although there is a way around this for the last frame captured: you can visit playback mode before capturing another image or powering off the camera, and press the AE-L button to save a copy of the Raw data for the last frame, which is still resident in the camera's buffer.
The only options remaining under user control in Green mode are image resolution and quality, live view autofocus method, self-timer and remote control, whether the flash is disabled or fires automatically (as it must be manually raised), whether red-eye reduction should be used, and whether to use Single-servo AF or focus manually. Regardless of external control positions and settings made in other modes, Green mode exposures always use the auto program line, JPEG file format, auto sensitivity, multi-segment metering, single-servo automatic AF point selection across all 11 points if autofocus is enabled, single-frame drive mode, automatic white balance, the Bright custom image setting, automatic high ISO and slow shutter noise reduction, shake reduction, and an sRGB color space. It's also only possible to use the optical depth-of-field preview function, not the digital preview.
![]() Program mode (P): Dubbed Hyper-program mode by Pentax, in this mode the K-5 automatically selects shutter speed, aperture, and (optionally) ISO sensitivity, while you control all other exposure variables. The Hyper-program functionality is reminiscent of a feature called Program Shift or Flexible Program that's available in many competing DSLRs, but with an important difference. Where Program Shift only allows you to bias the exposure towards either a wider aperture / faster shutter speed (or vice versa), with the camera itself still retaining control over both aperture and shutter speed, Hyper-program gives you complete control over one or other variable as soon as you turn either e-dial. Turning the front e-dial immediately switches the K-5 to Tv-Hyper mode, and the camera provides direct control over the shutter speed, just as it would in Shutter Priority mode. Likewise, turning the rear e-dial switches the camera to Av-Hyper mode, with direct control over the aperture. To return to Hyper-program, you simply press the Green button on the K-5's rear panel, restoring the Program mode's default choice for shutter speed and aperture.
Program mode (P): Dubbed Hyper-program mode by Pentax, in this mode the K-5 automatically selects shutter speed, aperture, and (optionally) ISO sensitivity, while you control all other exposure variables. The Hyper-program functionality is reminiscent of a feature called Program Shift or Flexible Program that's available in many competing DSLRs, but with an important difference. Where Program Shift only allows you to bias the exposure towards either a wider aperture / faster shutter speed (or vice versa), with the camera itself still retaining control over both aperture and shutter speed, Hyper-program gives you complete control over one or other variable as soon as you turn either e-dial. Turning the front e-dial immediately switches the K-5 to Tv-Hyper mode, and the camera provides direct control over the shutter speed, just as it would in Shutter Priority mode. Likewise, turning the rear e-dial switches the camera to Av-Hyper mode, with direct control over the aperture. To return to Hyper-program, you simply press the Green button on the K-5's rear panel, restoring the Program mode's default choice for shutter speed and aperture.
The Pentax K-5 also allows you to select, via an option in the Record menu, which program line the camera should use in Hyper-program mode. The selected program line tells the camera either to use the default (normal) program line, or to prioritize for higher shutter speeds, shallow or deep depth-of-field, or at the best best aperture setting for image quality (based on the MTF curve of the attached lens, so long as you're using a relatively recent lens model). Alternatively, the K-5 can be set to automatically choose between the program line choices as it deems appropriate.
![]() Sensitivity Priority mode (Sv): While a couple of cameras can now achieve something similar with a little careful configuration, Pentax's Sv mode is still pretty uncommon as a standalone mode, meriting its own position on the Mode dial. As the name would suggest, you set the ISO sensitivity manually, by turning the rear e-dial. The camera then picks the appropriate combination of aperture and shutter speed, so as to obtain the metered exposure. As in Program mode, you can select which program line the K-5 should abide by when determining these variables: normal, higher shutter speeds, shallow or deep depth of field, best MTF value, or an automatic selection between these types. If you're already in Hyper-program mode, you can achieve the same thing as Sv mode by hitting the Green button to clear Av-Hyper or Tv-Hyper modes if active, then pressing the ISO button and simply dialing in a manual ISO sensitivity.
Sensitivity Priority mode (Sv): While a couple of cameras can now achieve something similar with a little careful configuration, Pentax's Sv mode is still pretty uncommon as a standalone mode, meriting its own position on the Mode dial. As the name would suggest, you set the ISO sensitivity manually, by turning the rear e-dial. The camera then picks the appropriate combination of aperture and shutter speed, so as to obtain the metered exposure. As in Program mode, you can select which program line the K-5 should abide by when determining these variables: normal, higher shutter speeds, shallow or deep depth of field, best MTF value, or an automatic selection between these types. If you're already in Hyper-program mode, you can achieve the same thing as Sv mode by hitting the Green button to clear Av-Hyper or Tv-Hyper modes if active, then pressing the ISO button and simply dialing in a manual ISO sensitivity.
![]() Shutter Priority mode (Tv): Marked with the letters "Tv," for Time value, this mode allows the user to control the shutter speed, from 30 seconds to 1/8,000 second. The shutter speed can be adjusted in 1/2 or 1/3 EV steps. ISO sensitivity can be controlled automatically or manually.
Shutter Priority mode (Tv): Marked with the letters "Tv," for Time value, this mode allows the user to control the shutter speed, from 30 seconds to 1/8,000 second. The shutter speed can be adjusted in 1/2 or 1/3 EV steps. ISO sensitivity can be controlled automatically or manually.
![]() Aperture Priority mode (Av): Marked with an "Av," this mode gives the user control of aperture within the range offered by the currently attached lens, while the camera selects the corresponding shutter speed. ISO sensitivity can be controlled automatically or manually.
Aperture Priority mode (Av): Marked with an "Av," this mode gives the user control of aperture within the range offered by the currently attached lens, while the camera selects the corresponding shutter speed. ISO sensitivity can be controlled automatically or manually.
![]() Shutter and Aperture Priority mode (TAv): Another mode that's pretty much unique to Pentax cameras, this is the opposite of the Sv mode described previously. You specify both the aperture and shutter speed, and then the camera adjusts the ISO sensitivity as necessary to achieve the metered exposure. To achieve finer-grained control over the exposure level, the K-5 will ignore the Sensitivity Steps setting in the custom menu, and will instead match the EV step size configured for exposure compensation -- either 1/3 or 1/2 EV steps. You can press the Green button to have the K-5 suggest an appropriate shutter speed and aperture, and if you make adjustments beyond the ability of the camera to gain a metered exposure with ISO sensitivity alone, the sensitivity value will flash in the viewfinder, top panel, and (if active) rear panel displays. If you use the autoexposure lock function, then when you adjust the shutter speed, the aperture will be automatically adjusted correspondingly, and vice versa.
Shutter and Aperture Priority mode (TAv): Another mode that's pretty much unique to Pentax cameras, this is the opposite of the Sv mode described previously. You specify both the aperture and shutter speed, and then the camera adjusts the ISO sensitivity as necessary to achieve the metered exposure. To achieve finer-grained control over the exposure level, the K-5 will ignore the Sensitivity Steps setting in the custom menu, and will instead match the EV step size configured for exposure compensation -- either 1/3 or 1/2 EV steps. You can press the Green button to have the K-5 suggest an appropriate shutter speed and aperture, and if you make adjustments beyond the ability of the camera to gain a metered exposure with ISO sensitivity alone, the sensitivity value will flash in the viewfinder, top panel, and (if active) rear panel displays. If you use the autoexposure lock function, then when you adjust the shutter speed, the aperture will be automatically adjusted correspondingly, and vice versa.
![]() Manual mode (M): Dubbed Hyper-manual mode, this setting provides complete control over the exposure, with independent settings for aperture and shutter speed. Shutter speeds range from 1/8,000 to 30 seconds, and the full range of apertures available depends upon the attached lens. There are two main differences between this mode and the previous TAv mode. In Manual mode, the K-5 only allows manual ISO sensitivity, while TAv mode requires ISO sensitivity be controlled automatically. Also, since the exposure is controlled entirely automatically in Manual mode, the EV bar indicates how your configured exposure compares to that recommended by the camera's metering system.
Manual mode (M): Dubbed Hyper-manual mode, this setting provides complete control over the exposure, with independent settings for aperture and shutter speed. Shutter speeds range from 1/8,000 to 30 seconds, and the full range of apertures available depends upon the attached lens. There are two main differences between this mode and the previous TAv mode. In Manual mode, the K-5 only allows manual ISO sensitivity, while TAv mode requires ISO sensitivity be controlled automatically. Also, since the exposure is controlled entirely automatically in Manual mode, the EV bar indicates how your configured exposure compares to that recommended by the camera's metering system.
![]() Bulb mode (B): Marked with a "B" on the Mode dial, this mode offers unlimited exposure times, holding the shutter open for as long as the Shutter button is held down (and the batteries last, unless you're using the optional K-AC50 AC adapter kit). Since it's a fairly logical assumption that you're using a tripod, Shake Reduction is automatically disabled in this mode. As with Manual mode, ISO sensitivity must be controlled manually. However, in Bulb mode it is also limited to a maximum of ISO 1,600 equivalent. Use of an optional infrared remote control or cable release is recommended, and to further minimize camera shake, you can couple these with either a self-timer or mirror lockup.
Bulb mode (B): Marked with a "B" on the Mode dial, this mode offers unlimited exposure times, holding the shutter open for as long as the Shutter button is held down (and the batteries last, unless you're using the optional K-AC50 AC adapter kit). Since it's a fairly logical assumption that you're using a tripod, Shake Reduction is automatically disabled in this mode. As with Manual mode, ISO sensitivity must be controlled manually. However, in Bulb mode it is also limited to a maximum of ISO 1,600 equivalent. Use of an optional infrared remote control or cable release is recommended, and to further minimize camera shake, you can couple these with either a self-timer or mirror lockup.
![]() Flash X-sync mode (X): Sets shutter speed to 1/180 second, for use with manual strobes that can't automatically set the X-sync speed. ISO sensitivity must be set manually in this mode, and although page 117 of the user manual states that pressing the green button will automatically reset the aperture value to that recommended by the camera, we found that not to be the case with our production-level camera running firmware version 1.03 (the current release at the time of this writing.)
Flash X-sync mode (X): Sets shutter speed to 1/180 second, for use with manual strobes that can't automatically set the X-sync speed. ISO sensitivity must be set manually in this mode, and although page 117 of the user manual states that pressing the green button will automatically reset the aperture value to that recommended by the camera, we found that not to be the case with our production-level camera running firmware version 1.03 (the current release at the time of this writing.)
![]() User mode (USER): This mode lets the user quickly recall sets of favorite settings including exposure mode, drive mode, flash mode, flash exposure compensation value, white balance, sensitivity or ISO auto setting, exposure compensation value, program line, exposure bracketing, extended bracketing amount and type, JPEG resolution and quality, file format, AUTO AF point setting, high ISO and slow shutter noise reduction, D-Range setting, HDR capture, custom image mode, cross processing, digital filters, shake reduction, horizon correction, lens correction, color space, e-dial programming, button customization, and all custom menu settings.
User mode (USER): This mode lets the user quickly recall sets of favorite settings including exposure mode, drive mode, flash mode, flash exposure compensation value, white balance, sensitivity or ISO auto setting, exposure compensation value, program line, exposure bracketing, extended bracketing amount and type, JPEG resolution and quality, file format, AUTO AF point setting, high ISO and slow shutter noise reduction, D-Range setting, HDR capture, custom image mode, cross processing, digital filters, shake reduction, horizon correction, lens correction, color space, e-dial programming, button customization, and all custom menu settings.
Where the Pentax K-7 offered only one User mode position, the K-5 provides access to five separate groups of settings. They're saved by configuring the camera appropriately, including placing the Mode dial in your chosen position, and then accessing the Save USER Mode option in the Record menu. You can rename each of the five modes using an on-screen keyboard, controlled with the arrow buttons, OK button, and rear e-dial. Each User mode can comprise 18 characters from a selection of upper and lower case letters, numbers, plus a space, and 26 different punctuation marks. This name is then used everywhere the User mode is referenced, with the exception of the Save Settings confirmation dialog. To activate a stored User mode, you turn the Mode dial to the User position, and then use the left and right arrow keys to browse between available modes, while the up and down arrow keys switch between two pages of information on the settings saved in the currently selected user mode. Pressing the OK button or half-pressing the shutter button selects the currently displayed user mode for use.
It's not possible to create a user mode that saves only certain settings, but you can make changes to settings as desired after recalling your chosen user mode (and if desired, you can then resave these new settings -- either over the top of the current mode, or in one of the other four available mode positions.) Since the Mode dial position is one of the settings stored in a User mode profile, the K-5 adds an extra item to the Record menu when the mode dial is set to User. This allows you to change the exposure mode to anything except User or Movie. An additional item added to the Record menu allows you to switch between stored user modes without needing to first switch the mode dial out of, and then back to, the user mode position.
![]() Movie mode: This mode allows the user to record videos with sound. Resolution options consist of 1,920 x 1,080 (16:9 aspect, 25 frames per second), 1,280 x 720 (16:9 aspect, 30 or 25 fps) or 640x480 (4:3 aspect, 30 or 25 fps) pixels, all with monaural sound if using the internal microphone, or stereo sound when using an external stereo mic. There are three quality (compression ratio) options available, and you can choose to have the aperture fixed, or under automatic control. You can also enable or disable shake reduction and / or sound recording if desired, and use a subset of the digital filter and cross processing functionality that's available for still images. The nonstandard 3:2 aspect, 1,536 x 1,024 pixel and 640 x 480 pixel movie modes from the K-7 have both been dropped from the K-5. See the Video tab for more details as well as sample videos.
Movie mode: This mode allows the user to record videos with sound. Resolution options consist of 1,920 x 1,080 (16:9 aspect, 25 frames per second), 1,280 x 720 (16:9 aspect, 30 or 25 fps) or 640x480 (4:3 aspect, 30 or 25 fps) pixels, all with monaural sound if using the internal microphone, or stereo sound when using an external stereo mic. There are three quality (compression ratio) options available, and you can choose to have the aperture fixed, or under automatic control. You can also enable or disable shake reduction and / or sound recording if desired, and use a subset of the digital filter and cross processing functionality that's available for still images. The nonstandard 3:2 aspect, 1,536 x 1,024 pixel and 640 x 480 pixel movie modes from the K-7 have both been dropped from the K-5. See the Video tab for more details as well as sample videos.
Playback Mode
 Playback mode is entered by pressing the Playback button on the camera's rear panel. In this mode, you can scroll through captured images, delete them, write-protect them, and set them up for printing on devices capable of recognizing DPOF print orders specified on the flash card. Like the K-7 before it, the Pentax K-5 is not PictBridge compatible, so the printer and camera can't be directly attached, however. You can also process Raw files, apply digital filters for creative effects, and watch or perform basic processing on movie clips.
When in Playback mode, the rear e-dial is used to zoom into and out of images, and to switch from viewing a single image to either thumbnails or a calendar view. When viewing a single image, the left and right arrow keys scroll forward and backward one image or movie at a time, and turning the front e-dial has the same effect. Pressing the down arrow key calls up the Playback Mode Palette, from which you can perform basic image processing functions such as rotation, cropping, resizing, and digital filters, process Raw images, start an image slideshow, compare images side by side, trim movies, protect images and movies, set up print orders, create index images, and save a manual white balance preset from an image.
When playback zoom is active, the arrow keys pan around the zoomed image, and the front e-dial switches between images while maintaining the playback zoom level. In thumbnail and folder views, the arrow keys are used to move around the columns and rows to make a selection, while the front e-dial steps backwards or forwards through pages of thumbnails or folders. In Calendar view, the up and down arrow keys select from available dates, while the left and right arrow keys step between images from any specific date, and the front e-dial has no effect.
Pentax K-5 Menu Details
Below are Pentax K-5 menu options and their descriptions. Pressing the Menu button provides access to the camera's full menu system. The arrow pad is used to navigate between menu tabs and options, and to make selections. In the main menu system, the rear e-dial can be used to switch between menu tabs one at a time, and the front e-dial to switch between the four main tab groups. In the Control Panel menu, the same dials are used to quickly make adjustments to the currently selected item. Neither dial has any effect in the Playback Mode Palette menu. Although the Pentax K-5 doesn't immediately return to the last selected item when the Menu button is first pressed, it can at least be configured to start off at the top of the most recently used tab, potentially saving a few button presses for frequently used options. (The K-7, by contrast, always started on the first tab of the menu system.)
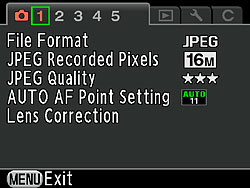
Record Menu 1:
|
Record Menu Options: Screen 1
|
|||
|
Top-Level
Selection |
Second-Level
|
Third-Level
|
Notes
|
|
File Format
|
- JPEG
- RAW - RAW+ |
|
Specifies the file type of images. Raw files are always recorded at maximum resolution, ignoring the Recorded Pixels setting. When using RAW+ mode, the K-5 captures each image in both Raw and JPEG formats, and you have full control over JPEG resolution / quality.
|
|
JPEG Recorded Pixels
|
- 16M (4,928 x 3,264)
- 10M (3,936 x 2,624) - 6M (3,072 x 2,048) - 2M (1,728 x 1,152) |
|
Sets the pixel dimensions of captured JPEG still images. This setting doesn't apply to Raw files. All resolutions except the highest 16 megapixel mode are unchanged from the K-7.
|
|
JPEG Quality
|
- **** (Premium)
- *** (Best) - ** (Better) - * (Good) |
|
Specifies the compression level of JPEG images. Doesn't apply to Raw files. Defaults to *** Best quality.
|
Auto AF Point Setting |
- Auto 11 - Auto 5 |
When the K-5 is set to use Phase Detect autofocus and select the focus point automatically, this determines whether it can use all eleven points, or should mimic the five point array of the *ist DL2 and K2000 / K-m., |
|
|
Lens Correction
|
- Distortion Correction
|
- Off
- On |
Corrects geometric distortion caused by lens, when using either DA (except 10-17mm Fish-Eye), DA L, D FA, or some FA lenses without any accessories between the lens and camera body. Applied in-camera to JPEGs, and tagged to RAW files.
|
|
- Lateral Chromatic Aberration Adjustment
|
- Off
- On |
Corrects lateral chromatic aberration caused by lens, when using either DA, DA L, D FA, or some FA lenses without any accessories between the lens and camera body. Applied in-camera to JPEGs, and tagged to RAW files.
|
|
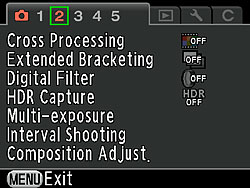
Record Menu 2:
|
Record Menu Options: Screen 2
|
|||
|
Top-Level
Selection |
Second-Level
|
Third-Level
|
Notes
|
Cross Processing |
- Cross Processing |
- Off - Random - Preset 1 - Preset 2 - Preset 3 - My1 (Favorite 1) - My2 (Favorite 2) - My3 (Favorite 3) |
Enables or disables an effect intended to be reminiscent of cross-processing, a technique from film photography. As well as three presets, the effect can also be randomized. In addition, you can save the settings used for a previous image as a Favorite for later reuse. This defaults to taking the settings from the most recently captured image, however you can also copy the settings from any other cross processed image on the flash card, including those which have been cropped, resized, or had filters applied. Not available unless shooting in JPEG-only mode. Precludes use of multi-exposure, extended bracketing, HDR capture, white balance, or custom image functions. |
- Save Settings |
- Save as favorite 1 - Save as favorite 2 - Save as favorite 3 |
||
|
Extended Bracketing
|
- Off
|
Allows bracketing of various variables unrelated to exposure. Not available unless shooting in JPEG-only mode. Precludes use of interval shooting, multi-exposure, cross processing, pre-capture digital filters, or HDR capture. Can be used with exposure bracketing, though.
|
|
- White Balance |
- Bracketing amount (Either blue / amber or green / magenta, +/-1 to +/-3) |
||
- Saturation |
- Bracketing amount (+/-1 to +/-4) |
||
- Hue |
|||
- High/Low Key Adj |
|||
- Contrast |
|||
- Sharpness |
|||
Digital Filter |
- Off |
Selects which digital filter to apply in capture mode (additional filters can be applied and combined in playback mode). Not available unless shooting still images in JPEG-only mode. Precludes use of interval shooting, multi-exposure, continuous shooting, extended bracketing, or HDR capture. Some of these filters are also available separately in Movie mode through the Movie menu, along with one additional optional not available for still images -- the Color filter. |
|
- Toy Camera |
- Shading level (1-3) - Blur (1-3) - Tone break (Red, green, blue, yellow) |
||
- Retro |
- Toning (Blue-amber, 7 steps) - Frame composite (None, thin, medium, thick) |
||
- High Contrast |
- Contrast (1 to 5) |
||
- Extract Color |
- Extracted color 1 (Red, magenta, blue, cyan, green, yellow) - Extractable range of color 1 (-2 to +2) - Extracted color 2 (Red, magenta, blue, cyan, green, yellow) - Extractable range of color 2 (-2 to +2) |
||
- Soft |
- Soft focus (1 to 3) - Shadow blur (Off or on) |
||
- Starburst |
- Shape (Cross, star, snowflake, heart, musical note) - Effect density (Small, medium, large) - Size (Small, medium, large) - Angle (0°, 30°, 45°, 60°) |
||
- Fish-eye |
- Strength (Weak, medium, strong) |
||
- Custom Filter |
- High contrast (Off, +1 to +5) - Soft focus (Off, +1 to +3) - Tone break (Off, red, green, blue, yellow) - Shading Type (6 types) - Shading Level (-3 to +3) - Distortion Type (3 types) - Distortion Level (Off, weak, medium, strong) - Invert Color (Off, on) |
||
|
HDR Capture
|
- HDR Capture
|
- HDR Off
- HDR Auto - HDR (Standard) - HDR 1 (Strong 1) - HDR 2 (Strong 2) - HDR 3 (Strong 3) |
Captures 3 frames (metered exposure, -3EV, +3EV) and combines them in-camera into 1 HDR image. Doesn't save the three source images separately. Auto Align function allows handheld shooting, and requires use of Hi-Speed Priority program line and Fast auto ISO parameter. If Auto Align is disabled, shake reduction cannot be activated and a tripod must be used. Not available unless shooting in JPEG-only mode. Precludes use of bulb, x-sync, drive modes except single-frame, self-timer, remote control, or remote control (3s delay). Also prevents use of interval shooting, multiple exposure, extended bracketing, pre-capture digital filters, or cross processing.Requires significant processing time post-capture to create final image.
|
- Auto Align |
- Off - On |
||
|
Multi-exposure
|
- Number of Shots
|
- 2 to 9
|
Allows anywhere from two to nine frames to be combined in-camera into a single exposure.
|
|
- Auto EV Adjust
|
- Off
- On |
Selects whether multi-exposures are additive (Off), or averaged (On).
|
|
|
Interval Shooting
|
- Interval
|
- 1s to 24 hrs
|
Allows automatic capture of images on a predetermined schedule (interval, number of frames, and start time). Identical to the K-7, except that the shot limit has been raised from 99 to 999 frames.
|
|
- Number of Shots
|
- 1 to 999 shots
|
||
|
- Start
|
- Now
- Set Time |
||
- Start Time |
- 00:00 to 23:59 |
||
|
Composition Adjust
|
- Start Adjustment
|
Initiates live view - Vertical (-24 to +24) |
Allows user to adjust X and Y position of image as well as rotation, using the shake reduction mechanism. Rotational adjustment is only possible when the horizontal and vertical adjustment are less than +/-16 steps. New since the K-7 is the ability to recall the last composition adjustment used. Requires use of live view mode for image framing, and resets to the center / level position when live view ends. Useful for making fine adjustments to framing when shooting on a tripod.
|
- Recall Previous Position |
- Off - On |
||
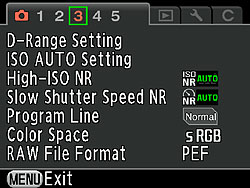
Record Menu 3:
|
Record Menu Options: Screen 3
|
|||
|
Top-Level
Selection |
Second-Level
|
Third-Level
|
Notes
|
|
D-Range Setting
|
- Highlight Correction
|
- Off
- On |
Corrects for clipping in highlight areas of images. When set on, the minimum ISO sensitivity is 200, unless Expanded Sensitivity is enabled, in which case the minimum is ISO 160. Highlight correction cannot be disabled in the Stage Lighting and Night Snap scene modes. Applies to both Raw and JPEG files.
|
|
- Shadow Correction
|
- Off
- Low - Medium - High |
Corrects for blocking up of shadow areas in images, with three steps of adjustment available, plus the ability to disable the effect altogether. Applies to both Raw and JPEG files, but can be also be enabled / disabled / adjusted post-exposure when shooting Raw.
|
|
ISO AUTO Setting |
- Low Limit (80-40,000) - High Limit (100-51,200) |
Sets the lower and upper limits for Auto ISO. Obeys the Expanded ISO Sensitivity and Sensitivity Steps settings in the Custom Function menu. |
|
- Parameters |
- Slow - Standard - Fast |
Slow increases the sensitivity as little as possible; Fast does the opposite |
|
High ISO NR |
- Auto - Off - Low - Medium - High |
As well as allowing automatic control over high ISO noise reduction, the K-5 lets you disable it altogether, or fix it at one of three levels across the board. In addition, there's an uncommonly fine-grained control over High ISO NR via the custom option, which allows a separate Off / Low / Medium / High setting for every stop of sensitivity increase. If the sensitivity steps are set to 1/2 or 1/3 EV, these extra steps share settings with the full-stop sensitivities. The extra sensitivities are only shown in this menu when they're active, but the settings for the expanded ISO sensitivities are always shown, even when they're not enabled through the custom menu. |
|
- Custom |
- ISO 80 - ISO 100 / 125 / 140 / 160 - ISO 200 / 250 / 280 / 320 - ISO 400 / 500 / 560 / 640 - ISO 800 / 1,000 / 1,100 / 1,250 - ISO 1,600 / 2,000 / 2,200 / 2,500 - ISO 3,200 / 4,000 / 4,500 / 5,000 - ISO 6,400 / 8,000 / 9,000 / 10,000 - ISO 12,800 / 16,000 / 18,000 / 20,000 - ISO 25,600 / 32,000 / 40,000 - ISO 51,200 |
||
Slow Shutter Speed NR |
- Auto - On - Off |
Sets whether Noise Reduction is applied when shooting at low shutter speeds. When enabled, the exposure time for shots longer than one second is roughly doubled, so the camera can capture a second 'dark current' exposure with the shutter closed. Regardless of this setting, slow shutter speed NR is not applied on shots of less than one second duration. |
|
|
Program Line
|
- Auto
- Normal - Hi-speed Priority - DOF Priority (deep depth-of-field) - DOF Priority (shallow depth-of-field) - MTF Priority |
|
Biases the exposure towards either high shutter speeds, larger (shallow) or smaller (deep) apertures, or the best apertures for the attached lens (most effective with DA, D, D FA, FA, and FA J lenses). Applicable when shooting in Program mode. Also applies when the Green button is set to Program Line in Sv, TAv, or M modes and the Green button is pressed to have the camera suggest appropriate exposure variables.
|
|
Color Space
|
- sRGB
- Adobe RGB |
|
Selects which color space should be used for JPEG images. The sRGB color spaces has a narrower gamut, but can be displayed without conversion on most PC displays. The Adobe RGB color space has a wider gamut and is better suited to color space-aware printing, etc.
|
|
RAW File Format
|
- PEF
- DNG |
|
Selects whether Raw data should be saved in Pentax's proprietary .PEF format, or Adobe's open Digital Negative (.DNG) format.
Note that some programs don't treat DNG files created in-camera the same as those created using Adobe's DNG Converter, and so for some software it may be preferable to shoot in PEF mode and then convert formats on your computer after capture.
|
Record Menu 4:
|
Record Menu Options: Screen 4
|
|||
|
Top-Level
Selection |
Second-Level
|
Third-Level
|
Notes
|
|
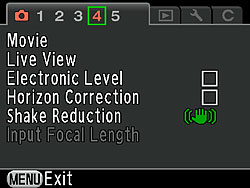
Movie
|
- Recorded Pixels
|
- Full HD 25 (1,920 x 1,080, 25 fps)
- HD 30 (1,280 x 720, 30 fps) - HD 25 (1,280 x 720, 25 fps) - VGA 30 (640 x 480, 30 fps) - VGA 25 (640 x 480, 25 fps) |
Sets movie recording parameters. 25 fps framerates and Full HD / VGA resolutions are new for K-5, as are Cross Processing and Filter effects. Nonstandard ,1536 x 1,024 and 640 x 416 pixel modes from K-7 are gone. Somewhat confusingly, the Cross Processing and Digital Filter options are greyed out unless the Mode dial is set to the Movie position, but all other settings can be changed regardless of Mode dial position. Cross Processing and Filter options function identically to their still image mode counterparts, with a couple of exceptions. The user presets for Cross Processing can be accessed in Movie mode, but they must first be setup in still image mode. Soft, Starburst, Fish-eye, and Custom filters are not available in Movie mode. The Color filter is an additional option not available in still image mode, and allows either a red, magenta, blue, cyan, green, yellow filter effect at either light, standard, or dark intensity levels.
|
|
- Quality Level
|
- ***
- ** - * |
||
|
- Sound
|
- On
- Off |
||
- Cross Processing |
- Off - Random - Preset 1 - Preset 2 - Preset 3 - My1 (Favorite 1) - My2 (Favorite 2) - My3 (Favorite 3) |
||
- Digital Filter |
- Toy Camera - Retro - High Contrast - Extract Color - Color |
||
|
- Movie Aperture Control
|
- Auto
- Fixed |
||
|
- Shake Reduction
|
- On
- Off |
||
|
Live View
|
- Autofocus Method |
- Face Detect - Contrast Detect - Phase Detect |
Sets parameters for the Live View mode. Three AF modes can be selected - Phase Difference AF (interrupts Live View during AF operation, uses dedicated AF sensor), Contrast AF (doesn't interrupt live view, allows focus point anywhere in frame, but is much slower to achieve focus lock), and Face Detection (similar to Contrast AF, but automatically detects dominant face in scene and sets AF on that face). Overlays containing basic exposure info, three framing grids, live histogram, and blinking highlight / shadow clipping warning can be enabled or disabled.
|
- Show Grid |
- Off - 3 x 3 grid - 2 x 2 grid + diagonals - Horizontal / vertical scale |
||
- Info Overlay |
- On - Off |
||
|
- Histogram
|
- On
- Off |
||
|
- Bright/Dark Area
|
- On
- Off |
||
|
Electronic Level
|
- On
- Off |
|
Displays bar graph indicating if camera is level in viewfinder and on LCD. Level is now dual axis (roll / pitch), unlike single-axis (roll) level in K-7.
|
|
Horizon Correction
|
- On
- Off |
|
Automatically corrects for camera tilt (roll) up to two degrees if SR is disabled, or one degree if SR is enabled.
|
|
Shake Reduction
|
- On
- Off |
|
Enables or disables the sensor-shift type Shake Reduction function, which corrects for blur caused by camera shake, but should be disabled when the camera is on a tripod.
|
|
Input Focal Length
|
- 8mm
- 10mm - 12mm - 15mm - 18mm - 20mm - 24mm - 28mm - 30mm - 35mm - 40mm - 45mm - 50mm - 55mm - 65mm - 70mm - 75mm - 85mm - 100mm - 120mm - 135mm - 150mm - 180mm - 200mm - 250mm - 300mm - 350mm - 400mm - 450mm - 500mm - 550mm - 600mm - 700mm - 800mm |
|
Only available if Shake Reduction switch is on and lens in use does not support automatic lens information communication. Allows the user to specify an approximate focal length, which is used to determine the level of correction needed by the shake reduction system. For zoom lenses, the value should be changed whenever the zoom position is changed. DA, DA L, D FA, FA J, FA, and F lenses already provide this information automatically.
|
Record Menu 5:
|
Record Menu Options: Screen 5
|
|||
|
Top-Level
Selection |
Second-Level
|
Third-Level
|
Notes
|
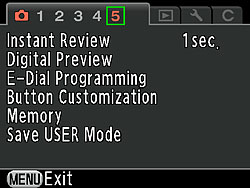
Instant Review |
- Display Time
|
- 1 sec. - 3 sec. - 5 sec. - Off |
Controls length of time the most recently captured image appears post capture, whether a histogram is shown, whether areas of over / underexposure are flashed, and whether the instant review can be enlarged using the rear e-dial. |
- Histogram |
- On - Off |
||
- Bright / Dark Area |
- On - Off |
||
- Enlarge Instant Review |
- On - Off |
||
Digital Preview |
- Histogram |
- On - Off |
Selects whether the optional Digital Preview function on the camera's LCD monitor should include a histogram, whether areas of over / underexposure should flash, and whether the instant review can be enlarged using the rear e-dial |
- Bright / Dark Area |
- On - Off |
||
- Enlarge Instant Review |
- On - Off |
||
E-Dial Programming |
- P |
- Front: Tv Rear: Av Green: P - Front: Av Rear: Tv Green: P - Front: Exposure compensation Rear: Program shift Green: Program line - Front: Program shift Rear: Exposure compensation Green: Program line - Front: Disabled Rear: Disabled Green: Disabled |
Selects the functionality of the front and rear e-dials, and the Green button, with each operating mode configured separately. Somewhat confusingly, in most modes you select from a variety of presets that combine both e-dial and Green button functions, but in a few modes you must specify these separately. |
- Sv |
- Front: Disabled Rear: ISO Green: Disabled - Front: ISO Rear: Disabled Green: Disabled - Front: Program shift Rear: ISO Green: Program line - Front: ISO Rear: Program shift Green: Program line - Front: Exposure compensation Rear: ISO Green: Disabled - Front: ISO Rear: Exposure compensation Green: Disabled |
||
- Tv |
- Front: Tv Rear: Disabled Green: Disabled - Front: Disabled Rear: Tv Green: Disabled - Front: Tv Rear: Exposure compensation Green: Disabled - Front: Exposure compensation Rear: Tv Green: Disabled - Front: Tv Rear: ISO Green: ISO Auto - Front: ISO Rear: Tv Green: ISO Auto |
||
- Av |
- Front: Disabled Rear: Av Green: Disabled - Front: Av Rear: Disabled Green: Disabled - Front: Exposure compensation Rear: Av Green: Disabled - Front: Av Rear: Exposure compensation Green: Disabled - Front: ISO Rear: Av Green: ISO Auto - Front: Av Rear: ISO Green: ISO Auto |
||
- TAv |
e-dials |
||
- M |
e-dials - Front: Tv Rear: Av - Front: Av Rear: Tv Green button - Program line - Tv shift - Av shift - Disabled |
||
- B |
- Front: Disabled Rear: Av Green: Disabled - Front: Av Rear: Disabled Green: Disabled - Front: ISO Rear: Av Green: Disabled - Front: Av Rear: ISO Green: Disabled |
||
- X |
e-dials - Front: Disabled Rear: Av - Front: Av Rear: Disabled - Front: ISO Rear: Av - Front: Av Rear: ISO Green button - Av shift - Disabled |
||
- Movie |
e-dials - Front: Disabled Rear: Av - Front: Av Rear: Disabled - Front: Exposure compensation Rear: Av - Front: Av Rear: Exposure compensation Green button - Av shift - Disabled |
||
|
Button Customization
|
- RAW / Fx Button
|
- One Push File Format
- Exposure Bracketing - Digital Preview - Electronic Level - Composition Adjust When One Push File Format selected -- Cancel after 1 shot: - Yes - No JPEG -> - JPEG - RAW - RAW+ RAW -> - JPEG - RAW - RAW+ RAW+ -> - JPEG - RAW - RAW+ |
|
- AF Button |
- Enable AF - Cancel AF |
||
- Preview Dial |
- Optical preview - Digital preview |
||
- Shutter Button Half Press |
- Enable AF - Off - Off (Live View only) |
||
Memory |
- Flash mode - Drive mode - White Balance - Custom Image - Sensitivity - EV Compensation - Flash Exposure Comp. - Cross Processing - Extended Bracketing - Digital Filter - HDR Capture - Playback Display - File No. |
- On - Off |
Allows you to select what settings are saved when you turn the camera off. All except cross processing, digital filter, and HDR capture are selected by default. |
Save USER Mode |
- Save Settings - Rename USER Mode - Check Saved Settings - Reset USER Mode |
- User 1 - User 2 - User 3 - User 4 - User 5 |
Saves current settings as settings for USER on Mode dial. Five groups of settings can be saved, and each can be given a unique 18 character name using an on-screen keyboard with a selection of upper and lower case letters, numbers, as well as a space, and 26 different punctuation marks. |
Playback Menu:
| Playback Menu Options | |||
|
Top-Level
Selection |
Second-Level
|
Third-Level
|
Notes
|
|
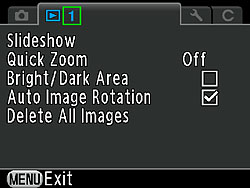
Slideshow
|
- Interval
|
- 3 sec
- 5 sec - 10 sec - 30 sec |
Sets slideshow interval, transition effects, and whether or not the slideshow should start over after the last image is shown.
|
|
- Screen Effect
|
- Off
- Fade - Wipe - Stripe |
||
|
- Repeat Playback
|
- Off
- On |
||
Quick Zoom |
- Off - 2x - 4x - 8x - 16x - 32x |
Sets initial magnification when enlarging images |
|
Bright / Dark Area |
- Off
- On |
Over/underexposed areas flash on playback |
|
|
Auto Image Rotation
|
- Off
- On |
If enabled, images that were recorded with rotation info, or which were rotated manually in playback mode, will be shown in their correct orientation in playback. |
|
|
Delete All Images
|
- Delete All Images
- Cancel |
|
Allows all images to be deleted simultaneously, including protected images. Deletion proceeds after acknowledgement of a confirmation screen noting the number of images to be deleted, and whether or not there are any protected images amongst these.
|
Setup Menu 1:
| Setup Menu Options: Screen 1 | |||
|
Top-Level
Selection |
Second-Level
|
Third-Level
|
Notes
|
|
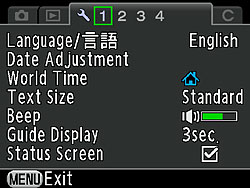
Language
|
- English
- French - German - Spanish - Portuguese - Italian - Dutch - Danish - Swedish - Finnish - Polish - Czech - Hungarian - Turkish - Greek - Russian - Korean - Chinese (Traditional) - Chinese (Simplified) - Japanese |
||
|
Date Adjustment
|
- Date Style
|
- mm/dd/yy
- dd/mm/yy - yy/mm/dd - 12h - 24h |
|
|
- Date
|
- Set date
|
||
|
- Time
|
- Set time
|
||
|
World Time
|
- Setting the Time
|
- Home |
When selecting the cities for destination and hometown, rolling the rear e-dial will switch between regions, while the left and right arrow keys step between cities one at a time.
|
- Destination |
North America South America Europe Middle East / Africa Asia Oceania DST |
||
|
Text Size
|
- Std.
- Large |
|
Selects menu system text size. Only affects the currently selected item in the menu, which increases in height, but not width. The remainder of the menu doesn't change size until selected.
|
Beep |
-Volume |
- Disabled - 1 - 2 - 3 - 4 - 5 |
Sets whether the camera beeps or not by category, and adjusts the overall volume. |
- In-focus - AE-L - Self-timer - Remote Control - Mirror Up - One Push File Format - Press OK for 1 sec. |
- On - Off |
||
|
Guide Display
|
- 3 sec
- 10 sec - 30 sec - Off |
Activates display guides on LCD when the exposure mode is changed or camera is switched on for set amount of time
|
|
|
Status Screen
|
- Enable
- Auto Screen Rotation |
- On
- Off |
Enables or disables the K-5's status display screen, sets whether it should rotate to match the camera orientation, and selects the color scheme to be used.
|
- Display Color |
- 1 (blue / grey) |
||
Setup Menu 2:
| Setup Menu Options: Screen 2 | |||
Top-Level Selection |
Second-Level |
Third-Level |
Notes |
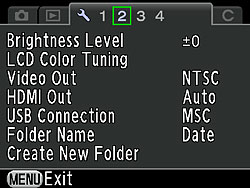
Brightness Level |
- 15 arbitrary units from -7 to +7 |
Adjusts overall brightness of LCD display |
|
LCD Color Tuning |
- 2D grid with Blue/Amber axis, Green/Magenta axis |
Adjust the LCD color in 15 levels for each direction. Turning the front e-dial selects either a photo for the background of the adjustment screen, or a standard screen showing luminance scale from black to white. |
|
Video Out |
- NTSC - PAL |
Selects composite video signal |
|
HDMI Out |
- Auto - 1080i - 720p - 480p |
Selects HDMI video signal |
|
USB Connection |
- MSC - PTP |
Selects USB mode (Mass Storage Class or Picture Transfer Protocol) |
|
Folder Name |
- Date - PENTX |
"Date" names files xxx_MMDD "PENTX" sets file naming in form of xxxPENTX, sequentially from 100 to 999 |
|
Create New Folder |
- Create folder - Cancel |
Creates a new folder for data storage, following the current folder naming convention |
|
Setup Menu 3:
| Setup Menu Options: Screen 3 | |||
Top-Level Selection |
Second-Level |
Third-Level |
Notes |
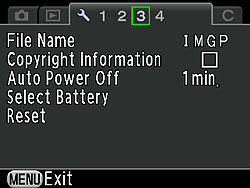
File Name |
- Change - Reset File Name |
You can define a four character prefix for sRGB JPEGs. The first three characters will also be used as a prefix for Adobe RGB JPEGs, prepended with an underscore. |
|
Copyright Information |
- Embed Copyright Data |
- Off - On |
Embeds name and copyright strings into EXIF headers of captured images. The name and copyright string can each include 32 characters, entered using an on-screen keyboard with a selection of upper and lower case letters, numbers, as well as a space, and 26 different punctuation marks. |
- Photographer |
- Enter alphanumeric string |
||
- Copyright Holder |
|||
Auto Power Off |
- 1 min - 3 min - 5 min - 10 min - 30 min - Off |
Sets time before camera shuts off after inactivity. |
|
Select Battery |
- Auto Select - Body First - Grip First |
Sets which battery is used first when two are present. |
|
Reset |
- Reset - Cancel |
"Reset" returns all settings except those in the Custom Settings menu to their defaults. |
|
Setup Menu 4:
| Setup Menu Options: Screen 4 | |||
Top-Level Selection |
Second-Level |
Third-Level |
Notes |
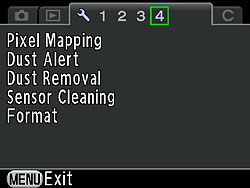
Pixel Mapping |
- Pixel Mapping - Cancel |
For remapping bad pixels, allowing the camera to automatically correct them as photos are captured. |
|
Dust Alert |
- Press the shutter release button |
For taking a high contrast image to detect dust on the sensor. Camera should be aimed at a uniformly bright subject. Focus mode must be set to Single or Continuous Autofocus, and Mode dial to any mode other than Movie. |
|
Dust Removal |
- Dust Removal |
First option activates Dust removal, which shakes the sensor to free dust particles when you press OK from this menu. Start-up action determines whether the camera should perform dust removal on every startup. |
|
- Start-up Action |
- On - Off |
||
Sensor Cleaning |
- Mirror Up - Cancel |
"Mirror Up" locks the mirror up for sensor cleaning. This should only be performed with fully charged batteries. The camera will attempt to sound a beep if it detects the battery charge is running low, which is a final warning to remove tools from the camera before the shutter closes and is damaged. |
|
Format |
- Format - Cancel |
"Format" erases all images, even protected ones |
|
Custom Menu 1:
| Custom Menu Options: Screen 1 | |||
|
Top-Level
Selection |
Second-Level
|
Third-Level
|
Notes
|
|
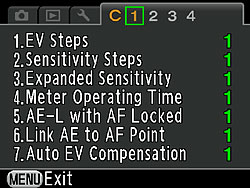
1. EV Steps
|
- 1: 1/3 EV Steps
- 2: 1/2 EV Steps |
|
Determines whether the exposure compensation function should use a step size of 1/3 or 1/2 EV.
|
|
2. Sensitivity Steps
|
- 1: 1 EV Step
- 2: As EV Steps |
|
"As EV Steps" adjusts ISO based on what variable is set in the previous Custom menu item (EV Steps). Alternatively, ISO sensitivity can be set to use a 1 EV step size.
|
|
3. Expanded Sensitivity
|
- 1: Off
- 2: On |
|
By default, the ISO sensitivity range is 100 to 12,800 equivalents. When set to On, this option expands the range at both ends: 80 to 51,200 equivalents.
|
|
4. Meter Operating Time
|
- 1: 10 sec
- 2: 3 sec - 3: 30 sec |
|
Determines how long the metering system should wait before powering down during inactivity. Longer values reduce battery life.
|
|
5. AE-L with AF locked
|
- 1: Off
- 2: On |
|
If set to "On" exposure is also locked when a focus lock is achieved.
|
|
6. Link AE to AF Point
|
- 1: Off
- 2: On |
|
"On" links the AE and AF points during multi-segment metering only, so that both values are set from the same point.
|
|
7. Auto EV Compensation
|
- 1: Off
- 2: On |
|
When set to "On", the K-5 will automatically correct your exposure if the metering system predicts an incorrect exposure level with the configured settings.
|
Custom Menu 2:
| Custom Menu Options: Screen 2 | |||
Top-Level Selection |
Second-Level |
Third-Level |
Notes |
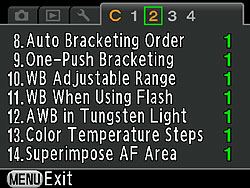
8. Auto Bracketing order |
- 1: 0 - + - 2: - 0 + - 3: + 0 - - 4: 0 + - |
Sets shooting order for bracketed exposures, with zero being the metered shot, '-' being underexposed, and '+' being overexposed. |
|
9. One-Push Bracketing |
- 1: Off - 2: On |
"Off" requires the shutter button to be pressed for each image in the bracketing sequence. On captures all shots in the sequence with a single press of the shutter button. |
|
10. WB Adjustable Range |
- 1: Auto Adjustment - 2: Fixed |
Auto Adjustment automatically performs fine tuning of selected WB. |
|
11. WB when using Flash |
- 1: Auto White Balance - 2: Unchanged - 3: Flash |
When flash is used, white balance can be auto, stay as set, or switch to Flash white balance. |
|
12. AWB in Tungsten Light |
- 1: Subtle Correction - 2: Strong Correction |
Adjusts strength of automatic WB correction in tungsten light. |
|
13. Color Temperature Steps |
- 1: Kelvin - 2: Mired |
Color temp can be set in steps of 100 Kelvin or 20 Mired with the front e-dial, or 1,000 Kelvin / 100 Mired with the rear e-dial. |
|
14. Superimpose AF Area |
- 1: On - 2: Off |
If switched on, highlights the AF point in red in the viewfinder |
|
Custom Menu 3:
| Custom Menu Options: Screen 3 | |||
Top-Level Selection |
Second-Level |
Third-Level |
Notes |
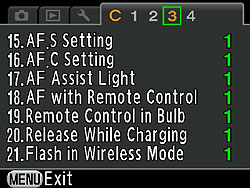
15. AF.S Setting |
- 1: Focus-priority - 2: Release-priority |
When set to focus priority and using autofocus, a focus lock must be achieved before the shutter can be fired. When set to release priority, the shutter will be released immediately that the button is fully depressed, regardless of whether the camera has determined a focus lock. |
|
16. AF.C Setting |
- 1: Focus-priority - 2: FPS-priority |
When set to focus priority and using autofocus, the K-5 gives priority to achieving a focus lock, rather than maximizing frame rate. When set to FPS priority, the shutter will be released immediately that the mechanism has recycled and the buffer capacity is available, regardless of whether the camera has determined a focus lock. |
|
17. AF Assist Light |
- 1: On - 2: Off |
"On" enables the built-in AF assist lamp, although it will still only operate as the camera deems necessary. |
|
18. AF with Remote Control |
- 1: Off - 2: On |
If on, performs an autofocus operation when the remote control is used to trigger the shutter release. If off, photo is taken immediately without focus adjustment, regardless of position of AF/MF slider. |
|
19. Remote Control in Bulb |
- 1: Mode1 - 2: Mode2 |
Mode 1 is push to start, push again to stop; Mode 2 is push and hold |
|
20. Shutter Release While Charging |
- 1: Off - 2: On |
"On" allows shutter release while flash is charging. The flash may fire at reduced strength, or not at all. |
|
21. Flash in Wireless Mode |
- 1: On - 2: Off |
When set to "On", the built-in flash fires as master in wireless mode, and participates in the exposure. When set to "Off", the built-in flash operates as a controller. It still fires to provide timing for the slave flash during the exposure, but at greatly reduced strength, minimizing its effect on the flash balance. |
|
Custom Menu 4:
| Custom Menu Options: Screen 4 | |||
Top-Level Selection |
Second-Level |
Third-Level |
Notes |
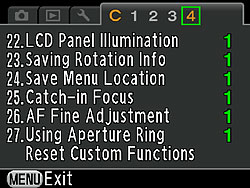
22. LCD Panel Illumination |
- 1: High - 2: Low - 3: Off |
Default value illuminates LCD panel at maximum brightness when exposure metering. Option 2 uses a lower brightness. Option 3 disables illumination altogether. |
|
23. Saving Rotation Info |
- 1: On - 2: Off |
If set to on, the K-5 embeds rotation tags in the EXIF headers of image files, which can be used by the camera and some software to automatically orient images correctly. |
|
24. Save Menu Location |
- 1: Reset Menu Location - 2: Save Menu Location |
When set to 1, the first press of the Menu button always brings up the first tab of the Record menu. When set to 2, the K-5 remembers which menu tab was last accessed, and starts from the top of this tab when the Menu button is first pressed. |
|
25. Catch-in Focus |
- 1: Off - 2: On |
If using a manual focus lens in single autofocus mode, the K-5 can trip the shutter release automatically when it determines that the subject is in focus. |
|
26. AF Fine Adjustment |
- 1: Off |
Autofocus can be fine-tuned +/- 10 steps for the K-5 body, and separately within the same range for up to 20 lens types. The K-5 can't recognize individual lens serial numbers, so the adjustment made for one specific lens model will apply to all other lenses of the same model. |
|
- 2: On (adjust) |
- Apply All - Apply One |
||
27. Using Aperture Ring |
- 1: Prohibited - 2: Permitted |
Setting one prevents image capture when the aperture ring isn't set to A. |
|
Reset Custom Functions |
- Reset - Cancel |
Resets all Custom Functions to default. |
|
 Fujifilm GFX 50S Review
 Fujifilm X-T3 Review
 Olympus E-M5 III Review

Follow Imaging Resource