Panasonic DMC-LS2 Design
 With a Spartan, brick-like or "candy bar" design, the Panasonic has a very basic, though not inelegant look. With dimensions of 4.35 x 2.11 x 1.22 inches, the LS2 is slender but not slim, small but not exactly svelte. It is little enough to fit into the pocket of your trousers but might be a tight squeeze in a pair of jeans. Weighing 6.7 ounces with batteries and card, the camera's certainly light enough to take with you anywhere. We recommend a carry case to protect it in a pocket or bag; this has the added benefit of protecting the lens from accidental activation when in a tight space, something that will almost always kill a lens mechanism. We also recommend use of the included wriststrap to prevent accidentally dropping the camera.
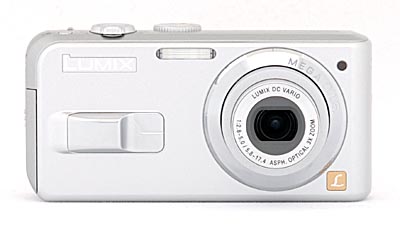
Though it has a pretty straightforward design, there are some nice touches on the front faceplate, as mentioned earlier, including a metal finger grip and a nice steel ring around the lens. Though it's made with a polycarbonate, the overall body is pretty solid and comes close to fooling you into thinking it's metal. On the bottom right of the front faceplate is a small "L" in a gold box to indicate the "Lumix" brand. In the top center of the faceplate is a small built-in flash with the full Lumix logo next to it in silver. To the upper right of the lens is the self-timer indicator lamp, and to the upper left of the lens is the flash.

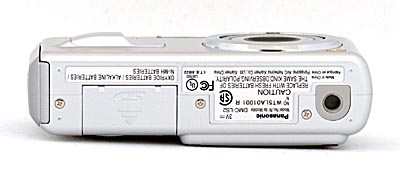
The right side of the camera has a sliding door for the AA batteries and a recessed eyelet for the strap.

The left side of the camera has a plastic door covering the Digital/Video Out socket and the DC In socket.
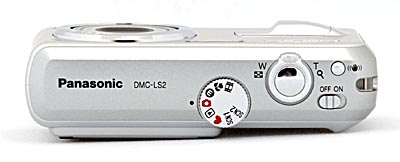
The top of the LS2 has a small on/off switch and a button to adjust the MEGA O.I.S. settings which are: Mode 1, Mode 2, and OFF. A metal zoom ring surrounds the shutter button on the upper right and in the center is a plastic mode dial with eight settings: Normal picture mode, Economy mode, Macro mode, Motion picture mode, Scene mode 1, Scene mode 2, Simple mode, and Playback mode.

The 2-inch LCD takes up the left half of the back of the camera while a multi-selector is located on the bottom right. Two buttons and an LED are sandwiched between. One, the display button, controls the info displays in both Record and Playback modes if pressed quickly. Pressing and holding this same button turns on the High Angle display mode, which brightens the screen. Below that is the Continuous/Delete button. The LED shines green when the camera turns on or when it's writing to the card.
The bottom of the camera has a small sliding door for the SD Card slot on the right and a plastic tripod mount on the left.
Panasonic DMC-LS2 External Controls
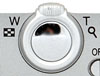
Shutter Button: On the front left of the top panel surrounded by the zoom ring, this metal button engages the autofocus when pressed half way and takes a pictures when fully pressed.
Zoom Ring (see image above): Surrounding the Lumix LS2's Shutter button, this lever controls the optical and digital zoom in any Record mode.
In Review mode, pushing the Lumix LS2's zoom lever toward the "W" end activates a nine-, sixteen-, or twenty-five-image index display mode. Pushing the lever to the "T" end digitally enlarges a captured image as much as 16x. When playback zoom is active, pushing the lever back toward the "W" zooms back out.
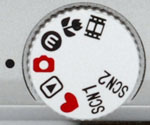
Mode Dial: The mode dial is located in the center of the top panel of the camera and has eight settings: Normal picture mode, Economy mode, Macro mode, Motion picture mode, Scene mode 1, Scene mode 2, Simple mode and Playback mode.
- Normal Picture mode: For normal recording; allows some manual control, though exposure is fully automatic.
- Economy mode: This mode lets you take pictures while reducing battery power consumption.
- Macro mode: For close-ups of a subject.
- Scene mode 1: This mode lets you choose from 13 scene modes
- Scene mode 2: As above, can be set to another Scene mode for easy access to two oft-used Scene modes.
- Simple mode: The camera sets everything in this entry-level mode.
- Playback mode: The user can review images and video clips in this mode.
![]()
Optical Image Stabilizer Button: Located on the top right of the camera, this little button allows you to turn image stabilization on or off and set it to one of two modes. In Mode 1, the stabilizer is continuously active; in Mode 2 it is activated only when the shutter is pressed.

Power Switch: The power switch is located on the top panel of the camera on the right side. When turned on, it powers on the camera and extends the zoom.
![]()
Display/High Angle button: With this button you can change the various info readouts on the LCD to include a live histogram or gridlines for framing pictures. When you press the button for a second or more, it engages the High Angle LCD Function which adjusts the screen so you can see it when taking a picture with the camera held above your head.
In Playback mode, pressing the button cycles between the image with information, expanded information and histogram, and no information displays.
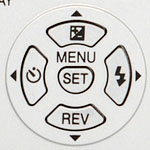
Four-way Cursor and Menu/Set button: The top button lets you adjust exposure and auto bracketing. The right button lets you pick between six flash modes -- Auto, Auto Red-eye, Slow sync, Forced ON and Forced OFF. The bottom button labeled "REV" lets you do a quick review of your images while you're still in recording mode. The left button is for setting the self timer which can be set to two or ten seconds. The center button is for accessing the menu system or for setting a function.

Burst Mode / Delete Button: In recording mode, this button can turn on or off the continuous shooting options including High speed, Low Speed, and Unlimited Continuous. In playback, this button is for deleting images, which can be done one at a time, all at once, or in multiples chosen by the user.
 Fujifilm GFX 50S Review
 Fujifilm X-T3 Review
 Olympus E-M5 III Review

Follow Imaging Resource