Toshiba PDR-M60Toshiba introduces a "value-priced" 2 megapixel camera with nice image quality and a 2.3x optical zoom.<<Camera Modes & Menus :(Previous) | (Next): Video, Power, Software>> Page 10:Image Storage & InterfaceReview First Posted: 1/12/2001 |
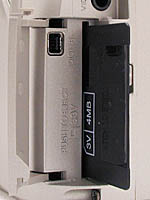 Image Storage and Interface
The PDR-M60 uses SmartMedia for image capture and storage. A 4MB card is supplied with the camera, but upgrades are available up to 64MB. Remember to use only 3.3V SmartMedia (sometimes marked simply 3V) and steer clear of the 5V version. The table below shows card capacities, based on the 4MB memory card, and approximate JPEG compression ratios for the various size/quality combinations the camera provides.
|
|||||||||||||||||||||||
SmartMedia should never be removed while the camera is on, nor should the camera be turned off while performing any operation, because there is a risk of damaging the media. Always load the SmartMedia card with the gold electrodes going into the camera first and facing the compartment door. Unlike many digital cameras, the PDR-M60 SmartMedia slot will accept the card inserted incorrectly. This doesn't damage the card, but might leave you scratching your head, wondering why the camera is insisting the card isn't working. The card is released by pressing the card down quickly, which should pop it up slightly. The card can then be pulled out of the slot.
You can write-protect SmartMedia cards by placing a write-protection sticker in the designated area. Write-protection stickers can only be used once and must be clean to be effective. You can protect individual images in Playback mode, through the Playback menu. Protecting images in the Playback mode prevents them from being accidentally erased or manipulated in any other way (such as resizing or compressing), except when the card is formatted, which erases all of the images.
Frames are assigned file numbers from 0001 to 9999 with a preceding directory or folder number. Once 9999 is reached, the directory number goes up by one. Setup mode allows you to reset the frame numbering sequence for new cards, and the Playback menu lets you select the image folder you'd like to review. Images are saved in DCF compliant (Exif Ver.2.1 JPEG) format. Two image sizes are available: 1,792 x 1,200 and 896 x 600 pixels, with a choice of Fine, Normal, and Basic JPEG compression levels. Through the Playback menu, 1,792 x 1,200-pixel images can be resized to 896 x 600 pixels. Likewise, Fine and Normal images can be compressed further.
The Erase button on the camera's back panel works in both Playback and Record modes. In Auto or Manual Record modes, the button can be used to delete the previously recorded image. Simply press the Erase button to bring up the Erase Frame options. Use the Up arrow on the Enter toggle button to highlight "YES" and press the center of the Enter button to complete the function. In Playback mode, you can delete the currently displayed image in the same manner. Pressing the Erase button with "NO" highlighted cancels the command. In either Record or Playback modes, holding down the Erase button for two seconds pulls up the full Erase menu, with options to erase a single frame, all frames, or to format the SmartMedia card (which erases all images and re-initializes the card).
A USB cable and software CD are provided for connecting to a computer and downloading images from the SmartMedia. USB download speed is a little slower than average, about 200 KBytes/second. (About 20 seconds to empty the 4 MB card the camera ships with.)
Reader Comments! --> Visit our discussion forum for the Toshiba PDR-M60!

Follow Imaging Resource: