Toshiba PDR-M60Toshiba introduces a "value-priced" 2 megapixel camera with nice image quality and a 2.3x optical zoom.<<Operation & User Interface :(Previous) | (Next): Image Storage & Interface>> Page 9:Camera Modes & MenusReview First Posted: 1/12/2001 |
Camera Modes and Menus
Manual Exposure Mode: Accessed by turning the Mode dial to the red camera symbol next to an "M," this mode allows the user to manually control White Balance and Exposure Compensation. The user also has control over Flash mode, ISO, File size/quality, Digital and Optical Zoom, Macro mode, Erase function, and Record mode. Pressing the Enter button displays the following menu on the screen:
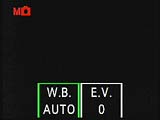 White Balance: Sets the camera's White Balance mode to Auto, Daylight, Cool White Fluorescent, Standard Fluorescent, or Incandescent.
- Exposure Compensation: Adjusts the camera's Exposure Compensation from -1.5 to +1.5 in one-third exposure value (EV) increments.
Pressing the Menu button in this mode pulls up the standard Record settings menu:
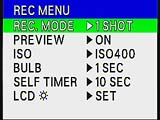 Record Mode: Sets the capture mode to One Shot, Multi, or Bulb.
- Preview: Turns the two-second image preview on or off.
- ISO: Sets the light sensitivity equivalent to ISO 100, 200, 400, or "B&W" puts the camera into black & white mode..
- Bulb: Sets the Bulb shutter time to one or two seconds.
- Self-Timer: Sets the Self-Timer countdown time to two or 10 seconds.
- LCD: Adjusts the LCD brightness level.
Automatic Record Mode: Marked on the Mode dial with a plain, red camera symbol, this mode gives the user control over the same functions as in Manual exposure mode, with the exception of White Balance and Exposure Compensation. Pressing the Menu button pulls up the same settings menu as in Manual mode.
Off: This position on the Mode Dial shuts the camera off, and retracts the camera lens if it was previously extended.
Playback: Noted on the Mode Dial with the traditional green playback symbol (a green triangle within a rectangular outline), Playback mode enables users to review captured images, as well as resize, protect, erase, or compress them. An index display is available for a quick review of saved images on the memory card, and a playback zoom option enlarges captured images for closer inspection (up to 3x). Pressing the Menu button displays the following Play menu options:
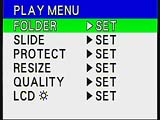 Folder: Selects the image folder to be played back, if the SmartMedia card has more than one folder.
- Slide: Begins an automatic slideshow playback of all the images in the selected image folder, with three-second display intervals.
- Protect: Protects (or removes protection) from the currently displayed image. Protected files cannot be altered in any way, except when the card is formatted and all images are erased.
- Resize: Reduces 1,792 x 1,200-pixel images to 896 x 600-pixel resolution. Protected images cannot be resized.
- Quality: Compresses the image from Fine to Normal, Fine to Basic, or Normal to Basic JPEG compression levels. Protected images cannot be compressed.
- LCD: Adjusts the LCD brightness level.
PC Mode: Turning the Mode Dial to the bent arrow symbol sets up the camera for connection to a PC or Macintosh computer. A USB cable is included with the camera for high-speed dowload of images from the camera to the computer.
Set-Up Mode: Labeled on the Mode Dial as SET-UP, this mode displays the camera's basic settings menu, as follows:
 Language: Changes the camera's menu language to English, German, French, Spanish, or Japanese.
- Sound: Turns the camera's beep sound on or off.
- Time: Sets the camera's date and time.
- Auto Off: Establishes the period of inactivity before the camera shuts itself off to conserve power. Options are one (default), two, or three minutes.
- TV: Sets the video-out signal to either NTSC or PAL timing.
- Image Number: Resets the image numbering sequence for a new folder.
- Default: Signals the camera to return all settings to their defaults settings when the camera is shut off (except for Time, TV, and LCD brightness).

Follow Imaging Resource: