Toshiba PDR-M60Toshiba introduces a "value-priced" 2 megapixel camera with nice image quality and a 2.3x optical zoom.<<Shutter Lag & Cycle Time Tests :(Previous) | (Next): Camera Modes & Menus>> Page 8:Operation & User InterfaceReview First Posted: 1/12/2001 |
Operation and User Interface
The user interface on the PDR-M60 is very uncomplicated and quick to learn, requiring only a quick overview of the instruction manual. A limited number of control buttons are provided for direct access to camera settings, leaving the majority of exposure settings controlled through the LCD menu. Although we prefer to see as little reliance as possible on the LCD monitor for camera adjustments, the PDR-M60 has such a modest range of features (compared to its more sophisticated cousins, the PDR-M70 and PDR-M5) that you could feasibly keep the LCD turned off most of the time. The small status display panel on top of the camera provides access to most camera settings, and buttons are provided to adjust the flash, image size/quality, self-timer, Macro mode, digital zoom, and optical zoom externally. The camera's portable size and easily accessible controls lend themselves to effective one-handed operation.
We found all of the camera's external controls user friendly, and its LCD menu system is very navigable. The only control we had trouble with was the locking mechanism for the battery compartment door, which was somewhat tricky to open and close. Other than that, camera operation was very smooth.
Control Enumeration

Shutter Button: Located on top of the hand grip portion of the camera, this large, silver button sets camera focus and exposure when depressed halfway. Fully depressing the button triggers the shutter release. When the Self-Timer function is enabled, fully depressing the shutter button kicks off the timer countdown.
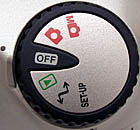
Mode Dial: Located at a slight angle from the camera's top panel to the back, this notched dial controls the camera's power and operating mode, and provides the following options:
- Manual Exposure Mode: Turns the camera on and places it in Manual exposure mode, which gives the user control over White Balance and Exposure Compensation, in addition to the features listed below.
- Automatic Exposure Mode: Also powers the camera on, but places the camera in Automatic exposure mode. The user can control ISO, Flash mode, Record mode, Digital Zoom, File size/quality, Macro mode, Self-Timer, and Optical Zoom.
- Off: Shuts the camera down and retracts the lens.
- Playback: Powers on the camera (the lens remains retracted) and allows the user to review captured images on the SmartMedia card. Images can be erased, protected, resized, or compressed. The user can also zoom into captured images, display an index of up to nine thumbnails, or start an automatic slideshow playback.
- PC: Identified by the standard bent arrow symbol, this setting enables the camera to connect to a computer via the included USB cable.
- Set-Up: Displays the camera's Set-Up menu for changing basic camera settings, such as Language (English, German, French, Spanish, and Japanese), Sound, Time, Auto-Off function, TV connection, Image numbering, and Default settings.

Flash Button: Located on the camera's top panel, under the lower left corner of the status display panel, this button chooses on of five flash modes: Auto, Red-Eye Reduction, Forced Flash, Suppressed Flash, and Slow Synchro.

Image Size/Quality Button: Directly to the right of the Flash button, this controls the image size and quality settings, cycling through the 1,792 x 1,200- and 896 x 600-pixel file sizes, as well as Fine, Normal, and Basic JPEG compression levels.

Self-Timer Button: Adjacent to the Image Size/Quality button on the right side, this button enables and disables the Self-Timer function. Once enabled, a full press of the shutter button begins the timed countdown. The Self-Timer can be set to two or 10 seconds through the Record menu.
![]()
T/W Zoom Toggle: Located beneath the Mode dial on the camera's back panel, this toggle button controls the optical zoom in any capture mode. In Playback mode, it controls the enlargement of captured images.

SmartMedia Slot Release Lever: To the right of the SmartMedia slot compartment door, this sliding lever releases the hinged, plastic door -- allowing you to insert and remove SmartMedia cards.

Enter/Rocker Arrow Button: Adjacent to the top right corner of the LCD monitor, this button features Up, Down, Left, and Right arrows, with an "Enter" function in the center. The arrow buttons navigate through all menu options, and the Enter function confirms choices. In either Automatic or Manual record modes, the Up and Down arrow buttons control the digital zoom, which provides up to 2x enlargement. In Manual mode, the Enter button cancels and recalls the White Balance and Exposure Compensation menu displays, which are navigated with the arrow buttons. In Playback mode, the Left and Right arrow buttons scroll through captured images. When the playback zoom feature is enabled with the T/W Zoom button, all four arrows enable the user to scroll around inside the captured image. Also in Playback mode, the Enter button calls up the nine-image index display, which is then navigated by the four arrow buttons.

Menu Button: Directly beneath the Enter button, this activates the settings menus in Playback and Record modes. It also cancels the menu display.
![]()
Display Button: Just to the right of Menu, this button controls the LCD display in Record and Playback modes. When used in Automatic and Manual Record modes, the button cycles through the following on-screen displays: image and settings, image display only, no display at all. In Playback mode, the button cycles through: image and information display (file name and number only), image and image information display (exposure and camera settings for the selected image), and image display only.
![]()
Macro Button: Below the Menu button, this button is marked with the traditional macro flower symbol. In both Automatic and Manual capture modes, this button enables the Macro shooting mode, which reduces the focusing range to 2.0 to 19.7 inches (5 to 50cm).
![]()
Erase Button: To the right of Macro, this button is marked with a trash can symbol. In both capture modes, this button erases the previously recorded image (with an option to cancel). In Playback mode, pressing this button deletes the currently displayed image (also with an option to cancel). In Playback and both Record modes, holding down the Erase button for two seconds pulls up the Erase menu. From there, you can erase a single frame or all frames, or format the SmartMedia card.

Follow Imaging Resource: