Sony DSC-N2 Operation
With its touchscreen technology and sparse physical controls, the Sony DSC-N2 is a breeze to operate. A sliding Mode switch on the side of the camera puts it into Movie, Still Record, or Playback modes, and the rest of the camera functions (aside from zoom) are controlled through the LCD display. The stylus makes navigating the LCD display quite simple, but a fingertip or fingernail does the job just as well. Though some users may need some adjustment time to get accustomed to the touchscreen display, most should feel comfortable in less than half an hour.
Record Mode Display
 In record mode, the LCD monitor displays the subject with a fair amount of information, indicating approximate battery life remaining (graphically), flash mode, focus mode, AF area mode setting, any currently-selected exposure compensation setting, ISO setting, the current size/quality setting, number of images that can be stored on the remaining Memory Stick space at the current size/quality, aperture and shutter speed, and if the AF assist lamp is activated. Pressing the Sony N2's Display button adds a small histogram to the lower left corner. A third press eliminates the histogram, and whittles the information display down to the AF area, flash mode, exposure settings, EV compensation, AF assist lamp, and focus mode.
Playback Mode Display
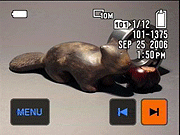 In Playback mode, the default image display shows the most recently captured image, with a modest information overlay present. Pressing the Sony N2's Display button once adds the exposure information and a small histogram to the overlay, pressing it again removes the information and histogram overlays entirely. Pressing the wide-angle side of the zoom lever takes you to a display showing images on the Memory Stick in groups of nine small thumbnails. You can navigate a blue arrow cursor over these thumbnails by using the arrow keys displayed onscreen. Pressing the telephoto side of the zoom lever will bring the currently-selected image up full-screen. Pressing the telephoto side of the Sony N2's zoom lever when viewing an image full-size on the LCD screen will zoom in on the image, up to a maximum magnification of 5x. Again, blue arrow "keys" display onscreen to navigate through the view.
Sony DSC-N2 Modes and Menus
Still Record Mode: Indicated on the Mode switch by a camera icon, this mode sets up the Sony N2 to record still images. A selection of exposure modes are available through the Record menu, including Auto, Program, and Manual, plus eight preset Scene modes: High Sensitivity, Twilight, Twilight Portrait, Beach, Landscape, Soft Snap, Snow, and Fireworks. High Sensitivity mode raises the camera's ISO setting to 1,600, while enabling a noise reduction setting to reduce the effect of image noise. Both Twilight modes capture images in low light, although the Twilight Portrait mode automatically enables the Red-Eye Reduction flash mode, combining it with a slower shutter speed to let ambient lighting brighten the background as well. Because the Sony N2 employs a slower shutter speed in both Twilight modes, a tripod is highly recommended to prevent blurring from camera movement. The Beach and Snow modes optimize the camera for bright situations and prevents color loss from overexposure. Landscape mode sets the focus at infinity and uses a smaller lens aperture to capture sharp details both near and far away. Fireworks mode attempts to preserve color when photographing fireworks or other colorful lights at night. Finally, Soft Snap mode is best for portraits, enhancing skin tones and keeping focus slightly soft for more flattering portraits.
The Auto mode puts essentially all of the exposure controls and options (except
zoom, image size, macro and flash modes) under automatic control, while Program
mode puts only aperture and shutter speed under automatic control. In Manual
mode, all options are available to the user, including aperture and shutter
speed. The Manual mode shutter speed range increases, extending to a maximum
of 30 seconds.
Playback Mode: Playback mode is noted on the Mode switch with the traditional Playback symbol (a right arrow enclosed within a rectangle outline). In this mode, you can scroll through captured images, delete them, write-protect them, and set them up for printing on PictBridge-compatible printers. You can also copy, resize, and rotate images. A fun tool in Playback mode is the Paint menu option, which turns the LCD screen into a canvas for doctoring up images. You can use the included stylus (or even a fingernail) as a paint brush, and the Sony N2 offers a few tools for drawing lines, painting, adding small graphics, and cloning images in-camera. Once you've altered the image, you can save the new image as a separate file, or cancel the whole thing and start over. There's even a screen calibration tool in the Setup menu to help you get the LCD screen as true to print as possible.
Movie Mode: A filmstrip icon marks this mode on the Sony N2's Mode switch. In Movie mode, you can record moving images and sound, for as long as the Memory Stick Duo or internal memory has space. Resolution and quality choices are 640 x 480 Fine (30 fps), 640 x 480 Normal (17 fps), or Video Mail 160 x 112 (8 fps). While recording, a timer appears in the LCD monitor to let you know how many minutes and/or seconds are remaining on the Memory Stick, and how long you've been recording, so you'll have some idea of how much time you have left. Recording in 640 x 480 Fine (30 fps) mode is only available with a Memory Stick Duo PRO card. Unfortunately, optical zoom is not supported in movie mode.
The Sony N2 offers a Burst mode separate from the movie mode and selected via the touchscreen menu, which captures series of images for as long as the Shutter button is held down. Frame rates and the maximum number of images depends on the image quality and resolution settings, as well as the amount of available memory space. The N2's Burst mode is actually a bit slow, however, as I clocked it at about 0.8 frames per second in large/fine mode, for only three frames. In VGA mode, the frame rate speeds up only a little, to 1.02 frames per second, for 15 frames. A Multi-Burst mode captures files much faster, though at a much smaller resolution, but it's much more useful for very active subjects. You can choose a frame rate interval (1/7.5, 1/15, or 1/30 second) through the Record menu, and the camera captures 16 small images at this rate. The Sony N2 also offers an Auto Exposure Bracketing mode, which captures a series of images at different exposures in case you're not sure which exposure is best.
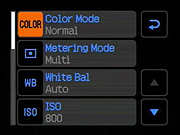
Record Menu:
| Record Menu Options | |||
| Top-Level Selection |
Second-Level | Third-Level | Notes |
Color Mode |
- Normal - Sepia - Black & White |
|
|
Metering Mode |
- Multi - Center - Spot |
||
|
White Balance
|
- Auto
- Daylight - Cloudy - Fluorescent - Incandescent - Flash |
||
|
ISO
|
- Auto
- 100 - 200 - 400 - 800 - 1,600 |
||
|
Picture Quality
|
- Fine
- Standard |
||
|
Record Mode
|
- Normal
- Burst - Exposure Bracketing - Multi Burst |
||
|
Bracket Step
|
- +/- 1.0 EV
- +/- 0.7 EV - +/- 0.3 EV |
|
Only available if Exposure Bracketing mode enabled
|
|
Interval
|
- 1/30
- 1/15 - 1/7.5 |
Only available if MultiBurst mode is selected
|
|
|
Flash Level
|
- High
- Normal - Low |
Controls the intensity of the flash
|
|
|
Contrast
|
- High
- Normal - Low |
||
|
Sharpness
|
- High
- Normal - Low |
||
|
Setup
|
Accesses the main Setup menus
|
||
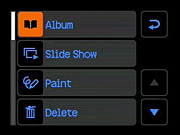
Playback Menu:
| Playback Menu Options | |||
| Top-Level Selection |
Second-Level | Third-Level | Notes |
|
Album
|
|
Menu:
- Exit Album - Slide Show - Delete - Volume - Protect - Rotate |
Displays the available digital albums
|
|
Slide Show
|
- Effects
- Music - Image Folder - Repeat - Start |
Effects:
- Simple - Nostalgic - Stylish - Active - Normal Music: Folder: Repeat: |
You can download music from a computer
to use with slide shows, or stick with the camera's default options
|
|
Paint
|
Displays image with paint tools
for use with included stylus. Options to save or delete altered image as
well.
|
||
|
Delete
|
- Delete
- Exit |
||
|
Volume
|
- Eight levels from - to +
|
Adjusts playback volume for slide shows and
movies
|
|
|
Folder
|
- Select Folder
|
Selects folder for image playback
|
|
|
Protect
|
- Protect
- Exit |
|
Marks file for write protection, or removes
protection
|
|
DPOF
|
- DPOF
- Exit |
Marks file for printing on a DPOF device, or
removes print mark
|
|
|
Print
|
- OK
- Cancel |
Enables direct printing to a PictBridge device
|
|
|
Resize
|
- 10M
- 8M - 5M - 3M - 2M - VGA |
Resizes selected image
|
|
|
Rotate
|
- OK
- Cancel |
Rotates images in 90-degree increments, either
clockwise or counterclockwise
|
|
|
Divide
|
For editing movie clips, lets you divide a section
and save it separately
|
||
|
Setup
|
Displays the Setup menus
|
||
Setup Mode, Camera 1:
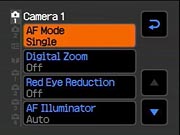
| Camera 1 Menu Options | |||
| Top-Level Selection |
Second-Level | Third-Level | Notes |
|
AF Mode
|
- Single
- Monitor |
Single adjusts focus with Shutter
button, Monitor acts like Continuous AF, but holds focus with a half press
of Shutter button
|
|
|
Digital Zoom
|
- Smart
- Precision - Off |
Enables either of the digital zoom
modes, or disables all digital zoom
|
|
|
Red-Eye Reduction
|
- On
- Off |
Activates the Red-Eye Reduction
preflash to prevent Red-Eye. If enabled, fires the preflash in all flash
modes.
|
|
|
AF Illuminator
|
- Auto
- Off |
Auto puts the camera in charge of when the AF
assist is needed
|
|
Setup Menu, Camera 2:
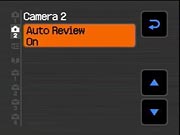
| Camera 2 Menu Options | |||
| Top-Level Selection |
Second-Level | Third-Level | Notes |
|
Auto Review
|
- On
- Off |
If on, the review displays the most recently
captured image for a few seconds on the LCD monitor
|
|
Setup Menu, Memory Stick:
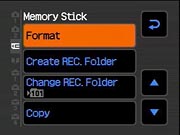
| Memory Stick Menu Options | |||
| Top-Level Selection |
Second-Level | Third-Level | Notes |
|
Format
|
- OK
- Cancel |
Erases all images from the internal
memory or memory card, even write-protected files
|
|
|
Create REC Folder
|
- OK
- Cancel |
Creates a new folder for storing
images
|
|
|
Change REC Folder
|
- OK
- Cancel |
Selects which folder images should
be recorded to
|
|
|
Copy
|
- Internal Memory
- Album |
For copying files between the internal memory
and the memory card
|
|
Setup Menu, Album:
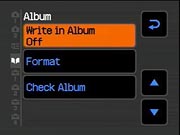
| Album Menu Options | |||
| Top-Level Selection |
Second-Level | Third-Level | Notes |
|
Write in Album
|
- On
- Off |
Sets camera to write photos to the album as they are shot
|
|
|
Format
|
- OK
- Cancel |
Erases all album information, even
files that are write protected
|
|
|
Check Album
|
- Exit
|
Verifies that album data is ok
|
|
Setup Menu, Setup 1:

| Setup 1 Menu Options | |||
| Top-Level Selection |
Second-Level | Third-Level | Notes |
|
Download Music
|
- Exit
|
Downloads music for slide show
playback
|
|
|
Format Music
|
- OK
- Cancel |
Erases music files
|
|
Setup Menu, Setup 2:
| Setup 2 Menu Options | |||
| Top-Level Selection |
Second-Level | Third-Level | Notes |
|
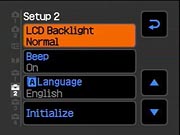
LCD Backlight
|
- Bright
- Normal |
Adjusts the brightness of the
LCD display
|
|
|
Beep
|
- Shutter
- On - Off |
Turns the camera's beep sounds on
or off, or sets a sound only for the shutter release
|
|
|
Language
|
- English
- Simplified Chinese - Traditional Chinese - Spanish - French - Italian |
||
|
Initialize
|
- OK
- Cancel |
Resets the camera's settings to default
|
|
Setup Menu, Setup 3:
| Setup 3 Menu Options | |||
| Top-Level Selection |
Second-Level | Third-Level | Notes |
|
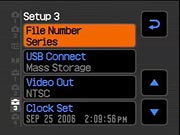
File Number
|
- Series
- Reset |
Series continues numbering regardless
of memory card. Reset starts over with each new memory card
|
|
|
USB Connect
|
- PictBridge
- PTP - Mass Storage - Auto |
||
|
Video Out |
- NTSC
- PAL |
||
|
Clock Set
|
- Date Style
- Date and Time Set |
Date Style adjusts the format of the date and
time display
|
|
Setup Menu, Setup 4:
| Setup 4 Menu Options | |||
| Top-Level Selection |
Second-Level | Third-Level | Notes |
|
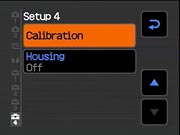
Calibration
|
- Cancel
|
Appears to calibrate the appearance
of the LCD monitor, presumably so that changes made in Paint mode are
as accurate as possible when compared to the printed version
|
|
|
Housing
|
- On
- Off |
Indicates whether an underwater
housing is in use
|
|
 Fujifilm GFX 50S Review
 Fujifilm X-T3 Review
 Olympus E-M5 III Review

Follow Imaging Resource