Pentax Optio A10 Design
The Pentax A10 isn't a particularly dazzling camera to look at, but it is tastefully designed. Though it's solidly constructed with a classic style, there's no getting around the fact that this camera is basically just a little metal box with rounded corners. There are some nice touches though. The exterior is composed of textured aluminum alloy that feels smooth and elegant in your hand. The 12-faceted metal lens ring jazzes up the exterior a bit and Pentax's designers did a good job of blending the connector covers into the camera by using fitted metallic polycarbonate around the metal eyelet for the strap so it looks like it's all one piece.
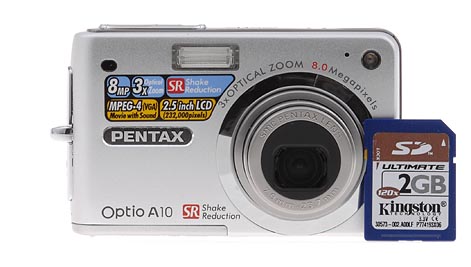
The front of the camera holds the lens, flash, self-timer lamp / AF illuminator, tiny microphone hole, and the sensor window for the optional remote control. The A10 uses Pentax's "Sliding Lens System" technology which removes elements from the lens' optical path as it retracts to maintain a slim profile. The shutter-like retractable lens cover slides quickly out of the way when the camera is turned on and the lens telescopes out from the camera body about an inch. Aside from the lens, the front of the camera is almost completely flat and there's not much for your fingers to find a grip on. I'd recommend keeping the strap securely cinched around your wrist when holding the camera, as there's not much to keep it from slipping out of your hand if you get bumped while shooting.
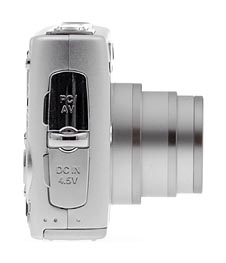
The right side of the camera (as viewed from the rear) is slightly rounded silver with a raised metallic eyelet for the included wrist strap. On either side of the eyelet are cleverly disguised silvery metallic covers for the PC/AV terminal and DC Input terminal.
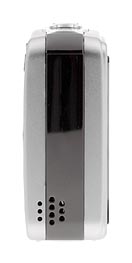
The opposite side of the camera is mostly featureless aside from a silver band that extends to the top of the camera and a series of ten holes that serve as the camera's speaker grill.
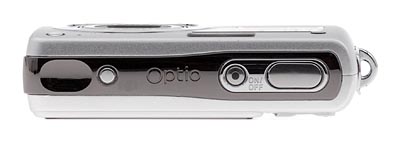
The Optio A10's top panel features a slightly indented fingergrip, the Shake Reduction preview button, the power switch which glows green in the center when engaged, and the oblong shutter release button.
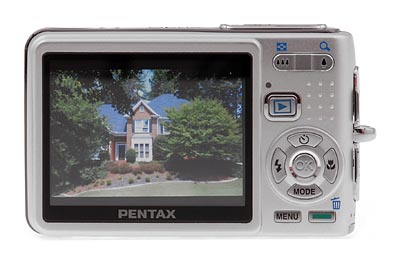
The remainder of the camera's controls dot its back panel, along with the 2.5-inch
color LCD monitor. Alongside the top right of the LCD is the Zoom rocker, which
also initiates and controls the playback zoom function, and accesses the camera's
nine-image thumbnail and folder views. Below the zoom control is a tiny access
lamp, the Playback button, and a Four-Way controller pad with an "OK"
button at its center for confirming menu selections and controlling the LCD
display. The controller serves as the navigational tool for the LCD menu system.
Below the Four-Way controller are the Menu button and the Green button which
accesses the camera's Green (Basic) exposure mode and can be assigned different
functions in the menu. In Playback mode, the Green button is used to delete
images.
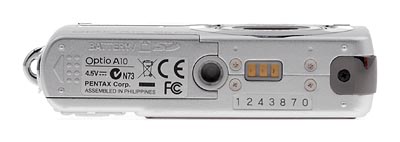
On the bottom panel of the Pentax Optio A10 are the battery/memory card compartment, plastic threaded tripod socket, and battery charger terminal for use with the charging stand. Inside the shared battery and memory card compartment, the SD card and battery slots line up side by side. A small pressure switch locks the battery in place so it won't accidentally slide out. The SD card releases with a quick press.
Pentax Optio A10 External Controls

Power Button: Mounted flush and surrounded by a piece of silver trim in the middle right of the camera's top panel, this button powers the camera on and off. The center of the button glows green whenever the camera is powered on.

Shutter Button: Located to the right of the Power button, this button sets focus and exposure when halfway pressed, and fires the shutter when fully pressed. When in Playback mode or any menu, pressing this button returns you to Record mode, and to readiness to take a picture.
![]()
Shake Reduction Preview Button: Located toward the left side of the
top panel and identified with an icon of a shaky hand, this button displays
the compensated image on the LCD monitor.

Zoom Toggle: Located in the top right corner of the back panel, this button controls the optical and digital zoom in any record mode. In Playback mode, this button lets you zoom in up to 8x on captured images, to check focus or precise framing. Pressing the wide-angle side of the button when not zoomed in activates the nine-image thumbnail index display mode, and if there are multiple folders on the flash card, pressing it a second time activates a Folder Display mode that shows a visual representation of the top-level folders.

Playback Button: Below the Zoom Toggle, this button places the camera into Playback mode. A second press returns to Record mode. Unlike some cameras, the Optio A10's Playback button does not double as a Power button that brings the camera directly into Playback mode. Instead, the camera must be powered on with the Power button first.
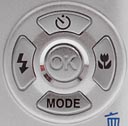
Four Way Controller: Taking up the lower middle of the rear panel, this four-way multi-controller navigates through settings menus. When in Record mode and not in a menu, the Four-Way Arrow pad allows quick access to some of the camera's functions. The Up arrow changes the Drive mode, and the Down arrow selects the exposure mode. When in manual focus mode, the same buttons adjust focus. The Left arrow selects the flash mode, and finally the Right arrow selects the Focus mode.
In Playback mode, the Left and Right arrows scroll through available still images, movies and audio clips, and are used to step through movie frames when paused, select whether movies are played forward or backward during playback, and fast-forwards or rewinds during audio clip playback. The Up arrow plays and pauses movies or audio clips, and the Down arrow stops playback. If nothing is being played back, the Down arrow calls up the Playback Mode Palette menu, where images can be edited, protected, voice memos added, DPOF orders set, slideshows initiated, and the camera startup screen changed. When the playback zoom is in use, all four arrows can be used to pan around the zoomed image.
OK / Display Button: Nestled in the center of the Four-Way Controller, this button confirms menu selections in any mode.
When outside of a settings menu, this button also controls the LCD display modes. In Record mode, pressing this once calls up a histogram display of the subject area (a graphical representation of the light and dark values in the image) and a readout of basic settings such as resolution, quality, white balance, etc. A second press dismisses the histogram and information display, showing only the image area with grid lines and focus brackets. A third press strips the screen of all info, a forth press turns off the LCD's altogether, and fifth press returns to the default normal display. In Playback mode, pressing the Display button once pulls up an information display, while a second press adds an extended histogram and information display, and a third press dismisses it. When using the playback zoom, pressing this button returns to the full single-image view. When in the thumbnail or folder views, this button returns back from the folder to the thumbnail view, and from the thumbnail to the single image view.
![]()
Menu Button: Next to the lower right corner of the LCD monitor, this button calls up and dismisses the settings menu in both Record and Playback modes. In some menu screens, this button also serves to exit a menu item and cancel any changes made.

Green / Erase Button: In the right hand corner of the rear panel, this
button accesses the camera's Green (Basic) exposure mode by default, and can
also be programmed to perform four different functions - enable Shake Reduction,
Initialize Rec. Mode (which lets you return all the shooting functions to the
defaults), enable Movie Mode, or enable the Fn Setting to register frequently
used functions.
In Playback mode, pressing this button displays the erase menu.
 Fujifilm GFX 50S Review
 Fujifilm X-T3 Review
 Olympus E-M5 III Review

Follow Imaging Resource