Canon PowerShot Pro1New level of sophistication takes over the top spot in the PowerShot line.<<Design :(Previous) | (Next): Optics>> Page 4:ViewfinderReview First Posted: 05/14/2004 |
Viewfinder
 The
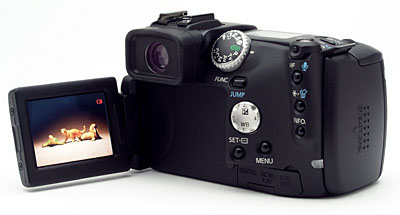
Pro1 features both an eye-level electronic viewfinder (EVF) and a tilt/swivel
LCD monitor on the back of the camera for image composition. The extreme zoom
on the Pro1 makes it very difficult to make an optical viewfinder that will
track the action of the zoom lens accurately, so most makers of long-zoom, non-SLR
cameras have switched to an EVF. It's a necessary evil that is nonetheless vexing.
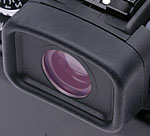
A diopter adjustment control on the left of the eyepiece adjusts the viewfinder
focus for eyeglass wearers. The viewfinder seems particularly well-suited for
eyeglass wearers. The objective has a high enough "eyepoint" to accommodate
even fairly thick eyeglass lenses, and the diopter adjustment seems to cover
a very broad range. (Accommodating even my own 20/180 vision with ease.)
The
Pro1 features both an eye-level electronic viewfinder (EVF) and a tilt/swivel
LCD monitor on the back of the camera for image composition. The extreme zoom
on the Pro1 makes it very difficult to make an optical viewfinder that will
track the action of the zoom lens accurately, so most makers of long-zoom, non-SLR
cameras have switched to an EVF. It's a necessary evil that is nonetheless vexing.
A diopter adjustment control on the left of the eyepiece adjusts the viewfinder
focus for eyeglass wearers. The viewfinder seems particularly well-suited for
eyeglass wearers. The objective has a high enough "eyepoint" to accommodate
even fairly thick eyeglass lenses, and the diopter adjustment seems to cover
a very broad range. (Accommodating even my own 20/180 vision with ease.)
Measuring 2.0 inches diagonally, Canon's low-temperature, polycrystalline silicon, TFT color LCD monitor features the same smart, swiveling design we first saw years ago on the PowerShot Pro 70, and later on the original G1. The monitor's plastic casing actually pops out of the back of the camera and swings around to face forward (the same direction as the lens). From that position, the monitor can be rotated forward 180 degrees or backward 90 degrees, allowing you to hold the camera in practically any position and still see what's going on in the viewfinder. The best part of the LCD's swiveling monitor design is that it can be flipped around to face the back panel and then closed, keeping the screen safe from scratches and smudgy fingerprints.
The Pro1 preserves the enhanced manual focus utility we first saw on the G2's LCD display. Not only does the LCD show numbers on its distance scale (a feature I consider almost mandatory), it also enlarges the center of the image, making it easier for you to focus accurately based on what you're seeing in the LCD. The Pro1's LCD is also used when selecting exposure compensation, white balance, flash exposure compensation, and autoexposure bracketing options. Pressing the Function button next to the LCD on the camera's rear panel calls up a series of tabbed sub-menus that let you control ISO, picture effects, exposure and focus bracketing, flash exposure compensation, and image size and quality.
 In Record mode, the LCD monitor normally displays a range of information about
the camera's settings, including flash mode, exposure mode, drive (single vs
continuous), macro setting, ISO, exposure compensation, image effects, image
size and JPEG quality setting, and number of shots remaining on the memory card
at the current size/quality settings, as well as a white box showing the currently
active focus area.. Pressing the Info button dismisses all of the status overlays
with the exception of the focus box. Pressing the Info button a second time
restores the status information.
In Record mode, the LCD monitor normally displays a range of information about
the camera's settings, including flash mode, exposure mode, drive (single vs
continuous), macro setting, ISO, exposure compensation, image effects, image
size and JPEG quality setting, and number of shots remaining on the memory card
at the current size/quality settings, as well as a white box showing the currently
active focus area.. Pressing the Info button dismisses all of the status overlays
with the exception of the focus box. Pressing the Info button a second time
restores the status information.
 In
Replay (Playback) mode, the LCD monitor provides a full-frame display of captured
images, which you can view individually by scrolling left or right with the
arrow buttons on the Four-Way Arrow pad. Depressing the Flash/Zoom button on
the top left panel zooms in a little at a time, up to 10x its normal size, and
pressing the Macro/Index button zooms out to thumbnail and Jump modes, which
can scroll through nine images at a time; both of these features are duplicated,
with a Jump button integrated into the Function button, and the zoom ring that
normally controls the lens can zoom in or out. The arrow keys permit you to
move around the image and check the fine details. Unlike the implementation
of this feature on some cameras, zoomed playback on the Pro1 lets you see all
the way to the extreme edges of the image, important for checking critical framing.
The 10x magnification is also quite sufficient for critical focus evaluation.
In
Replay (Playback) mode, the LCD monitor provides a full-frame display of captured
images, which you can view individually by scrolling left or right with the
arrow buttons on the Four-Way Arrow pad. Depressing the Flash/Zoom button on
the top left panel zooms in a little at a time, up to 10x its normal size, and
pressing the Macro/Index button zooms out to thumbnail and Jump modes, which
can scroll through nine images at a time; both of these features are duplicated,
with a Jump button integrated into the Function button, and the zoom ring that
normally controls the lens can zoom in or out. The arrow keys permit you to
move around the image and check the fine details. Unlike the implementation
of this feature on some cameras, zoomed playback on the Pro1 lets you see all
the way to the extreme edges of the image, important for checking critical framing.
The 10x magnification is also quite sufficient for critical focus evaluation.
 In
Playback mode, one press of the Info button pulls up detailed information about
the captured image, including the file name, date, and time it was recorded, compression,
resolution, and what number it is in the sequence of captured images. Depressing
the Info button twice adds exposure information such as the Image Zone (portrait,
landscape, etc.), Shutter Speed, Aperture, Exposure Compensation, and White Balance.
Included in this extended information display is a small histogram, which plots
the tonal distribution of the image in a graph. Histograms are useful tools for
checking exposure, as they report the distribution of highlights, shadows, and
midtones, but they don't do a good job of informing you when small highlight areas
are blown out. The Pro1 deals with this by flashing any overexposed portions of
the image black and white in the image accompanying the histogram display, indicating
that you need to adjust the exposure. A third press of the Display button turns
off the information display, returning the LCD to the main image display mode.
A nice feature is that the expanded information display seen in histogram mode
remains on the screen if you use the zoom toggle to magnify the playback image
from that mode; the histogram disappears, but you keep the rest of the information.
In
Playback mode, one press of the Info button pulls up detailed information about
the captured image, including the file name, date, and time it was recorded, compression,
resolution, and what number it is in the sequence of captured images. Depressing
the Info button twice adds exposure information such as the Image Zone (portrait,
landscape, etc.), Shutter Speed, Aperture, Exposure Compensation, and White Balance.
Included in this extended information display is a small histogram, which plots
the tonal distribution of the image in a graph. Histograms are useful tools for
checking exposure, as they report the distribution of highlights, shadows, and
midtones, but they don't do a good job of informing you when small highlight areas
are blown out. The Pro1 deals with this by flashing any overexposed portions of
the image black and white in the image accompanying the histogram display, indicating
that you need to adjust the exposure. A third press of the Display button turns
off the information display, returning the LCD to the main image display mode.
A nice feature is that the expanded information display seen in histogram mode
remains on the screen if you use the zoom toggle to magnify the playback image
from that mode; the histogram disappears, but you keep the rest of the information.
I'm generally no fan of EVFs on cameras, because they usually stop working at light levels quite a bit higher than the camera's low-light exposure limit. This is true of the EVF on the Pro1 too, but I found that it actually offered a dim but very usable image at the lower limit of my low-light test. (1/16 foot-candle, about four(!) f-stops darker than typical city street lighting at night.) This is really an excellent performance for an EVF-equipped camera. Combined with the Pro1's excellent low-light focusing ability (see the following review section on the camera's optics), this makes the Pro1 an unusually capable low-light shooter.

Follow Imaging Resource: