Canon PowerShot SD900 Design
Canon's Perpetual Curve design, which has graced the Digital ELPH line for some time now, looks sleek on the SD900's smooth titanium case. Its pocketable dimensions of 3.59 x 2.35 x 1.11 inches (91.2 x 59.6 x 28.2 millimeters) weigh just 6.67 ounces (189 grams), about average for its class. The SD900, which can stand on its side or its end, looks comfortable either way. It's not the slimmest digicam you can find, but it fits your hand easy as a bar of soap; though thankfully it's not as slippery.
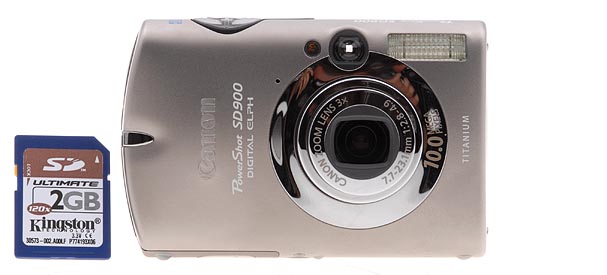
The front of the Canon SD900 will be familiar to fans of the ELPH line. The lens dominates on the right side with the flash tucked into the top right corner. Directly above the lens is the viewfinder window and just to its left is the self-timer lamp. If you follow down the left side of the chrome lens frame you'll see the small hole for the microphone. The lens telescopes out and back in very quickly, above average for its class, extending an inch from the body in two pieces.
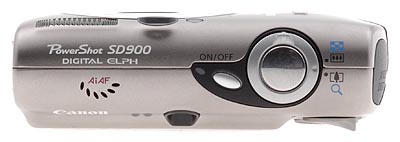
Controls are located nearest the right hand with the large Shutter button surrounded by the Zoom lever most prominent at the right side of the top panel. To their left is a small Power button with its Power lamp on its left. Closer to the left side is a grill for the speaker.
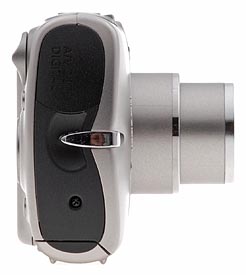
On the right side of the Canon SD900 (as viewed from the rear) are the AV Out and USB ports, protected by a hinged, plastic door that swings out and upward to reveal the ports. Below the door is the wrist strap attachment eyelet.
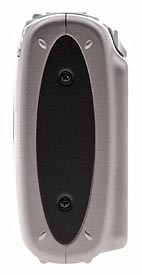
The opposite side of the camera is bare, showing only a few screws and the four small feet that let you stand the SD900 up vertically.
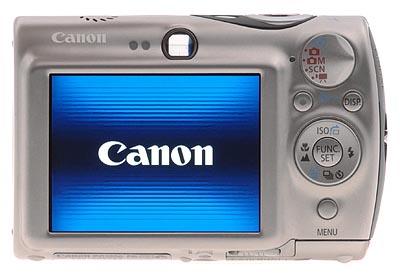
On the back panel, the 2.5 inch LCD dominates the left two-thirds just below two small indicator lamps and the tiny viewfinder eyepiece. The lamps indicate the camera's status (ready to shoot, recording, flash ready, camera shake for the right orange indicator, and focus mode, focus difficulty for the yellow indicator on the left). The controls aligned to the right of the LCD are topped by the Mode dial, with options for Playback, Auto, Manual (actually a Programmed Auto), Scene, and Movie mode. Below that are the Print/Share button and, to its right, the Display button. Below them is the Touch Control dial with the usual four arrow keys and options for ISO/Jump, Flash, Erase/Continuous/Self-Timer, and Macro/Infinity modes. In the middle of the dial is the Function/Set button that brings up the Function menu and confirms menu choices. Below the dial is the Menu button, which accesses the main LCD menu system.
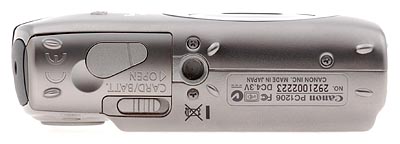
The bottom of the SD900 has six feet to stand on (balancing out the curved panel), a metal tripod mount just off center. The card/battery compartment cover has a small flap for the DC coupler terminal (or dummy battery). Inside the compartment, the battery and SD memory card slots line up next to each other. A small spring-loaded latch ensures the battery won't accidentally fall out when you open the compartment cover.
Canon PowerShot SD900 External Controls
Shutter Button: Located on the top panel, this button sets focus, and exposure when halfway pressed, and fires the shutter when fully pressed. If the Self-Timer is activated, a full press of the Shutter button triggers the countdown.
Zoom Lever (see image above): Surrounding the Canon SD900's Shutter button on the top panel, this lever controls the optical and digital zoom in any record mode. In Playback mode, the wide-angle end activates first a nine-image index display, and then a "Jump" mode that allows you to page through screens of nine thumbnails at once. The telephoto setting zooms in on captured images for closer inspection of fine details.

Power Button: To the left of the Shutter button on the Canon SD900's top panel, this button turns the camera on, or off.

Mode Dial: At the top of the right side of the back panel, this rotating dial controls the camera's operating mode, offering the following options:
- Playback Mode: Replays captured images, and movies, with options for image management, and printing.
- Auto Still Record Mode: Sets the camera for still image capture, with limited user options.
- Manual Still Record Mode: Sets the camera for still image capture, with varying exposure options available through the Function menu.
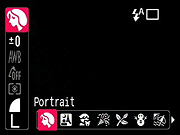
- Scene Mode: Accesses the 11 different preset scene mode options, which include: Portrait, Night Snapshot, Kids & Pets, Indoor, Foliage, Snow, Beach, Fireworks, Aquarium, Underwater, and ISO 3,200.
- Movie Mode: Captures moving images with sound in several different modes.
![]()
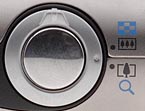
Print/Share Button: Below and to the left of Mode Dial on the back panel, the Print/Share button activates uploads to Windows computers, or connects to a variety of compatible printers, including those that understand the PictBridge protocol. The button glows blue when ready to print or transfer images, and flashes blue when printing or transferring images.
![]()
Display Button: To the right of the Print/Share button, this button cycles through the LCD image, and information displays. In Playback mode, it cycles through the image only, information display, and info display with histogram modes.
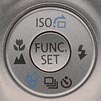
Touch Control Dial: This four-way rocker ring is located to the right of the PowerShot SD900's LCD monitor, and serves multiple functions. In any Settings menu, the ring navigates through menu selections depending on which section is pressed. The top part of the ring cycles through ISO speeds from Auto to Auto High, 80, 100, 200, 400, 800, or 1,600 ISO equivalents. The left side cycles the focus modes between Macro, Infinity, and the normal AF mode. The right side accesses the camera's flash modes, cycling through Automatic, Red-Eye Reduction, Forced On, Forced On with Red-Eye Reduction, Forced Off, and Slow-Sync settings. Finally, the bottom part of the ring activates the Self-Timer, and Continuous Shooting modes, or returns to the normal exposure mode. Through the Setup menu, you can enable the selector's Touch Icons sensitivity, which makes the outer edge of the dial sensitive to just the touch of a finger. When touched, the LCD monitor displays a digital version of the dial, and enlarges the icon closest to your finger. Pressing down on the function icon enables you to change the setting, as you normally would without the Touch Control feature enabled.
In Playback mode, the top of the ring calls the Jump menu, and the bottom calls the Delete menu, while the right and left sides scroll through captured images and movie files. When you zoom in on an image, all four sides pan the view.
Function/Set Button (see image above): In the center of the four-way control ring, this control activates the Canon SD900's Function menu in any Record mode, and confirms selections once any menu has been invoked. When used to activate the Function menu, the following options are available (not all options being available in all modes):
 Shooting Mode: Selects among the shooting options available
in the Record mode selected on the Mode dial. Auto offers none. Manual offers
Manual, Digital Macro, Color Accent, Color Swap, Stitch Assist Right, and
Stitch Assist Left. Scene offers Portrait, Night Snapshot, Kids&Pets,
Indoor, Foliage, Snow, Beach, Fireworks, Aquarium, Underwater, and ISO 3,200.
Movie offers Standard, High Resolution, Compact, Color Accent, and Color Swap.
Shooting Mode: Selects among the shooting options available
in the Record mode selected on the Mode dial. Auto offers none. Manual offers
Manual, Digital Macro, Color Accent, Color Swap, Stitch Assist Right, and
Stitch Assist Left. Scene offers Portrait, Night Snapshot, Kids&Pets,
Indoor, Foliage, Snow, Beach, Fireworks, Aquarium, Underwater, and ISO 3,200.
Movie offers Standard, High Resolution, Compact, Color Accent, and Color Swap.- Exposure Compensation: Increases or decreases the exposure from -2 to +2 exposure equivalents in one-third-step increments.
- Long Shutter Mode: If Long Shutter mode has been enabled through the main record menu, this option is available for adjusting the shutter speed
- White Balance: Controls the color balance of images. Options are Auto, Daylight, Cloudy, Tungsten, Fluorescent, Fluorescent H, and Custom (manual setting).
- My Colors: Enables Vivid Color (high color saturation), Neutral Color (low color saturation), Sepia, Black-and-White, Positive Film, Lighter Skin Tone, Darker Skin Tone, Vivid Blue, Vivid Green, Vivid Red, Custom Color, or turns My Colors off.
- Metering: Sets the camera's metering mode to Evaluative, Center-Weighted, or Spot.
- Compression (Still): Sets the JPEG compression to Superfine, Fine, or Normal.
- Frame Rate (Movie): Sets the movie frame rate to 30 or 15 frames per second.
- Resolution: Specifies the image resolution. Still image resolutions are 3,648 x 2,736, 2,816 x 2,112, 2,272 x 1,704, 1,600 x 1,200, and 640 x 480 pixels; a Postcard mode also takes the resolution to 1,600 x 1,200, and locks the resolution to Fine; a date stamp can be printed on the image in this mode, and the top, and bottom of the screen are greyed out when you half-press the Shutter button, showing the portions of the image that won't fit on a 4 x 6 postcard. A Widescreen mode shoots in 16:9 format at 3,648 x 2,048. This mode is for playback on widescreen televisions, or printing on wide paper. Movie resolutions are 640 x 480, and 320 x 240 pixels.
![]()
Menu Button: Directly below the Touch Control Dial, this button accesses the LCD menu system in both Record, and Playback modes.
 Fujifilm GFX 50S Review
 Fujifilm X-T3 Review
 Olympus E-M5 III Review

Follow Imaging Resource