Sony T30 Operation
The Sony DSC-T30's user interface is straightforward and easy to navigate, following the theme Sony established for their Cyber-shot line several years back. The Sony T30 has only a few external controls, as most of the exposure options are accessed through the LCD menu system. The camera's Five-way navigator ring and button serve multiple functions, and you can quickly change from playback to still capture to movie mode via the Mode switch angled back from the top panel. The arrow directions of the Five-way navigator scroll through menu selections, and the OK button in the center of the pad confirms any changes. In shooting mode, the four arrow directions of the navigator each have a separate function assigned to them, indicated by engraved icons on the navigator ring. There's an external button for directly accessing the image-size setting or for deleting images in playback mode, and another button triggers a slide show in playback mode. A display button cycles through options for information display on the LCD screen. Special Scene modes (Beach, Fireworks, Night Portrait, etc) are accessed via the first entry on the camera's capture-mode menu system. The menu system is so simple and intuitive I think even novice users will be able to become completely familiar with it in an hour or less.
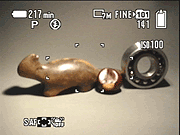 Record Mode Display: The DSC-T30's LCD monitor optionally reports a fair amount of camera information in Record mode, including the battery level and approximate operating time left (a feature unique to Sony digicams, thanks to their "InfoLITHIUM" battery technology), image resolution and quality, exposure mode, flash mode, autofocus mode, and other basic settings. A set of focus brackets in the center of the frame highlight when the shutter is half-pressed to indicate what portions of the subject are in focus. A half-press of the Shutter button also adds the shutter speed and aperture settings to the bottom of the display: Even though you can't change them directly, we always like seeing the values the camera has chosen, so we can know whether to expect motion blur, what the depth of field is likely to be, etc. The Display button cycles through a range of display modes, enabling a histogram, as well as eliminating the information overlay almost (but not quite) entirely.
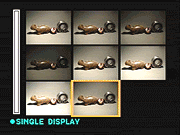 Playback Mode Display: In Playback mode, the LCD monitor reports basic information such as the image resolution, battery level and time, folder number, image series number, file name, and the date and time the image was captured. Pressing the Display button enables an expanded information display with basic exposure information and a small histogram. You can also cancel the information display entirely, by pressing the Display button a third time. Pressing the wide-angle side of the zoom control brings up a nine-image thumbnail display of previously-captured images, handy for times when you want to scroll through the images quickly. Pressing the telephoto side of the zoom control reverses the process, and continued pressing smoothly zooms in on the currently-displayed image, to a maximum 5x magnification. When zoomed, the arrow keys scroll the enlarged view around the image as a whole.
Sony T30 Modes and Menus
Record Mode: In this mode, the camera captures standard still images, controlling aperture and shutter speed. Pressing the Menu button displays the Record settings menu, with options varying depending on the exposure mode selected:
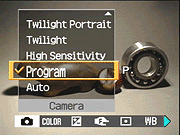 Camera: Offers Auto, Program, Beach, Fireworks, High Sensitivity, High Speed Shutter, Landscape, Snow, Soft Snap, Twilight, and Twilight Portrait exposure modes. The mode selected dictates which of the following options are available. Program mode offers all of the following, most of the other choices offer less. Auto mode provides access only to the Mode and Setup menu options.
- Color: Offers Black and White, Sepia, Natural, Vivid, and Normal color mode options.
- Exposure Compensation: Increases or decreases exposure from -2 to +2 exposure equivalents (EV) in one-third step increments.
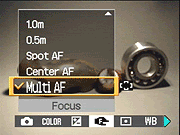
- Focus: Changes the focus area to Multi AF, Spot AF, or Center AF, or selects from a range of fixed focus settings (0.5, 1.0, 3.0, or 7.0 meters, or Infinity).
- Metering: Sets the metering mode to Multi-Pattern (default), Center-Weighted, or Spot.
- White Balance: Sets the color balance to Auto, or adjusts for Daylight, Cloudy, Fluorescent, Incandescent, or Flash light sources.
 ISO: Sets the camera's sensitivity to Auto, or to 80, 100, 200, 400, 800, or 1,000 ISO equivalents.
- Picture Quality: Sets the JPEG compression level to Fine or Standard.
- Mode: Changes the recording mode to Normal, Burst, Exposure Bracketing, or Multi Burst modes.
- Bracket Step: (Only available if Exposure Bracketing is selected above.) Sets the level of exposure variation for Auto Exposure Bracketing shots. Step sizes include 1.0, 0.7, or 0.3 EV.
- Interval: (Only available in Multi Burst mode.) Specifies the shutter interval for Multi Burst mode. Options are 1/7.5, 1/15, or 1/30.
- Flash Level: (Only available when the flash is enabled.) Sets the flash intensity to Normal, Low, or High.
- Contrast: Controls the level of contrast in images, with options for High, Normal, and Low.
- Sharpness: Adjusts the in-camera sharpening. Options are High, Normal, and Low.
- Setup: Accesses the main setup menu.
Playback Mode: This mode lets you review captured images on the memory card, erase them, protect them, set them up for printing, etc. When playing back movie files, you can also opt for "frame-by-frame" playback, which plays back the movie file slowly, several frames at a time. Pressing the Menu button displays the following options:
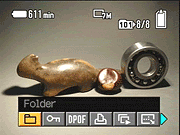 Folder: Selects the folder of images to be played back.
- Protect: Write-protects the current image, or removes protection.
- DPOF: Marks the current image for printing on a DPOF device, or removes the print mark.
- Print: Allows printing to PictBridge printers.
- Slide: Enables a slide show of all images captured on the Memory Stick Duo. You can control the interval between each image, the range of images to be played back, music, and whether or not the slide show repeats.
- Resize: Resizes the current image to one of the available resolution sizes.
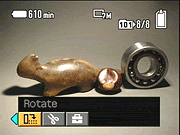 Rotate: Rotates the current image 90 degrees clockwise or counterclockwise.
- Divide: Divides movie files into segments, providing a very basic editing tool you can use to "trim" your movies to just the portion you want to keep. (Only available when the current image being viewed is a movie.)
- Setup: Accesses the camera's setup menu.
- Trimming: Lets you crop an image and save it separately. (Only available when you're zoomed in on an image, still photos only.)
Movie Mode: Records short movie clips with sound, for as long as the Memory Stick has available space. The LCD menu system offers the following options. (No screenshots shown, as these are just subsets of the options for still photo mode.):
- Color: Offers Black and White, Sepia, Natural, Vivid, and Normal color mode options.
- Exposure Compensation: Increases or decreases exposure from -2 to +2 exposure equivalents (EV) in one-third step increments.
- Focus: Changes the focus area to Multi AF, Spot AF, or Center AF, or selects from a range of fixed focus settings (0.5, 1.0, 3.0, or 7.0 meters, or Infinity).
- Metering: Sets the metering mode to Multi-Pattern (default), Center-Weighted, or Spot.
- White Balance: Adjusts the color balance for Auto, Daylight, Cloudy, Fluorescent, or Incandescent light sources.
- Setup: Accesses the main setup menu.
Set-Up Mode: The following four-page Set-Up menu is available in Playback, Record, and Movie modes, as an extension of the LCD menu:
- Camera 1:
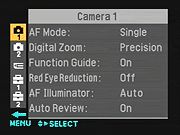 AF Mode: Sets the autofocus to Single or Monitor (continuous) modes.
- Digital Zoom: Enables Smart Zoom or Precision Digital Zoom, or turns digital zoom off entirely.
- Function Guide: Enables the built-in Function Guide, which provides help information for various camera functions.
- Red-Eye Reduction: Enables the Red-Eye Reduction flash (which will fire with all flash modes), or turns it off.
- AF Illuminator: Puts the AF Illuminator into Auto mode, or simply turns it off.
- Auto Review: Activates the Auto Review function, which automatically displays the most recently captured image post-capture.
- Camera 2:
 Steady Shot: Puts the Steady Shot option into Shooting or Continuous modes. Shooting mode means that pressing the Steady Shot button enables the anti-blur function, while Continuous mode activates Steady Shot at all times.
- Internal Memory Tool (This menu option only appears when no Memory Stick is inserted in the camera.):
- Format: Formats the internal memory, erasing all files.
- Memory Stick Tool (This menu option only appears when a Memory Stick is inserted in the camera.)
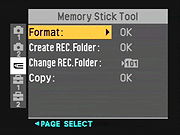 Format: Formats the Memory Stick Duo, erasing all files (even protected ones).
- Create Rec. Folder: Creates a new folder for recording images.
- Change Rec. Folder: Changes the folder that images are recorded to.
- Copy: Copies files from the internal memory to a memory card.
- Setup 1
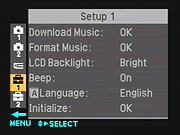 Download Music: Downloads music to use as a background for slide show playback. (Used in conjunction with the Music Transfer software application, shipped with the camera on the software CD. Versions of Music Transfer are included for both Mac and Windows platforms.)
- Format Music: Erases all music files.
- LCD Backlight: Controls the LCD backlight feature, setting it to Normal or Bright.
- Beep: Controls the camera's beep sound, setting it to Shutter, On, or Off.
- Language: Changes the camera's menu language, English is default.
- Initialize: Resets all camera settings to their defaults.
- Setup 2
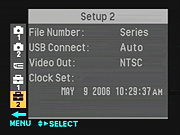 File Number: Sets file numbering to Series or Reset. The Series option continues numbering files from one memory card to the next, while Reset starts over with each new memory card.
- USB Connect: Places the USB connection into PictBridge, PTP, Mass Storage, or Auto modes.
- Video Out: Specifies the camera's Video Out signal timing for either NTSC or PAL standards.
- Clock Set: Sets the camera's internal clock.
 Fujifilm GFX 50S Review
 Fujifilm X-T3 Review
 Olympus E-M5 III Review

Follow Imaging Resource