Sony DSC-W30 Operation
Operating the Sony DSC-W30 is very straightforward, as the camera controls the basic exposure at all times. The Mode dial on the rear panel controls the main operating modes, with options for Auto, Program, High Sensitivity, Twilight, Twilight portrait, Snow, Beach, Landscape, Soft Snap, and Movie modes. In all image capture modes, the DSC-W30 provides an onscreen LCD menu (activated by the Menu button), with a variety of options for adjusting image quality or adding special effects. The four arrows of the Five-way arrow pad are used to scroll through menu options, while the button in the center of the pad functions as the OK button to confirm selections. Outside of the menu, the arrow pad adjusts flash, exposure compensation, macro, and self-timer modes. A separate Image Resolution button calls up the available resolution settings, removing this item from the main menu system, thereby making it much quicker to access when needed. The Zoom control surrounding the Shutter button adjusts both optical and digital zoom (when the latter is activated through the Setup menu).
 The Sony W30 incorporates two nice user-interface touches that we liked quite a bit. If the LCD is on in capture mode, rotating the Mode Dial causes a "virtual dial" to appear along the right edge of the LCD display. An optional function guide can also be enabled through the Setup menu, which displays concise help text on the LCD for camera functions. The combination of virtual dial and plain-English explanations of camera modes made for a very friendly user interface. Overall, we were impressed by Sony's judicious use of space, especially with the large number of external controls provided, the larger than average LCD, and the relatively short learning curve the W30's user interface entails.
Record-Mode Display In record mode, the LCD monitor displays the subject with a fair amount of overlaid information, indicating approximate battery life remaining (graphically), flash mode, focus mode (macro or normal), autofocus mode setting, any currently-selected exposure compensation setting, ISO setting, the current size/quality setting, and number of images that can be stored on the remaining Memory Stick space at the current size/quality. Half-pressing the Shutter button causes the camera to display the shutter speed and aperture setting it has chosen for the current lighting conditions. Pressing the Display button beside the LCD once adds a small "live" histogram display to the information, pressing it again removes the information overlay, and pressing it a third time turns the LCD off entirely. Pressing it a fourth time restores the default display.
Playback-Mode Display In Playback mode, the default image display shows the most recently captured image, with a modest information overlay present. Pressing the Display button once adds the exposure information and a small histogram to the overlay, pressing it again removes the information overlay entirely, and pressing it a third time returns to the default display. Pressing the wide-angle side of the zoom lever takes you to a display showing images on the Memory Stick in groups of nine small thumbnails. (You can navigate a yellow outline cursor over these thumbnails by using the four arrow keys. Pressing the telephoto side of the zoom lever will bring the currently-selected image up full-screen.) Pressing the telephoto side of the zoom lever when viewing an image full-size on the LCD screen will zoom in on the image, in 17 variable-sized increments up to a maximum magnification of 5x.
Sony DSC-W50 Modes and Menus
Scene Modes: Marked on the Mode dial with corresponding black icons, these modes are for capturing images in specific situations. Seven "scenes" are available, including High Sensitivity, Twilight, Twilight Portrait, Snow, Beach, Landscape, and Soft Snap. The High Sensitivity mode increases the ISO setting automatically, so you can shoot without the flash in dim conditions. (Albeit at the cost of much-increased image noise.) Both Twilight modes capture images in low light, although the Twilight Portrait mode automatically enables the Red-Eye Reduction flash mode, combining it with a slower shutter speed to let ambient lighting brighten the background as well. Because the camera employs a slower shutter speed in both Twilight modes, a tripod is highly recommended to prevent blurring from camera movement. Snow and Beach modes optimize the camera for bright situations and prevent color loss from overexposure. Landscape mode sets the focus at infinity and uses a smaller lens aperture to capture sharp details both near and far away. Soft Snap mode enhances skin colors while keeping a soft focus for a pleasing glow.
Program Mode: This mode is marked on the Mode dial with a black "P." In this mode, the camera selects shutter speed and aperture, while you control all other exposure variables.
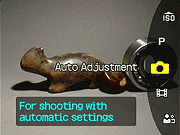
Automatic Mode: Indicated on the Mode dial with a green camera icon, this mode puts the camera in control over the exposure and everything except Macro, Image Size and Quality, Zoom, Flash, and the Self-Timer.
Movie Mode: A filmstrip icon marks this mode on the Mode dial. In Movie mode, you can record moving images and sound, for as long as the Memory Stick or internal memory has space. Resolution and quality choices are 640 x 480-, or 160 x 112-pixels, with Fine and Standard options in 640 x 480 mode. While recording, a timer appears in the LCD monitor to let you know how many minutes and / or seconds are remaining on the Memory Stick, and how long you've been recording, so you'll have some idea of how much time you have left. Recording in 640 x 480 Fine mode is only available with a Memory Stick Pro Duo card.
The W30 offers a Multi Burst mode separate from the movie mode and selected in the menu in Auto, Program, and Scene modes, which captures an extremely rapid 16-frame burst of images, at a selectable rate of 7.5, 15, or 30 frames per second. Multi Burst shots are played back as a slow-motion animation on the camera, but appear as a single large file with 16 sub-images in it when viewed on a computer. (This would be a fun way to catch someone crossing a finish line during a race, or to analyze golf and tennis swings.) A Burst mode is also available, and captures a rapid series of images for as long as the Shutter button is held down. Frame rates and the maximum number of images depends on the image quality and resolution settings, as well as the amount of available memory space.
Playback Mode: Playback mode is accessed by pressing the Playback button on the rear panel. In this mode, you can scroll through captured images, delete them, write-protect them, and set them up for printing on PictBridge-compatible printers. You can also copy, resize, and rotate images.
Record Menu: Available in all three Record modes by pressing the Menu button, the Record menu offers the following options (some options are not available in all modes):
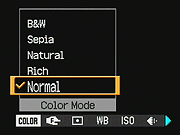 Color Mode: Offers Normal, Rich, Natural, Sepia, and Black & White color modes.
- Focus: Sets focus control to Multi AF or Center AF, or one of five preset focus distances (0.5, 1.0, 3.0, and 7.0 meters, and Infinity).
- Metering Mode: Chooses between Multi-Metering, Center-Weighted, and Spot modes. Spot metering reads the exposure from the very center of the frame (identified by a cross hair target on the monitor). Spot metering is handy for backlit subjects, or any time the subject and background exhibit very high contrast. Center-Weighted also reads from the center of the frame, but from a larger area than Spot. Multi-Metering mode reads the entire frame to determine exposure.
- White Balance: Adjusts the overall color balance of the image, to suit the light source. Options are Auto, Daylight, Cloudy, Fluorescent, Incandescent, and Flash.
- ISO: Adjusts the camera's light sensitivity. Options are Auto, or 80, 100, 200, 400, 800, and 1,000 ISO equivalents. (See our notes below, in the Test Results section: The ISO 800 and 1000 settings are almost unusable, due to high image noise.)
- P.Quality: Sets compression between Standard and Fine.
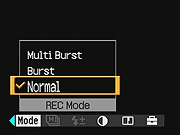 Mode: Sets capture mode, Normal (single), Burst, and Multi-burst.
- Interval: When in Multi-burst mode (grayed out otherwise), sets the capture interval between 1/7.5, 1/15, and 1/30.
- Flash level: When the flash is enabled (grayed out otherwise), sets flash power to plus, normal, and minus settings.
- Contrast: Alters the level of contrast in images with plus, normal, and minus settings.
- Sharpness: Controls the overall image sharpness and softness with plus, normal, and minus settings.
Playback Menu:
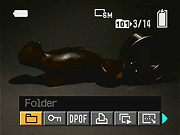 Folder: Selects the folder for playing back images.
- Protect: Write-protects the current image (or removes protection), preventing it from being deleted or manipulated in any way except with card formatting.
- DPOF: Marks the current image for printing on a DPOF device. Also removes the print mark.
- Print: Prints the current image.
- Slide: Plays back images in an automatic slide show. You can set the time interval and whether or not the sequence of images repeats.
- Resize: Resizes the image to 2,618 x 2,112; 2,048 x 1,536; 1,632 x 1,224; or 640 x 480 pixels. (When an image is resized, the original image is left in place, and a new copy is made at the selected size.)
- Rotate: Rotates the image 90 degrees clockwise or counterclockwise.
- Divide: Allows you to trim material from the beginning or end of a recorded movie, or to extract an interesting bit of action from the middle of a longer clip.
- Trimming: Lets you crop an image and save it as a separate file from the original.
- Setup: Accesses the camera's Setup menu.
Setup Mode: This mode allows you to change a variety of camera settings, and is accessible through each of the camera menus by scrolling to the Setup icon and pressing the right arrow button.
- Camera:
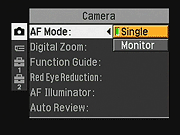 AF Mode: Sets the focus mode to Single, or Monitor. (Monitor is Sony's term for continuous autofocus.)
- Digital Zoom: Switches between the up to 13x Smart Zoom and Precision zoom, or turns digital enlargement off. (Smart Zoom values will depend on the resolution selected, 13x is the max at VGA resolution.)
- Function Guide: Turns the Function Guide on or off. If enabled, the guide displays text about camera functions when they are accessed.
- Red Eye Reduction: Enables or disables the Red Eye Reduction flash mode, affecting both Auto and Forced flash modes.
- AF Illuminator: Turns the AF Assist light on or off. If on, the light automatically illuminates in dark shooting conditions.
- Auto Review: Immediately plays captured image onscreen for two seconds.
- Internal Memory Tool (only available when no Memory Stick is present):
- Format: Formats the internal memory, erasing all files (even protected ones).
- Memory Stick Tool:
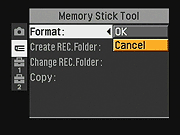 Format: Formats the Memory Stick, erasing all files (even protected ones).
- Create REC Folder: Creates a new folder for recording images.
- Change REC Folder: Changes the folder that images are recorded to.
- Copy: Copies images from the internal memory to a Memory Stick.
- Setup 1:
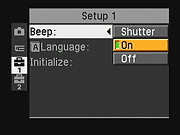 Beep: Controls the camera's beep sounds, turning them on or off. A Shutter option enables only the shutter beep noise.
- Language: Selects among Italian, French, Spanish, Chinese, Japanese, or English for the menu language.
- Initialize: Resets the camera to its default settings.
- Setup 2:
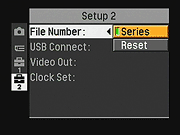 File Number: Chooses between Series (continuing the shot number infinitely) or Reset, which resets the frame number by folder.
- USB Connect: Sets the USB connection type to PictBridge, PTP, Mass Storage, or Auto.
- Video Out: Sets the timing of the video output signal to either NTSC or PAL.
- Clock Set: Sets the camera's internal clock and calendar.
 Fujifilm GFX 50S Review
 Fujifilm X-T3 Review
 Olympus E-M5 III Review

Follow Imaging Resource