32-BIT IMAGING
Adobe CS2's Photoshop
-- Flaunting It
 By MIKE PASINI
Editor
The Imaging Resource Digital Photography Newsletter
Review Date: August 2005
We continue our review of Adobe Creative Suite 2 with a look at Photoshop's evolution. Our previous feature on Bridge (http://www.imaging-resource.com/SOFT/CS2/CS2BR.HTM) also listed the system requirements for the Suite after a general introduction.
|
See Also: |
Adobe told us they used Photoshop's 15-year milestone to rethink some basic operations. The goal was to make the product more user-friendly for the legions of digital photographers marching their way. We highlight the improvements to tools, workflow and customization before taking a closer look at a few significant new features.
Among the Tool highlights:
- Adobe Bridge, included even with the standalone Photoshop upgrade, replaces the File Browser as a separate application, so you can let Bridge process multiple Raw images (using the Camera Raw plug-in) while you work in Photoshop.
- Vanishing Point takes pasting selections into a new dimension by letting you build a 3D perspective. You can move a window from one side of a building to another just by dragging it now. Compositing, retouching and major image editing gets a big productivity boost here. You do have to draw the perspective grids, but the program makes that simple enough.
- Image Warp can alter any object with adjustable control points and customizable presets. But you see the new Lens Correction filter below.
- Noise Reduction corrects noise and JPEG artifacts created in high-ISO images.
- 32-bit HDR combines a set of bracketed images into one 32-bit High Dynamic Range image for tone and color correction.
- The Spot Healing Brush provides one-click flaw correction.
- Red-Eye Correction, hidden in the Healing Brush toolset, has been revamped to do the job with one click. Just click on an eye and the red turns black, preserving any highlight. Nothing fancy.
- Optical Lens Correction corrects barrel or pincushion distortion, chromatic aberration, vignetting and perspective flaws in all three dimensions. It does it in one pass with simple, intuitive controls, a live preview and an alignment grid.
- Animation builds animated Web graphics (in fact, Photoshop seems to be swallowing ImageReady whole).
- The Smart Sharpen filter sharps images with new algorithms for better edge detection and reduced sharpening halos. You can also control the amount of sharpening in the highlights and shadows.
- Shadow/Highlight now works with CMYK images.
- Enhanced 16-bit Editing comes to filters like Liquify.
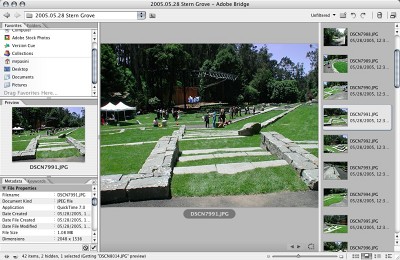 |
| Bridge. A nice custom view from the Bridge but beware. If you use distributed caches, every folder on your drive will have two new Adobe Bridge Cache files. And if you use a centralized cache, you'll have just one pair but it will be huge. Bridge keeps adding to its cache automatically, but you have to manually purge it. |
CREATION ACCELERATION | Back to Contents
Among the Workflow highlights:
- Smart Objects provide non-destructive editing and transformations by including vector information and full-res bitmaps in native Photoshop PSD files.
- Multiple Layer Control with Smart Guides yields faster, more intuitive editing without using the Layers palette. You can now group layers as you would expect, for example, using Command-G.
- Multiple-Image Camera Raw can preview and process multiple Raw conversions.
- Video Preview instantly streams video to an external NTSC or PAL monitor so you can see your broadcast graphics as you build them.
- WYSIWYG Font Menus
- Printing Enhancements make print options more intelligible.
- There's an all-new PDF engine for PDF 1.6/Acrobat 7.0 compatibility.
- Enhanced Memory Use can address over 2-GB RAM on systems running 64-bit processors.
- Design Process Management provides easier versioning and collaboration using the revised Version Cue.
- Integrated Adobe Online Services includes Adobe Stock Photos and Adobe Photoshop Services.
- ImageReady Functionality is just the start of complete integration into Photoshop.
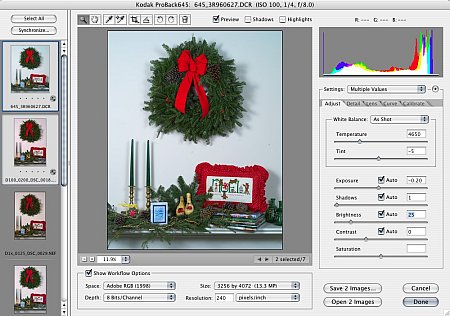 |
| Camera Raw Process multiple images at once -- and even let Bridge do it to free up Photoshop |
ADAPTABILITY | Back to Contents
Among the Customization highlights:
- Menu Customization determines visibility and color of any menu item. You can highlight new commands (as Adobe does) or simplify the menus.
- Enhanced Automation includes new actions and scripts for batch processing and video production.
- Variables streamlines creation of repetitive graphics using imported spreadsheet data.
- Event-based scripting triggers commands to your workflow.
- Adobe Help Center offers task-based topics and search features.
NEW MAC PLUG-IN ARCHITECTURE | Back to Contents
This version of Photoshop has followed OS X's move from the legacy CFM format of Metrowerks CodeWarrior to Mach-O for improved runtime performance, true pre-emptive threads and a more easily maintained build system. The first version of Photoshop to support Mach-O plug-ins, Adobe has taken pains to include support for legacy (all currently shipping) CFM plug-ins as well.
We polled several plug-in developers about this change. One reported they were able to reduce the conversion process from CFM to Mach-O from three days to three hours a plug-in, suggesting this is far from a trivial recompilation. Another reported that while they have been able to convert their plug-ins with Adobe's assistance, they were concerned about the need to maintain two different builds for customers.
For end users, the crisis seems to have been averted. While earlier builds of the program failed to run any CFM plug-ins, the shipping release runs everything we've thrown at it, although it will display a warning if the plug-in includes an OS 9 version in the package. And since CFM support has been worked out, product manager John Nack told us, there's no reason to pull it from future versions.
With this release, Adobe has refined their activation implementation to allow you to install on more than one computer and "transfer" the activation to the computer you're using. So before you leave the office, you'd transfer the activation from your desktop to your laptop to be able to run the suite on the your laptop.
We installed the Suite on two machines and have not had to transfer the activation to use either, however. We think it's important to have two functional installs of the product, particularly in case an upgrade breaks something. We have no problem with a license that only allows us to run one at a time, but critical applications need functional backups. You should be able to boot from a backup external drive, say and be able to run the application. You can't do that with Quark XPress, but fortunately you can with the Suite.
NOISE REDUCTION | Back to Contents
Integrated noise reduction will be welcomed by the increasing number of digicam owners unhappy with the quality of their ISO 400 and above images. As small sensors crowd more sensor sites onto the same small real estate to deliver higher megapixel images, noise increases to such an extent that ISO 400 sensitivity is often unusable. The new Reduce Noise filter with its Advanced settings cleans up a lot of that noise while also reducing JPEG artifacts.
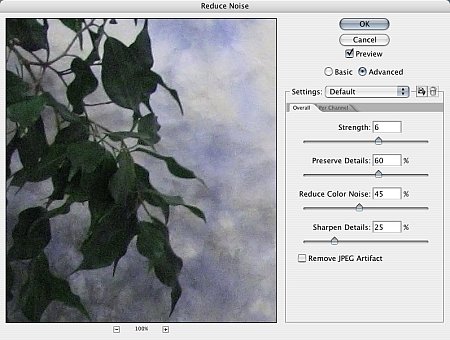 |
| The Noise Reduction Filter |
The Reduce Noise filter lets you handle noise with four sliders and one checkbox. The Strength slider controls the amount of luminance noise reduction that's applied. Preserve Details protects hair and texture. Reduce Color Noise blends in random color pixels. Sharpen Details combats the noise removal's inherent softening but you can also use the Unsharp Mask filter to restore sharpness. The lone checkbox is Remove JPEG Artifacts to smooth JPEG images that were overly compressed.
An Advanced button lets you adjust the Strength and Preserve Details controls on a per channel basis.
You can save your settings to disk for reuse, something that could be very handy for images shot at ISO 400 or 800 on a particular camera.
OPTICAL LENS CORRECTION | Back to Contents
Also impressive is the Optical Lens Correction filter, which corrects barrel or pincushion distortion, chromatic aberration, vignetting and perspective flaws in all three dimensions. It does it in one pass with simple, intuitive controls, a live preview and an alignment grid.
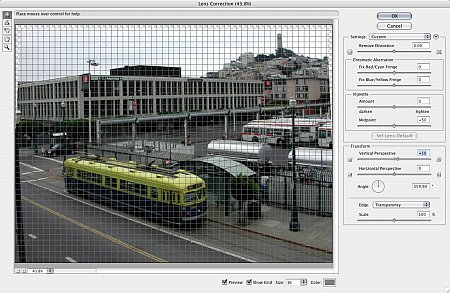 |
| The Lens Correction Filter Harder to describe than to actually use! |
This is remarkably easy to use -- if you can find it. It's buried in the Distort menu.
The Distortion slider runs from barrel to pincushion distortions so you either undo what you have or (even more fun) introduce a distortion.
Chromatic Aberration lets you Fix Red/Cyan Fringe or Fix Blue/Yellow Fringe using sliders.
Vignette has an Amount slider to darken or lighten a vignette, as well as a Midpoint slider to adjust the how much of the image is affected by the vignette.
The Transform panel lets you fool around with either the Vertical or Horizontal Perspective and change the Angle (or rotation) of the image.
You can also set the Edge to fill in blank areas of the image resulting from the various corrections. Options include Transparency, Color or Extend the edge pixels.
Finally, Scale accomplishes the same thing by cropping the image without changing the image size, interpolating back up to the original pixel dimensions.
SMART SHARPEN | Back to Contents
The world needs a smarter unsharp masking filter. The new Smart Sharpen goes a long way toward that but has one fatal flaw.
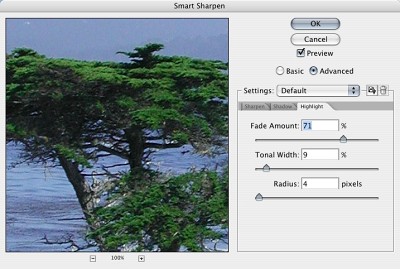 |
| The Smart Sharpen Filter Dealing with highlights in the Advanced tab |
There are five controls in the dialog. Amount, like its equivalent in Unsharp Mask, sets the amount of sharpening with higher values increasing the contrast between edge pixels. Radius, also like its cousin, sets the number of edge pixels affected by the sharpening (how many rows deep it goes).
Remove is a new option. It sets the sharpening algorithm. You can select Gaussian Blur (which is used by Unsharp Mask), Lens Blur (for finer detail and reduced halos) or Motion Blur (if the camera or the subject moved during the exposure). If you select Motion Blur, you can also set the Angle.
Also new is the More Accurate checkbox, best left unchecked to prevent creating noise.
Click on the Advanced radio button and you get the Shadow and Highlight tabs. They let you set a Fade Amount (to decrease the amount of sharpening in the Shadows or Highlights), Tonal Width (which restricts the effect to either the darker tones in Shadows or the lighter tones in Highlights) and Radius (ah, that's where Radius went).
That's all terrific, but the problem is that you are using a screen display to judge sharpening not for display on the screen, typically, but for printing. You should always tailor your sharpening for the output device and here Adobe provides no guidance. We'll continue to rely on nik Sharpener Pro for that (http://www.imaging-resource.com/SOFT/NS2/NS2.HTM).
 |
 |
 |
 |
 |
| A Set of Images -2 EV to +2 EV |
If there's one new feature that represents this upgrade, however, it's Adobe's support for Radiance's 32-bit channel file format.
We raved about Reindeer Graphics' Optipix plug-in to Blend multiple 8-bit images into a 16-bit image (http://www.imaging-resource.com/SOFT/OPT/OPT.HTM). Photoshop's new Merge to HDR automation tool takes that capability to 32-bit channels, although without providing any manual image alignment. Instead, Nack told us, it uses the same automatic alignment algorithms the Panorama stitching tool uses.
HDR, which stands for high dynamic range, uses the 32-bit Radiance format (.hdr) originally developed for visualizing lighting effects in virtual 3D environments. You can also save as 32-bit TIFF or PSD (although not DNG, which does support 32-bit channels). The format stores the quantity of light per pixel rather than the colors to be displayed on-screen using luminosity levels far higher than the 256 levels in 8-bits-per-channel image file formats. In fact, using Photoshop in 32-bit mode activates floating point color calculations. Where there are more colors than stars in the universe.
Why would you want to work in a color space that exceeds what you can see (which is, even with 16.7 million RGB combinations, only 518,733 actual perceiveable colors)?
As long as there has been photography, photographers have had to choose which luminances in the real world they would capture in the narrow range of their films or sensors and depict in the even more restricted mediums of their displays or papers. The prerequisite for any art is choice.
And in this new universe of HDR, some marvelous choices become possible.
But because you merge 8-bit or 16-bit channel images to build a 32-bit channel image, some special considerations come into play. Your subject, for example, can't move. Nor can your camera. And while you want to vary exposure, you can only do so by varying the shutter speed. If you change the aperture, you affect depth of field, changing the image. While you do want to bracket your exposures, the steps should be one or two f-stops, not the 1/3 or 1/2 stops most auto bracket features provide.
These restrictions suggest the experimental nature of 32-bit channel imaging. But expect to see more of it in future versions.
Once you've got a set of images, you can select them in Bridge and use the Photoshop Tools option to Merge to HDR. If you're working with Raw image, you may want to use the Image Processor in Bridge to convert them to JPEGs first, but it isn't necessary. Bridge just lets you batch process a selection no matter what you need to do. You can also browse and select images from Photoshop to merge.
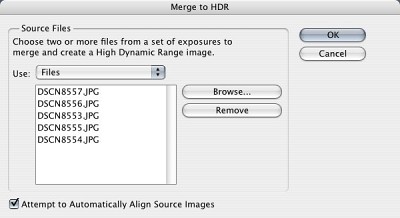 |
| Merge to HDR Auto align is turned on, too. |
But if your images don't have the usual Exif header information, Photoshop will ask you to manually set the EV value of each image so it can figure out how to blend the various images. Enter a different value for each image using negative whole numbers for the darker images, zero for the normal image and positive whole numbers for the lighter images.
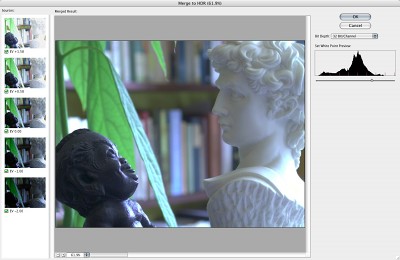 |
| The HDR Image Originals on the left, white point preview on the right |
The merge that Photoshop displays is really no more significant in tonal values or color than a thumbnail is in judging detail. You can't see everything in that file. But you can use it.
And Adobe's emphasis in this release on usability comes in pretty handy here. Under Image Adjustments you'll find Exposure. The Exposure dialog presents three sliders: Exposure, Offset and Gamma. OK, not too friendly. Actually, they should be labeled Highlight, Shadows and Midtones.
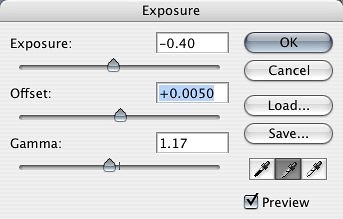 |
| Exposure Adjusting the 32-bit image. |
You can manipulate them visually, of course. But you might try setting markers for the highlights and shadows and watching the values change as you edit. To do that, close the Exposure dialog box and grab the Color Sample tool.
Assuming your image does not have specular highlights (which should be blown) and that you want some detail in your highlights, use the Color Sample tool to click in the highlight so you can monitor its value. Click in a shadow area, too.
In 32-bit mode, values can go way beyond the 0-255 of 8-bit mode. Clicking on the tool in the Info palette lets you choose between 8-bit, 16-bit and 32-bit values. The 32-bit values are, as you might expect, expressed in floating point numbers. You may prefer to work in 8-bit numbers to get displayable results or 16-bit numbers for more refinement.
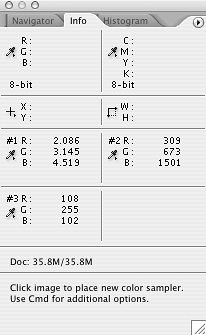 |
Info We set a highlight, shadow and midpoint, each using a different readout (32-bit, 16-bit and 8-bit), to demonstrate the values available. |
Now bring up the Exposure dialog again and slide Exposure while monitoring those RGB numbers in the Info palette. When they start to vary from each other you've got detail. Alternately, you can use the Eye Dropper to set the highlight, shadow and gray point in the Exposure dialog.
 |
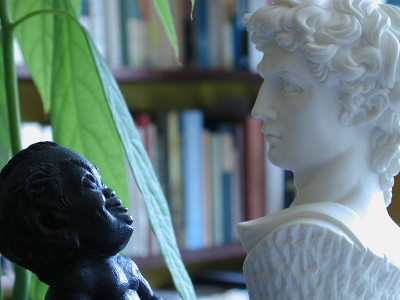 |
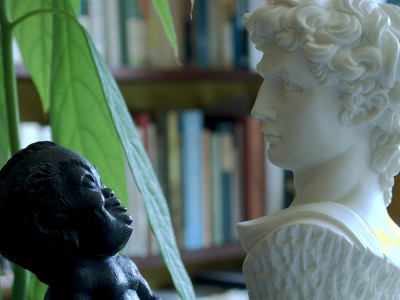
| Final Image. After our 32-bit edits for tone, we made some 16-bit edits using Curves to shift the color and finished with an 8-bit export (top) that exceeds what could be captured in a single 8-bit image (bottom). Note even in this resized image the detail in David's slignshot, the green leaf and the chest of our Hawaiian Menehune. |
The impressive thing here is being able to edit, not just blend, the HDR image. You can populate your highlights with detail, salvage detail in the shadows and shift the color without penalty. You can play with the image, discovering completely different effects as you move the Gamma or Midtone value.
No, this isn't a tool for snapshots. But in the choices it provides, it is a tool for the art of photography.
This is a surprisingly rich release for such a venerable application. It makes some complicated tasks easy to do well while blazing new trails for future development. Best of all, perhaps, it feels like Photoshop. You can integrate the new tools at your own pace without suffering a paradigm shift. But why shift the Photoshop paradigm? When you've got it, flaunt it.