BEATING ADOBE TO 16-BIT TOOLS
Optipix 2 (or Photoshop 8?)
 By MIKE PASINI
Editor
The Imaging Resource Digital Photography Newsletter
Review Date: September 2003
Long on our wish list for Photoshop have been more 16-bit mode tools -- like selections and layer modes. There are workarounds for some (8-bit selections can be made to work) but not for others (layer modes).
C O N T E N T S
Just as we were narrowing our gaze toward Adobe and the soon-to-be-announced Photoshop 8, Reindeer Graphics (http://www.reindeergraphics.com) answered our prayers with Optipix 2.
THE 16-BIT GAME | Back to Contents
In our review of the original Optipix (http://www.imaging-resource.com/SOFT/OPT/OPT.HTM), we were impressed with how it let us blend a series of 8-bit exposures into a 16-bit image. The expanded shadow and highlight detail survived when we converted it back to eight bits -- as the review illustrates.
Digicams typically use eight bits to record the luminance in each color channel, although high-end models can use more (10-12) as do scanners (12-14). There are three color channels -- red, green and blue -- that use eight bits each in building a 24-bit color image. Your monitor and printer can display no more than 24-bit color anyway.
The attraction of 16-bit channels (48-bit color images) is that they provide room to make tonal and color adjustments without posterizing the image (called banding). Once you've optimized those adjustments, you can reduce the image to 8-bit channels to continue editing it. It's a little like digging into a serving bowl for just the stuff you want on your plate. You can only eat what's on your plate but it's nicer picking from a much larger platter first.
Base Image
Underexposed to capture highlight detail
Working Image
Overexposed to capture shadow detail
The Blend
Preserves detail at both ends of the curveBut with Optipix 2 (http://www.reindeergraphics.com/optipix) a 16-bit workflow from shot to print is now actually feasible. In fact, photographer George DeWolfe has written Digital Fine Print Workflow, a 95-page treatise on just that subject -- and it's included with Optipix 2.
The CD also includes Photoshop for Digital Photographers, a 217-page PDF by Dr. John Russ on image editing in general. The tome is a hands-on guide showing how to adjust, enhance and print optimized images.
The two publications are worth the price of admission themselves but the real draw, of course, are the plug-ins.
PLUG-INS | Back to Contents
The Blend plug-in that can turn your 8-bit images into a 16-bit picture now has some new companions.
Layer Modes emulates all the Photoshop 7 layer transfer modes and adds six new layer transfer modes in a 16-bit compatible plug-in.
Detail Sharpener enhances texture and grain without over-sharpening edges. It's also useful for dynamic range compression.
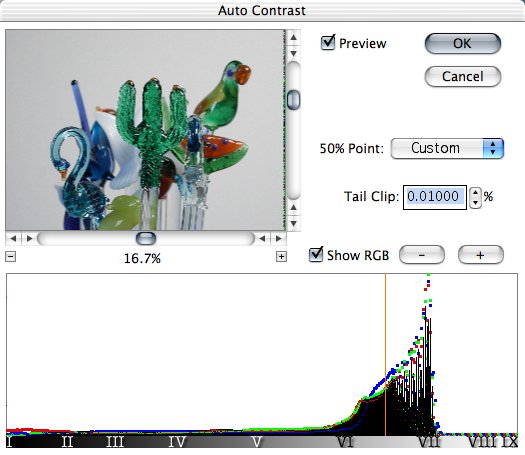
Auto Contrast now sports a wide histogram for 16-bit images, exposure value compensation labeled according to the Zone system and user adjustable tail-clipping.
Safe Median, which first appeared in Optipix 1.1, removes grain without rounding corners like typical medians.
Power Median, which also first appeared in Optipix 1.1, removes power lines and scratches.
You can now store and recall a selection to and from the second image buffer and retrieve whatever you've stored there, too.
These join not only Blend but Image Averaging, Edge Enhancement, Safe Sharpen and Safe Median from prior releases.
Let's take a closer look at a few of the new ones. See our expanded review (http://www.imaging-resource.com/SOFT/OP2/OP2.HTM) for illustrations.
LAYER MODES | Back to Contents
Using Layer Modes in Optipix 2 is a little different from using the Photoshop equivalent. In Optipix 2, you store a base image in Optipix's Second Buffer. Then you select the image to apply to that base image and run the Layer Modes filter.
All of the modes you know from Photoshop are available in Optipix. But Optipix adds a few interesting new ones:
Highlight keeps the brighter pixels in the two images. It can remove shadows from a pair of exposures in which the light source moved by removing dark areas not common to both images.
Shadow retains the darker pixels in the two images. It can remove an object's highlights when the light was moved between shots.
Base Image
Kind of a short shadow.
Working Image
Right shadow, but...
Shadow Mode
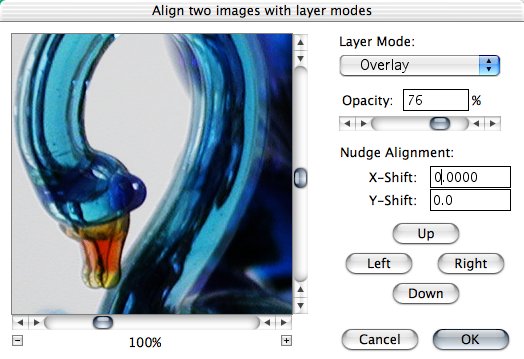
No problem! Shadow mode preserves the darkest pixels.Subtract is the mathematical (rather than absolute) difference between two images. It can emboss an image aligned with itself by nudging the top image.
Remove subtracts the luminance of the bottom image from the top image, leaving color alone. It's useful for correcting brightness falloff. After shooting your subject, shoot a blank sheet of paper in the same spot. Remove the second image from the first to even out the lighting.
Ratio is the ratio of the two images.
Compare is similar to remove, but uses a ratio of the luminance instead of just subtracting the luminance.
16-Bit Layer Modes
Unaligned
16-Bit Layer Modes
Nudged into alignmentLayer Modes also lets you Nudge the top image to align it with the bottom image. But unlike Photoshop's full pixel moves, Nudge allows a move of only a third of a pixel (although other values are possible). This is a not just handy but essential, actually. At full enlargement, it was easy to nudge the working image over the image stored in the buffer for perfect alignment. And you need perfect alignment because you're usually working with two separate images, rather than a duplicate of the background.
AUTO CONTRAST | Back to Contents
The Auto Contrast plug-in has new life in Optipix 2.
Its doublewide histogram provides more detail than Photoshop's 8-bit histogram. And it's labeled with the nine zones of the Zone System. Just click on any of them to place the midtone there.
Auto Contrast
Twice the width with Zone System labelsA popup menu provides an interesting alternative to using the Zone System to alter tonal values. It uses EV values ranging from -2 to +2 in one-third increments. There's also a Custom and Pen Color mode that can set the midtone to the foreground color or any part of the histogram you click on, respectively.
And you can set the percentage of tail clipping to use or turn it off. Tail clipping compresses the darkest values and the lightest values, enhancing contrast.
A scalable image preview accompanies the histogram so you can instantly evaluate your changes.
Unlike Photoshop's Auto Levels, Optipix's Auto Contrast presumes you want to play. We played around quite a bit with our high-key test image until we got a range we liked. But we liked it very, very much.
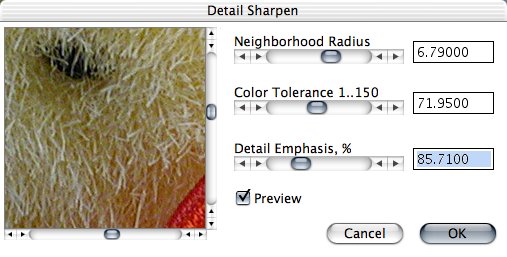
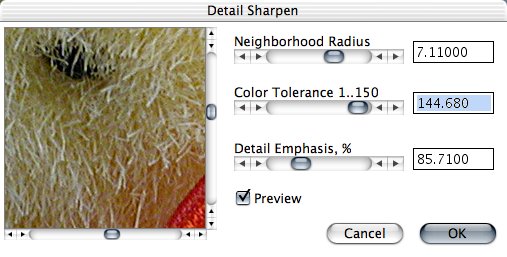
DETAIL SHARPENER | Back to Contents
Detail Sharpener can enhance fine details in an image without over sharpening the edges. If you want to sharpen edges (without bumping up the noise), use Edge Enhancer.
Detail Sharpen
Low color tolerance
Detail Sharpen
Average color tolerance
Detail Sharpen
High color toleranceBut Detail Sharpener can also reduce the dynamic range of 16-bit images, optimizing them for display and printing. Monitors and printers can display much less dynamic range than a 16-bit image contains. Typically, the last step before printing an image is to reduce it to 8-bit mode in Photoshop.
The Original Blend
Before optimizing contrast
Dynamic Range Reduction Action
16-bit mode, Levels, Detail Sharpener and Auto ContrastBut the Reduce Dynamic Range action included with Optipix 2 uses Detail Sharpener to enhance detail in the highlights and shadows while also reducing the dynamic range to something your printer can handle.
POWER MEDIAN | Back to Contents
Released with the 1.1 free upgrade, Power Median lets you describe a custom median using a 5x5 matrix to remove noise with a particular shape or orientation. You can get rid of power lines and scratches (or the cables on the Golden Gate Bridge), for example.
You can designate Normal, Dark or Light noise removal and a Preview helps you evaluate your custom median.
SELECTION TOOLS | Back to Contents
In Photoshop, you can only make selections in 8-bit mode. There are ways to apply an 8-bit selection to a 16-bit image, but Optipix makes that moot with a set of selection tools that appear on the Selection menu.
Duplicate a 16-bit image and change the mode of the duplicate to eight bits. Make your selection and then store the selection in Optipix's second selection buffer. Then just select the 16-bit image and recall the selection from the buffer.
You can also recall as a selection any image placed in the second image buffer. Call it 16-bit luminosity masking. Everything brighter than the midtone will be selected.
PRICE | Back to Contents
Optipix 2 retails for $149.95. For a limited time, Reindeer Graphics is offering a $15 discount on purchases made through the Reindeer Graphics store (http://www.reindeergraphics.com/online-store/scstore). Users with a valid Optipix 1 serial number can upgrade to Optipix 2 for $75. Users who purchased Optipix 1.1 after Aug. 1, will receive Optipix 2.0 as a free update. Just type "Dave's Deal" in the Notes field on the order form (which also helps support Imaging Resource) to save an additional $5.
CONCLUSION | Back to Contents
Adobe will no doubt make some headlines at Seybold San Francisco next week. But while you're waiting for the big guys to roll out the next release -- which may or may not cover your wish list -- we invite you to marvel with us at what the little guys can do. With Optipix 2, Reindeer Graphics has delivered what others only promise.