THE IMAGE ENGINE THAT COULD
Optipix Makes It Three
 By MIKE PASINI
Editor
The Imaging Resource Digital Photography Newsletter
Review Date: July 2004
They brought 16-bit channels to the ordinary digicam, then beat Adobe to 16-bit editing tools in Photoshop. Now Reindeer Graphics has released the third version of its little image engine that could with four exciting new tools. Harnessed in Photoshop actions they're one great way to run a railroad.
Rather than repeat our review of the earlier plug-ins in the Optipix suite, we'll just cite them here:
To learn how to blend ordinary 8-bit channel images from any digicam into a 16-bit channel image (artificial RAW, let's call it) see "Optipix Plug-ins Enrich Your Images" (http://www.imaging-resource.com/SOFT/OPT/OPT.HTM). You'll see an example of how the extended dynamic range built by Optipix retains detail in the shadows and highlights that just aren't captured in any one digicam shot.
To learn about the 16-bit editing tools like Layer Modes, introduced for Photoshop 7, see "Optipix 2 (or Photoshop 8)" (http://www.imaging-resource.com/SOFT/OP2/OP2.HTM).
And to see what new tricks are up Optipix 3's sleeve, just read on.
REQUIREMENTS
To run Optipix, you should be running OS 9 or OS X 10.1+ on the Mac or Windows 98/NT/2000/XP. You can purchase the software at http://www.reindeergraphics.com
INSTALLATION
The plug-ins are copied to the Photoshop Plug-ins directory you select. You have to enter a registration number (the process depends on your operating system). If you're upgrading, you should archive Optipix 2 first.
WHAT THEY DO
The Optipix plug-ins enhance either 8- or 16-bit images, improving contrast, removing blur, averaging images, blending bracketed exposures, enlarging images without artifacts and sharpening without color shifts. With version 3.0, Optipix has improved the existing plug-ins and included four new tools:
- Interactive Interpolation enlarges digital images, allowing you to fine tune how the interpolation is performed in an interactive preview that shows you what you're going to get.
- The Refocus tool is a blur remover for correcting focus problems and blurring caused by image processing. Reindeer Graphics President Chris Russ told us, "The guys at NASA really knew what they were doing when they corrected the Hubble pictures. I'm glad there is enough horsepower to do that on personal computers now."
- JPEG Cleaner is a one-step tool for removing artifacts from JPEG images. "Even at high quality settings (e.g. 90 or lower in Photoshop) we can still detect the JPEG signature in an image. The detail created by the JPEG compression process in a digital camera severely limits what you can do when enhancing or interpolating an image. Obviously we suggest people work in RAW, but if you're stuck with JPEG these are designed to help you cope," Russ noted.
- Grain Maker adds a realistic grain-like texture, rather than pattern, to an image. "I've had a lot of fun making B/W images with channel mixer and applying grain to my images," Russ said. "It's also useful for hiding seams where I've pasted images together. This is not the same as just adding noise and I think it is very useful."
- Digital Fine Print Workflow by photographer George DeWolfe describes a complete 16-bit workflow from the shot to the final print in just 76 pages.
- Photoshop for Digital Photographers by Professor John Russ is an introductory 217-page text about manipulating digital images.
INTERACTIVE INTERPOLATION
The problem of resizing images has had a number of solutions wither at its feet. Why do you need to resize? To feed the voracious appetite of some output device, like a printer that demands 300 pixels an inch. If you've got a 2560x1920-pixel image, that only prints a 6x8 print on that 300 dpi printer. To get an 8x10, you need a 3000x2400-pixel image.
 |
| Photoshop Bicubic is hard to beat |
Photoshop's built-in bicubic resizing does at least as well as several commercial alternatives (particularly if you enlarge in 110 percent increments), as we've noted before. But that doesn't mean it's a raging success. You'll see artifacts and the inevitable softness of interpolating data that doesn't exist.
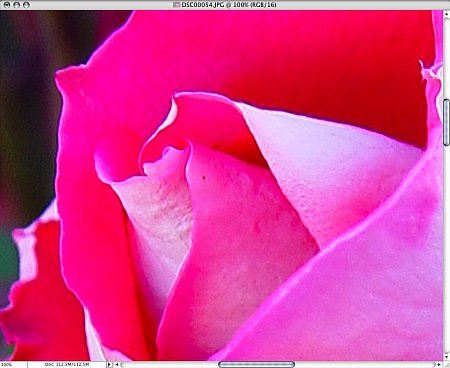 |
| Interactive Interpolation Same 200 percent enlargement (resized for the Web) |
Interactive Interpolation doesn't pretend to do the impossible. Its great advantage is in letting you see what is possible. That's the "interactive" part. You can fine tune the three sliders until you see the best alternative, rather than blindly enlarge to a new image size.
Alongside the preview are the Sharpness, Edge Strength and Grain sliders. Sharpness can be set from 0 to 100 percent to determine how crisp you want the image to appear. Edge Strength ranges from 0 to 150 percent to enhance those edges that become fuzzy when enlarged. Grain adds 0 to 100 percent noise to the edges to mask any blockiness resulting from the enlargement.
If you have a particularly noisy image, you can try reducing it slightly before continuing with the enlargement. That will average out the noise.
Set the Image Mode to 16 bits (just because you can). Then load the second image buffer with your image. Use the Image Size command to resize the image and run the Interactive Interpolation plug-in from the Filter menu.
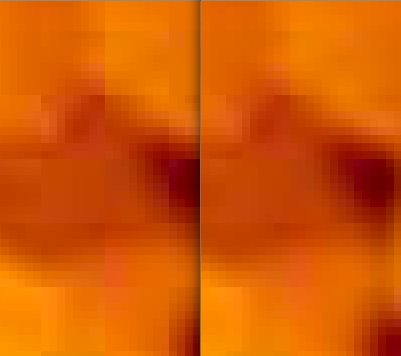
We tried this on a shot of our mother's rose. We compared Photoshop's bicubic enlargement to Optipix's Interactive Interpolation. This is the first time we've actually seen anything do better than Photoshop. It's subtle, but the Optipix enlargement is sharper. Being able to choose just how sharp and what happens at the edges was a real treat, though. Even the grain setting was clearly distinguishable.
REFOCUS
Blurred photos are a fact of digital life. Auto exposure mode can't enforce a reasonable shutter speed and autofocus can't always tell what it's looking at. Nothing will ever really make a blurred shot sharp. But Refocus can remove the blur. The same algorithm was used to correct Hubble space telescope images before the optics were replaced.
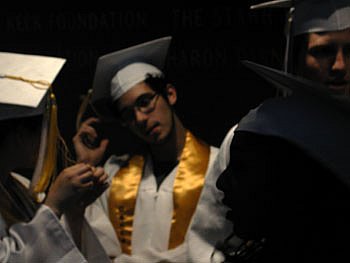 |
| Original |
 |
| Refocus |
 |
| nik Sharpener Pro |
Below the Refocus preview are two sliders, a Blur Radius and Noise Tolerance. A Preview checkbox lets you see what the effect of your settings will be.
The documentation suggests setting both sliders at about the same point and then "walk the noise downward until just before the characteristic 'ringing' artifacts appear."
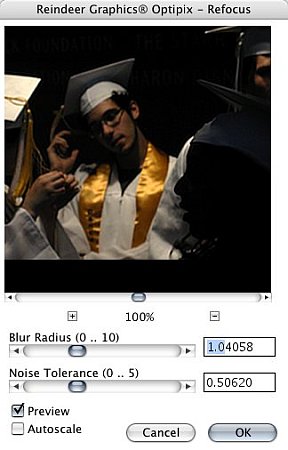 |
| The Refocus Dialog Box Pretty simple |
Our very blurry test image was refocused to a somewhat more acceptable state. Unsharp masking can't quite compare. Even trusty nik Sharpener Pro didn't do quite as well a job. And that's intelligent unsharp masking.
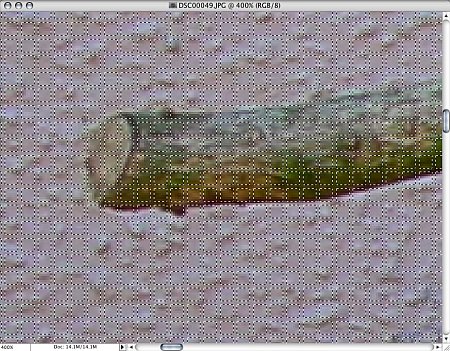
JPEG CLEANER
Unless you shoot in RAW mode or uncompressed TIFF, your digicam may aggressively compress your image data. Despite the high compression ratio, artifacts aren't usually disturbing -- until you start processing your image with one or another filter.
 |
| JPEG Cleaner Original (l) with Cleaned (r) image enlarged to show both pixels and blocks. It's subtle but there, so stare. |
JPEG Cleaner, run prior to any other image processing, can find the 8x8 JPEG pixel block boundaries in your image and process the pixels along those boundaries to make the steps less noticeable. You can even roll your own filtering using the Select JPEG Tile Boundaries plug-in under the Selection menu, if you prefer.
 |
| Select JPEG Tile Boundaries Marching ants on parade |
Think of it as a de-JPEGer that lets you take advantage of the other Optipix plug-ins without the handicap of high JPEG compression.
The filter can detect JPEG blocks on the whole image or a selection. Even if you crop the image without saving it, the filter can find the block boundaries.
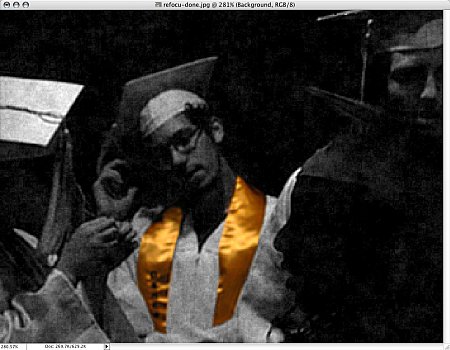
GRAIN MAKER
Remember grain? For that matter, remember Tri-X (whose 50th anniversary it happens to be)? Somehow running Photoshop's film grain filter just isn't the same. It's too, well, regular. And the shadows are never mottled the way they used to be.
 |
| Grain Maker Same image as the Refocussed one above |
Enter Grain Maker. The dialog presents a preview on the left with a Grain Strength slider (0 to 100 percent) on the right along with a Grain Scale (Fine, Medium, Broad) radio button.
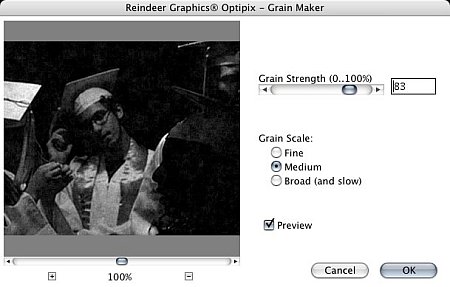 |
| The Grain Maker Dialog Box |
At its most subtle, you can simply add texture to a flat field to add some visual interest (well, confusion). But we enjoyed running it over a desaturated image. Made us feel like the high school yearbook editor back in the days of Tri-X.
Our graduate was the perfect model for that. We kept the gold sash, but desaturated everything else. We particularly like the mottled shadows, though.
QUIBBLES
On the Quibble Meter, there are just a few readings.
The previews use elevators to navigate the window (with a couple of buttons to enlarge and reduce from the default 100 percent view). We'd really like to see a grabber there, to slide the preview around more easily. Once you've honed in on a representative spot at 100 percent, though, you really appreciate the concept.
No matter how fast your system is, some of these calculations take a while. Considering it's magic, that doesn't really bother us. But it made the needle on the Quibble Meter twitch.
CONCLUSION
If you think Optipix is a little too exotic to add to your software suite, think of it as the nicest thing you can do for your digicam. We've been able to get dynamic range out of images captured by our old Average digicam that just wasn't built into it. And the tweaks you can now perform range from important edits like JPEG Cleaner to rewarding effects like Grain Maker. You really can't lose with Optipix. These are tools written by someone who not only knows about pocket protectors but who loves taking pictures, too.