
A Photographer’s Guide to the August 2026 Total Solar Eclipse

Imaging Resource is reader-supported. When you buy through links on our site, we may earn an affiliate commission. How this works.
A total solar eclipse will occur on August 12, 2026, with the path of totality crossing Greenland, Iceland, northern Russia, the Atlantic Ocean, Spain, and a small part of Portugal. Much of Europe and other parts of the Northern Hemisphere will also experience a partial eclipse. For many photographers, this will be a rare opportunity to capture one of the most spectacular events in the sky — and one that requires a bit more preparation than simply pointing a camera at the Sun.
The biggest thing to remember is that safety comes first. The Sun can cause permanent eye damage, and looking through a camera’s optical system without the proper protection can be extremely dangerous. With the right equipment and a little preparation, however, photographing the eclipse is relatively straightforward.
Preparation Is Key
An eclipse gives you a very short window to capture the most dramatic moments. You don’t want to be changing lenses, searching through your camera bag, or trying to figure out settings when totality begins.
Have everything prepared beforehand and practice with your camera and lens before eclipse day. This includes setting up your tripod, testing your remote shutter release, figuring out your composition, and practicing how you will put on and remove your solar filter.
A sturdy tripod should be one of the first things in your bag. You don’t necessarily need an enormous professional tripod, but it should be stable enough that a gust of wind or an accidental bump won’t move your composition. Compact options such as the SmallRig CT-10 and Neewer TP77 can work well for photographers who need something portable.
Protect Your Eyes and Camera
This is the most important part of photographing a solar eclipse.
During the partial phases of the eclipse, never look directly at the Sun without proper solar eye protection. Regular sunglasses, regardless of how dark they are, are not safe. NASA recommends eclipse glasses or handheld solar viewers that meet the ISO 12312-2 standard.
There is one important exception: during totality, when the Moon completely covers the bright face of the Sun, you can look directly at the eclipse without eye protection. The moment any part of the bright solar surface becomes visible again, you need to put your eclipse glasses back on.
Your camera needs protection as well. Do not point a camera with an unfiltered lens at the Sun during the partial phases. NASA recommends using a special-purpose solar filter securely attached to the front of the camera lens.
ND Solar Filter Options
In addition to dedicated solar filters, some photographers use extremely dense neutral density (ND) filters that are specifically marketed for solar photography. These include ultra-dark options such as:
- K&F Concept ND100000 (16.5 stops)
- K&F Concept ND1000000 (20+ stops)
These filters are designed to reduce sunlight to a level suitable for safe imaging and are commonly used for solar disc photography when properly mounted on the front of the lens.
However, it is important to understand their limitations:
- They must be high-quality, full-aperture front-mounted filters
- They should be used only for partial phases of the eclipse
- They are not a substitute for proper solar viewing glasses for your eyes unless explicitly certified for that purpose
- They should never be used if damaged, scratched, or improperly mounted
When used correctly, these ultra-dark ND filters can be a practical and widely available option for photographing the Sun during the partial phases, especially for photographers who do not have access to dedicated astronomical solar filters.
As with all solar photography equipment, always ensure the filter is securely attached and fully covers the front of the lens.
Make Your Solar Filter Easy to Remove
There are two very different parts of a total solar eclipse: the partial phases and totality.
During the partial phases, your solar filter needs to remain on the lens. During totality, the filter should be removed if you want to photograph the much fainter solar corona. NASA’s eclipse photography guidance specifically recommends removing the solar filter during totality because the corona is dramatically dimmer than the Sun’s surface.
That means you don’t want to spend valuable seconds unscrewing a filter while totality is already underway.
A magnetic filter system can be useful here because it allows you to quickly attach and remove the filter. Whatever system you use, practice with it before eclipse day so you know exactly how it works.
For the same reason, don’t make your first attempt at removing the filter during the actual eclipse. Have a rehearsed procedure for putting it on and taking it off.
Use Live View or an Electronic Viewfinder
If you are using a DSLR, we recommend using the rear LCD screen rather than looking through the optical viewfinder while photographing the Sun.
Mirrorless cameras are particularly convenient for eclipse photography because you can use the electronic viewfinder or rear screen to compose without looking directly through the optical path.
Regardless of the camera type, the important thing is that the lens has a proper solar filter attached during the partial phases. NASA warns that viewing the Sun through an optical device without an appropriate solar filter can cause severe eye injury.
Use a Remote Shutter Release
A remote shutter release is another useful accessory for eclipse photography.
The less you have to physically touch the camera, the less likely you are to accidentally move the tripod or change your composition. Many modern cameras can also be controlled remotely using a smartphone app.
For example, Nikon users can use SnapBridge to remotely control compatible cameras. If your camera has a similar companion app, this is a good opportunity to put it to use.
Choosing the Right Lens
Your choice of lens will depend on what you want the final photograph to look like.
If the eclipse itself is the main subject, a long telephoto lens is the obvious choice. Something in the 400mm to 600mm range will make the Sun significantly larger in the frame. NASA’s eclipse photography guide also recommends a fairly long focal length for getting a larger image of the Sun.
If you want a landscape composition with the eclipse in the background, however, a much wider lens may be more appropriate. This lets you include buildings, mountains, trees, or other elements in the foreground while keeping the eclipsed Sun as part of the overall composition.
There isn’t necessarily a single “correct” lens for an eclipse. Decide what you want to photograph beforehand and choose your lens accordingly.
It is also a good idea to practice by photographing the Moon. The Moon and Sun appear roughly the same size in the sky, so photographing the Moon can give you an idea of how large the Sun will appear with a particular lens.
Pick Your Location Carefully
Having all the right equipment won’t matter much if clouds completely obscure the eclipse.
Check the weather forecast when choosing your location and, if possible, have a backup location. The 2026 eclipse will be particularly interesting for photographers because totality occurs relatively low in the sky in parts of Europe.
For example, NASA lists the Sun at only around 25.8 degrees above the horizon at the point of greatest eclipse. In Spain, the total eclipse will occur shortly before sunset, creating the possibility of dramatic sunset-eclipse compositions.
That means a high vantage point with an unobstructed view toward the Sun can be extremely valuable. Buildings, trees, and mountains that wouldn’t normally be a problem can completely ruin your view when the Sun is only a few degrees above the horizon.
Know Exactly Where the Sun Will Be

Know where the sun will be at totality. Credit: NASA/Vanessa Thomas
Don’t wait until eclipse day to figure out where the Sun will be.
Use an astronomy or eclipse-tracking app to determine exactly where the Sun will appear from your chosen location and when totality will begin. Apps such as Star Walk 2 are useful for planning, although there are plenty of other astronomy and eclipse apps available.
Knowing the exact direction and altitude of the Sun also lets you determine whether your chosen location actually has a clear line of sight.
More importantly, know the exact times for your location. Totality is extremely brief. NASA’s calculations show that the maximum duration anywhere along the eclipse path will be about 2 minutes and 18 seconds, while many locations will experience less than two minutes.
That isn’t much time to troubleshoot camera settings.
Don’t Forget Yourself
You’ll probably arrive at your location well before totality begins, which means you could spend several hours outside.
Bring plenty of water, food, sunscreen, a hat and appropriate clothing. NASA also recommends taking precautions against prolonged sun exposure during the eclipse.
Your location should also have a reasonably flat and stable area for your tripod and camera. Avoid setting up somewhere dangerous simply because it provides a better composition.
An eclipse is worth traveling for, but it isn’t worth putting yourself in danger.
Camera Settings for the Partial Eclipse
There isn’t one universal set of camera settings for photographing an eclipse. Your exposure will depend on your camera, lens, solar filter and lighting conditions.
As a starting point, you can use ISO 100 or your camera’s lowest native ISO and an aperture somewhere around f/8 to f/11. From there, adjust the shutter speed based on your camera’s meter and, more importantly, test your exposure beforehand.
The Sun’s brightness doesn’t suddenly become unpredictable just because an eclipse is happening, so practicing on the uneclipsed Sun is a useful way to determine an appropriate exposure. NASA’s eclipse photography guide similarly recommends testing exposures on the Sun ahead of time and using those results as a starting point.
Most importantly, shoot RAW. RAW files give you considerably more flexibility when recovering highlights and shadows and processing the dramatic contrast of an eclipse.
Camera Settings During Totality

Remember to remove your solar filter once totality begins. Credit: NASA/Aubrey Gemignani
Everything changes once totality begins.
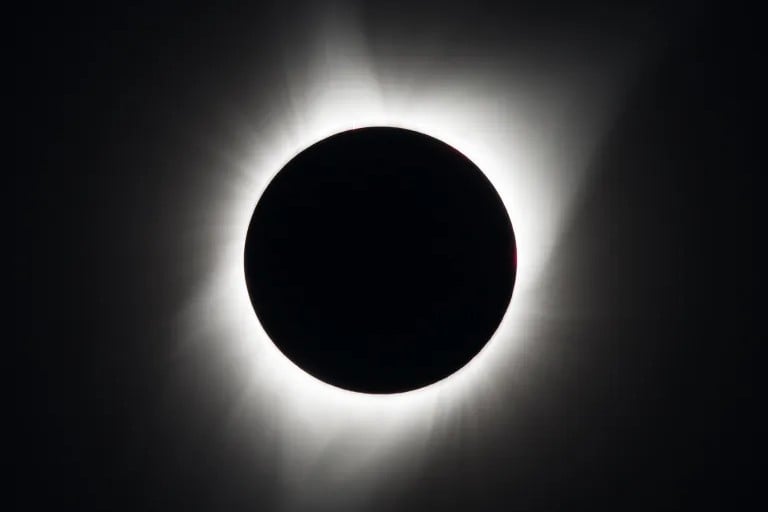
The bright solar photosphere is completely hidden, revealing the much dimmer corona. This means the exposure required during totality is dramatically different from what you used during the partial phases.
Most importantly, remove the solar filter during totality if you want to photograph the corona. The filter that protects the camera during the partial phases will also block the faint light from the corona.
This is where exposure bracketing becomes particularly useful. The corona has an enormous dynamic range, so a single exposure won’t necessarily capture all of its details. Taking a series of exposures at different shutter speeds gives you considerably more flexibility when processing the images later. NASA’s eclipse photography guide recommends bracketing exposures during totality for this reason.
And remember: once totality ends and the bright photosphere begins to reappear, the solar filter needs to go back on immediately.
Practice Before the Eclipse
The best thing you can do before August 12 is practice.
Set up your camera and tripod, choose your lens, test your solar filter, practice focusing, and figure out your exposure settings. Practice removing and replacing the filter quickly and safely.
You can also photograph the Moon beforehand to get an idea of how your chosen focal length will frame the eclipse.
There are plenty of detailed eclipse photography guides available, including MrEclipse’s extensive camera-setting recommendations, which can be useful as a starting point. But don’t rely entirely on a preset list of settings. Your camera, lens, filter, and local conditions will all affect the final exposure.
The 2026 total solar eclipse is going to be a spectacular event, and with a little preparation, photographers can capture it without putting themselves or their equipment at unnecessary risk.
Just remember: during the partial phases, protect your eyes and your camera. During totality, enjoy the view — and be ready to shoot.
More in Guides
 FeaturesDesert landscape photography guide: Tips for capturing compelling shots in deserts28 Mar 2019
 FeaturesPerfecting the pose: 10 tips for posing women in flattering, beautiful portraits29 Aug 2016
 FeaturesPhoto Book 101: Blurb and PhotoShelter teach you to publish and sell your own photographic compendium12 May 2016
 FeaturesA closer look at curves16 Jan 2016
 FeaturesHow well do you understand curves? Find out with this quiz11 Jan 2016
 FeaturesTravel better: Tips and tricks for your travel photography workflow3 Dec 2015