Panasonic G2 Exposure Options
The Panasonic G2 offers all the exposure options you'd expect in an SLR-class camera, plus a few Panasonic-specific options. Available exposure modes include Program AE, Manual, Aperture Priority, and Shutter Priority modes, with shutter speeds from 1/4,000 to 60 seconds, as well as a Bulb setting for longer exposures up to four minutes. The x-sync speed for flash photography is 1/160 second. A fully automatic mode called Intelligent Auto (iA) enables Scene Detection, Red-eye Removal, Face Detection, Intelligent ISO Sensitivity, Intelligent Exposure, Long-Shutter Noise Reduction, Quick Autofocus, Focus Priority, Backlight Compensation, and Intelligent Resolution to try to deliver optimum results under a wide range of conditions. (In our experience playing with the camera, iA did a surprisingly good job, under a wide range of lighting conditions.) The Panasonic G2 also offers a number of Scene modes, a My Color Mode, and a Custom mode where up to three sets of shooting modes and settings can be stored and recalled. See the Modes and Menus page for more details.
While in Program AE mode, you can rotate the rear control dial to select different combinations of aperture and shutter speed settings than those normally chosen by the autoexposure system. This is often called Program Shift. If the automatic program would have chosen 1/125 second and f/5.6, you could instead direct the camera to use 1/60 at f/8 or 1/30 at f/11, to get greater depth of field. It's a very nice touch that's common on a lot of SLRs these days, and is a handy option for those times when you need some measure of increased control, but still want the camera to do most of the work for you.
Another feature that's also pretty common, but still very welcome is the electronic analog exposure display visible in the viewfinder data readout as well as on the rear-panel shooting display when the camera is in Manual exposure mode. This shows the amount the camera thinks an image will be over- or underexposed, based on the settings you have selected, and helps you find the best exposure for the subject.
Panasonic G2 Face Recognition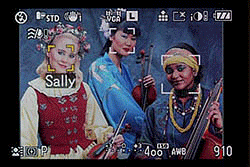 Like the GH1 and GF1 before it, the Panasonic G2 includes Face Recognition. (The image at right is from our GH1 review, but the feature is largely similar.) Face recognition isn't to be confused with face detection, a function offered by many cameras these days. The Panasonic G2 goes a step further by trying to recognize specific individuals. Up to six faces can be registered, with up to three training shots per individual face for increased accuracy.
Even more unusually, the G2 can be configured to automatically recognize when a particular unregistered face has appeared in more than three photos (excluding burst or bracketed exposures), and suggest that it be registered using the Face Recognition function. If you choose to register the face, you're prompted to confirm whether it is a new person, or an additional image of an individual you've already registered (unless there are no faces registered, in which case you're immediately prompted to enter the new individual's details.)
Like the GF1, the Panasonic G2 allows the user to select the sensitivity of the face recognition system. When set to Low, the camera is less likely to incorrectly identify a face, but more likely to fail to recognize a face at all. When set to high, the converse applies -- faces should be more likely to be recognized, but with an increased likelihood of incorrect identification being made.
The camera will display and write into the EXIF headers up to three people's names when it recognizes their faces. In addition to just the name, a birthday can be registered, as well as focus priority. If you program in a birthday for a person, whenever the camera recognizes that person's face in an image in playback mode, it will display their age as of the date of the photo in an overlay over the image on the camera's screen, and write the information into the JPEG file's EXIF header. Focus priority allows the camera to optimize focus and exposure for the highest priority face it finds in a scene with multiple faces.
The included PHOTOfunSTUDIO software package can be used to search for images containing specific people on your PC, and can also show their age in photos where they're recognized. Although we haven't played with it in our lab, PHOTOfunSTUDIO can further be used to improve on the camera's face recognition, by training the software on a larger number of images -- a feature demonstrated to us by Panasonic staff last year, using the previous iteration of the software. Unfortunately for Mac users, PHOTOfunSTUDIO is still available only for Windows PCs.
Panasonic G2 ISO Range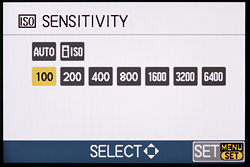 ISO sensitivity ranges from 100 to 6,400, adjustable by pressing the ISO button (up arrow) on the back of the camera and then pressing the desired sensitivity on the touch-panel display, or using the up/down or left/right arrow directions of the Multi-Selector to select values from those shown. The ISO number can be adjusted in one-stop (default) or 1/3-stop increments, depending on the ISO increment setting selected in Record Menu 3.
An Auto ISO mode is available, and you can set the upper limit to ISO 200, 400, 800, or 1,600 in Record Menu 3. (The "Off" setting defaults to a limit of ISO 400.) Intelligent ISO mode detects subject movement, and will boost ISO to increase the shutter speed in an attempt to freeze subject motion. The maximum ISO selected by Intelligent ISO is 800 with the flash off, and 400 with the flash on.
Panasonic G2 Noise Reduction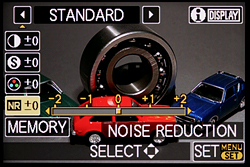 The Panasonic G2 gives you five choices for noise reduction, ranging from -2 to +2, with 0 being the default. While the user manual doesn't say, we can see by examining our Still Life ISO NR series that the noise reduction controlled by this setting is applied at all ISOs, not just higher ones. A separate Long Shutter noise reduction On/Off setting is available for dark frame subtraction for long exposures. If enabled, this approximately doubles the exposure time for each shot, allowing the second dark frame exposure to be captured with the shutter closed.
Panasonic G2 White Balance Options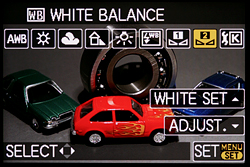 White balance modes on the Panasonic G2 include Auto, Daylight, Cloudy, Shade, Halogen, and Flash. No Fluorescent preset is provided. Kelvin temperature settings are also available, ranging from 2,500K to 10,000K, as are two Custom white balance settings, for setting white balance from a white or grey card. The effect of changes in white balance settings is shown in real-time, on the LCD monitor or EVF.
In most of the white balance modes, you can fine-tune the color by pressing the down arrow, or the on-screen "adjust" button. You're then presented with a x/y axis graph with which you can adjust between Amber and Blue levels and Green and Magenta levels by using the four arrow buttons, or touching the appropriate area on the graph display.
In Kelvin white balance mode, the up/down directions on the Multi Selector or the touch screen can be used to adjust the color temperature. A numerical readout at the top left of the display shows the exact Kelvin temperature, and arrow buttons above and below can be used to increment or decrement the value. A scale at screen right shows the color temperature relative to existing presets, and also allows direct adjustment by touching the appropriate point on the scale.
Custom white balance is set by selecting one of the two Custom White Balance settings, pointing the camera at a neutral white or grey card under the lighting you'll be shooting in, filling a frame in the center of the display with the reference target, and then pressing the on-screen Set button.
You can also bracket white balance exposures. The bracket setting is performed using the fine-tuning adjustment values, and three images are taken when the shutter button is pressed once. An Amber to Blue axis sequence can be selected, or a Green to Magenta axis sequence.
Panasonic G2 Metering Options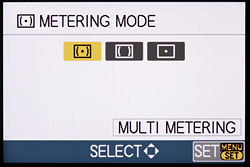 The Panasonic G2 offers three metering modes, selected via the Metering Mode option in the Quick Menu or Record Menu 1: Multi-pattern, Center-Weighted, and Spot. The default Multi-segment metering mode takes readings throughout the image to determine exposure, using an array of 144 zones covering the bulk of the frame. Center-Weighted gives precedence to the center of the image while reading the whole frame. Spot metering is useful for high-contrast subjects. Unless using Face Detection or Tracking AF modes, it bases the exposure reading on the very center of the image, letting you set the exposure based on a small portion of your subject. With Face Detection or Tracking AF enabled, the Spot meter area is locked to the AF target, rather than being fixed at the center of the frame. You can lock an exposure reading by pressing the AF/AE Lock button on the back panel. Halfway pressing the Shutter button also locks exposure (and focus in AFS mode).
 Panasonic G2 Exposure Compensation & Bracketing
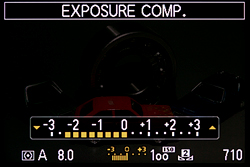
The Panasonic G2's Exposure Compensation adjustment increases or reduces the overall exposure from -3 to +3 exposure values (EV) in one-third stop increments, and like White Balance, the effect of Exposure Compensation is simulated on the preview. An Auto Bracketing feature captures multiple shots with different exposures. See the Drive Mode section on Auto Bracketing below for more details.
Panasonic G2 I. Exposure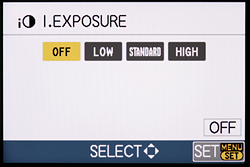 The Panasonic G2 offers three levels of what the company calls "I. Exposure" or Intelligent Exposure: Low, Standard, and High, as well as an Off setting. Intelligent Exposure attempts to automatically adjust contrast and exposure to improve apparent dynamic range in difficult lighting situations. It may raise ISO to achieve this.
Panasonic G2 I. Resolution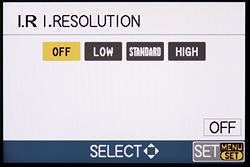 The Panasonic G2 offers three levels of what the company calls "I. Resolution" or Intelligent Resolution: Low, Standard, and High, as well as an Off setting. Intelligent Resolution is a form of localized sharpening, which applies different levels of sharpening to outlines, texture and gradation within a single image.
Panasonic G2 Drive Modes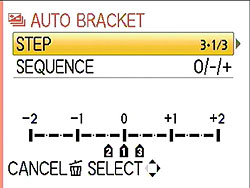 The Panasonic G2 offers a variety of shooting modes via the Drive Mode lever under the Mode Dial on of the camera's top panel. Drive options include Single Shot, Burst, Auto Bracket, and Self-timer. The Burst Mode has rate options for "H" (3.2 frames-per-second), "M" (2.6 frames-per-second), or "L" (2 frames-per-second). Auto Bracket lets you take a sequence of 3, 5, or 7 shots with either 1/3 EV or 2/3 EV exposure variation steps. The sequence can be selected from "0/-/+" (default/underexposed/overexposed) or " -/0/+" (underexposed/default/overexposed). The Self-timer mode offers 10 seconds, 10 seconds with 3 pictures taken at 2 second intervals, or 2 seconds. All Drive Mode options are set in Record Menu 4.
Panasonic G2 Film Modes
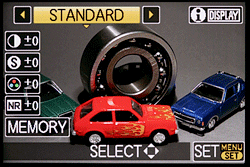 The Panasonic G2 moves the Film Mode button to the rear panel, as a secondary function of the left arrow button. The Film Mode function lets you choose from nine preset "Film Modes," which have different characteristics such as contrast, saturation, sharpness, and noise reduction. You can also define two of your own.
Here's how Panasonic describes the available Film Modes (the descriptive verbiage below is theirs):
|
Film Mode
|
Effect
|
|
Standard (Color)
|
This is the standard setting
|
|
Dynamic (Color)
|
The saturation and contrast of the stored colors are increased
|
Smooth (Color) |
The contrast is lowered for smoother and clearer color |
|
Nature (Color)
|
Brighter red, green, and blue. Enhanced beauty of nature
|
|
Nostalgic (Color)
|
Lower saturation and contrast. Reflecting passage of time
|
|
Vibrant (Color)
|
Higher saturation and contrast than dynamic
|
|
Standard (B&W)
|
This is the standard setting
|
|
Dynamic (B&W)
|
The contrast is increased
|
|
Smooth (B&W)
|
Smooths the picture without losing the skin texture
|
|
My Film 1 /
My Film 2 |
The saved setting is used. (You can start with any of the preset modes, and adjust each parameter in 5 steps.)
|
|
Multi Film
|
It will take pictures changing the type of film in accordance with the setting every time the shutter button is pressed. (Up to 3 pictures.)
|
Multi Film is like a Film Mode bracketing feature, that lets you define up to three types of Film Modes to be used in a bracketing sequence. The shutter button must be pressed for each type of film desired in a bracketing sequence, or you can put the Panasonic G2 into Continuous Drive mode and hold the shutter button down; the camera will stop capturing after three shots.
The images above were taken from our standardized test shots. For a collection of more pictorial photos, see our Panasonic Lumix DMC-G2 Photo Gallery .
Not sure which camera to buy? Let your eyes be the ultimate judge! Visit our Comparometer(tm) to compare images from the Panasonic Lumix DMC-G2 with those from other cameras you may be considering. The proof is in the pictures, so let your own eyes decide which you like best!
 Fujifilm GFX 50S Review
 Fujifilm X-T3 Review
 Olympus E-M5 III Review

Follow Imaging Resource