Olympus E-3 Operation
The Olympus E-3 is big and teeming with buttons and controls. Its overall feel is very tight, solid, hefty, and well-thought-out. It is easily the finest experience I've had with an Olympus SLR. While you can quickly feel comfortable using the Olympus E-3, getting to know everything it can do can take a little time, given the large number of custom settings and setup options. However, once you get the hang of it, the control layout and overall feel of the camera should become natural. Right out of the box, you could probably snap a few images with just a cursory look at the manual, but plan on investing more time to get better acquainted with all of the camera's controls and settings.
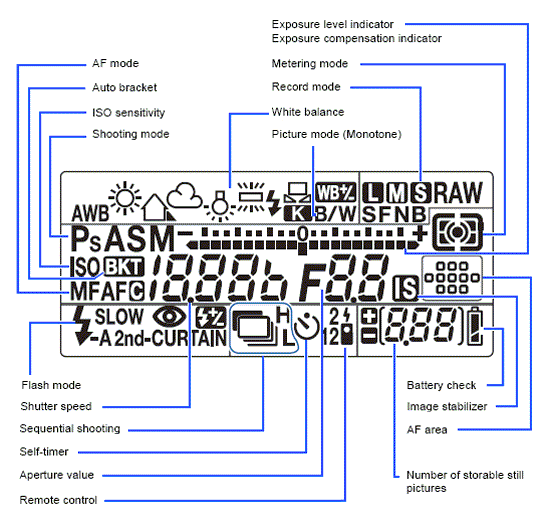
Olympus E-3 Control Panel LCD
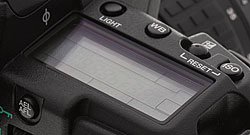 As with most prosumer and pro DSLRs, the Olympus E-3 is equipped with an illuminated top-panel data readout LCD that communicates a lot of information about current camera settings, and provides an interface for setting many camera functions when used in conjunction with the various buttons and dials. Whenever you press one of the control buttons to change a setting (exposure compensation, white balance, ISO, etc), the current value of the chosen parameter appears in the top-panel readout. This makes for very fast and easy settings changes, without having to resort to the main LCD menu system. The illustration below (courtesy of Olympus) shows the meaning of the various icons and readouts in this display.
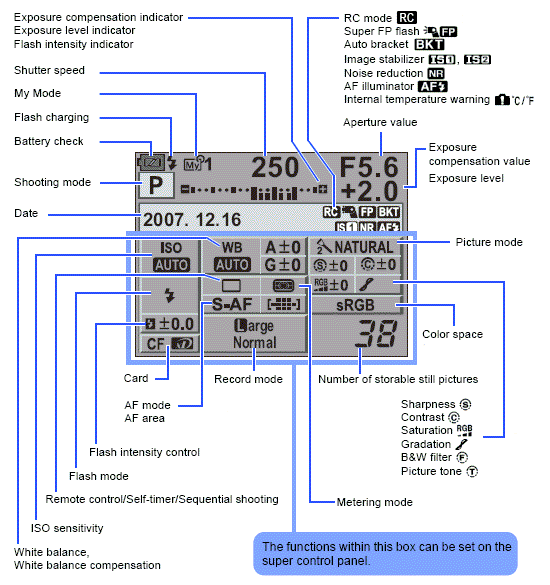
Olympus E-3 Main LCD
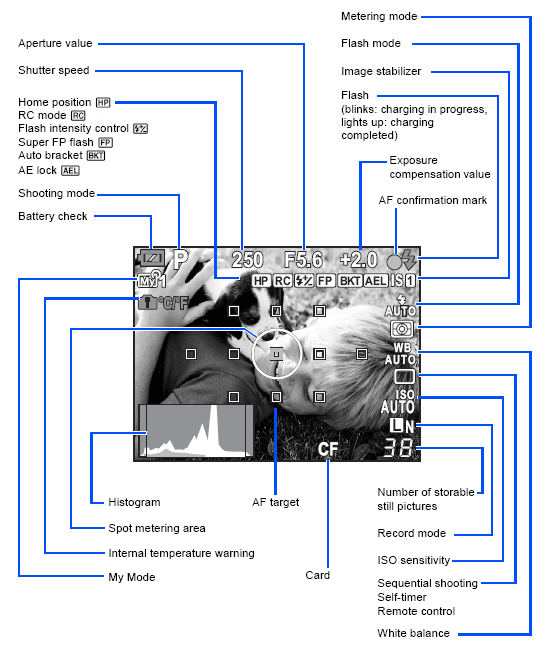
Record Mode Display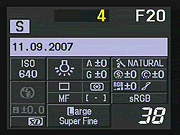 In record mode and not in Live View mode, the main LCD monitor displays a "Super Control Panel" that you can navigate around in and make changes to menu options (ISO, White Balance, flash mode, etc.). If you're in optical viewfinder mode, pressing the Info button displays the Super Control Panel. Pressing it again turns the LCD monitor off. Pressing the OK button in Live View mode also displays the Super Control Panel. See the illustration below (courtesy of Olympus) for callouts of the info that is available.
Live View Display In Live View mode, the LCD displays the subject, along with optional overlaid information, showing AF points, exposure mode, shutter speed, aperture, metering mode, file format and which memory card is in use, the number of exposures that can be stored on the card with the current settings, etc. A live histogram is also available. See the illustration below (courtesy of Olympus) for callouts of the info that is displayed in Live View mode.
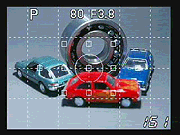 In Live View mode, you can also optionally display various alignment grids over the image, as an assist for lining up subjects. While in Live View mode, pressing the Info button a few times brings up a small green box. You can use the arrows to move the box around the screen and press the OK button to enlarge the center of the frame 5x, 7x or 10x for more precise focusing or focus verification (manual focus must be enabled in advance).
Playback Mode Display In Playback mode, the default image display shows the most recently captured image, with a modest information overlay present. Pressing the Info button cycles through the main display (with no information), a basic information overlay, more detailed information overlay, a thumbnail display with main and RGB histograms, a main histogram overlay, a blinking highlight display, and a blinking shadow display. Pressing the Display button returns you to the status display or Live View mode, depending on the last setting.
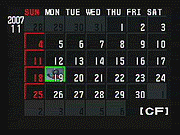 Turning the main Control dial to the left cycles through a four, nine, 16, and 25-image index display, and finally a Calendar display. Turning the main Control dial to the right enlarges the captured image from 2x to as much as 14x. You use the four arrow keys to move around the zoomed image.
 Fujifilm GFX 50S Review
 Fujifilm X-T3 Review
 Olympus E-M5 III Review

Follow Imaging Resource