Olympus E-P2 Operation
The Olympus E-P2 packs a lot of features into a very compact body. This of course means that many features are accessed via menus shown on the LCD instead of dedicated buttons. Still, Olympus has crammed a lot of controls into what little space is available, and they've given a lot of flexibility on how many of them function, via an extensive set of Custom and Setup menu options. (See our Modes & Menus page for details.)
Most major functions are accessible via the 11 buttons on the back and three on the top deck. A Function button activates an L-shaped menu that offers access to major functions, like White balance, Drive mode, Image stabilization, Aspect ratio, Compression, AF mode, Face detection, and AF point.
Menus can be navigated either with the Main and Sub dial, or using the four arrow buttons. The dials are also used to adjust shutter speed and aperture in Manual exposure modes.
Record Mode Displays
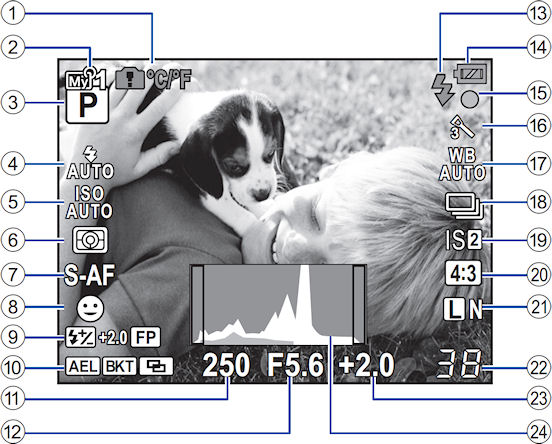
Full-time Live View The information display in record mode includes
the shutter speed and aperture settings, exposure mode, flash mode, ISO sensitivity setting, metering mode, AF mode, number of available images, resolution, aspect ratio, image stabilizer mode, drive mode, white balance,
picture mode, focus confirmation, battery status, etc. You can also enable a
live histogram. Through the Custom menu, you can select one of three styles of grid displays. See the illustration below (courtesy of Olympus America) for information callouts in record mode.
The information display in record mode includes
the shutter speed and aperture settings, exposure mode, flash mode, ISO sensitivity setting, metering mode, AF mode, number of available images, resolution, aspect ratio, image stabilizer mode, drive mode, white balance,
picture mode, focus confirmation, battery status, etc. You can also enable a
live histogram. Through the Custom menu, you can select one of three styles of grid displays. See the illustration below (courtesy of Olympus America) for information callouts in record mode.
As you change exposure settings, the display changes to reflect what the captured image will look like, also known as "exposure simulation."
|
1
|
Internal Temperature Warning
|
12
|
Aperture Value
|
|
2
|
My Mode
|
13
|
Flash Status
|
|
3
|
Shooting Mode
|
14
|
Battery Status
|
|
4
|
Flash Mode
|
15
|
AF Confirmation
|
|
5
|
ISO Sensitivity
|
16
|
Picture Mode
|
|
6
|
Metering Mode
|
Art Filter /
Scene Mode
|
|
|
7
|
AF Mode
|
17
|
White Balance
|
|
8
|
Face Detection
|
18
|
Sequential Shooting
|
|
5
|
ISO Sensitivity
|
Self-Timer
|
|
|
9
|
Flash Intensity
|
19
|
Image Stabilizer Mode
|
|
Super FP Flash Mode
|
20
|
Aspect Ratio
|
|
|
10
|
AE Lock
|
21
|
Image Size & Quality
|
|
Auto Bracket
|
22
|
Number of storable still images
|
|
|
Multiple Exposure
|
Available Recording Time
|
||
|
Home Position
|
23
|
Exposure Compensation Value
|
|
|
11
|
Shutter Speed
|
24
|
Histogram
|
Level Gauge The Olympus E-P2 includes a nifty Level Gauge feature, which when enabled, displays the amount of roll (left/right) and pitch (forward/backward) as bars on the bottom and right hand-side of the screen respectively. (The animation at right is from the E-P1, but the E-P2 is identical.) This helps ensure that images are level with the horizon, or parallel with a subject for critical work such as architecture or macro. You can also calibrate, or "zero-out" the level gauge, in a Custom menu.
Super Control Panel In record mode, the LCD monitor displays the "Super Control Panel" when you press the Info button with the Live Control menu active, or when you press the OK button thereafter. (The animation at right is from the E-P1, but the E-P2 is very similar.) You can navigate around in and make changes to a number of menu options (ISO, White Balance, etc.). See the illustration below (courtesy of Olympus America) for callouts of the various settings that are shown and adjustable from this screen.
|
1
|
Internal Temperature Warning
|
14
|
Picture Mode
|
|
2
|
Shooting Mode
|
15
|
Sharpness
|
|
3
|
Function Name
|
Contrast
|
|
|
4
|
White Balance
|
Saturation
|
|
|
White Balance Compensation
|
Gradation
|
||
|
5
|
ISO Sensitivity
|
B&W Filter
|
|
|
6
|
Sequential Shooting
|
Picture Tone
|
|
|
Self-Timer
|
16
|
Color Space
|
|
|
7
|
Flash Mode
|
17
|
Face Detection
|
|
8
|
Flash Intensity
|
18
|
Metering Mode
|
|
9
|
Image Stabilizer Mode
|
19
|
Number of storable still images
|
|
10
|
AF Mode
|
20
|
Exposure Compensation Value
|
|
AF Target
|
Exposure Level
|
||
|
11
|
Image Size & Quality
|
21
|
Aspect Ratio
|
|
12
|
Flash Status
|
22
|
Aperture Value
|
|
13
|
Battery Status
|
23
|
Shutter Speed
|
Live Control The Olympus E-P2 features a menu display type reminiscent of the Function menu found on Canon PowerShots, called Live Control. (The animation at right is from the E-P1, but the E-P2 is very similar.) The menu is accessed by pressing the "OK" button, unless the Super Control Panel has been used more recently, in which case you simply press the Info button with that panel active. The Live Control display overlays commonly used functions along the right hand side, while options for the currently selected setting are displayed along the bottom. Menu options in this mode include Scene mode (when SCN exposure mode is selected), Art filter mode (when ART exposure mode is selected), Movie AE mode (in Movie mode), Picture mode (in all but Scene, Art filter or Movie modes), White Balance, Sequential shooting/self-timer, Image Stabilizer, Aspect Ratio, Record Mode (image size and quality), ISO sensitivity, Flash mode, Metering mode, AF mode, Face detection, AF target selection and Movie sound record (in Movie mode).
Playback Mode Displays
Information Screens In Playback mode, the default image display shows the most recently captured image. Pressing the Info button cycles through the main display (with no information), a simplified display with basic information overlay, a detailed thumbnail display with RGBY histogram, shooting info and highlight/shadow display, a luminance histogram overlay display, and a blinking highlight/shadow display (overexposed areas are shown in red, underexposed in blue). The last display type will be stored and shown the next time by default. Pressing the Right or Left arrow displays the next or previous frame, while pressing the Up or Down arrow jumps 10 frames forward or backward.
Index and Calendar Views Turning the Sub dial to the left cycles through a four, nine, 16, 25, 49, and 100-image index display, and finally a Calendar display. The arrow pad keys are used to select a particular frame in an index view. In Calendar view, you can display images arranged by date, and you can select a date by using the arrow keys, then pressing OK. If more that one shot was taken on a single date, the first shot on that date is displayed.
Magnified View Turning the Sub dial to the right enlarges the captured image as much as 14x. You use the four arrow keys to move around the zoomed image, and if Face Detect is enabled, a frame is displayed around a detected face. You can press OK to move the frame to another face. After pressing the Info button in magnified view, you can view other images at the same magnification by using the Left and Right arrows. When Face Detect is enabled, you can jump to the next or previous face by using the Up and Down arrows, useful for quickly checking for closed eyes or focus issues.
 Fujifilm GFX 50S Review
 Fujifilm X-T3 Review
 Olympus E-M5 III Review

Follow Imaging Resource