Canon S3 IS Operation
While the Canon S3 IS's user interface may seem a little cryptic at first approach, it's actually very efficient in practice. Most camera functions are controlled externally, and a few of the external control buttons serve multiple functions. When you do need to enter the LCD menu system, navigation is straightforward with only two main pages of options. The Canon PowerShot S3 IS's external controls cut down on the amount of time spent searching menu screens, and I particularly like the "Function" menu, which became standard on Canon digicam models as of the 2003 model year. Combined with the instruction manual, the Canon S3 IS's user interface shouldn't take more than an hour to get comfortable with.
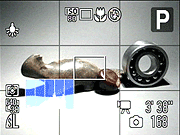 Record Mode LCD Display: In Record mode, the PowerShot S3 IS's LCD reports various exposure settings, including camera modes, the resolution and quality settings, number of available images, a live histogram, etc. Half-pressing the Shutter button reports the aperture and shutter speed settings, in all modes except Manual. Pressing the Display button cycles through the available display modes, including the image with some information, more information, and no information with the electronic optical viewfinder showing some or more information (it's otherwise off when the LCD is active).
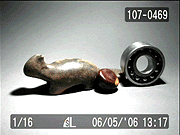 Playback Mode LCD Display: In Playback mode, the LCD reports the image series number, resolution and quality setting, file name, and the date and time of image capture. Pressing the Canon S3 IS Display button once pulls up an enhanced information display, with a histogram for checking the exposure and general exposure details. A third press cancels the information overlay entirely. Unlike its behavior in Record mode, the Display button will not let you view images through the electronic optical viewfinder, although you can force the electronic viewfinder to be used by rotating the LCD monitor so that it is closed pointing towards the camera body. In Playback mode, pressing the zoom control in the wide-angle direction switches to a 9-up thumbnail display of previously captured images. Pressing it in the wide-angle direction a second time produces a "jump bar" at the bottom of the screen, which shows where the current group of nine thumbnails is relative to the total collection of images on the memory card, and that lets you jump through them nine images at a time. Toggling the zoom lever in the telephoto direction takes you back out of the thumbnail displays, and if continued beyond the point at which you see the full-sized image, zooms in on the image up to 10x, letting you check focusing and very fine details.
Canon S3 IS Modes and Menus
Record Mode: Marked on the Mode switch with the red camera icon, this mode sets up the Canon PowerShot S3 IS for capturing still and moving images. The Mode Display LED lights in orange to indicate this mode is active. The following exposure modes are available:
 Custom (C): This custom mode configures the camera with a previously-saved set of exposure options.
 Manual (M): Provides complete control over all exposure settings, including shutter speed and lens aperture (available shutter speeds depend on the aperture and lens zoom settings; see chart).
 Shutter-Speed Priority AE (Tv): Allows you to control the shutter speed settings from 1/3,200 to 15 seconds, while the camera controls the aperture. All other exposure settings are available.
 Aperture Priority AE (Av): Allows you to set the lens aperture from f/2.7 to f/8.0 (depending on the zoom setting), while the camera controls the shutter speed. In this mode, you maintain control over all other exposure variables.
 Program AE (P): Places the camera in control of shutter speed and lens aperture, while you maintain control over everything else (i.e., white balance, ISO, metering, exposure compensation, flash, etc.).
 Auto: The camera controls everything about the exposure, except for Flash and Macro modes, and image size and quality settings.
 Portrait: Uses a large aperture setting to blur the background and keep the primary subject in sharp focus.
 Landscape: Employs a small aperture setting to keep both the background and foreground in focus.
 Night Scene: Uses slower shutter speeds and flash to balance the background and subject in nighttime exposures. The slow shutter speed allows more ambient light to be recorded in the low-light areas, while the flash fully exposes the subject.
 Sports: Sets the camera to shoot in Continuous mode with Autofocus to capture moving subjects.
 Special Scene Mode: Accesses specially-tuned exposure modes for the specific situations outlined below. Each mode is selected by pressing the left or right arrow keys.
- Foliage: For trees, leaves and flowers, this mode enhances colors, making them more vibrant.
- Snow: Compensates for bright snowy backgrounds, holding detail in the snow while properly exposing the main subject and eliminating the bluish tint common in snow shots.
- Beach: Similar to snow mode, compensates for brightly lit backgrounds where sand and water dominate the scene.
- Fireworks: Optimized for night skies speckled with fireworks.
- Color Accent: Retains only the color specified in the LCD monitor while rendering all the others in black and white.
- Color Swap: Transforms the color specified in the LCD monitor to any selected color.
- Night Snapshot: Fires a flash to illuminate and freeze the foreground, while leaving the shutter open just a little longer to capture more of the ambient light in the background, while still making the scene look like a night scene.
- Indoor: Biases the exposure for common indoor lighting situations, automatically adjusting between fluorescent and tungsten light sources. The camera attempts to use flash as little as possible in this mode to allow for a more natural appearance.
Record Menu: Pressing the Canon PowerShot S3 IS's Menu button in Record mode pulls up the following options (not all options are available in all modes):
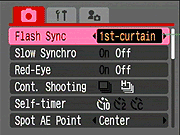 Flash Sync : For long exposures, sets the flash to fire either immediately after the shutter opens (first-curtain) or immediately before it closes (second curtain), allowing you to change the effect the flash has on the picture. Second-curtain sync produces sharp images with the blurred motion trails streaming behind them (rather than in front of the subjects), generally the effect you want in that situation.
- Slow Synchro : For dark shooting conditions in Program exposure mode, determines whether the flash is used with a long shutter time (on) or a faster shutter speed (off).
- Flash Adjust: Determines whether the flash intensity is adjusted automatically or manually. (Tv and Av modes only)
- Red Eye: Turns Red Eye Reduction mode on or off, pulsing the flash briefly to contract the subject's pupils before firing the full flash and opening the shutter.
- Continuous Shooting: Selects between Standard Continuous mode (1.5 fps) and High-Speed Continuous mode (2.3 fps).
- Self-timer: Sets the delay of the camera's self-timer to either two or ten seconds. The Custom option lets you choose delays ranging from 0 to 30 seconds, and program the camera to shoot anywhere from 1 to 10 shots when the self-timer goes off. (Very handy for group portraits, to make sure you get at least one shot with nobody blinking.)
- Spot AE Point: Sets the location of the Spot AE point (from which Spot exposure metering is determined) to either the center of the frame, or the current AF point location.
- Safety Shift: In Tv and Av mode only, automatically adjusts the exposure setting you've chosen if the camera can't get a good exposure with it.
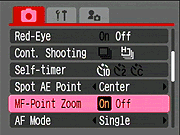 MF-Point Zoom: Turns the MF Point zoom option on or off. If on, the center of the frame is enlarged on the LCD display for better viewing while adjusting the Manual focus.
- AF Mode: Sets the autofocus mode to either Single (the camera focuses when the shutter button is depressed), or Continuous (the camera adjusts focus continually between images).
- AF Assist Beam: Sets the AF Assist Beam to on or off. If on, the bright LED on the front of the camera will illuminate when the camera is trying to focus in dim lighting.
- Tally Lamp: Determines whether or not the Self Timer/Tally Lamp LED on the front of the camera blinks while movies are recorded.
- Digital Zoom: Turns the variable digital zoom on or off.
- Review: Turns the instant image review function on or off, with available image display times from two to 10 seconds in one second steps, plus a Hold option to leave the image on the screen until the shutter button is depressed halfway again.
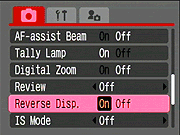 Reverse Disp.: Designates whether images are displayed in reverse when the LCD monitor is open and tilted 180 degrees.
- IS Mode: Cycles Image Stabilization mode through Off, Continuous, Shoot Only, and Panning modes. In Shoot only, IS only comes on when the shutter is pressed, and in Panning mode IS only affects vertical shake for sharper images while panning (otherwise the IS system would try to compensate for the panning motion as well).
- Converter: Used to tell the camera which conversion lens is attached to the S3 IS.
- Intervalometer: Automatically captures images at predefined intervals, from two to 100 frames with a delay of one to 60 minutes between shots, in one minute steps.
- Custom Display: Configures the information display on the LCD and EVF to show Shooting Info, Grid Lines, and a Histogram. Each display is configured for both the simple information and the more elaborate information option toggled by the Display button.
- Set Shortcut Button: Selects functions to be registered to the Shortcut/Print-Share button in Record mode. Functions that can be registered are Resolution, ISO Speed, AF Lock, AE Lock (all in still image mode only); Recording Size or Frame Rate (both for movies only); or to Photo Effect, White Balance, Image Stabilizer, My Colors, or Display Off.
- Save Settings: Saves the currently-set camera settings in both the Function and Record menus, for instant recall via the C option on the Mode dial.
Playback Mode: This mode lets you review captured images and movies on the memory card, as well as erase them, protect them, or tag them for printing and transfer. The traditional green Playback symbol denotes this mode on the Mode switch, and the Mode Display LED lights in green to indicate this mode is active. Pressing the shutter button in Playback mode takes you immediately to Record mode, something we describe as a Shooting Priority design, because the Canon PowerShot S3 IS is always ready to shoot. Pressing the Menu button displays the following options:
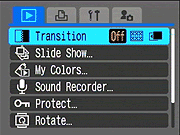 Transition: Disables transitions or applies either a fade-in between scenes of a movement effect that transitions scenes right with the Right arrow and left with the Left.
- Slide Show: Automatically plays captured images in a slide show. You can choose to show all images or just selected ones, and can set the duration of each frame from 3 to 30 seconds, or to only change when the left or right arrow is pressed. You can also choose whether to have the slide show loop back to the beginning and run continuously or not. Up to three separate slide shows of selected images can be saved for later playback.
- My Colors: Applies Vivid Color, Neutral Color, Sepia, Black-and-White, Positive Film, Lighter Skin Tone, Darker Skin Tone, Vivid Blue, Vivid Green, Vivid Red, or Custom picture effects to recorded images.
- Sound Recorder: Allows user to make stereo audio recordings up to two hours in length, limited only by the battery life and card capacity.
- Protect: Marks the current image for write-protection, or removes write-protection. Protected images cannot be deleted or manipulated, except through card formatting, which erases all files.
- Rotate: Rotates the current image 90 or 270 degrees clockwise.
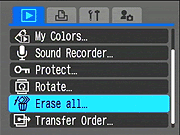 Erase All: Erases all files on the memory card, except protected ones.
- Transfer Order: Marks images to be transferred to a computer later.
Print Menu: This menu is available in the Canon PowerShot S3 IS's Playback mode, simply by pressing the Menu button and selecting the Print tab. The bottom line of the display shows how many images are selected for printing and the print method that is active.
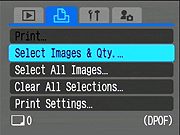 Print: Sends images tagged for printing to the printer.
- Select Images & Quantity: Allows you select images for printing and set the number of prints for each image selected.
- Select All Images: Selects all images on the memory card for printing.
- Clear All Selections: Clears all print selections.
- Print Settings: Brings up a menu of these options:
- Print Type: You can specify whether to print one image per page, an index of the images, or both.
- Date: Set printing of the date and time on or off.
- File No.: Set printing of the file number on or off.
- Clear DPOF data: Set the option to clear the DPOF tag on or off.
Setup Menu: This menu is available in all modes on the Canon S3 IS, simply by pressing the Menu button and selecting the Setup tab.
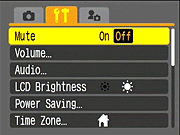 Mute: Turns the camera's start-up, operation, self-timer, shutter and playback sounds on and off. Note that the camera's error warning signal is not disabled by the Mute function.
- Volume: Displays the volume settings for the camera's start-up, operation, self-timer, shutter, and playback sounds, with each sound being able to be disabled or set to one of five levels individually.
- Audio: Allows user to select from five Mic levels, switch the wind filter on and off, and select an audio sampling rate (11.025 kHz, 22.050 kHz, and 44.100 kHz).
- LCD Brightness: Sets the brightness level of the LCD to either Normal or Bright.
- Power Saving: Accesses the camera's Auto Power Down and Display Off settings. Power Down can be enabled or disabled, and Display Off can be set to 10, 20, or 30 seconds, or 1, 2, or 3 minutes.
- Time Zone: Sets the camera's time zone for Home and World locations.
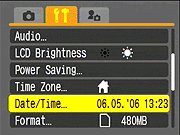 Date/Time: Sets the camera's internal calendar and clock.
- Format: Formats the memory card with an option for low-level formatting, erasing all files (even those marked for write-protection).
- File Numbering: Sets the camera to resets file numbering with each new memory card with Auto Reset or to continue numbering in sequence with Continuous.
- Create Folder: Specifies whether to capture new images in a new folder or to create a new folder for new images after a certain time.
- Auto Rotate: Specifies whether images shot with the camera held vertically appear vertically in the LCD monitor when played back.
- Distance Units: Sets the manual focus indicator to Meters/Centimeters or Feet/Inches.
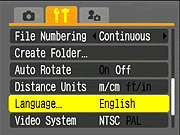 Language: Sets the camera's menu language to one of 23 choices. English is the default setting (for models sold in the US, at least).
- Video System: Sets the camera's video-out signal to NTSC or PAL timing.
- Print Method: Chooses between Auto detect and PictBridge printing method.
- Reset All: Resets camera settings to default.
My Camera Menu: This is the third menu tab on the Canon PowerShot S3 IS's menu screen, and appears in every mode.
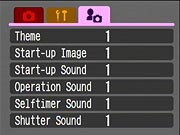 Theme: Selects a common theme for each My Camera menu settings item. Four options are available, the first one being Off. When a theme is selected, all of the following settings automatically adjust to that theme.
- Startup Image: Sets the startup image when you turn on the camera to: Black screen, Canon logo, Canon logo w / sunset, nature scene and user. You can apply your User image in Playback mode by pressing the Display button and choosing an image from the memory card. The image is copied to the camera's internal memory, and is still displayed when the card is removed.
- Startup Sound: Sets the startup sound when you turn on the camera to: No sound, Musical tone (1), Musical tone (2), or Birds chirping. You can apply User sounds in Playback mode by pressing the Display button and choosing a sound from the SD card. The sound is copied to the camera's internal memory, and is still displayed when the SD card is removed.
- Operation Sound: Sets the sound when any control or switch is use (except the Shutter button). Options include No sound, Beep, Boing, Chirp and User. See the Startup Sound item for a description of User sounds.
- Self-Timer Sound: Sets the sound that signals you when the shutter release is two seconds away. Options include No sound, Fast beeps, Telephone ring, Howling and User. See the Startup Sound item for a description of User sounds.
- Shutter Sound: Sets the shutter sound that you hear when you depress the Shutter button (there is no shutter sound in Movie mode). Options include No sound, Shutter sound, Boing, Bark and User. See the Startup Sound item for a description of User sounds.
 Fujifilm GFX 50S Review
 Fujifilm X-T3 Review
 Olympus E-M5 III Review

Follow Imaging Resource