Canon PowerShot SD1000 Design
With the look and feel of the original APS film-based Canon ELPH that graced the shelves of retailers eleven years ago, the SD1000 is small, portable and, despite its boxy shape and classic design, is quite attractive and modern-looking. Available in black-on-silver for those who prefer the retro look, the SD1000 is also available in silver-on-silver for those who prefer a more contemporary look. Despite its diminutive size--which measures 3.8 x 2.11 x 0.76 inches (85.9 x 53.5 x 19.4 millimeters)--the SD1000 is sturdily built, increasing it take-anywhere appeal. At the same time, at 4.41 ounces/125 grams (body only), it's light weight enough to wear around your neck from a lanyard when it's not stored in a pocket or purse. While the camera and its controls may be too small for those with larger hands to operate comfortably, the SD1000 is a tidy package that will inspire you to carry with you everywhere.
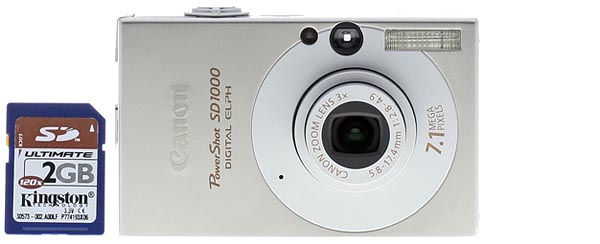
Although there's no grip on the SD1000's flat front surface, the clean design maintains the SD1000's sleek lines. The 3x, 5.8-17.4mm zoom lens (equivalent to a 35-105mm zoom on a 35mm camera) is protected by a built-in lens cover that opens and closes when the lens extends and retracts as the camera is powered on and off. Just above the lens you'll find a small orange lamp that serves three purposes: an assist beam for autofocusing in low light, a warning light when using the self-timer, and red-eye reduction. A tiny optical viewfinder can be seen from the front, just next to the camera's built-in flash. A microphone is barely visible as a tiny hole in the circular design element surrounding the lens.
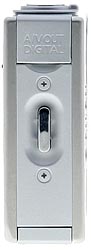
The right side of the camera (as viewed from the rear) has a small, hard plastic cover that hides the AV terminal and the mini-USB port for connecting the SD1000 to a computer or printer. A wrist strap or lanyard can be threaded through the silver eye-beam.
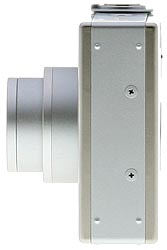
There is nothing to see on the left side (as viewed from the rear).
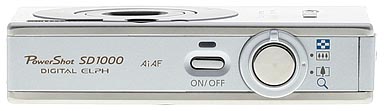
The camera's top panel is pretty simple and is home to only the power button, the shutter button and, surrounding the shutter, the zoom lever.
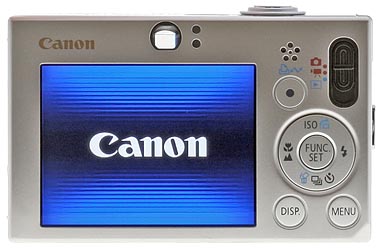
The Canon PowerShot SD1000's rear panel holds the remaining camera controls and function buttons, along with a 2.5-inch color LCD monitor for previewing and playing back images, a small optical viewfinder and two tiny status lights. The LCD information display shows detailed information about the camera settings and reports the aperture and shutter speed prior when the shutter button is halfway depressed. A small speaker sits to the left of the Mode Switch and just above the Print/Share Button. A 4-way controller or navigator ring surrounds a Function/Set button, while Display and Menu buttons are positioned below.
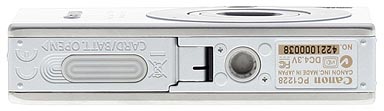
On the bottom of the camera you'll find a the battery and SD card compartment, as well as a plastic tripod mount. Depending on the style of your tripod, you may or may not be able to change the battery and/or the SD card.
Canon PowerShot SD1000 External Controls

Shutter Button: Positioned along the camera's top edge, the shutter button sets focus and exposure when halfway pressed, and fires the shutter when fully pressed.
Zoom Lever: (See image above) Surrounding the shutter button, the zoom lever controls the optical and digital zoom in Record mode. In Playback, move the lever to its widest setting and an index of nine-images is displayed. Jog the zoom lever to the wide position once again and a jump indicator appears at the bottom of the LCD; press the 4-way controller left or right to jump to the previous or following index set of images. Jog the zoom lever to the right or telephoto setting in either index display or single-shot display mode and a single image will be enlarged up to 10x; use the 4-way controller to (up/down and left/right) to scroll around the image and check for focus accuracy and details. When navigating tabbed menus, the zoom lever can be utilized to move quickly back and forth between the tabs.

Power Button: Located just left of the shutter button/zoom lever, this oblong button, which lies almost flush with the top of the camera, turns the camera on and off.

Mode Switch: Switches between Record, Video, and Playback modes.
![]()
Print/Share Button: Used for quick and easy transfer of images from camera to computer, as well as to send images directly from the camera to a compatible printer. In the manual Record mode, this button can be programmed to function as a dedicated button for any of the following: Exposure Compensation, White Balance (all options), Custom White Balance only, Digital Teleconverter, Display Overlay, Video Mode, Display Off, Play Sound Effect. In Playback mode, the Print/Share button opens up a menu to organize images into one or more categories such as people, scenery, and events.
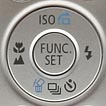
4-Way Controller/Navigator Ring: A navigational control for scrolling through settings menus. When set to Manual and Record, pressing the controller up/right/down/left provides access ISO, Flash, Drive Mode/Self-Timer, Focus (macro, normal, infinity) menu, to the right opens the Flash menu, when scrolling through menus or images in playback, the 4-way controller also provides access to ISO, Flash, Macro and Drive Mode settings. When set to Auto and Record, the options within each group of settings are limited.
Function/Set Button: (see image above) Surrounded by the 4-way controller, the Function/Set button opens the Function menu and is used to confirm selections in any menu. The Function menu offers the following options (available options vary according to shooting mode):
 Shooting Mode: Selects among shooting options. In Auto, the camera automatically selects settings; only compression and resolution options are available in the Function menu. Manual provides access to all settings. Other shooting mode options include Digital Macro, Portrait, Night Snapshot, Color Accent, Color Swap and additional scene modes: Kids & Pets, Indoor, Foliage, Snow, Beach, Fireworks, Aquarium, and Underwater.
- Exposure Compensation: Increases or decreases the exposure from +2 to -2 in one-third step increments. Press the Menu button with this item highlighted to enter Long Shutter mode, where you can set exposure times of 1, 1.3, 1.6, 2, 2.5, 3.2, 4, 5, 6, 8, 10, 13, and 15 seconds.
- White Balance: Adjusts the overall color balance of the image according to light source. Options include Auto, presets for Daylight, Cloudy, Tungsten, Fluorescent, Fluorescent H and Custom (manual). To manually set white balance, aim the camera at a white or neutral gray object, press the button and the appropriate white balance will be saved.
- My Colors: Select from Off, Vivid (increased saturation), Neutral, Sepia, Black & White, Positive Film, Lighter Skin Tone, Darker Skin Tone, Vivid Blue, Vivid Green, Vivid Red and Custom Color. Within Custom Color, adjustments (in plus/minus two-step increments) can be made: Contrast, Sharpness, Saturation , Red, Green, Blue, Skin Tone.
- Metering Mode: Chooses between Evaluative, Center-Weighted Average, and Spot modes. Evaluative analyzes the entire frame to determine exposure; Center-Weighted utilizes a large portion of the center; Spot reads from the very center of the frame to determine exposure.
- Compression: Sets the JPEG compression to Superfine, Fine or Normal.
- Resolution: Specifies image resolution. Still image resolutions are: Large (3072 x 2304); Medium 1 (2592 x 1944); Medium 2 (2048 x 1536); Medium 3 (1600 x 1200), Small (640 x 480); Postcard (1600 x 1200, locks in the resolution at Fine and overlays gray areas at the top and bottom of screen indicating what areas will not print); Widescreen (3072 x 1728).
![]()
Display Button: Positioned below the 4-way controller, the Display button controls the LCD display. In Record modes, the button cycles through off, on with no information, on with detailed shooting information. In Playback mode, the Display button cycles through no image information, basic image information, and detailed image information with a histogram.
![]()
Menu Button: To the right of the Display button, this button activates the settings menu in any camera mode. The Menu button also turns off the menu display.
 Fujifilm GFX 50S Review
 Fujifilm X-T3 Review
 Olympus E-M5 III Review

Follow Imaging Resource