Fujifilm V10 Operation
For size reasons, the Fujifilm V10 does away with a mode dial, but operating the camera is a lot easier than I expected. In fact, switching through menus and changing options was not difficult especially if you make liberal use of the F Photo Mode button which allows you to adjust basic photo settings such as image size, ISO, and color. I just wish Fujifilm had let you access the various Scene Modes through the F Photo Mode button rather than via the Menu button on the back. It would have saved a lot of time rather than having to switch back and forth between the various buttons to adjust the basics. Since the buttons on back have been reduced in size to make way for the giant screen, they take some getting used to. Much better for someone with small fingers. Users familiar with typical digicam features and nomenclature (especially Fujifilm's models) should be able to operate the camera straight out of the box, referring to the manual only for more specific details. Even novice users should need less than an hour of studying the manual and playing with the Fujifilm V10 to become familiar with its main features.
Record Mode LCD Screens In Record mode, the Fujifilm V10's LCD monitor reports the basic exposure settings, as well as other exposure settings such as flash mode, focus mode, etc. The Fujifilm V10 reports the shutter speed and aperture that will be used when the shutter button is half-pressed. The number of images available and resolution also appear. Pressing the Display button turns the information overlay off, enables an alignment grid with the information overlay, or enables the post-shot assist (which shows the last three images captured since switching the camera to record mode alongside a live view, to assist in framing shots with similar composition; a cool feature unique to the V10 and F10). The LCD display cannot be switched off without powering the camera off altogether.
Playback Mode LCD Screens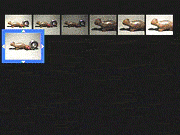 In Playback mode, the information display includes the image number and date of capture, but this information disappears after a few seconds. The Fujifilm V10's Display button cycles through several other options, where you can turn the information overlay off, enable a 30-image index display for seeing quickly what images are on the memory card, or sort images by date. Another special date-view mode is really a rather unusual feature, and could be quite useful if you have a large flash card and tend to keep images on it for weeks at a time. Up to 11 thumbnails are shown at once, alongside a bar which allows you to see the dates of all images on the flash card; you can then use the Four-way controller to select which day you want to see images from. When in playback mode, the zoom toggle lets you zoom in on the image to check small details, and the Four-way controller lets you pan around the image when zoomed in.
Fujifilm V10 Modes and Menus
Record Mode: Indicated by an icon on a red background at the top left of the Fujifilm V10's LCD display (unless the display is in image only mode), this mode allows the camera to capture images. Exposure modes include Scene Program, Auto, Manual, and Movie (Manual mode does not allow user control of shutter speed or aperture). Pressing the Menu button displays the following options (not all options are available in all modes):
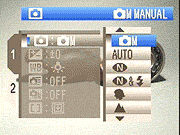 Shooting Mode: Selects from the available Shooting modes: Manual, Auto, Natural Light, Natural Light & with Flash, Portrait, Landscape, Sport, and Night
 - Exposure Compensation: Allows for +/- 2.0EV of exposure compensation from the metered exposure, in steps of 1/3EV.
- White Balance: Sets the white balance to Auto, Custom (manual setting), Fine, Shade, Fluorescent Light-1, Fluorescent Light-2, Fluorescent Light-3, or Incandescent.
- High-Speed Shooting: Increases autofocus speed. Battery life will be reduced when this is set to On.
- Continuous Shooting: Modes include Off, Top 3 (shoots and saves 3 frames), Final 3 (shoot up to 40 frames, camera saves last 3), or Long-period continuous (the camera shoots and saves up to 40 frames).
- AF Mode: Sets the autofocus mode to Center or Multi.
- Set-Up: Allows user to activate Setup Menu (see below).
- Setup Menu: Accessed from the Set-Up option in all Record or Playback menus (but not the Photo Mode or DPOF menus), the Setup menu offers the following options:
 Image Display: Turns the post-capture image review screen off, or sets it to a duration of 1.5 or 3 seconds. Also can set Zoom, where the center of the focusing position is shown enlarged.
 - Shutter Volume: Adjusts the volume of the shutter noise in three steps, or disables it altogether.
- Beep Volume: Adjusts the volume of the camera's operating sounds in three steps, or disables it altogether.
- Playback Volume: Calls up the Playback volume menu, where you can disable playback sound altogether, or set the volume in ten arbitrary steps from 1 to 10.
- Frame Number: Renews frame numbering with each new memory card, or continues numbering from card to card.
- LCD Brightness: Calls up the LCD Brightness menu, where you can set LCD brightness to the default, or adjust it in arbitrary steps from -5 to +5. This adjustment is separate from the Record-mode LCD brightness adjustment option, so the effect of the two is added together.
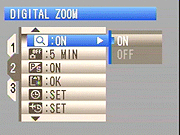 Digital Zoom: Enables or disables the camera's 5.7x digital zoom. If enabled, the camera will pause when crossing the boundary at which the optical zoom is at full telephoto and the digital zoom is enabled. You must let go of the zoom rocker briefly and then press it again to continue from the optical to digital zoom, or vice versa.
 - Auto Power Off: Turns the power save option off, or sets it to shut down the camera after two or five minutes of inactivity.
- LCD Power Save: When enabled, dims the camera's backlights after ten seconds of inactivity, to save power. (A nice feature.)
- Format: Formats the xD-Picture Card, which erases all files, regardless of whether they've been "protected" via the Playback menu.
- Date/Time: Sets the camera's internal clock and calendar.
- Time Difference: Allows a second date/time setting for another time zone.
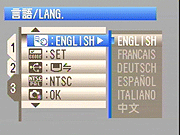 Language: Sets the menu language to English, French, German, Spanish, Italian, Chinese, or Japanese.
 - Background Color: Lets you select the color scheme for the camera's menus, with options being light / dark blue, light / dark purple, light / dark pink, light / dark orange, light / dark green, and grey / black.
- USB Mode: Sets the USB mode to PictBridge (Direct Printing) or DSC (Storage device).
- Video System: Sets the video output signal timing to match either the NTSC or PAL standard. (NTSC for the US and Japan, PAL for Europe.)
- Reset: Resets all camera settings to their defaults.
Playback Mode: Indicated by an icon on a blue/green background at the top left of the Fujifilm V10's LCD display (unless the display is in image only or thumbnail mode). Here, you can review captured images and movies, as well as manage files and set up images for printing. Pressing the Menu button displays the following options:
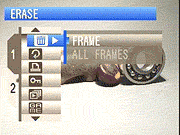 Erase: Deletes the current frame or all frames.
 - Image Rotate: Calls up the Image Rotate menu, where you can rotate the image clockwise (Down arrow) or anti-clockwise (Up arrow) in 90-degree increments. The OK button saves the change, or the Back button cancels.
- Print Order (DPOF): Sets the current DPOF order for printing, with or without dates, or resets the current DPOF order.
- Protect: Write-protects the displayed image, preventing it from being accidentally erased or manipulated (except via card formatting). Also removes protection, and offers options to protect or unprotect all images on the card.
- Playback: Enables an automated slideshow of captured images on the memory card, with options for different image durations and transitions.
- Game: Allows you to choose from four video games: Number Puzzle, Block Buster, Maze and Shooting Game.
- Voice Memo: Allows you to record a 30 second audio clip to accompany the current image. The OK button starts and stops recording; the Back button restarts recording when it is under way, and cancels recording if you have not yet started it.
 Trimming: Allows you to crop a portion from the current image using the same controls as the Playback zoom function, and save it as a new file.
 - Set-Up: Allows you to access the Setup Menu.
 Fujifilm GFX 50S Review
 Fujifilm X-T3 Review
 Olympus E-M5 III Review

Follow Imaging Resource