Olympus E-PL7 Image Quality
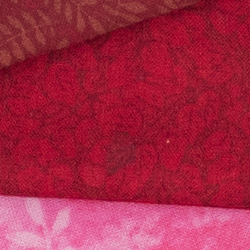
Color
Saturation & Hue Accuracy
Somewhat muted colors with good hue accuracy.
 |
||
|
ISO Sensitivity
|
||
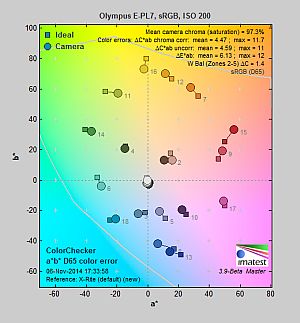
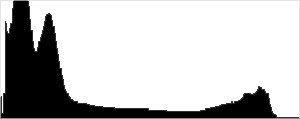
| In the diagram above, the squares show the original color, and the circles show the color that the camera captured. More saturated colors are located toward the periphery of the graph. Hue changes as you travel around the center. Thus, hue-accurate, highly saturated colors appear as lines radiating from the center. Mouse over the links to compare ISOs and click for a larger version. | ||
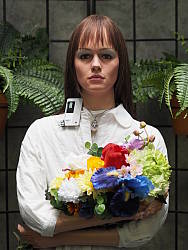
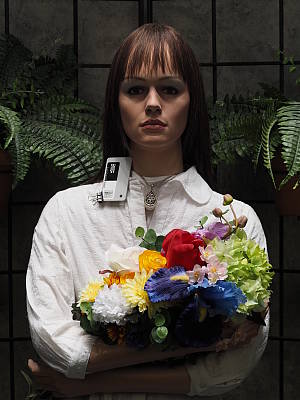
Saturation. The Olympus E-PL7's default mean saturation is noticeably lower than most cameras, at 97.3% at base ISO (about 2.7% undersaturated from ideal, and about 13% lower than the average camera.). Only reds are pushed mildly, while most colors are slightly desaturated or close to spot on. Mean saturation remains fairly stable across the ISO range, except at ISOs 12,800 and 25,600 where it is lower (96.3% and 93.9% respectively), likely an attempt to help control chroma noise. Most consumer digital cameras produce color that's more highly saturated (more intense) than what's found in the original subjects. This is simply because most people like their color a bit brighter than life.
Skin tones. The Olympus E-PL7 does fairly well here, producing natural-looking Caucasian skin tones, just slightly on the warm side. Where oversaturation is most problematic is on Caucasian skin tones, as it's very easy for these "memory colors" to be seen as too bright, too pink, too yellow, etc.
Hue. The Olympus E-PL7 exhibits good overall hue accuracy, with a Delta-C color error after correction for saturation of 4.47 at base ISO, which is better than average. And hue accuracy is good across the ISO sensitivity range. Hue is "what color" the color is.
 |
 |
 |
| See full set of test images with explanations See thumbnails of all test and gallery images |
||
Sensor
Exposure and White Balance
Indoors, incandescent lighting
Warm color cast with Auto and cool with Incandescent white balance, but very good color with the Manual setting. Average exposure compensation required.
 |
 |
| Auto White Balance +0.3 EV |
Incandescent White Balance +0.3 EV |
 |
|
| Manual White Balance +0.3 EV |
Indoors, under normal incandescent lighting, color balance is very warm with the Auto white balance setting, with a strong orange/yellow cast. Results with the Incandescent setting are however actually pretty good, but a little cool and cyan. The Manual setting is quite accurate, providing nearly neutral color balance. The Olympus E-PL7 required an average amount of positive exposure compensation here, at +0.3 EV. (Our test lighting for this shot is a mixture of 60 and 100 watt household incandescent bulbs, a pretty yellow light source, but a very common one in typical home settings here in the U.S.)
Outdoors, daylight
Natural looking colors overall, with good exposure.
 |
 |
| Manual White Balance, +0.7 EV |
Auto White Balance, Auto Exposure |
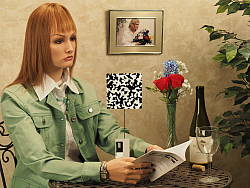
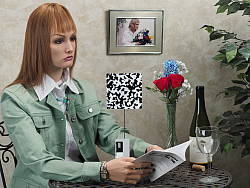
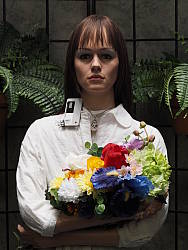
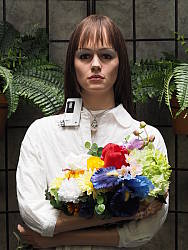
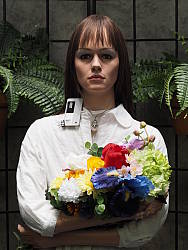
Outdoors, the Olympus E-PL7 performed well, with natural colors and good exposure. Skintones are good but slightly warm with the Auto white balance setting in our "Sunlit" Portrait shot, so we preferred Manual white balance, though it too is still a touch warm. The Olympus E-PL7 required an average amount of positive exposure compensation (+0.7 EV) to keep the mannequin's eyes relatively bright. Default contrast is a bit high, but despite the bright appearance in some areas there are very few blown highlights in the mannequin's shirt and flowers, which is much better than average. And there are few lost shadows as well. The Far-field shot has very good exposure at default settings and almost no blown highlights or lost shadows. Shadows are fairly clean, though there are signs of more aggressive noise reduction in darker regions. (Note that these shots were taken at ISO 200 as ISO 100 is an extended setting with inferior dynamic range.)
See full set of test images with explanations
See thumbnails of all test and gallery images
Resolution
~2,450 lines of strong detail in JPEGs, a little higher from processed RAW files.
 |
 |
| Strong detail to ~2,450 lines horizontal Camera JPEG |
Strong detail to ~2,450 lines vertical Camera JPEG |
 |
 |
| Strong detail to ~2,500 lines horizontal ACR processed ORF |
Strong detail to ~2,450 lines vertical ACR processed ORF |
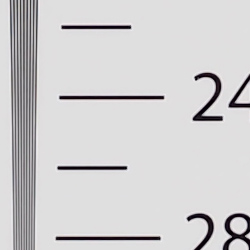
In-camera JPEGs of our laboratory resolution chart reveals sharp, distinct line patterns down to about 2,450 lines per picture height in the horizontal direction, and about the same in the vertical direction. Complete extinction of the pattern doesn't occur until about 3,200 to 3,400 lines, though. Adobe Camera Raw was able to extract just a touch more high-contrast detail in the horizontal direction here, though color moiré is more apparent near the limits of resolution. Use these numbers to compare with other cameras of similar resolution, or use them to see just what higher resolution can mean in terms of potential detail.
See full set of test images with explanations
See thumbnails of all test and gallery images
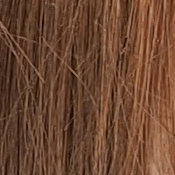
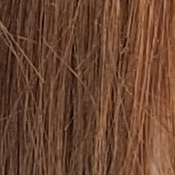
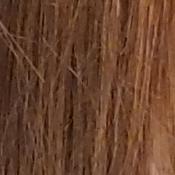
Sharpness & Detail
Very good sharpness and detail overall, though edge-enhancement artifacts on high-contrast subjects are visible. Mild noise suppression visible in the shadows.
 |
 |
| Good definition of high-contrast elements with some visible sharpening artifacts. |
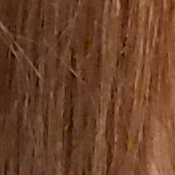
Subtle detail: Hair Noise suppression tends to blur detail in areas of subtle contrast. |
Sharpness. The Olympus E-PL7 captures very sharp images overall, though as is usually the case for most manufacturers, edge enhancement artifacts are visible on high-contrast subjects such as sharpening halos around the lines and lettering in the crop above left. Edge enhancement creates the illusion of sharpness by enhancing colors and tones right at the edge of a rapid transition in color or tone.
Detail. The crop above right shows fairly mild noise suppression artifacts in the darkest areas of the model's hair as base ISO, smudging individual strands together when contrast between them is low, though quite a few individual strands remain visible. Overall detail is very good for a 16-megapixel Micro Four Thirds model. Noise-suppression systems in digital cameras tend to flatten-out detail in areas of subtle contrast. The effects can often be seen in shots of human hair, where the individual strands are lost and an almost "watercolor" look appears.
RAW vs In-Camera JPEGs
As noted above, the Olympus E-PL7 does a great job at capturing lots of fine detail in its JPEGs, but more detail can often be obtained from carefully processing RAW files, while at the same time reducing sharpening artifacts. Take a look below, to see what we mean:
|
Base ISO (200)
|
|
 |
 |
 |
 |
 |
 |
|
Camera JPEG, defaults
|
RAW via Adobe Camera Raw
|
In the table above, we compare an in-camera JPEG taken at base ISO using default noise reduction and sharpening (on the left) to the matching RAW file converted with Adobe Camera Raw 8.4 using default noise reduction with some strong but tight unsharp masking applied in Photoshop (300%, radius of 0.3 pixels, and a threshold of 0).
As you can see, the Adobe Camera Raw conversion contains fine detail superior to the camera's Super Fine JPEG at default settings, especially in the red-leaf swatch where where much of the thread pattern is resolved, though it does leave behind more noise at default noise reduction settings. Out of camera images also have a bit more "pop," with higher contrast.
The E-PL7's JPEG engine does a very good job capturing most of the detail offered by its 16-megapixel sensor, at least at low ISOs. (And its expanded ISO 100 setting does even better, but at the cost of limited dynamic range.)
ISO & Noise Performance
Very good high ISO performance for its class.
|
Default High ISO Noise Reduction
|
 |
 |
 |
| ISO 100 | ISO 200 | ISO 400 |
 |
 |
 |
| ISO 800 | ISO 1600 | ISO 3200 |
 |
 |
 |
| ISO 6400 | ISO 12,800 | ISO 25,600 |
The Olympus E-PL7's images are quite clean and detailed at ISOs 100 though 400, though there's a minor increase in noise in the shadows as ISO rise within this range. ISO 800 shows a slight drop in overall image quality, but fine detail is still quite strong. At ISO 1600, we see some moderate detail loss due to stronger noise and noise reduction efforts, as well as more visible chroma noise in the shadows, but fine detail is still pretty good. ISO 3200 is the first step in sensitivity where image quality suffers a noticeable drop with much stronger blurring of fine detail. Image quality drops off rapidly at ISO 6400 and above, with stronger noise, visible noise reduction and sharpening artifacts, as well as a shift in color towards green and a drop in saturation.
Overall, though, high ISO noise performance is comparable to the best we've seen from a Micro Four Thirds model thus far, and even competes well with some APS-C rivals. As always, see the Print Quality section below for maximum recommended print sizes at each ISO.
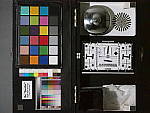
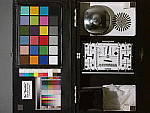
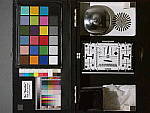
A note about focus for this shot: We shoot this image at f/4, using one of three very sharp reference lenses (70mm Sigma f/2.8 macro for most cameras, 60mm f/2.8 Nikkor macro for Nikon bodies without a drive motor, and Olympus Zuiko 50mm f/2.0 for Four Thirds and Micro Four Thirds bodies). To insure that the hair detail we use for making critical judgements about camera noise processing and detail rendering is in sharp focus at the relatively wide aperture we're shooting at, the focus target at the center of the scene is on a movable stand. This lets us compensate for front- or back-focus by different camera bodies, even those that lack micro-focus adjustments. This does mean, though, that the focus target itself may appear soft or slightly out of focus for bodies that front- or back-focused with the reference lens. If you click to view the full-size image for one of these shots and notice that the focus target is fuzzy, you don't need to email and tell us about it; we already know it. :-) The focus target position will simply have been adjusted to insure that the rest of the scene is focused properly.
Extremes: Sunlit, dynamic range and low light tests
Very good detail and dynamic range. Very good low-light performance as well.
 |
|
 |
| +0.3 EV | +0.7 EV | +1.0 EV |
Sunlight. The Olympus E-PL7 did very well with this difficult shot, requiring the average amount of exposure compensation (+0.7 EV) to keep the mannequin's face bright in this harsh lighting. As mentioned previously, despite the bright appearance of the mannequin's shirt, dynamic range is surprisingly good, with very few highlights blown and very good detail in the shadows as well. Performance here is well above average, particularly for a Micro Four Thirds model.
Because digital cameras are more like slide film than negative film (in that they tend to have a more limited tonal range), we test them in the harshest situations to see how they handle scenes with bright highlights and dark shadows, as well as what kind of sensitivity they have in low light. The shot above is designed to mimic the very harsh, contrasty effect of direct noonday sunlight, a very tough challenge for most digital cameras. (You can read details of this test here. In actual shooting conditions, be sure to use fill flash in situations like the one shown here; it's better to shoot in open shade whenever possible.)
| Face Detection | ||
 |
 |
 |
| Off at 0 EV Aperture priority, ISO 200, f/8, 1/100s |
On at 0 EV Aperture priority, ISO 200, f/8, 1/60s |
On at 0 EV Full Auto ISO 200, f/2, 1/1000s |
Face Detection
Like most cameras these days, the Olympus E-PL7 has the ability to detect faces, and adjust exposure and focus accordingly. As you can see from the examples above, it works well, as the center image with face detection enabled is much better exposed for the face without having to use exposure compensation. The Full Auto setting worked even better by choosing Portrait scene mode which used a larger aperture (f/2) and applied Auto Gradation to reduce strong shadows and highlights. An excellent performance under very difficult lighting such as this.
|
Outdoor Portrait Gradation Comparison
|
|
 |
Gradation Normal (Default) Auto Low Key High Key |
 |
|
Gradation
Similar to dynamic range optimization systems from other manufacturers, the Olympus E-PL7's Gradation setting applies local contrast adjustments in an attempt to preserve shadow detail and prevent highlight clipping with the Auto setting. Above are examples of the Normal (default), Auto, Low Key and High Key settings applied to our "Sunlit" Portrait shot with no exposure compensation. Mouse over the links to load the associated thumbnail and histogram, and click on the links to visit the full resolution image.
As you can see, the Low Key setting applies Gradation for making subjects darker (in the thumbnail and histogram above, you can see that the camera shifted levels to the left, darkening the image dramatically), while the High Key setting does the opposite for brighter subjects (shifting levels to the right so that lighter tones are blown, but darker ones are opened up). The Auto setting did a good job here, boosting shadows and midtones without blowing highlights, though the overall exposure is still a bit dim.
|
Far-field Gradation Comparison
|
|||
 |
|||
Above, we can see the Gradation options at work in our Far-field test shot series. Mouse over the links to load the associated thumbnail, and click on the links to visit the full resolution image.
|
High Dynamic Range
|
|||
 |
|||
HDR setting: |
|||
High Dynamic Range
The E-PL7's in-camera HDR feature works by combining four shots at different exposures. Two strength settings are available: HDR1 and HDR2, with the later providing a more extreme result. ISO is fixed to 200, and slowest shutter speed is 1 second (4 seconds total).
Above, you can see the E-PL7's in-camera HDR mode at work with our Far-field shot. HDR1 did a pretty good job brightening shadows and toning down highlights, though you can probably do better by using the bracketing mode and combining the images yourself in software. HDR2 mode looked overprocessed and was too bright with blown-out highlights as well as soft details and more visible noise.
Notice that the HDR images are not cropped compared to the non-HDR image, which can imply the camera does not microalign the source images, or at least can't compensate for much camera motion. This is pretty much confirmed by the user manual which says to use a tripod for HDR shots, potentially making this mode less useful than those offered by some other manufacturers, however we found we were able to capture HDR images hand-held with no alignment issues.
Dynamic Range Analysis (RAW mode)
A key parameter in a digital camera is its Dynamic Range, the range of brightness that can be faithfully recorded. At the upper end of the tonal scale, dynamic range is dictated by the point at which the RGB data "saturates" at values of 255, 255, 255. At the lower end of the tonal scale, dynamic range is determined by the point at which there ceases to be any useful difference between adjacent tonal steps. Note the use of the qualifier "useful" in there: While it's tempting to evaluate dynamic range as the maximum number of tonal steps that can be discerned at all, that measure of dynamic range has very little relevance to real-world photography. What we care about as photographers is how much detail we can pull out of the shadows before image noise becomes too objectionable. This, of course, is a very subjective matter, and will vary with the application and even the subject matter in question. (Noise will be much more visible in subjects with large areas of flat tints and subtle shading than it would in subjects with strong, highly contrasting surface texture.)
While we once performed our own dynamic range measurements based on in-camera JPEGs as well as converted RAW images (when the camera was supported by Adobe Camera Raw), we've switched to using DxO Labs' results from their DxOMark website. As technology advanced, the dynamic range of modern high-end cameras in some cases exceeded the range of the Stouffer T4110 density scale that we used for our own measurements. DxO's approach based on RAW data before demosaicing is also more revealing, because it measures the fundamental dynamic range of the sensor, irrespective of whatever processing is applied to JPEGs, or to RAW data by off-the-shelf conversion software.
In the following, we use DxO's "Print" dynamic range results, which are scaled based on camera resolution. As the name suggests, this scaling corresponds to the situation in which you print at a given size, regardless of how many megapixels the camera might have. (In other words, if you've decided to make a 13x19 inch print, that's the size you're printing, whether the camera's resolution is 16 or 300 megapixels.) For the technically-minded, you can find a discussion of the reasoning behind this here on the DxOMark website. Also note that DxO Labs uses a signal-to-noise (SNR) threshold of 1 when defining the lower boundary of acceptable luminance noise in their dynamic range measurements, which corresponds to the "Low Quality" threshold of the Imatest software we used to use for this measurement.
 |
Here, we compare the Olympus E-PL7's dynamic range to its predecessor, the E-PL5, as well as to an APS-C competitor with an identical list price at introduction, the Sony A5100.
As you can see from the above graph (click for a larger image), compared to its predecessor, the E-PL7's dynamic range is very similar which is not surprising given they use very similar if not identical sensors. The E-PL5 does however do a little better at higher ISOs, but probably not significantly enough to be able to discern in real-world images.
The Olympus E-PL7's dynamic range compares well with the Sony A5100 at low ISOs, where the Sony has only about a 1/3 stop advantage (12.7 vs 12.4 EV) at base ISO, though the Sony pulls away at higher ISOs, with about a full stop advantage at the highest common ISO. Still, a very good performance, especially for a Four Thirds sensor.
Click here to visit the DxOMark page for the Olympus E-PL7 for more of their test results and additional comparisons.
| 1 fc 11 lux |
1/16 fc 0.67 lux |
1/16 fc No NR |
|
|---|---|---|---|
| ISO 100 |
 1s, f2.8 |
 15s, f2.8 |
 15s, f2.8 |
| ISO 3200 |
 1/15s, f2.8 |
 1s, f2.8 |
 1s, f2.8 |
| ISO 25600 |
 1/125s, f2.8 |
 1/8s, f2.8 |
 1/8s, f2.8 |
Low Light
The Olympus E-PL7 performed well in low lighting, capturing bright exposures at our lowest light level at all three ISOs we test. As you'd expect, noise is low at ISO 100 (sorry, we usually test at base ISO which is 200 for the E-PL7) and well-controlled at ISO 3200 though ISO 25,600 is noisy, desaturated and probably best avoided except for small images.
We didn't notice any issues with banding (fixed pattern noise) or heat blooming, however we did spot a few bright pixels at ISO 100.
White balance was fairly neutral using the Auto setting, just slightly cool.
The camera's autofocus system was able to focus on our subject down to below the 1/16 foot-candle light level unassisted with an f/2.8 lens (albeit slowly), which is excellent, and in total darkness with the aid of its focus assist lamp.
How bright is this? The one foot-candle light level that this test begins at roughly corresponds to the brightness of typical city street-lighting at night. Cameras performing well at that level should be able to snap good-looking photos of street-lit scenes.
NOTE: This low light test is conducted with a stationary subject, and the camera mounted on a sturdy tripod. Most digital cameras will fail miserably when faced with a moving subject in dim lighting. (For example, a child's ballet recital or a holiday pageant in a gymnasium.) Thanks to their phase-detect AF systems, digital SLRs tend to do much better than point & shoots, but you still shouldn't expect a quick autofocus lock with moving subjects. The E-PL7 uses contrast-detect autofocus as is found in most point & shoot cameras, so its low-light focusing ability is less than that of most SLRs with phase-detect systems. That said, though, the larger, more sensitive pixels of the E-PL7's sensor do better under dim lighting than do the tiny pixels of most point & shoots, (A useful trick is to just prop the camera on a convenient surface, and use its self-timer to release the shutter. This avoids any jiggling from your finger pressing the shutter button, and can work quite well when you don't have a tripod handy.)
Output Quality
Print Quality
Excellent 24 x 36 inch prints at ISO 100/200; a nice 16 x 20 at ISO 1600; and a good 4 x 6 at ISO 12,800.
 ISO 100/200 images look excellent at 24 x 36 inches. A very close inspection reveals a trace of pixelation given the 16-megapixel resolution, but for normal viewing distances of a 2' x 3' print, this would never be noticed in the slightest. Fine detail is very sharp, and colors look excellent.
ISO 400 prints at 24 x 36 inches introduce the slightest trace of noise in a few flatter areas of our target, but are fine for less critical applications. 20 x 30 inch prints here look quite good with no noticeable issues.
ISO 800 almost makes our "good" grade at 20 x 30 inches. Moving down a size to 16 x 20 inches does the trick and yields a very nice print across the board with virtually no noise reduction artifacts.
ISO 1600 produces a good 16 x 20 inch print, which is quite good for an entry-level camera at ISO 1600. Fine detail and full color reproduction are on display here.
ISO 3200 is often the turning point for Micro Four Thirds cameras in general, but the E-PL7 handles it about as well as any in this class. 13 x 19 inch prints here are good with only a few areas showing minor issues with softening in the red channel and some mild noise in flatter areas.
ISO 6400 takes a fairly dramatic toll on image quality, as is typical for all but the best full-frame camera bodies on the market. 8 x 10 inch prints here pass our "good" rating, though all contrast detail is now lost in our tricky red-leaf fabric swatch.
ISO 12,800 yields a 5 x 7 inch print that almost passes our good grade, but it's the 4 x 6 inch print here that we'll pin our seal of approval on, with full color reproduction still on display here.
ISO 25,600 prints aren't terrible, as with some cameras we've seen, but they don't quite make our good grade at 4 x 6, and this setting is best avoided for most all applications.
Like its predecessor, the E-PL5 and its esteemed big brother the E-P5, the Olympus E-PL7 produces very worthwhile prints across most of the available ISO sensitivity range. It bests the E-PL5 at ISO 1600 and 3200 by a print size, and generally looks better than its predecessor as ISO rises. Fine detail and rich color reproduction are on full display up to ISO 1600, where large 16 x 20 inch prints are still possible with virtually no noise reduction artifacts. Noise and softness begin to take their usual toll in increasing degrees after this, but a good 4 x 6 inch print is still possible at ISO 12,800, which would correspond to a large onscreen image. And while the highest available ISO setting of 25,600 doesn't quite make the grade, it generally doesn't until you move to a larger sensor. A very nice performance in the print quality department by this mid-level PEN camera!
The images above were taken from our standardized test shots. For a collection of more pictorial photos, see our Olympus PEN E-PL7 Photo Gallery .
Not sure which camera to buy? Let your eyes be the ultimate judge! Visit our Comparometer(tm) to compare images from the Olympus PEN E-PL7 with those from other cameras you may be considering. The proof is in the pictures, so let your own eyes decide which you like best!
 Fujifilm GFX 50S Review
 Fujifilm X-T3 Review
 Olympus E-M5 III Review

Follow Imaging Resource