Sony Alpha A580 Modes and Menus
 When powered on, the Sony A580 is automatically placed into Record mode. The Mode dial on the left side of the A580's top panel lets you select various exposure modes. The Mode dial offers the following selection of shooting modes:
![]() Auto: Proceeding around the Sony A580's Mode Dial in a clockwise direction, the first option is the Auto mode, which gives the camera control over most exposure variables, including shutter speed, aperture, and ISO sensitivity. The user can still adjust image resolution / compression, aspect ratio, image stabilizer, flash metering, AF illuminator, color space, drive mode, flash mode (off, auto, or on). You can also control a number of live view and movie related options, including movie file format, size, and audio recording, AF method, face detection, and smile shutter.
Auto: Proceeding around the Sony A580's Mode Dial in a clockwise direction, the first option is the Auto mode, which gives the camera control over most exposure variables, including shutter speed, aperture, and ISO sensitivity. The user can still adjust image resolution / compression, aspect ratio, image stabilizer, flash metering, AF illuminator, color space, drive mode, flash mode (off, auto, or on). You can also control a number of live view and movie related options, including movie file format, size, and audio recording, AF method, face detection, and smile shutter.
![]() Program AE: In its Program AE mode, the Sony A580 controls both aperture and shutter speed automatically, and you have control over all other exposure variables, including exposure compensation. Unlike many SLRs, the A580 lacks a Program Shift function in its Program mode, however, so without switching to a Priority mode, you're stuck with whichever balance of shutter speed vs. aperture that the camera selected.
Program AE: In its Program AE mode, the Sony A580 controls both aperture and shutter speed automatically, and you have control over all other exposure variables, including exposure compensation. Unlike many SLRs, the A580 lacks a Program Shift function in its Program mode, however, so without switching to a Priority mode, you're stuck with whichever balance of shutter speed vs. aperture that the camera selected.
![]() Aperture-Priority AE: This mode allows you to manually set the lens aperture (with available apertures depending on the lens in use), while the Sony A580 selects the most appropriate shutter speed. You have control over all other exposure variables, including exposure compensation.
Aperture-Priority AE: This mode allows you to manually set the lens aperture (with available apertures depending on the lens in use), while the Sony A580 selects the most appropriate shutter speed. You have control over all other exposure variables, including exposure compensation.
![]() Shutter-Priority AE: The opposite of Aperture-Priority mode, Shutter-Priority AE allows you to set the shutter speed anywhere from 1/4,000 to 30 seconds, while the Sony A580 chooses the best corresponding aperture setting. Again, you have control over all other exposure variables, including exposure compensation. The Bulb setting that's available in Manual Exposure mode isn't available in Shutter-priority AE mode.
Shutter-Priority AE: The opposite of Aperture-Priority mode, Shutter-Priority AE allows you to set the shutter speed anywhere from 1/4,000 to 30 seconds, while the Sony A580 chooses the best corresponding aperture setting. Again, you have control over all other exposure variables, including exposure compensation. The Bulb setting that's available in Manual Exposure mode isn't available in Shutter-priority AE mode.
![]() Manual Exposure: This mode provides full control of all exposure variables, including independent control of shutter speed, lens aperture, and ISO sensitivity, and hence there is no exposure compensation function. The Control dial adjusts shutter speed by default, and adjusts the aperture when turned while holding down the Exposure Compensation button. The shutter speed range also includes a Bulb setting, allowing long exposures for as long as you hold the Sony A580's Shutter button down. A display in the viewfinder or on the rear panel in live view mode reports whether the Sony A580 thinks your settings will result in under, over, or correctly exposed photos.
Manual Exposure: This mode provides full control of all exposure variables, including independent control of shutter speed, lens aperture, and ISO sensitivity, and hence there is no exposure compensation function. The Control dial adjusts shutter speed by default, and adjusts the aperture when turned while holding down the Exposure Compensation button. The shutter speed range also includes a Bulb setting, allowing long exposures for as long as you hold the Sony A580's Shutter button down. A display in the viewfinder or on the rear panel in live view mode reports whether the Sony A580 thinks your settings will result in under, over, or correctly exposed photos.
![]() Sweep Panorama: Captures multiple images in a burst for as long as the shutter button is held down, then automatically stitches them into either a 2D panorama, or a 3D panorama that's saved as a multi-picture object file. Focus and exposure are locked from the first frame.
Sweep Panorama: Captures multiple images in a burst for as long as the shutter button is held down, then automatically stitches them into either a 2D panorama, or a 3D panorama that's saved as a multi-picture object file. Focus and exposure are locked from the first frame.
![]() Scene: This mode provides access to the eight preset shooting modes via a Scene Selection menu. Scene modes available are: Portrait, Sports Action, Macro, Landscape, Sunset, Night View, Hand-held Twilight, and Night Portrait.
Scene: This mode provides access to the eight preset shooting modes via a Scene Selection menu. Scene modes available are: Portrait, Sports Action, Macro, Landscape, Sunset, Night View, Hand-held Twilight, and Night Portrait.
![]() Flash Off: This mode functions identically to the standard Auto mode, but disables use of flash -- perfect for shooting in situations where flash might prove objectionable, such as in museums.
Flash Off: This mode functions identically to the standard Auto mode, but disables use of flash -- perfect for shooting in situations where flash might prove objectionable, such as in museums.
Playback Mode The Playback button on the rear panel accesses the A580's Playback mode, which rather unusually allows you to review either captured still images, or movies -- but not both side by side. The left and right arrow keys scroll forward and backward one image or movie at a time, and turning the Control dial has the same effect. The Display button cycles through the various display modes -- image only, image plus basic information, and RGBY histogram with detailed information, of which only the first two modes are available in movie playback. Using the AEL (Enlarge) and Exposure Compensation (Reduce) buttons, you can enlarge captured still images by as much as 11.8x, while the arrow keys pan around the zoomed image. Panoramic images can be automatically scrolled across the screen by pressing the AF (OK) key, and paused with a second press. The same controls are used to play, pause, and cue through movie files. By pressing the Reduce key without playback zoom active, the A580 can also display images or movies in an index format for quick viewing, with either four or nine thumbnails per page. The index includes tabs on the left hand side with which to switch between still image or movie playback, and this can also be done through a Playback menu option. The A580 also remembers whether you captured a still image or movie most recently, and defaults to entering the Playback type relevant to the last image or movie capture performed.
Sony Alpha A580 Menu Details
Pressing the Menu button provides access to the camera's main menu system, while the Function button calls up the separate Function menu when in Record mode. Below are Sony A580 menu options and their descriptions.
Record Menu 1:

| Record Menu Options: Screen 1 | ||
Top-Level Selection |
Second-Level |
Notes |
Image: Size |
3:2 aspect mode:
- L:16M 16:9 aspect mode: - L:14M |
Sets the pixel dimensions of captured still images 3:2 16:9 |
Image: Aspect Ratio |
- 3:2 - 16:9 |
Select normal or HDTV wide screen
aspect ratios for images. |
Image: Quality |
- RAW - RAW & JPEG - Fine - Standard |
Specifies the compression level and file type of images. Raw files are always recorded at maximum resolution, ignoring Image Size setting. JPEG resolution / quality is fixed to Large / Fine when using Raw & JPEG mode. |
Movie: File Format |
- AVCHD - MP4 |
Selects AVCHD or MP4 compression for movies. AVCHD is only available for high-def 1080i video (17Mbps, 1,920 x 1,080 pixels, interlaced). AVCHD video is saved at 60 fields per second , from 30 frames per second sensor output. MP4 is 30fps progressive scan, and available at two lower resolutions -- non-standard high-def (1,440 x 1080, 12 Mbps), and standard-def VGA (640 x 480, 3Mbps). Audio is Dolby Digital for AVCHD, and AAC for MP4. (All frame / field rates for NTSC cameras; PAL cameras have 25 fps sensor output, 25 fps MP4, and 50 fps AVCHD.) |
Movie: Size |
- 1,920 x 1,080 - 1,440 x 1,080 - VGA |
1,920 x 1,080 pixel option is only available when file format is set to AVCHD. Lower-resolution options are only available when file format is set to MP4. |
Movie: Audio Recording |
- On - Off |
Allows sound recording during movie capture to be disabled altogether. |
SteadyShot |
- On - Off |
Enables or disables the sensor-shift type SteadyShot function, which corrects for blur caused by camera shake, but should be disabled when the camera is on a tripod. |
Record Menu 2:

| Record Menu Options: Screen 2 | ||
Top-Level Selection |
Second-Level |
Notes |
Panorama: Size |
- Standard |
When set to Standard, horizontal panoramas are limited to 15.2 megapixels, and vertical panoramas to 8.4 megapixels. In Wide mode, horizontal panoramas are 23.0 megapixels, and vertical panoramas are 12.0 megapixels. |
Panorama: Direction |
- Right |
Selects in which direction the camera will be panned when using the Sweep Panorama function. |
3D Panorama: Image Size |
- 16:9 |
When set to 16:9, 3D panoramas are recorded at HDTV-friendly 1,920 x 1,080 pixel resolution. The Standard setting records 3D panoramas at 5.3 megapixels, and the Wide setting at 7.7 megapixels. |
3D Panorama: Direction |
- Right |
Selects in which direction the camera will be panned when using the 3DSweep Panorama function. |
Flash Control |
- ADI Flash - Pre-flash TTL |
Selects the flash metering method.
ADI uses pre-flash, but also considers distance info provided by lens. Pre-flash
TTL uses exposure calculated with pre-flash only. |
AF Illuminator |
- Auto - Off |
The A580 lacks an AF assist lamp, so unless an external flash with AF illuminator is attached to the hot shoe, the camera's popup strobe is used to assist AF by firing a burst of low-power flashes. |
AF Method |
- Contrast AF - Phase-detect AF |
Selects whether the A580 should use contrast detection or phase detection autofocus in Focus Check Live View mode. Phase detection AF is always used in all other modes. Contrast detection is slower, and only suitable for static subjects, but is potentially more accurate, doesn't interrupt the live view feed, and allows the AF point to be placed almost anywhere in the image frame. Phase detect AF if faster, but more prone to back / front focus issues, interrupts the live view feed to drop the mirror, and is limited to the 15 physical points (11 manually selectable) on the AF sensor. |
Record Menu 3:

| Record Menu Options: Screen 3 | ||
Top-Level Selection |
Second-Level |
Notes |
Color Space |
- sRGB - Adobe RGB |
Changes the color space setting. |
Long Exposure NR |
- On - Off |
The A580 can perform dark frame subtraction noise reduction
for exposures longer than one second. This cannot be disabled in Auto or Scene Selection modes, and cannot be enabled during continuous shooting, bracketing, panorama, hand-held twilight, or multi-frame NR shooting. |
High ISO NR |
- Auto - Weak |
Noise reduction levels at high ISOs. Only applies to JPEG images. Cannot be set to Auto during continuous shooting or bracketing. Cannot be set to Weak in Auto, Sweep Panorama, or Scene modes. |
Custom Menu 1:

| Custom Menu Options: Screen 1 | ||
|
Top-Level
Selection |
Second-Level
|
Notes
|
Eye-Start AF |
- On - Off |
The A580's Eye-Start AF feature automatically starts focusing as soon as your eye is placed against the viewfinder. The IR sensor used to detect this can be fooled when certain viewfinder accessories are attached, or the camera is worn with a neck strap, so it may be desirable to disable this feature to save battery life. |
Function of AEL Button |
- Focus magnifier - AEL |
Selects whether the AEL button should be used to access the focus magnifier function, or to perform an exposure lock, when using the Focus Check Live View mode. The focus magnifier allows either 7.5x or 15x zoom to confirm precise focus, and the zoomed area can be moved anywhere within the image frame. |
AEL |
- Hold - Toggle |
Determines whether exposure lock is retained only while the AEL button is held down, or locked and unlocked with sequential presses of the AEL button. |
Focus Hold Button |
- Focus Hold - D.O.F.Preview |
For lenses with a focus hold button, the function can be changed to act as a depth-of-field preview button instead. |
Red Eye Reduction |
- On - Off |
If On, low-power flash bursts are used immediately before exposure, to reduce the probability of red-eye. |
Release Without Lens |
- Enable - Disable |
Allows a photograph to be taken when the camera doesn't detect an attached lens. This is useful when shooting with lenses that lack any electronic contacts, such as when using a telescope attachment. |
Auto Off w/ Viewfinder |
- On - Off |
Ordinarily, the A580 uses its Eye-Start AF sensor to automatically disable the LCD display when you bring the camera to your eye in OVF mode. When set to off, the LCD remains active until manually disabled. |
Custom Menu 2:

| Custom Menu Options: Screen 2 | ||
|
Top-Level
Selection |
Second-Level
|
Notes
|
Grid Line |
- Rule of 3rds Grid - Square Grid - Diagonal + Square Grid - Off |
If enabled, the A580 shows grid lines on the live view feed, useful for precise image framing. These can either split the frame into a 3 x 3 grid (aka rule of thirds), a 6 x 4 grid, or a 4 x 4 grid plus diagonal lines from the frame corners to the center. |
Histogram |
- On - Off |
Enables or disables a small luminance histogram near the bottom right corner of the LCD display or electronic viewfinder in Record mode. When active, this replaces much of the info in the EVF's "detailed info" view, and the LCD's "partial info" display, including the shutter speed and aperture indicator gauges. |
Auto Review |
- 10 sec. - 5 sec. - 2 sec. - Off |
Sets the display time for an image immediately
post-capture, or turns review off. |
Playback Menu 1:

| Playback Menu Options: Screen 1 | |||
|
Top-Level
Selection |
Second-Level
|
Third-Level
|
Notes
|
Delete |
- Multiple images - All in folder |
Lets
you delete all photos in the current folder, or only marked photos. |
|
Still / Movie Select |
- Still - Movie |
One of the more unusual design features of the Sony A580 is that it completely separates still images from movies in Playback mode. You can't browse directly from a still image to a movie, view thumbnails or slideshows containing both still images and movies at once, or access menu options except those related to the current data type. This option selects whether the A580 should display still images or movies in Playback mode. The change can also be accomplished by going to thumbnail mode, and then switching between the still image and movie tabs. |
|
Slide Show |
- Repeat |
- On - Off |
Display slide show of captured images or movies. |
- Interval (still image mode only) |
- 1 sec - 3 sec - 5 sec - 10 sec - 30 sec |
||
- Image type (still image mode only) |
- All - Display 3D only |
||
- Movie type (movie mode only) |
- All - AVCHD - MP4 |
||
- Enter |
|||
3D Viewing |
Only accessible when connected to a 3D-compatible TV via HDMI. Allows the camera to be set only to display 3D images. |
||
Protect |
- Multiple images - Cancel all images (still image mode only) - Cancel all movies (movie mode only) |
Write protects images or movies, or removes
protection. |
|
Specify Printing (Still image mode only) |
- DPOF setup |
- Multiple Images - Cancel All |
Sets up photos for DPOF (Digital Print Order
Format) printing on a compatible standalone printer. |
- Date imprint |
- On - Off |
||
- Enter |
|||
Volume Settings (Movie mode only) |
- 7 - 6 - 5 - 4 - 3 - 2 - 1 - 0 |
Selects the playback volume for movies, or disables sound playback. |
|
Playback Menu 2:

| Playback Menu Options: Screen 2 | |||
|
Top-Level
Selection |
Second-Level
|
Third-Level
|
Notes
|
Select Folder (Still image mode only) |
- Folder name selection dialog |
Browse images from one specific folder only. |
|
Select Date (Movie mode only) |
- Date selection dialog |
Browse movies from one specific date only. |
|
Playback Display |
- Auto rotate - Manual rotate |
Sets whether the camera automatically rotates
portrait orientation images in Playback mode. |
|
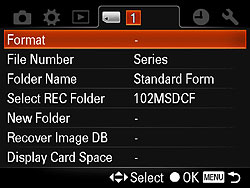
Storage Menu 1:
| Storage Menu Options: Screen 1 | |||
|
Top-Level
Selection |
Second-Level
|
Third-Level
|
Notes
|
Format |
- Enter - Cancel |
Formats the selected memory card,
erasing all files (even protected ones). |
|
File Number |
- Series - Reset |
Set whether filename continues
to increment from last image, regardless of whether folder or card has
changed, or the card has been formatted. |
|
Folder Name |
- Standard form - Date form |
Select standard folder names (i.e.,
100MSDCF), or include the date in the folder name (i.e.., 10170101). |
|
Select Recording Folder |
- Folder selection dialog
|
Selects current folder. |
|
New Folder |
Create a new folder with a number incremented
from the largest previous number. |
||
Recover Image DB |
Check image database file? - Enter - Cancel |
Allows a corrupted database file to be rebuilt. |
|
Display Card Space |
Number of remaining still images / Minutes of remaining movie recording - OK |
Figures shown are for currently selected resolution / compression. |
|
Date and Time Menu 1:

| Date and Time Menu Options: Screen 2 | |||
Top-Level Selection |
Second-Level |
Third-Level |
Notes |
Date / Time Setup |
Daylight Savings |
- On - Off |
Set the cameras internal clock and calendar. |
Fields for: - Month - Day - Year - Hour - Minute |
|||
- Date format |
- Y-M-D - D-M-Y - M-D-Y |
||
Area Setting |
World map with cities in currently selected time zone displayed. |
Left / right arrows select time zone, up and down arrows adjust daylight savings. |
|
Setup Menu 1:

| Setup Menu Options: Screen 1 | |||
|
Top-Level
Selection |
Second-Level
|
Third-Level
|
Notes
|
LCD Brightness |
- Brightness Setup |
- Auto - Manual |
Adjust LCD brightness. |
- Level selection dialog (For Manual brightness setup only) |
- -2 to +2 |
||
Power Save (LV) |
- 30 min - 5 min - 1 min - 20 sec - 10 sec |
Determines the amount of inactivity time that
will cause camera to enter a low power mode when using Optical Viewfinder mode. Pressing shutter button half-way
exits power save mode. |
|
Power Save (OVF) |
- 30 min - 5 min - 1 min - 20 sec - 10 sec |
Determines the amount of inactivity time that
will cause camera to enter a low power mode when using Optical Viewfinder mode. Pressing shutter button half-way
exits power save mode. |
|
Control for HDMI |
- On - Off |
Enables or disables Consumer Electronics Control (HDMI-CEC), which allows certain playback functions to be remotely controlled from an HDMI-attached high definition display's remote control. |
|
Language |
- English |
Menu language setup. Retail cameras may have more choices; these were the only ones in our review sample. |
|
Help Guide Display |
- On - Off |
Enables or disables the help guide display function, which pops up helpful information when changing operating modes or browsing the menu system. |
|
USB Connection |
- Mass Storage - PTP |
Sets USB mode. |
|
Setup Menu 2:

| Setup Menu Options: Screen 2 | |||
Top-Level Selection |
Second-Level |
Third-Level |
Notes |
Audio Signals |
- On - Off |
Enables sound during self-timer
countdown, etc. |
|
Cleaning Mode |
After cleaning, turn camera off. Continue? - Enter - Cancel |
The A580 uses its sensor shift mechanism to shake dust from the optical low pass filter overlying the sensor, a function performed automatically whenever the camera is switched off. The cleaning function can also be performed manually on demand with this option. After performing this operation, Sony recommends removing the lens and holding the camera lens mount-side down, then using an air blower (but not a spray blower) to clear dust from the sensor, rear of the translucent mirror, and surrounding areas. Will warn if there is insufficient power to proceed. |
|
Pixel Mapping |
Attach the lens cap. Continue? - Enter - Cancel |
Maps the location of stuck pixels on the image sensor, and uses this information to automatically correct these pixels in subsequently captured images. |
|
Version |
Version number - OK |
Displays the current firmware version of the camera body. |
|
Demo Mode |
- On - Off |
When enabled, the camera performs its demo routine after one minute of inactivity. |
|
Reset Default |
Reset Default? - Enter - Cancel |
Returns all settings to their defaults, except for date/time setup, and area setting. |
|
Function Menu:

| Function Menu Options | |||
Top-Level Selection |
Second-Level |
Third-Level |
Notes |
Drive Mode |
- Single-shot Advance - Continuous Advance Hi / Lo - Speed Priority Continuous - 2 / 10 sec. self-timer -Bracket Continuous 0.3 / 0.7 EV - Bracket White Balance Hi / Lo - Remote Commander |
Continuous Advance Hi is 5 frames per second max. Continuous Advance Lo is 3 fps max. Live View mode is fixed to Continuous Lo, while Focus Check Live View mode is fixed to Continuous Hi. Speed Priority Continuous fixes exposure and focus from the first shot, but allows seven frames per second in all shooting modes except for Sweep Panorama, 3D Sweep Panorama, and all scene modes bar Sports Action. |
|
Flash Mode |
- Off - Auto - Fill-flash - Slow sync - Rear sync. - Wireless |
Wireless flash shooting requires
HVL-F58AM or HVL-F42AM external flash. |
|
Autofocus Mode |
- Single-shot AF - Automatic AF - Continuous AF |
Automatic selects between single-shot and continuous AF as appropriate. |
|
AF Area |
- Wide - Spot - Local |
Wide option lets the camera choose
AF area from all fifteen points, Spot uses center focus area, Local allows user to choose from a subset of 11 AF points. |
|
Face Detection |
- Off - On |
If enabled, faces are taken into account when determining focus and exposure. |
|
Smile Shutter |
- Off - On (Slight Smile) - On (Normal Smile) - On (Big Smile) |
If enabled, automatically captures an image when a smile is detected. Smile detection sensitivity can be adjusted in three steps. |
|
ISO Sensitivity |
- Multi-frame Noise Reduction |
- Auto
- 100 - 200 - 400 - 800 - 1600 - 3200 - 6400 - 12800 - 25600 |
Multi-frame noise reduction captures multiple images in sequence, then combines them into a single image with reduced overall noise. This mode is only suitable for relatively static scenes. |
- Auto - 100 - 200 - 400 - 800 - 1600 - 3200 - 6400 - 12800 |
|||
Metering Mode |
- Multi segment - Center weighted - Spot |
Metering mode is fixed to Multi-segment in Auto and Scene modes. |
|
Flash Compensation |
- -2 to +2 EV in 1/3 EV steps |
Sets the flash exposure compensation
level in EV. |
|
White Balance |
- Auto WB |
Custom option sets white balance manually from a neutral target. |
|
- Daylight - Shade - Cloudy - Incandescent - Fluorescent - Flash |
- -3 to +3 step adjustment (except Fluorescent, which is -1 to +2 step) |
||
- Color Temperature |
- 2500 to 9900K in 100K steps |
||
- Color filter |
- G9 (green) to M9 (magenta) |
||
- Custom |
- Custom - Custom Set |
||
DRO / Auto HDR |
- D-R Off |
DRO adjusts tone curve to bring out shadow detail. HDR merges multiple sequential shots in-camera to create a single exposure with increased dynamic range. |
|
- DRO |
- Auto - Level 1 to 5 |
||
- HDR |
- Auto - 1.0 to 6.0 EV in 1.0 EV steps |
||
Creative Style |
- Standard - Vivid - Portrait - Landscape - Sunset - B/W |
- Contrast - Saturation - Sharpness |
Customizable styles start with a preset
style, but allow contrast, saturation (except B/W), and sharpness, adjustments within a +/- 3 step range. |
 Fujifilm GFX 50S Review
 Fujifilm X-T3 Review
 Olympus E-M5 III Review

Follow Imaging Resource