Nikon D3000 Optics
Kit Lens
 The Nikon D3000 ships in kit form with the same Nikkor AF-S 18-55mm f/3.5-5.6G DX VR lens that comes with the D5000 kit. To better compete with models from brands such as Olympus, Pentax, and Sony that have built-in image-stabilization, this kit lens comes with Nikon's excellent Vibration Reduction (VR) technology to help compensate for camera shake. We tested a sample of the Nikkor 18-55mm f/3.5-5.6G ED AF-S DX VR on SLRgear.com. Optical performance is so-so wide open, but the lens is capable of very good sharpness if stopped down one or two f-stops, and the added image stabilization should come in handy in low-light situations. While sharpness wide-open is only average, this newer kit lens performs better overall than the original, non-VR 18-55mm, and is enormously better when it comes to flare: The previous version was subject to rather extreme veiling flare when shooting high-contrast subjects under bright conditions.
Kit lenses work well enough for most consumers, and serve their purpose, getting you started without breaking the bank; but a big part of the attraction with SLRs is that you can easily trade up to a better lens when your finances improve, and extend your reach to wider angle, telephoto, or macro photography just by adding to your lens collection. The 18-55mm VR lens that comes with the Nikon D3000 will do a fine job until such time as budget and desire lead you to start building a lens collection.
Lens Compatibility
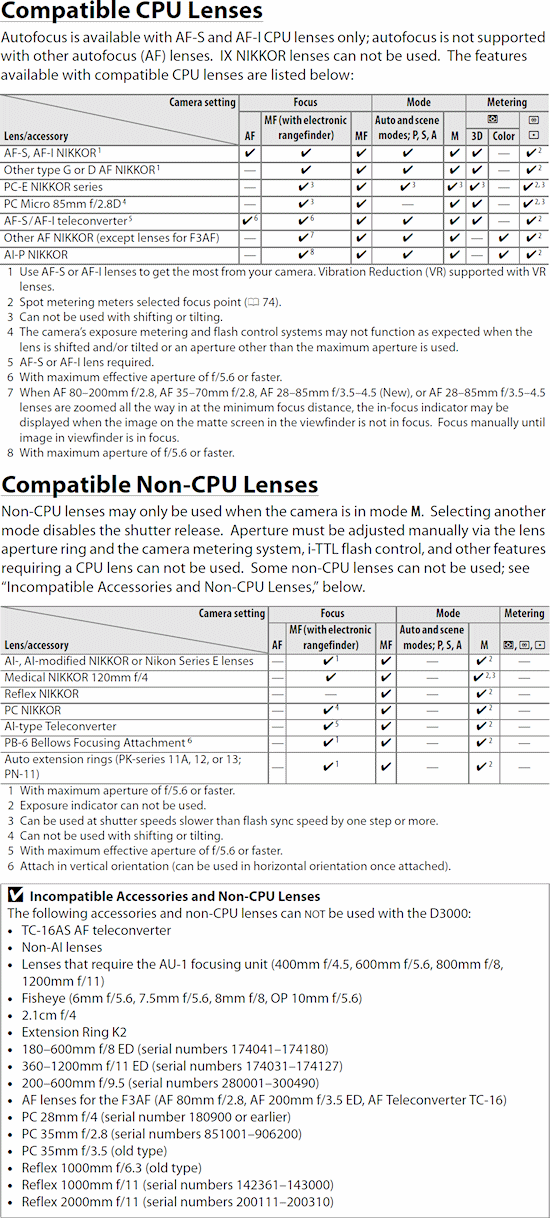
Like the Nikon D40, D40x, D60, and D5000 before it, the Nikon D3000 drops autofocus support for the older AF lenses whose focus mechanisms were driven from the camera. These lenses have what looks like a little screwdriver slot on their mounting flange that couples with a protruding, screwdriver-looking shaft on the camera body. A motor in the camera body is thus required to drive the lens mechanics to adjust focus.
More recent Nikkor lenses have motors built into the lens body, which tend to be both faster and quieter than the old-style drive system, as well as allowing the camera body to be lighter, smaller and cheaper. These newer lenses carry an AF-S or AF-I designation in their name, and are the only types of lenses the D3000 can autofocus with. CPU-equipped lenses lacking built-in focus motors can be used in manual focus mode, and type G or D lens types will also support full 3D color matrix metering for more accurate exposures, particularly when flash is being used. (You can tell CPU-equipped lenses by the set of five electrical contacts arrayed on the side of the lens flange.)
The tables below (courtesy Nikon Inc.) tell the full story of lens compatibility for the Nikon D3000.
Focusing Options
The Nikon D3000 inherits the same Multi-CAM 1000 AF sensor module used in the D5000, so many of its basic specs mirror those of the D5000 quite closely. As shown in the review section covering the viewfinder, the D3000 has a total of 11 autofocus regions, arranged with 9 in an almost square matrix in the central area of the frame, plus two additional points positioned to the right and left of the others. Each of the 11 focus areas can be directly selected, or an Auto-area AF mode can measure all 11 focus areas, then automatically determine which of them are on the primary subject and activates only those areas. As with the D5000, only the center sensor is cross-type, able to respond to subject detail oriented either horizontally or vertically.
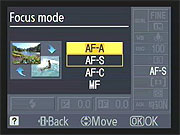 The Nikon D3000 lets you choose either auto or manual focus, but it doesn't have the small AF mode dial on the front of the camera as found on higher-end Nikon DSLRs. Instead, the switch on the lens must be used. Setting the switch to "M" puts the lens into manual focus mode, while "A" places it in autofocus mode. Single-servo AF (AF-S), Continuous-servo AF (AF-C), Auto-servo AF (AF-A), and Manual focus (MF) options can be selected via the menu system. Single-servo AF is best for stationary objects, as the camera sets focus only once when the Shutter button is first pressed halfway (or if the AF-ON function is set, when the AE-L / AF-L button is pressed). Continuous-servo AF means that the camera continuously adjusts the focus, as long as the Shutter button is halfway pressed, suitable for moving objects. In Auto-servo AF mode, the camera begins focus operations in Single-servo mode, but switches to Continuous-servo AF if it detects motion within the active AF area.
There's an important difference between Single and Continuous Servo modes: In Single-servo mode, the shutter won't release unless the lens is focused, or the lens itself is set to manual focus -- what's known as Focus Priority. In Continuous-servo mode however, the camera operates in Release Priority -- the shutter will fire regardless of the state of focus. If you want to be sure that the camera is focused when you snap the picture, use Single Servo mode. Use Continuous Servo for moving subjects, and/or times when the instant of shutter release is more important to you than sharp focus.
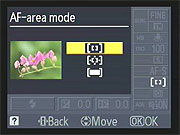 The AF Area Mode option on page two of the Shooting Menu, and duplicated in the information display (see right) lets you select between Single Area, Dynamic Area, and Auto AF modes, and includes the new 3D Tracking mode, brought over from Nikon's recent pro-level SLRs. Single Area AF simply means that the camera judges focus based on one part of the subject, and the user can manually select the AF point by pressing the arrow keys. Dynamic Area AF employs all of the autofocus points, though you can still manually select the main point. When Dynamic Area focusing is enabled, the camera first focuses on the subject in the primary focus area. When the subject moves to a different AF area, the camera shifts the focus to "follow" the subject. This is great for irregularly moving subjects. (Sports and kids come to mind.) The Auto-area AF option means that the camera first focuses on the subject in whatever single AF area is selected, but will switch to Dynamic Area AF if it detects subject motion. The new 3D Tracking mode uses the 420-element RGB exposure/white balance sensor to aid in subject tracking.
In any of the AF modes other than Auto Area, you can select the focus area by using the up, down, right, or left arrow directions on the control rocker. There are two methods by which you can lock focus on the Nikon D3000. The first is to half-press the Shutter button to lock the focus, placing your subject in the selected focus area, halfway pressing the Shutter button, then realigning the composition and firing the shutter. (This is the default behavior of the Shutter button, but if the AE-L/AF-L button is set to AF Lock, it will override the shutter button as long as it's held down.) Alternatively, when using Single Servo AF, you can press the AF-L/AE-L button to lock focus (and exposure, unless that button is set for focus only in Custom Settings menu f2). Keeping this button pressed will lock focus and/or exposure, even if the Shutter button is released. This lets you recompose the photograph without keeping your finger on the Shutter button, but on the AE-L/AF-L button instead. (Reducing the chance that you'll accidentally trip the shutter when you don't intend to.)
There are several options available for the AE-L/AF-L button, which can be set via Custom Settings Menu f2. You can program it to lock either focus or exposure separately, or both together (the default). You can also change its operation so a single press locks and holds the exposure setting. (No need to keep the button pressed down.) Finally, you can set the AE/AF lock button so it alone controls the autofocus system, meaning the autofocus won't actuate when the shutter button is half-pressed, only when the AE/AF lock button is pressed instead.
AF Assist
 Like past Nikon DSLRs with built-in flashes, the D3000's AF-assist light is a bright incandescent bulb that emits from the body near the handgrip. We thought to call particular attention to it, because some DSLRs use the flash as an AF-assist light. This would be fine, but some models also require that the flash be used in the exposure, so there's no way to have AF assist for available-light shots. The Nikon D3000 doesn't have this limitation.
Anti-Dust Technology
The Nikon D3000 includes a two-pronged approach to fighting dust. The dust reduction system previously seen on the D5000 digital SLR has been adopted for the D3000, where the optical low pass filter over the sensor is vibrated to shake off dust. In addition, Nikon has coupled this with what it is calling the "Airflow Control System". In essence, the camera's internals have been designed so as to control the flow of air -- along with the dust the air is carrying -- when the shutter is triggered, channelling dust particles away from the sensor.
The Nikon D3000 lets you choose when the sensor is ultrasonically cleaned. Selections available in the Setup Menu are Clean at Startup, Clean at Shutdown, Clean at Startup & Shutdown, or Cleaning Off. You can also lock-up the mirror for manual cleaning (see below). It's important to check that you have sufficient power available while cleaning the sensor though. When the camera is switched off or the power runs out, the mirror and shutter will return to their normal positions- potentially causing damage if there's something blocking their path. Helpfully, the Nikon D3000 will attempt to give a warning roughly two minutes before the power runs out, by flashing the self-timer lamp and emitting a beeping sound -- a good warning to get your cleaning supplies out of the camera pronto!
Despite the new dust cleaning features, we haven't seen an automatic system yet that's capable of removing all dust. So while this is a nice feature to have, don't be fooled into thinking that you won't have to either learn how to clean your sensor or send the camera in for cleaning.
Everyone understands that lenses sometimes get dust on them and need to be cleaned, and there are a lot of lens-cleaning cloths, solutions and other accessories on the market that work well. BUT, what do you do when your sensor gets dusty? Dust specks on the sensor tend to show up when shooting at very small apertures, appearing as dark blobs on your images. They're distracting at best, a terrible nuisance at worst, if you end up having to retouch every image to rid of them.
Most of us are naturally leery about the idea of poking around inside the delicate innards of our DSLRs to wrestle with recalcitrant dust specks. Gently blowing the sensor surface (actually, the surface of the anti-aliasing filter) with compressed air gets rid of some dust, but there's invariably a lot that just stays stuck, no matter what. So what do you do?
If you've got dust specks on your sensor (and sooner or later you will), you're going to need to clean it. There are a lot of products out there intended to address this need, but a distressing number of them work poorly (if at all), and many are grossly overpriced. Advertising hype is rampant, with bogus pseudo-scientific jargon and absurd product claims run rampant. And prices -- Did I mention prices? How about $100 for a simple synthetic-bristle brush?
So how do you know what product to use?
We don't pretend to have used everything currently on the market, but can tell you about one solution that worked very well for us. The "Copper Hill" cleaning method is straightforward and safe, and in our routine usage here at Imaging Resource, highly effective. Better yet, the products sold by Copper Hill Imaging are very reasonably priced. Best of all, Nicholas R (proprietor of Copper Hill) has put together an amazingly detailed tutorial on sensor cleaning, free for all.
Sensor cleaning is one of the last things people think about when buying a d-SLR, but it's vital to capturing the best possible images. Take our advice and order a cleaning kit from Copper Hill right along with your d-SLR, so you'll have it close at hand when you need it: You'll be glad you did!
(While they've advertised on our sister site SLRgear.com from time to time, we receive no promotional consideration from Copper Hill for this note. We just think their sensor cleaning products are among the best on the market, and like their way of doing business. -- We think you will too. Check them out.)
Kit Lens Test Results
Zoom
Good performance with the 18-55mm VR kit lens.
 |
 |
| 18mm | 55mm |
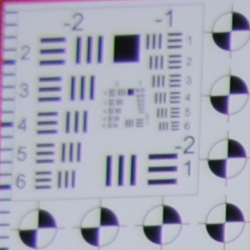
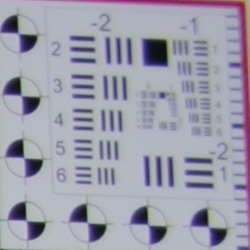
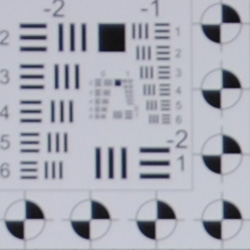
The Nikon D3000 comes with a Nikkor AF-S DX 18-55mm f/3.5-5.6G VR (Vibration Reduction) kit lens, which has a typical optical zoom ratio of about 3x. Details are pretty good across the frame at full wide-angle, with minimal corner blurring. There are low levels of coma distortion in the leaves at the corners, but chromatic aberration is more visible. Results at full telephoto are also good, with very little corner softness or chromatic aberration, but the whole frame is just slightly soft. (These shots were both taken at f/8. See below for how the lens performs at maximum aperture.) Overall good performance for a kit lens, and the built-in Vibration Reduction (Nikon's term for optical image stabilization) will come in handy for hand-held shots in low light.
Macro
A slightly large macro area with the kit lens, with somewhat soft detail overall. Flash throttles down pretty well.
 |
 |
| Macro with 18-55mm Kit Lens |
Macro with Flash |
The Nikon D3000 captured a slightly larger macro area than average with the standard 18-55mm kit lens, measuring 2.40 x 1.60 inches (61 x 41 millimeters). Detail was a little soft overall, with some additional softening in the corners. (Most lenses have some softening in the corners at macro distances.) The D3000's flash throttled down for the macro area pretty well, though the resulting image is a bit dim (easily fixed by applying some positive flash exposure compensation).
Geometric Distortion
High barrel distortion at wide-angle with the 18-55mm kit lens, though hardly any distortion at telephoto.
| Barrel distortion at 18mm is 1.0 percent |
 |
| Almost no distortion at 55mm |
 |
The Nikon D3000's 18-55mm kit lens produced about one percent barrel distortion at wide-angle, which is higher than average and noticeable in its images. At the telephoto end, there was only about one pixel of pincushion distortion which is practically nonexistent. This is the tendency for the lens to bend straight lines outward (like a barrel -- usually at wide-angle) or inward (like a pincushion -- usually at telephoto).
Chromatic Aberration
Moderate at wide-angle, but low at telephoto with the 18-55mm kit lens.
 |
 |
| Wide: Moderate, top left @ |
Wide: Moderate, top right |
 |
 |
| Tele: Low and dull, top left |
Tele: Low and dull, top right |
Chromatic aberration is moderate at the full wide-angle setting of the Nikon D3000's 18-55mm VR kit lens, showing about 6-8 pixels of bright coloration on either side of the target lines, and it extends pretty far into the frame. At telephoto, chromatic aberration is much lower and hardly noticeable. (This distortion is visible as a slight colored fringe around the objects at the edges of the field of view on the resolution target.) Note that the D3000 doesn't appear to do any CA reduction to JPEGs, as do its more expensive brethren.
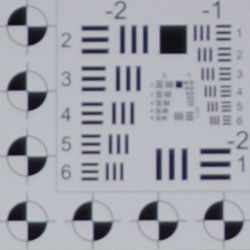
Corner Sharpness
Some blurring in the corners of the frame at wide-angle and telephoto with the kit lens.
 |
 |
| Wide: Soft in the corners (lower right). |
Wide: Sharp at center. |
 |
 |
| Tele: Soft in the corners (lower left). |
Tele: Somewhat soft at center at maximum aperture. |
The Nikon D3000's 18-55mm VR kit lens produced soft corners of the frame at full wide-angle, noticeable in a few shots. The lower right corner was a little softer than the others, but the softness didn't extend very far into the frame. At telephoto, corners were also soft, but the lens is softer overall at telephoto than at wide-angle. There's also a little bit of vignetting (corner shading) at full wide-angle. These are typical results for a kit lens, considering the aperture was wide-open for these shots. (Corner sharpness and vignetting typically improve as the lens is stopped-down from maximum aperture.)
The images above were taken from our standardized test shots. For a collection of more pictorial photos, see our Nikon D3000 Photo Gallery .
 Fujifilm GFX 50S Review
 Fujifilm X-T3 Review
 Olympus E-M5 III Review

Follow Imaging Resource