Nikon D7000 Operation
With its many buttons, knobs, and dials, the Nikon D7000 could look intimidating to the unseasoned SLR user. But to the experienced shooter, the Nikon D7000's controls will quickly make this camera a photographer's best friend. All key buttons for essential controls are on the Nikon D7000's surface skin, and several of the buttons can be reprogrammed to meet your needs or personal shooting style. Several of the front-panel controls are positioned to fall right under your fingertips without moving your hands while shooting, making the camera extremely intuitive to use, once you've memorized the button locations. These include the Function, Depth-of-field Preview, and AF Mode buttons, and the Focus Mode lever. The functions of numerous controls can also be changed through the Custom Setting menu, allowing D7000 owners to tune the camera to their preferences.
Many functions can be changed using a button and the Main Command dial while looking at the Status LCD on the top deck, while several can be changed while looking at the viewfinder's info LCD. Other items are changed by pressing the Menu key and using the navigation disk on the back of the D7000.
Nikon D7000 Top Panel Status LCD
 As with most higher-end Nikon DSLRs, the top-panel data readout LCD communicates a lot of information about current camera settings, and is used in conjunction with the various buttons and Command dials to set many camera functions. You can also use the main LCD to adjust many of the same settings, but using the top LCD saves power and can be more convenient when the camera is below eye level. The info display in the optical viewfinder can also be used for some command, but lacks the level of detail provided by the top panel display. It's also always active whenever the camera is on and not in sleep mode, so you don't have to go into the menu system to make changes to the settings it supports. The panel is illuminated by a green backlight which is activated by a third, spring-loaded lamp position on the power switch. The illustrations below show the meaning of the various icons and readouts in this display.
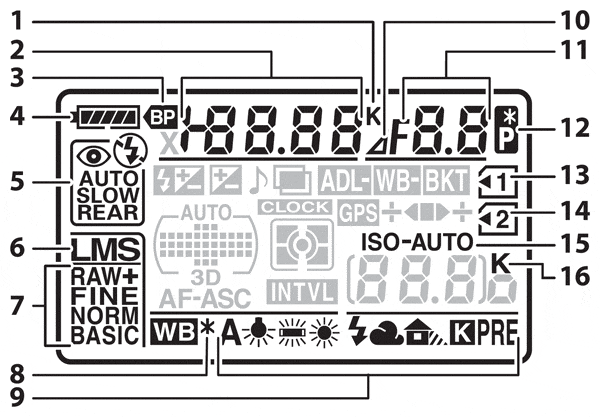
1 |
Color temperature indicator |
15 |
ISO sensitivity indicator |
2 |
Shutter speed |
Auto ISO sensitivity indicator |
|
|
Exposure compensation value |
16 |
"K" (appears when memory remains for over 1000 exposures) |
|
|
Flash compensation value |
17 |
"Beep" indicator |
|
|
White balance fine-tuning |
18 |
Exposure compensation indicator |
|
Color temperature |
19 |
Flash sync indicator |
|
White balance preset number |
20 |
Flash compensation indicator |
|
Number of shots in bracketing sequence |
21 |
Auto-area AF indicator |
|
Number of intervals for interval timer |
AF-area mode indicator |
||
Focal length (non-CPU lenses) |
3D-tracking indicator |
||
3 |
MB-D11 battery indicator |
22 |
Autofocus mode |
4 |
Battery indicator |
23 |
Clock not set indicator |
5 |
Flash mode |
24 |
Interval timer indicator |
6 |
Image size |
25 |
Multiple exposure indicator |
7 |
Image quality |
26 |
Exposure and flash bracketing indicator |
8 |
White balance fine-tuning indicator |
WB bracketing indicator |
|
9 |
White balance |
ADL bracketing indicator |
|
10 |
Aperture stop indicator |
27 |
Bracketing progress indicator |
11 |
Aperture (f-number) |
28 |
GPS connection indicator |
Aperture (number of stops) |
29
|
Metering |
|
Bracketing increment |
30 |
Number of exposures remaining |
|
Number of shots per interval |
Number of shots remaining before buffer fills |
||
Maximum aperture (non-CPU lens) |
Capture mode indicator |
||
PC mode indicator |
ISO sensitivity |
||
12 |
Flexible program indicator |
Preset white balance recording indicator |
|
13 |
Memory card indicator (Slot 1) |
Active D-Lighting Amount |
|
14 |
Memory card indicator (Slot 2) |
Manual lens number |
|
HDMI-CEC connection indicator |
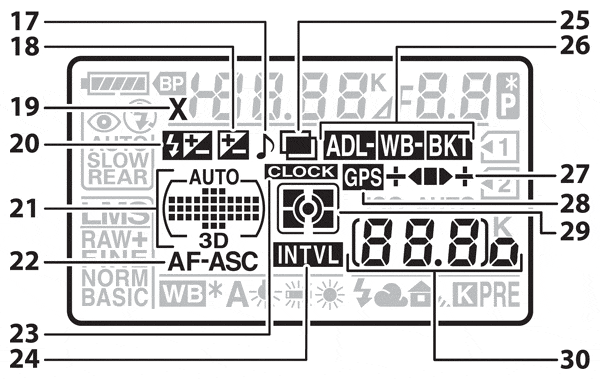
Nikon D7000 Shooting Info Display
Like other recent Nikon DSLRs, the D7000 has the ability to display shooting info and settings on the main LCD. The main LCD is larger and in color, so some prefer to use it over the top LCD, at the expense of reduced battery life. It's nice that Nikon gives you the choice of display type with the D7000. The rear LCD's greater display area allows more information to be displayed, although it's important to note that not all data elements from the top-panel readout are replicated here. Because it's a full pixel-based display, it can also show greater detail, such as the differentiation between the available and starting AF points in Dynamic-Area AF mode.
The illustrations below show the meaning of the various icons and readouts available on the Shooting Display screen:

|
1 |
Shooting mode |
18 |
White balance |
|
2 |
Flexible program indicator |
White balance fine-tuning indicator |
|
3 |
Flash sync indicator |
19 |
Image quality |
|
4 |
Shutter speed |
Role played by card in slot 2 |
|
|
Exposure compensation value |
20 |
Image size |
|
|
Flash compensation value |
21 |
Flash mode | |
|
Number of shots in bracketing sequence |
22 |
Beep indicator |
|
Focal length (non-CPU lenses) |
23 |
Multiple exposure indicator |
|
Color temperature |
24 |
Exposure and flash bracketing indicator |
|
5 |
Color temperature indicator |
WB bracketing indicator |
|
6 |
Aperture stop indicator |
ADL bracketing indicator |
|
7 |
Aperture (f-number) |
25 |
ADL bracketing amount |
Aperture (number of stops) |
26 |
Interval timer indicator |
|
Bracketing increment |
27 |
Camera battery indicator |
|
Maximum aperture (non-CPU lenses) |
28 |
MB-D11 battery type display |
|
8 |
Exposure indicator |
MB-D11 battery indicator |
|
Exposure compensation indicator |
29
|
GPS connection indicator |
|
Exposure, Flash, and WB bracketing progress indicator |
30 |
Metering |
|
9 |
Auto-area AF indicator |
31 |
Depth-of-field preview button assignment |
Focus points indicator |
32 |
Color space |
|
AF-area mode indicator |
33 |
Active D-Lighting indicator |
|
3D-tracking indicator |
34 |
High ISO noise reduction indicator |
|
10 |
ISO sensitivity indicator |
35 |
Movie quality |
Auto ISO sensitivity indicator |
36 |
Autofocus mode |
|
11 |
"K" (memory remains for over 1000 exposures) |
37 |
Copyright information |
12 |
Number of exposures remaining |
38 |
"Clock not set" indicator |
Manual lens number |
39 |
Image comment indicator |
|
13 |
Fn button assignment |
40 |
Release mode |
14 |
AE-L / AF- button assignment |
Continuous shooting speed |
|
15 |
Picture control indicator |
41 |
Eye-Fi connection indicator |
16 |
Long exposure noise reduction indicator |
42 |
FV lock indicator |
17 |
Auto distortion control |
43 |
Flash compensation indicator |
44 |
Exposure compensation indicator |
Nikon D7000 Virtual Horizon
 A really neat feature of the D7000 first seen on the D3 is the virtual horizon gauge, activated from the Setup menu. The display remains active as long as certain buttons aren't pressed (such as the shutter release). Sensors in the body are used to detect the orientation of the camera and a virtual horizon is displayed in realtime, similar to an aircraft instrument, though it only shows left/right tilt (or "roll"). This is useful for critical alignment of subjects such as buildings, the horizon, etc. The virtual horizon display works in both landscape and portrait orientations. Courtesy of Custom Settings f3 or f4, the electronic analog scale in the viewfinder can also be made to display the amount of tilt. The virtual horizon is also available during Live View mode as one of the overlay options via the "Info" button. In Live View mode, the display is smaller and mostly translucent, so as not to obscure the preview.
Nikon D7000 Playback mode
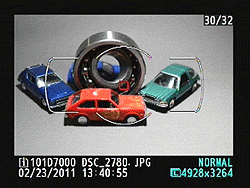 Playback mode is entered by pressing the playback button. The D7000's playback mode provides a great deal of information about your pictures after you've shot them. A variety of up to nine different playback displays can be cycled through using the up/down arrows on the multi-selector, including image with file information and and focus point display, with highlight warning, with RGB / luminance histograms and white balance information, three screens with overlaid shooting and image parameter information (an additional GPS info screen is available when a GPS device was used when the image was captured), and an overview display with basic shooting data and luminance histogram. The screenshot animation at right shows the sequence when the down arrow is used.
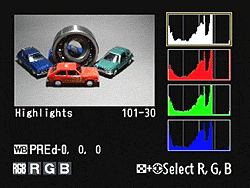 As you'd expect, the Nikon D7000 offers a comprehensive RGB histogram display mode. Histogram displays are common on professional digital cameras (and many amateur models now), regarded as almost mandatory by many pros for evaluating exposure levels. A histogram is simply a graph of how many pixels there are in the image at each brightness level. The brightness is the horizontal axis, running from black at the left to white at the right. The height of the graph shows the relative number of pixels having each brightness level. This sort of display is very handy for determining under- or overexposure. Ideally, the histogram would stretch across the entire width of the display, using the full range of brightness values available. An underexposed image will have a histogram with all the data lumped on the left-hand side, with nothing reaching all the way to the right. Likewise, an overexposed image will have all the data lumped on the right hand side. Clipped highlights are shown by blinking any highlights that are saturated in any of the color channels. It does this by taking the nearly-white areas on the LCD and toggling them between white and black.
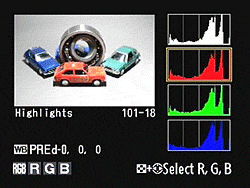 As with the Highlights display mode, the blinking highlights in the histogram display mode can also be displayed separately for each color channel by selecting R, G, or B in the RGB Histogram display mode. The screenshots at right show an example of where this might be useful: The bright, strongly colored lamp shade (deliberately shot with an incorrect white balance, to produce the strong hue) showed only minor lost detail in the screenshot above, looking at the RGB or luminance highlights, but the shot at right shows that the red channel is badly blown. This is quite common: It's easy to lose detail in a strongly-colored object well before other, more neutral-colored highlights are lost.
 Finally, the shot at right shows a nice feature that is we're surprised isn't more common: You can zoom into the image and pan around the magnified display, and the RGB histogram will change to show only the portion of the image that you're looking at. In this mode, you lose the blinking highlights, but this strikes us as very useful for checking critical parts of the image, to see if you've held highlight or shadow detail in areas you really care about.
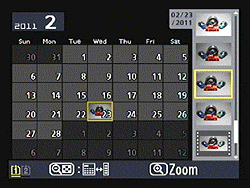 Of course the D7000 also lets you zoom out to quickly find and select images, or magnify them for closer inspection on its gorgeous 3-inch, 922K pixel LCD. You have the normal 4-, 9- or 72-image thumbnail displays or a calendar view available by pressing the thumbnail/zoom out button, and you can magnify them up to approximately 31x for large, 23x for medium or 15x for small images, using the zoom in button. Once magnified, you can scroll around the image using the multi-selector to examine critical detail and framing. When you zoom in or out on an image, a little navigation window pops up in the lower right corner of the display, showing a thumbnail of the image, with a yellow box indicating the currently-viewed area. Portrait-mode images can also be automatically rotated to match the camera's current orientation, using the Rotate Tall option in the Playback menu. Of course, there are the usual options to protect or delete images or movies in Playback mode, as well. Since the D7000 offers dual memory card slots, the playback mode also allows the user to select only one card for review; it's also possible to limit review to only data from a specific folder, or only data captured using the D7000 (but not other cameras).
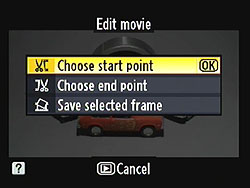 Movies can be played by pressing the multi-selector's center button, and during movie playback both the down arrow and OK button serve as a pause / resume control. The left and right arrows allow cuing during playback, with subsequent presses adjusting the speed to 2, 4, 8 or 16x. While paused, these same buttons allow cuing through the video one frame at a time. Also while paused, the Help / Protect button can be used to call up the Retouch menu, where you can opt to save the current frame as a still image, or to trim off everything before or after the current point, with the result saved as a new file. Movies shorter than two seconds in length cannot be edited in-camera.
To return the D7000 to shooting mode, simply press the playback button again, or half-press the shutter button.
 Fujifilm GFX 50S Review
 Fujifilm X-T3 Review
 Olympus E-M5 III Review

Follow Imaging Resource