| Basic Specifications | |
|---|---|
| Full model name: | Canon EOS-1D Mark III |
| Resolution: | 10.10 Megapixels |
| Sensor size: | APS-H (28.1mm x 18.7mm) |
| Kit Lens: | n/a |
| Viewfinder: | Optical / LCD |
| Native ISO: | 100 - 3200 |
| Extended ISO: | 50 - 6400 |
| Shutter: | 1/8000 - 30 sec |
| Dimensions: |
6.1 x 6.2 x 3.1 in. (156 x 157 x 80 mm) |
| Weight: | 40.7 oz (1,155 g) |
| MSRP: | $4,500 |
| Availability: | 04/2007 |
| Manufacturer: | Canon |
| Full specs: | Canon 1D Mark III specifications |
Your purchases support this site
Buy the Canon 1D Mark III
|
10.10
Megapixels |
Canon EF |
APS-H size sensor |
|---|---|---|
|
||

|

|

|
|
|
Canon EOS-1D Mark III Introduction
by Dave Etchells,
Shawn Barnett
Posted: 02/21/2007
Updates:
2/23/07 - AF Details
2/24/07 - Sample Images
2/25/07 - User Report
2/28/07 - Live View section,* Accessories video**
3/3/07 - Incandescent noise,
High Tone Priority
(See exposure tab above)
4/12/07 - Performance results
(See performance tab above)
1/22/10 - Updated with production images and performance results
The big story with the Canon EOS 1D Mark III is that it's a better, more universally appealing professional camera for more types of professional photographers. I think a lot of intermediate photographers may want to make the jump as well, given its more friendly interface and astonishing high ISO performance. With past Canon EOS 1D announcements, the big story was the incredibly high capture speed at reasonably high resolutions. The amazing technology required to dump high res images at high speed tended to dominate our coverage of these sport-tuned professional SLRs. But the scene has changed. The additional 1.5 frames per second isn't the most important improvement with the Canon EOS 1D Mark III, it's just a nice enhancement. The same goes for the jump from 8 megapixels to 10.
The Canon EOS 1D Mark III isn't just for sports anymore. It's a more universal camera for the vast majority of pro photographers. With the multiple improvements in the new camera, photographers will no longer need to trade off resolution, image quality, and speed against each other. The 1D Mark III now has enough of all three to satisfy a huge slice of the market in a single camera body.
The EOS 1D Mark III has several improvements that illustrate its greater versatility:
- Fast performance, high resolution, and improved image quality across the board
- Resolution sufficient for double-truck spreads and general commercial photography
- Even faster capture, processing, and write speeds, and faster AF tracking for sports shooters
- Super low-light capability for photojournalists (High ISO)
In addition, the EOS 1D Mark III has a few new features that will expand the camera's versatility and convenience, including a new Live View mode for image composition on the camera's LCD or via a remote computer; compatibility with a faster optional WiFi transmission system; several AF improvements; a stack of custom functions; and Canon's new dust reduction technology, which first appeared in the Canon EOS Digital Rebel XTi.
There's a lot to cover, so stick with us over the next few days as we build on our preview coverage of the Canon EOS 1D Mark III.
Canon EOS-1D Mark III Hands-on Preview
by Shawn Barnett
Posted: February 25, 2007
At a glance, you really can't tell the difference between the Canon EOS 1D Mark II N and the Canon EOS 1D Mark III. They're both large, cut an imposing profile, and look like high quality instruments. Even the name looks similar. But look more closely and there are different design accents and, new buttons, new button arrangements, and a nice big three-inch LCD.
But the exterior is more similar to the Mark II N than the interior. Canon says the Mark III was redesigned from the ground up; and I believe it. There are so many changes in the Mark III that it's a little tough to know where to start. Writing about a camera like the 1D Mark III after only a day is a little like writing a report on a textbook on the first day of class. So I haven't delved into every custom function, or its potential impact on each of the settings I'll comment on. That will come, but later. Also, note that this is a prototype camera, and anything is subject to change as they finalize the camera before its release.
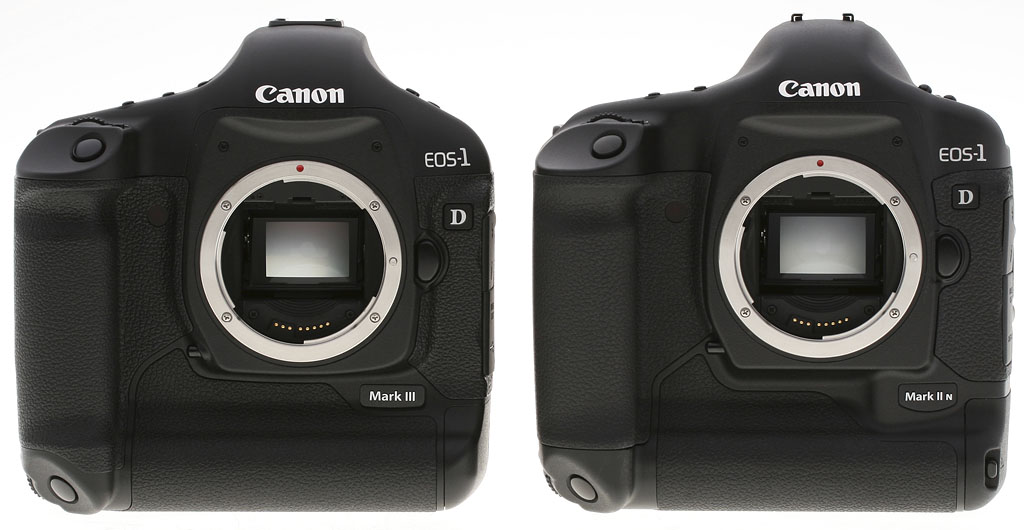
Big and beautiful: The 1D Mark III is very similar to the 1D Mark II N at first glance, but look more closely and the functional differences become apparent.
Quoting the bare specs says a lot: 10 frames per second, 10 megapixels, 110 JPEG buffer, three inch LCD, Live View mode, dual DIGIC III processors, automatic sensor cleaning. These are all impressive, but the Mark II N was pretty darn impressive, too. What I'm more excited about is the radical interface improvements that make all this impressive power more accessible to the photographer. If I have to think too much about how to set the camera while I'm shooting, I lose connection with my subject, and the creative process is stifled.
As it was, going out to shoot our usual Gallery shots left me feeling a little frustrated. The 1D Mark III is far more sophisticated than any of my snapshots of inanimate objects could convey, and my limited time wouldn't allow me to get truly creative and explore the vast possibilities with a camera of this caliber. But the Galleries aren't intended to show any artistic ability; they're taken to give you a sample shot of something textured and colorful with the camera in the daylight. Let's just say I was wishing I had a week in the Sierras, four days with models in a studio, three days with the same models on a beach, 36 hours photographing bears in Alaska, and a weekend at the racetrack. Just me and the Mark III.
But I did the next best thing, and closer to my heart: I took some pictures of my kids in my makeshift studio in the basement. Righteous.
 |
 |
 |
|
Portrait shoot. Took me a few shots to get the lighting right. Not sure I did. It's a struggle when Dad's trying to take pictures and control chaos at the same time. It helped to have a camera that's fast and easier to use, because if I spend too much time looking at menus I lose their attention in a hurry. Though the shirt sleeves in the left shot appear blown out, there's still detail in those highlights, even in the JPEG if you slide the mids control around. You won't likely be able to parse the CR2 yet, unless you're fortunate to have Canon's Digital Photo Professional 3.0. Adobe RAW doesn't seem to have the key yet. |
||
|
NOTE: The Safari browser cannot download the CR2 files for some reason; please use Firefox or another browser.
|
||
| Y0B0B0327.CR2 14.6MB |
Y0B0B0430.CR2 14MB |
Y0B0B0494.CR2 13MB |
Opening Canon EOS-1D Mark III RAW files: Canon's Chuck Westfall was kind enough to let us know that there is a way for users of Canon's software to access Mark III RAW files, through a software update. The "RAW Image Task" software built into the latest version of Canon's ZoomBrowser EX (for Windows only) can apparently read the Mark III's CR2 files. NOTE though, that you must already have an earlier version of ZoomBrowser EX, Digital Photo Professional, or EOS Viewer Utility installed for the updater to work. Here's what to do:
Note once again, that this will only work if you have a previous version of one of the aforementioned software utilities installed on your computer, and that this is a Windows-only solution. (Interestingly, Canon reports that ZoomBrowser EX 5.8 is compatible with both Vista and Windows XP SP2.) Canon expects updaters for Digital Photo Professional (for Windows and Mac) as well as ImageBrowser (for Mac) to be available in the next 4-8 weeks, but doesn't have a finalized schedule for them yet. |
||
Anticipation. Picking up the 1D Mark III is like climbing on a mountain bike at the top of a long hill and placing your feet on the pedals. It's like taking a glider to the edge of the cliff on a perfect spring day and looking down. It's like pushing your raft out toward the center of a river just above the rapids and jumping aboard. Nothing has happened, but it's about to. And you're really looking forward to it.
 But with that anticipation comes a sense of responsibility. The 1D Mark III costs $4,000, not including the lens. You better take a good picture! But if you like a challenge, and have some time, the EOS 1D Mark III has everything you need to make great images. If you don't get a great picture, it's you. That's not nice, but it's true. The good news is, that $4,000 and the Mark III's serious capabilities will draw you into learning more about it, and drive you to experiment until you make some great images worthy of its power. Okay, I may be projecting, because the 1D Mark III sure is drawing me.
The funny part is, I've had access to other EOS 1D cameras, but I've not been drawn at all, at least not after the review. I've been frustrated instead. They've long had a cumbersome menu system, and that alone has kept me from exploring the depth of the 1D cameras after the review, despite their superior capabilities. The press and hold menu system worked like no other system on the market, and seemed to be designed to make changing settings accidentally more difficult. What it did instead was make the menu more like a puzzle than a quick way to adjust your camera. First, you press and hold the menu button down, then scroll the Quick Control dial to move to the tab you want to change. Then you release that button and press and hold the Select button just below. Then you can scroll to your desired menu item. When you release it, your menu item is selected. If you've changed your mind, you're out of luck, because you have to release the button somewhere, and wherever you release it, you go to another screen, where you have to press the Select button again to start scrolling again. I always say, anything can be learned, but I use too many other cameras to bother messing with such a silly way of making simple settings.
New control: Both the Multi-Controller and the Set button are new interface twists that make the 1D Mark III more usable than past Canon Pro offerings.
When the full-frame EOS 5D hit the market, I was pleased that it had inherited the EOS 20D's straightforward interface, and I'm happy to report that the 1D Mark III has also taken on many of the same intelligent design elements of that prosumer EOS series, refining them along the way. What that means is that I'm less frustrated with an odd interface and better able to explore, adjust settings, and take pictures.
That's what a pro camera should do: give easy access to its myriad features. Like anything worth doing, it will require practice. You don't just jump on a bike, jump off a cliff, or push to the center of a raging river without some experience with and knowledge of your equipment. I suppose you could, but the results would probably be messy.
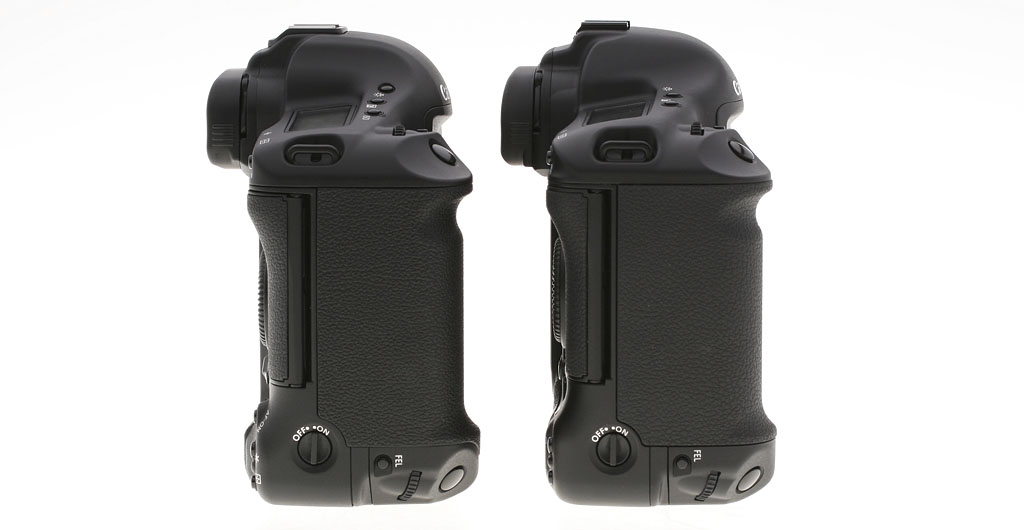
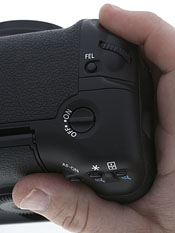
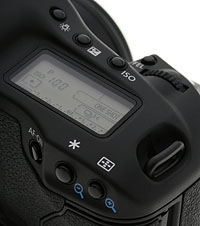
Once I get over the reverie that comes from picking up the 1D Mark III, I generally support it with my left hand, because it's heavy. It seems a little lighter than the Mark II N. My middle finger feels secure in the grip's top groove (though not as comfortable as it is on the 5D), and my index finger settles perfectly on the black shutter release. It might not be so perfect for everyone's hand, but this couldn't get better for me. My thumb supports the weight comfortably, and surprisingly does so without accidentally pressing the new AF-ON button. This new button is positioned in the same place you'll find it on the Nikon D200. It's just right. On the Mark II N, there's a button in the same place, though it's slightly smaller and a smidge higher; but was used in conjunction with the Command dial to switch between the last Registered AF point and the auto AF selection mode, or to adjust the White balance. I think it's better used as the AF-ON button.
Vertical grip: The vertical grip offers all of the same buttons, and is an equally nice fit.
Since I do most of my shooting vertically, I like that the 1D Mark III's vertical release is built in, rather than an accessory as it is on the 30D and 5D. Attach a battery grip to either of those, and they easily approach a 1D in size and weight, but there's often flex between the body and grip. There's nothing like that here. It's all one big rock. The surfaces are different, and all the buttons are in slightly different places from the horizontal grip controls, but it's all quite comfortable. The AF-ON button is also higher than the WB button was on the 1D Mark II N.
Joystick. The first major import from the prosumer series is the eight-way, joystick-like Multi-Controller. In general, it's a little more useful than it is on the 20D/30D. You can use it to navigate among tabs and menu items, which makes the tabbed menu system superior to the long list that I once preferred on the 20D. You can also use the Main and Quick Control dials to navigate the tabs and items: Main for the tabs, and Quick Control for the menu items. I haven't settled on either just yet. The dials are faster, but the Multi-Controller requires only the thumb.
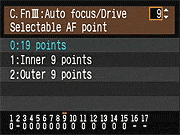
By default, the 1D Mark III's Multi-Controller doesn't make selecting an AF point easy, like it does on the 30D. On that model, the eight directions of the joystick take you to the eight AF points surrounding the center, and pressing the joystick in selects the center AF point. With 45 AF points total, and 19 that can be manually selected, picking your AF point is unfortunately more complicated. The joystick only switches between the center point and an AF mode that illuminates only the 20 outer points, but enables all 49 the intelligent AF system, regardless of the Custom Function. CF 3.9 modifies the behavior, but it's more than a little confounding. You have to choose to use all "19 points" (default), the "Inner 9," or the "Outer 9." To be completely accurate, it's all 19 cross-type AF points including the center, the inner eight plus the center point, and the outer eight plus the center point. Only the camera can select the non-cross-type AF points in Auto AF mode.
In 19 points, you really can select all 19, but it's not immediately obvious how. It's the least intuitive feature I've found on this amazingly friendly Pro camera, but it can be grasped if you're clever. If you just stick with the center ring of eight, it's pretty easy. Just turn the Quick Control dial. It rolls through all of the points in a circle, dipping to the center point after top center, then back out to the 2 o'clock position and around. To get to the outer points, you turn the Main dial. Once you reach the outer points, you switch back to the Quick control dial to move up and down. Here's where it gets tricky; but to keep it from being tricky, just give up the idea of rolling around the "racetrack."
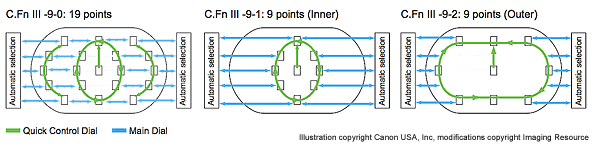
If you want to move to any of the 19 points in the viewfinder, you use the Main dial to move left or right, and you use the Quick Control dial to move in up or down in a vertical arc. On the outer ring, once you get to the top of either the left or right arc with the Quick Control dial, you have to move the main dial in the direction you want to go next. If you're at the top or bottom of the left arc, you turn the main dial to the right to move to the top or bottom center point, then turn it again to hop to the right arc. If you move beyond that, you enter Auto AF mode. Until you give up on the idea of an outer "racetrack," this default mode will befuddle you. I'd like to see an approach that includes the Multi-Controller, selectable via a Custom Function, because in my early shooting with the 1D Mark III, I've wanted faster AF point selection.
Alternately, if you want to just move around the racetrack of eight outer points, you can set it to Outer 8. As with the better menu navigation method, I haven't yet decided which I prefer, but I needed both inner and outer points when photographing the kids today.
There's no question, though, that having 19 cross-type AF points to choose from is very good. I've had some struggles working with the AF system on previous 1D cameras, and come away feeling deceived by the camera's idea of "in focus" as represented by the selected points in post-processing. The photos last night were far better, with the only out-of-focus shots being either wiggly kids or daddy error. There are far more in-focus shots in the studio than I'm used to getting from any of the other cameras I work with. Some of those shots were in Auto AF mode, but most were one of the single AF points. We'll see how true that holds as I continue to explore the 1D Mark III prototype I'm working with.
Viewfinder. I found the viewfinder quite accurate while framing shots outdoors. I'm curious to see what our VFA target shows, but I'd guess it's 97 percent or better. I do have trouble seeing the entire viewfinder with my glasses on, without pressing them against the rubber cup. Adjusting the diopter wheel requires removing the eyecup (just pinch the sides at the bottom and pull up). I still prefer the diopter out in the open, but I seldom use it anymore, as my prescription has long since moved out of the range of even a professional camera's range of settings. Canon's new focusing screen does seem a little better, giving out of focus objects an almost foggy appearance when out of focus. That kind of natural feedback gives me more confidence when shooting candids.
Live preview: See a live image on the three-inch LCD, or pipe it through your computer, where you can remote control the camera.
Live View. While on the subject of viewfinders, the 1D Mark III has a new feature that has heretofore only appeared on the Olympus E-330 and its offspring, the Panasonic Lumix L1 and the Leica Digilux 3 (see video). Canon's Live View mode operates much like the E-330's Live View B mode: You're seeing the image directly off the main imaging sensor, but you can't autofocus while you're viewing with the LCD. You can zoom in either 5x or 10x and focus manually, or you can leave Live View mode to autofocus, then compose, and shoot. The clarity and speedy refresh on the 1D Mark III's three-inch LCD is really impressive, making manual focus fairly easy. Using the new CameraWindow MC program, you can remote control the camera, seeing exactly what the camera sees. You can do this either wired via USB 2.0, or via WiFi with the WFT-E2A that screws into the side of the camera.

Click photo to go to Live View tab.
Using USB 2.0, I had varying degress of success depending on the computer I used. A three-year-old computer is not going to cut it; you'll need a faster, more recent model, with a faster system bus to make good use of the 1D Mark III's Live View mode through a computer. At this point, I've only tested it with Macs. The frame rate is nowhere near as fast as it is on the back of the camera. The fastest I've seen with the iMac G5 was about five frames per second, which is jerky, but good enough for tripod work. My PowerBook was only about 1 to 2 frames per second, which is too slow. Bear in mind, this is all with Beta software. There are six icons that do allow you to focus from the computer. It's a slow process changing focus this way, but at least it's there. You can also zoom in what looks like 10x, which really helps you get even sharper focus. With the 50mm f/1.8 attached, I was able to get quite good focus in the normal view, given its excellent bokeh. Note that all on-camera controls are disabled in Live View mode, so all settings must be made through the computer. Someone also needs to come up with a more permanent attachment system, because the cable can fall out with the slightest tug. For more on this experience, see the Operation Tab and click on the Live View subtab (or click here).


New perspective: One potential use illustrated here is a shift of perspective, something you can currently do with a digicam, but few other digital SLRs.
I happened on a thought while shooting, that it might be possible to AF from one perspective, but take the shot from another. I tried that out, producing a not-so-great picture, but it illustrates the point. I wanted to focus on the second lantern in the scene, taking advantage of row of repeating lanterns, but including some of the street and paintings below. So I focused on the lantern from head level (first shot) then switched into Live View mode and raised the 1D Mark III above my head and framed the image using the three-inch LCD. The result is not a good picture, but I hope it illustrates the point. Hopefully I'll have some better subjects soon and more ideas to use Live View when we get the shipping version of the 1D Mark III.
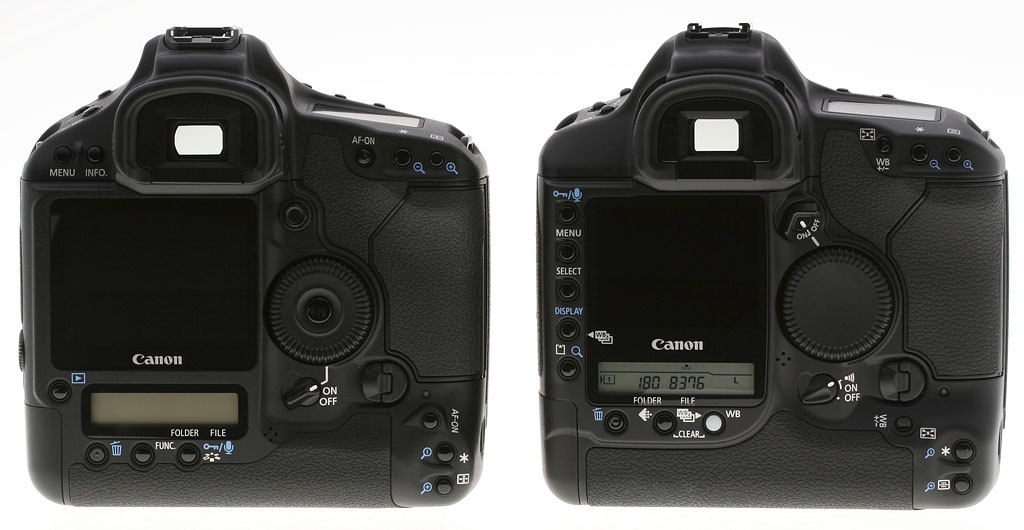
Slight modifications: Good but subtle additions and reshuffling have made for a more comprehensible interface. Unlike the Mark II N, you don't have to hold these buttons down to make your adjustments. Instead, like the 30D, you just press and release and you have about seven seconds to make a change with either the Main or Quick Control dial, depending on the item you're adjusting.
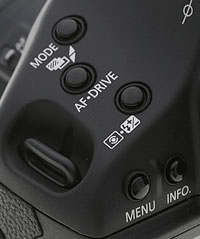
Access. Changing settings on the 1D Mark III has improved somewhat from the 1D Mark II N, with a slight retasking of several buttons. On the left deck, the three buttons used to control six functions: three with a single press, and three more with a combination press. Though it seems strange at first, I think most photographers liked the clever simplicity of the method. Now those three buttons only have one direct combination purpose, which is to set the bracketing mode. Drive mode has been integrated into the AF button. Just press the button and AF is changed with the Main dial, while Drive mode is adjusted with the Quick Control dial. Users of prosumer Canon SLRs are familiar with this style of control. ISO has been moved from this cluster to a new button on the right. This oft-changed control is better placed here, where you can watch the change on the top Status display as you turn the Quick Control dial with your thumb.
Two of the three buttons on the back beneath the LCD display have also been repurposed. The trash button is the same, but the middle button is the Function button, and lets you adjust the image quality mode or White Balance with a turn of the Quick Control dial. That leaves the third button open for locking images, recording audio notes to images (just press and hold), or accessing Picture Styles in a hurry.
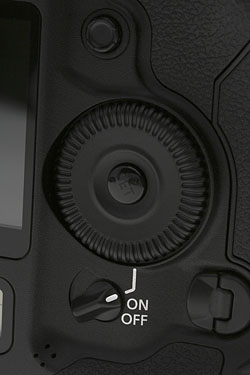
Status LCDs. The top Status LCD has changed less than the back Status LCD, which now accommodates a little more information for the greater number of image quality modes. The top deck's most welcome change is the four-stage battery icon, instead of the old two-stage icon on the 1D Mark II N. I've seen the big batteries in the old 1D cameras die quite suddenly, and with as much power as modes like Live View can use, you want to have a much better picture of your battery status than this.
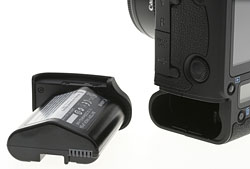
LP-E4: You have to love a battery that is both lighter and carries more juice. The LP-E4 battery pack can deliver up to 2,200 shots, compared to the 1D Mark II N's 1,200 shots.
New battery. The good news is that the 1D Mark III has a new battery. It looks just like the battery in the Nikon D2Xs, probably because it's made by the same battery supplier. That's the same reason most of the batteries in prosumer digital SLRs have nearly the same form factor. Unfortunately, they don't have the same contact arrangement, so those shooting both Nikon and Canon might get a little confused now and then. The battery's a lot smaller and lighter, and packs a lot more power. That would be due to the higher power density inherent in lithium-ion batteries. The LP-E4 delivers 11.1v, 2,300mAh and weighs 6.29 ounces (178.5g). That's light enough that you could make a handsome bandolier to hold them; except that most photographers won't need that, since the battery is good for 2,200 shots according to CIPA standards (I'm sure that doesn't include Live View mode). The old NP-E3 NiMH battery is rated at 12v, 1,650mAh, and weighs 11.77 ounces (333.7g). The new LP-E4 is also easier to remove, without that secondary lock button on the NP-E3. The dual-pack charger that comes with the 1D Mark III holds the batteries on its back, rather than just leaving them to sit on the carpet or table connected by a cable, as the older 1D-series chargers do. Yet another major improvement.
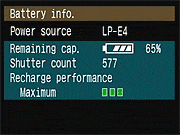
The LP-E4 is no longer a "dumb" battery, either. It has integrated electronics that can monitor charge cycles and adjust the battery gauge readout as the battery's capacity changes. Not only does the Status LCD report more charge levels, you can see the percentage remaining in the Battery info dialog, available in the Setup menu 2. This is a change that has been long overdue.
A secondary power supply comes with the camera, with its own power cord and dummy battery to provide power from a normal AC wall outlet.
Need for Speed: The 1D Mark III is made to be fast. See the video to experience it, or download our MPEG4 video here for smoother playback.
Ten frames per second. I know, all you care about is speed. Sorry to bore you with all that talk of buttons, batteries, and modes. You're right, though. This camera is very fast. It's tough to write about fast, though, so I made a little video to convey the speed. I first shot the 1D Mark II N, the former speed leader at 8.5 frames per second. I didn't think 1.5 frames more could really seem that much faster. But it does. Unfortunately, the YouTube compression messes up the audio, so you can also download the MPEG4 video here. It's only 3.5MB, so it should be no trouble to download for most. It's copyrighted, but so long as you don't claim it's yours, sample from it, or remove or modify the references to Imaging Resource from the beginning and end, you may distribute the video as you wish.
The video shows the worst case, with RAW + JPEG, with JPEG set to the highest quality. The resulting file sizes are 15MB and 4MB each, but the Mark III handles them more quickly than the Mark II N handled the data generated from its lower-res sensor and lower speed shutter, thanks to the dual DIGIC III chips onboard, and an as-yet-unspecified buffer. With high quality JPEGs, the Mark III should capture about 110 images before the buffer fills. Naturally that depends on the subject and how compressible the elements are. At high ISO, the number is significantly lower, only 47 in low light, at ISO 3,200. But changing that to ISO 100 with a fairly simple subject, I'm able to get 150 shots, so the 110 figure is a believable average.
**Accessories: Two new accessories were announced with the 1D Mark III: the WFT-E2A Wireless Transmitter for WiFi, Ethernet, hard drive, and GPS compatibility; and the 580EX II, with several new features, including weather sealing around the hot shoe.
Image Quality. As you can see from the shots at the top of the page, the images from the 1D Mark III are beautiful. Though we usually roll our eyes when companies list ridiculously high ISO ratings, we were pleasantly surprised by how good the Mark III's ISO 6,400 images are. Noise is present, of course, but it's at a level that most cameras produce at ISO 1,600 or 800. We found the 8x10 printed results to be quite acceptable from the ISO 6,400 setting. That means that ISO 1,600 should be more like ISO 200 or 400 on another camera, right? With Noise Reduction on, some would make that argument. Since most don't enlarge their images significantly beyond 8x10, it's absolutely true that the 1D Mark III at ISO 1,600 delivers images that are better than acceptable at 8x10, they're great. See the crops we've done on the Exposure tab for sample crops from the 1D Mark III compared to the Mark II N. Also see the difference between all the images in the Thumbnails section on the Samples tab.
Image Size. Be warned that the now popular practice of shooting RAW plus JPEG can really cost you. I've been using the new Lexar 8GB and a Kingston 2GB CF card in the 1D Mark III, and it does take some time to fill them up. But that's not as big a problem as copying them to my computer. The photoshoot with the kids was 2.7GB worth of photos. If you're thinking of getting a 1D Mark III and like the high speed setting, consider shopping online for a few big hard drives, like two 500GB babies and a couple of Firewire or USB 2 drive housings. You're going to need them.
More info from Rob Galbraith: Practicing sports shooter and digital workflow consultant extraordinaire Rob Galbraith has published a detailed hands on with the Canon Mark III, including a detailed look at image quality vs the Mark II N, some observations on its AF system, and a report on his real-world experiences with the Mark III and Canon's new WFT-E2 wireless remote system.
More info from Canon: The Digital Photography Show has posted an interview about the Mark III with Rudy Winston of Canon on their podcast site. (The Mark III discussion begins 20 minutes and 40 seconds into the show.)
Features/Capabilities
Here's a list of the Canon EOS-1D Mark III's salient characteristics, as listed by Canon:
- World's fastest AF DSLR with approximately 10 fps continuous shooting in One-Shot AF or AI Servo AF
- Maximum burst (JPEG Large, compression level 8) approximately 110 shots; RAW, approximately 30 shots (based on Canon's testing standards)
- Dual DIGIC III Image Processors for fine detail, natural color reproduction and high-speed performance
- ISO 100-3200 with ISO speed extension, L= 50, H = 6400
- 14-bit A/D conversion for fine gradation
- Live View in camera and remote, wired and wireless
- New 45-point Area AF sensor with 19 high-precision, cross-type points (f/2.8 compatible), 26 standard-precision Assist AF points
- New AF point selection methods
- AF micro-adjustment (fine adjustment of AF point of focus)
- Adjustable operation characteristics for AF point selection, shutter release priority and focus-tracking sensitivity with AI Servo AF
- New methods of AF point expansion during manual AF point selection
- New 10.1-megapixel CMOS sensor, APS-H size
- Improved microlens array and pixel fill factor plus optimized photodiode structure to increase light-reception efficiency
- Professional EOS Integrated Cleaning System with Self-Cleaning Sensor Unit, Dust Delete Data acquisition
- RAW, sRAW (new SmallRAW), RAW+JPEG, sRAW+JPEG, JPEG+JPEG simultaneous recording
- Increased shutter durability of approximately 300,000 cycles
- Large and bright 3.0-inch LCD monitor with 230,000 pixels and wide viewing angle
- Five custom WB settings
- Selectable noise reduction for high ISO images, 50% less shadow noise for all images
- Selectable Highlight Tone Priority
- High-speed shutter with 1/8000 sec. maximum speed and high-speed X-sync at 1/300 sec. with EX Speedlites
- Startup time approx. 0.2 sec.
- Shutter release time lag approx. 55 ms. (approximately 40 ms. at maximum aperture with C. Fn IV-13-1) and viewfinder blackout time 80 ms. at 1/250 or higher
- Compatible with SDHC (SD High-Capacity) memory cards as well as high capacity CF cards
- Compatible with USB 2.0 Hi-Speed image transfer
- Faster writing to memory card
- High-magnification, wide-coverage viewfinder and improved focusing screen with 100% finder coverage
- 63-zone metering sensor for more stable exposure control with ambient light and flash
- High-capacity, lightweight and compact lithium-ion battery with estimated battery life display
- Enhanced recording options include automatic switching of recording media, separate recordings to media and identical recordings to multiple media
- Silent mode for single images
- Image copying and backup to external media enabled
- ISO speed safety shift
- ISO speed and metering pattern always displayed in viewfinder and on top LCD data panel
- New control layout with SET button, AF On button and Multi-Controller
- Displayable camera settings and better image information during playback
- Histogram display, jump display, error code display, and shooting settings display
- Chassis, mirror box, and exterior covers made of magnesium alloy
- Maintains water resistance with new 580EX II Speedlite
- Personal Functions consolidated with Custom Functions, resulting in 57 Custom Functions in 4 groups
- Custom Function settings can be registered and called up
- Camera settings can be saved and read
- Camera's basic settings can be registered and applied
- New "My Menu" function can be registered and displayed at startup
- Camera direct printing (PictBridge) improved and DPOF print ordering provided
- Direct printing of RAW and sRAW images
- Direct image transfer
- Wireless/wired LAN for image transfers via new WFT-E2A dedicated Wireless File Transmitter
- External USB recording media and GPS unit usable via the WFT-E2A
- Verification data can be generated, encrypted and appended to the image with new Original Data Security Kit OSK-E3
- Compatible with original image verification system
- Speedlite Custom Functions settable with the camera when the 580EXII Speedlite is attached
- New software package includes Digital Photo Professional 3.0 and EOS Utility 2.0
- New EF 16-35mm f/2.8L II USM lens features improved peripheral image quality
Image Quality
For a lot of people, when they look at the specs for the Canon 1D Mark III, the first thing they'll focus on is that it has a couple more megapixels than the Mark II N before it. It turns out though, that the image quality story of the Canon 1D Mark III isn't just about the addition of a couple of extra megapixels, it's about delivering more megapixels, while simultaneously increasing dynamic range, increasing light sensitivity, and improving tonality. That's an achievement of quite another order.
Here's a quick run-down of the sensor and system-level improvements Canon made to improve the 1D Mark III's image quality:
- Improved sensor layout, for higher "fill factor," and thereby better light sensitivity. Fill factor refers to the percentage of each pixel
area that's able to gather light. More efficient layout of the
circuit elements leaves more space for gathering light, and therefore
better high-ISO performance.
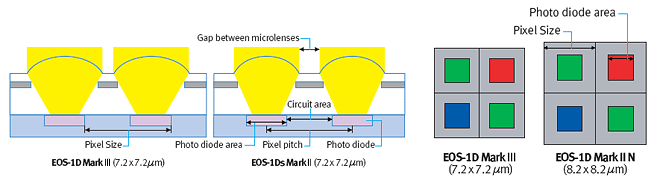
- Improved microlens
design, allowing larger lenses with closer spacing. This is a
design improvement that's been making its way through the Canon SLR
line. The larger microlenses once again improve the light-collection
ability of the sensor, giving a higher inherent efficiency, and
therefore lower image noise at high ISO settings.
- Improved on-chip active
noise reduction. This also seems to be a feature that's working
is way through Canon's SLR models. One of the unique advantages of
the active CMOS sensor technology developed by Canon is the ability
to perform noise-reduction signal processing right on the sensor chip
itself. (Before the signal is ever transferred off to the external
processing circuitry.) In recent sensors, Canon has implemented a
more advanced form of this processing that has the effect of reducing
the noise levels seen by the camera's processor. This helps noise
levels across the board.
 New high-speed output
amplifier design also offers improved noise characteristics.
Noise in a digital camera isn't solely caused by the sensor chip
itself. All the signal-processing circuitry has some contribution to
the overall noise level that ends up in the final pictures. Canon
engineers redesigned the output amplifiers on the sensor chip to
deliver the speed required by the 10 frames/second design spec. In
the process, they also managed to reduce the noise these amplifiers
contributed to the final images.
New high-speed output
amplifier design also offers improved noise characteristics.
Noise in a digital camera isn't solely caused by the sensor chip
itself. All the signal-processing circuitry has some contribution to
the overall noise level that ends up in the final pictures. Canon
engineers redesigned the output amplifiers on the sensor chip to
deliver the speed required by the 10 frames/second design spec. In
the process, they also managed to reduce the noise these amplifiers
contributed to the final images.- Improved tonality through higher-resolution digitization. The EOS-1D Mark II N digitized its sensor output to 12 bits of resolution, allowing 4,096 levels of gradation from each pixel. The 1D Mark III digitizes to 14 bits, allowing 16,384 levels. At first blush, this would seem to be about dynamic range, but it really isn't: Dynamic range is set by the noise floor of the overall system and the maximum signal level that can be captured by each pixel, not by how many bits your digitizer has. What the 14 bit digitizer in the Mark III offers though, is much better control over tonal gradation. It will be interesting to see what the impact of this is in the final images. The Canon EOS-5D shows some of the most beautiful tonality we've seen to date from a digital camera. In the past we've attributed this to its larger pixels and a tone curve with very gentle tails at both highlight and shadow levels. We're excited to discover whether the 14-bit digitization in the 1D Mark III will let it achieve similar subtlety. It sounds like this may well be the case, as the 1D Mark III has a special exposure option called High Tone Priority that Canon claims delivers a full f-stop of headroom in strong highlights. Watch for our eventual lab tests of the 1D Mark III to see how this plays out.
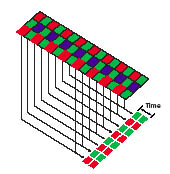
- 8-channel output, and a faster output amplifier. Like the 1D Mark II N before it, the 1D Mark III reads data out of the sensor chip 8 pixels at a time. That just holds things even though, the Mark III has to move its pixels almost 50% faster than did the Mark II (10Mp at 10 fps vs 8Mp at 8.5 fps). Part of the answer was the faster output amplifier we mentioned earlier when we were talking about image quality. Boosting amplifier bandwidth by 50% is no mean feat; doing so while simultaneously reducing noise levels is quite an accomplishment.
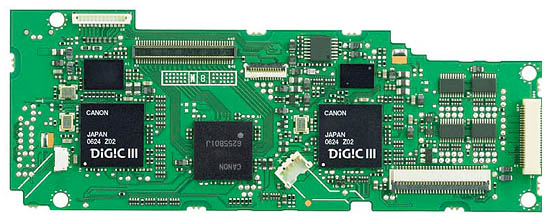
- Dual Digic IIIs, with parallel processing. Canon's Digic III image-processor chip is arguably one of the fastest camera-based processing chips on the planet. Among other things, it's the key to Canon's fast performance and low power consumption in their high-end point & shoot models, and to their excellent noise-suppression processing (which takes a lot of computational horsepower). But even the zippy Digic III couldn't keep up with the absurd data rates generated by the 1D Mark III. So Canon took the simple expedient of doubling up on the processors, packing two Digic IIIs onto the Mark III's processor board. (Does that make it a Digic VI?)
- New drive design. If the electrical engineers had a hard time boosting the electrical and computational throughput of the Mark III, that was nothing compared to what the mechanical guys (and gals, presumably) had to do to get the mirror to slam up and down fast enough without destroying itself or the camera, and to get the shutter to be able to fire and reset fast enough. It'd take a lot more than the paragraph or so we have here to describe all they did, but their approach had three main elements:
- A new bound/bounce prevention mechanism for the mirror's downward travel, to provide a "gentle landing" when it comes whipping down after the shutter fires.
- A separate, dedicated motor for mirror cocking, to get it wound up and ready to fire again in jig time.
- A separate, dedicated motor for shutter cocking, to get the curtain drawn back to be ready for the next exposure
- A new bound/bounce prevention mechanism for the mirror's downward travel, to provide a "gentle landing" when it comes whipping down after the shutter fires.
High Speed
Of course, the most startling feature of the Canon EOS-1D Mark III is its raw speed. I mean 10 frames/second at 10 megapixels? Very few film cameras approached that frame/second rate; the Canon EOS-1 RS managed 10 fps, a pellicle-mirror Canon F-1 did 14 fps, and Nikon pellicles (the F2H-MD and F3H) managed 13.5 fps, but all of those were decidedly special-purpose devices. In the digital realm, the Olympus E-100RS managed 15 fps, but it was only a 1.5 megapixel digicam. (Thanks to reader Tom Trottier for the details on the fastest pellicle-mirror designs, and for reminding us of the E-100RS' performance.)
The pellicle mirror SLR designs worked by using a half-silvered mirror that never flipped up: Half the light went to the viewfinder, half to the film, and the mirror stayed put during the exposures. That made it possible to achieve very high frame rates, but at the cost of a dim viewfinder and an effective ISO only half that of the film you were using. How'd Canon achieve this incredible frame rate in a digital SLR? Here's the short list:
Bottom line, the Canon 1D Mark III is by far the fastest digital SLR on the planet, and one of the very fastest SLRs ever.
Canon Japan has posted sample images from the EOS-1D Mark III on their website.
See the 63-page white paper in PDF format.

 Fujifilm GFX 50S Review
 Fujifilm X-T3 Review
 Olympus E-M5 III Review

Follow Imaging Resource