Pentax K-x Modes and Menus
Capture Modes
![]()
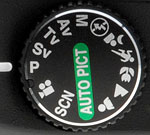 Program mode: The Pentax K-x's Program mode can operate in several ways, depending on the camera's setup. By default, the K-x operates in Program Shift mode (some manufacturers refer to this as Flexible Program), which controls shutter speed and aperture automatically, but allows you to use the e-dial to bias the camera towards a faster shutter speed / wider aperture, or a slower shutter speed / narrower aperture.
The "e-dial in Program" setting under the Green Button submenu -- selected from page four of the Record menu -- allows this behavior to be changed, with the e-dial behavior being linked to the function assigned to the Green button. The e-dial can be disabled altogether, or set to switch the camera to either Shutter- or Aperture-priority Automatic (aka Hyper Shutter or Hyper Aperture) exposure -- but only if the Green button is programmed to reset the exposure to that calculated as optimal by the metering system. If the Green button is set to any other function, the e-dial is simply disabled in Program mode, and the camera takes complete control of both the shutter speed and aperture, while you control all other exposure variables.
In the Hyper modes, the e-dial can be set to directly take control of either the aperture or the shutter speed if adjusted after the Program exposure has been determined, effectively switching the camera to Aperture-priority or Shutter-priority for the current exposure only. The difference between this and Program Shift mode is that the Aperture or Shutter speed are explicitly fixed to your set value, rather than simply biasing the metering system while the camera still selects the actual values of both variables.
![]() Sensitivity Priority mode: Marked with an "Sv" for Sensitivity value, in this unusual mode you manually set the ISO by pressing the shutter button halfway, then turning the e-dial. The camera picks the Aperture and Shutter value accordingly.
Sensitivity Priority mode: Marked with an "Sv" for Sensitivity value, in this unusual mode you manually set the ISO by pressing the shutter button halfway, then turning the e-dial. The camera picks the Aperture and Shutter value accordingly.
![]() Shutter Priority mode: Marked with a "Tv," for Time value, this mode allows the user to control the shutter speed, from 30 seconds to 1/6,000 second.
Shutter Priority mode: Marked with a "Tv," for Time value, this mode allows the user to control the shutter speed, from 30 seconds to 1/6,000 second.
![]() Aperture Priority mode: Marked with an "Av" for Aperture value, this mode gives user control of aperture, while the camera selects the shutter speed. Available apertures depend on the lens in use.
Aperture Priority mode: Marked with an "Av" for Aperture value, this mode gives user control of aperture, while the camera selects the shutter speed. Available apertures depend on the lens in use.
![]() Manual mode: This setting provides complete control over the exposure, with independent settings for aperture and shutter speed. The e-dial ordinarily controls shutter speed, and switches to aperture control if the exposure compensation button is held in (or pressed once before adjustment, and then a second time to confirm the aperture value change). Shutter speeds range from 1/6,000 to 30 seconds. Auto ISO sensitivity isn't available - if the camera is left on ISO Auto in M mode, the last set ISO value is instead used. The Green button ordinarily prompts the camera to meter the scene, and set both the aperture and shutter speed to obtain the metered exposure, much as would happen in Program mode. This metered exposure is then fixed until either the Green button is pressed again, or the photographer manually adjusts the aperture or shutter speed. Alternatively, the Green button can be set to adjust either the aperture or shutter speed alone to obtain a metered exposure, while the other variable is left to the manually set value. Finally, the Green button can be disabled altogether, requiring the photographer to set both exposure variables manually.
Manual mode: This setting provides complete control over the exposure, with independent settings for aperture and shutter speed. The e-dial ordinarily controls shutter speed, and switches to aperture control if the exposure compensation button is held in (or pressed once before adjustment, and then a second time to confirm the aperture value change). Shutter speeds range from 1/6,000 to 30 seconds. Auto ISO sensitivity isn't available - if the camera is left on ISO Auto in M mode, the last set ISO value is instead used. The Green button ordinarily prompts the camera to meter the scene, and set both the aperture and shutter speed to obtain the metered exposure, much as would happen in Program mode. This metered exposure is then fixed until either the Green button is pressed again, or the photographer manually adjusts the aperture or shutter speed. Alternatively, the Green button can be set to adjust either the aperture or shutter speed alone to obtain a metered exposure, while the other variable is left to the manually set value. Finally, the Green button can be disabled altogether, requiring the photographer to set both exposure variables manually.
![]() Flash Off mode: Disables the flash strobe, and otherwise is identical in function to the Standard Auto picture mode described below.
Flash Off mode: Disables the flash strobe, and otherwise is identical in function to the Standard Auto picture mode described below.
![]() Night Scene mode: The symbol of a person with a crescent moon marks this mode on the Mode dial. Here, the camera employs a slower shutter speed and a synchronized flash to capture bright portraits in dark settings.
Night Scene mode: The symbol of a person with a crescent moon marks this mode on the Mode dial. Here, the camera employs a slower shutter speed and a synchronized flash to capture bright portraits in dark settings.
![]() Moving Object mode: An icon of a person running marks this mode on the Mode dial. The camera uses faster shutter speeds to "freeze" action on fast-paced subjects, and the drive mode is fixed to High-speed Continuous shooting.
Moving Object mode: An icon of a person running marks this mode on the Mode dial. The camera uses faster shutter speeds to "freeze" action on fast-paced subjects, and the drive mode is fixed to High-speed Continuous shooting.
![]() Macro mode: The traditional flower macro symbol indicates this mode on the Mode dial. Though actual macro focusing distances will depend on the lens in use, this mode optimizes the camera for capturing bright color in small subjects at close range.
Macro mode: The traditional flower macro symbol indicates this mode on the Mode dial. Though actual macro focusing distances will depend on the lens in use, this mode optimizes the camera for capturing bright color in small subjects at close range.
![]() Landscape mode: The familiar mountain icon marks Landscape mode, which increases the focus range for sharp pictures of sweeping vistas. Saturation is boosted for bright skies and foliage.
Landscape mode: The familiar mountain icon marks Landscape mode, which increases the focus range for sharp pictures of sweeping vistas. Saturation is boosted for bright skies and foliage.
![]() Portrait mode: An icon of a person's head and shoulders symbolizes this mode, which uses a larger aperture to decrease the depth of field, thereby producing sharply focused portraits in front of slightly blurred backgrounds. This mode also optimizes the camera for attractive skin tones.
Portrait mode: An icon of a person's head and shoulders symbolizes this mode, which uses a larger aperture to decrease the depth of field, thereby producing sharply focused portraits in front of slightly blurred backgrounds. This mode also optimizes the camera for attractive skin tones.
![]() Auto Picture mode: This mode puts the camera in full control over the exposure, automatically selecting between the five previous scene modes - Portrait, Landscape, Macro, Moving Object and Night Scene -- as well as a Standard scene mode which isn't directly accessible from the Mode dial. In addition, when shooting in Live View mode, the Auto Picture mode can also select two further Scene modes - Blue Sky, and Sunset. The selected Scene mode is shown in the viewfinder info display, or at the top left corner of the LCD when shooting in Live View mode.
Auto Picture mode: This mode puts the camera in full control over the exposure, automatically selecting between the five previous scene modes - Portrait, Landscape, Macro, Moving Object and Night Scene -- as well as a Standard scene mode which isn't directly accessible from the Mode dial. In addition, when shooting in Live View mode, the Auto Picture mode can also select two further Scene modes - Blue Sky, and Sunset. The selected Scene mode is shown in the viewfinder info display, or at the top left corner of the LCD when shooting in Live View mode.
![]() Scene mode: Allows direct selection of ten scene modes, of which two can be accessed through other positions on the Mode dial as previously described. The available scene modes are Night Scene, Surf & Snow, Food, Sunset, Stage Lighting, Kids, Pet, Candlelight, Museum, and Night Snap. Night Scene also has its own Mode dial position, while Sunset can be automatically selected by the camera when using Auto Picture mode with Live View active.
Scene mode: Allows direct selection of ten scene modes, of which two can be accessed through other positions on the Mode dial as previously described. The available scene modes are Night Scene, Surf & Snow, Food, Sunset, Stage Lighting, Kids, Pet, Candlelight, Museum, and Night Snap. Night Scene also has its own Mode dial position, while Sunset can be automatically selected by the camera when using Auto Picture mode with Live View active.
![]() Movie mode: This mode allows the user to record videos with sound. Resolution options consist of 1280x720 (16:9) or 640x416 (3:2) pixels, both at 24 frames-per-second with monaural sound. There are three quality (compression ratio) options available, and you can choose to have the aperture fixed, or under automatic control. Shake reduction can also be enabled or disabled as desired. See the Video tab for more details as well as sample videos (if available).
Movie mode: This mode allows the user to record videos with sound. Resolution options consist of 1280x720 (16:9) or 640x416 (3:2) pixels, both at 24 frames-per-second with monaural sound. There are three quality (compression ratio) options available, and you can choose to have the aperture fixed, or under automatic control. Shake reduction can also be enabled or disabled as desired. See the Video tab for more details as well as sample videos (if available).
Playback Mode
![]() Playback mode is entered by pressing the Playback button on the camera's rear panel. In this mode, you can scroll through captured images, delete them, write-protect them, and apply digital filters for creative effects. You can also set them up for printing on devices capable of recognizing DPOF print orders specified on the flash card. Like the K-7 before it, the Pentax K-x is not PictBridge compatible, so the printer and camera can't be directly attached, however.
Playback mode is entered by pressing the Playback button on the camera's rear panel. In this mode, you can scroll through captured images, delete them, write-protect them, and apply digital filters for creative effects. You can also set them up for printing on devices capable of recognizing DPOF print orders specified on the flash card. Like the K-7 before it, the Pentax K-x is not PictBridge compatible, so the printer and camera can't be directly attached, however.
Pentax K-x Menu Details
Below are Pentax K-x menu options and their descriptions. Pressing the Menu button provides access to the camera's full menu system.
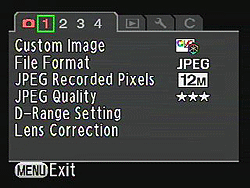
Record Menu:
|
Record Menu Options |
|||
|
Top-Level Selection |
Second-Level |
Third-Level |
Notes |
Custom Image |
- Bright - Natural - Portrait - Landscape - Vibrant - Muted - Monochrome |
- Saturation - Hue - High / Low-key Adjust - Contrast - Sharpness / Fine Sharpness - Filter Effect - Toning |
Allows control over the rendering of images. Filter Effect and Toning are only available in Monochrome mode, while Saturation and Hue are available in all but Monochrome mode. See the Exposure page for more details. |
File Format |
- JPEG - RAW - RAW + JPEG |
Allows selection of the filetype - either JPEG, Raw, or both formats simultaneously. |
|
|
JPEG Recorded Pixels |
- 12M (4288 x 2848) - 10M (3936 x 2624) - 6M (3072 x 2048) - 2M (1728 x 1152) |
|
Selects the image dimensions for JPEG files. |
|
JPEG Quality |
- *** Best - ** Better - * Good |
|
Selects the level of compression to apply to JPEG images. |
|
D-Range Setting |
- Highlight Correction |
- Off - On |
Corrects for clipping in highlight areas of images. When set on, the minimum ISO sensitivity is 400. Highlight correction cannot be disabled in the Stage Lighting and Night Snap scene modes. |
|
- Shadow Correction |
- Off - Low - Medium - High |
Corrects for blocking up of shadow areas in images, with three steps of adjustment available, plus the ability to disable the effect altogether. |
|
|
Lens Correction
|
- Distortion Correction
|
- Off
- On |
Corrects geometric distortion caused by lens, when using either DA, DA L and D FA lenses without any accessories between the lens and camera body. Applied in-camera to JPEGs, and tagged to RAW files.
|
|
- Lat- Chromatic -Ab Adj
|
- Off
- On |
Corrects lateral chromatic aberration caused by lens, when using either DA, DA L and D FA lenses without any accessories between the lens and camera body. Applied in-camera to JPEGs, and tagged to RAW files.
|
|
|
Cross Processing |
- Off - On |
Enables or disables an effect intended to be reminiscent of cross-processing, a technique from film photography. See the Exposure page for more details. Note: Firmware version 1.01 adds three presets. |
|
Digital Filter |
- Off - Toy Camera - Retro - High Contrast - Extract Color - Soft - Star Burst - Fish-eye - Custom Filter |
- Filter adjustment screen |
Selects which digital filter to apply in capture mode (additional filters can be applied and combined in playback mode). All filters allow some degree of adjustment, although the precise controls vary by filter. If set at shooting time, digital filters necessitate use of JPEG mode, and preclude use of multi-exposure and high dynamic range capture functions. Raw files can be captured with the digital filters set to off, and then the filters applied after shooting by processing in-camera. |
|
HDR Capture |
- Off - Standard - Strong |
|
Captures three frames and combines them in-camera into one single image with increased dynamic range. See the Exposure page for more details. |
|
Multi-exposure |
- Number of Shots |
- 2 to 9 |
Allows anywhere from two to nine frames to be combined in-camera into a single exposure. See the Exposure page for more details. |
|
- Auto EV Adjust |
- Off - On |
Selects whether multi-exposures are additive, or averaged. |
|
|
AF Mode |
- AF.A (Auto) - AF.S (Single) - AF.C (Continuous) |
Selects the Autofocus mode - either Single, Continuous, or an Auto mode which chooses between the other modes based on subject movement. |
|
AE Metering |
- Multi-segment - Center-weighted - Spot |
Selects the metering mode - either 16-segment multiple, center-weighted, or spot. Multi-segment metering can optionally be linked to the AF system through the Custom menu. |
|
Select AF Point |
- Auto (5 AF points) - Auto (11 AF points) - Select - Spot |
Allows the user to select which autofocus point(s) should be considered when determining the point of focus. The default option is to automatically choose one of five points in a plus-shaped pattern at the center of the frame. Other options include automatic selection across all eleven points, Select (manual selection of any single AF point), or Spot (AF point fixed at the center of the frame). |
|
|
Movie |
- Recorded Pixels |
- 0.9M (1280x720) - 0.3M (640x416 ) |
Sets parameters for movie recording. Movies are recorded at 24 frames per second in either 16:9 720p high-definition, or 3:2 aspect ratio at slightly below VGA resolution. Three quality settings are offered, and the aperture can be controlled automatically or selected manually at the start of recording. The camera's shake reduction system and monaural microphone can both be enabled or disabled. |
|
- Quality Level |
- *** (Best) - ** (Better) - * (Good) |
||
|
- Sound |
- On - Off |
||
|
- Movie Aperture Control |
- Fixed - Auto |
||
|
- Shake Reduction |
- On - Off |
||
|
Live View |
- Info Overlay |
- On - Off |
Sets parameters for the Live View mode. Overlays containing basic exposure info, a framing grid, live histogram, and blinking highlight / shadow clipping warning can be enabled or disabled. Three AF modes can be selected - Phase Difference AF (interrupts Live View during AF operation, uses dedicated AF sensor), Contrast AF (doesn't interrupt live view, allows focus point anywhere in frame, but is much slower to achieve focus lock), and Face Detection (similar to Contrast AF, but automatically detects dominant face in scene and sets AF on that face). |
|
- Show Grid |
- On - Off |
||
|
- Histogram |
- On - Off |
||
|
- Bright/Dark Area |
- On - Off |
||
|
- Autofocus Mode |
- Face Detect - Contrast AF - Phase Difference AF |
||
|
Status Screen |
- Display Color |
- 1
- 2 - 3 - 4 - 5 - 6 |
Selects the color scheme to be used for the K-x's status display screen. Choices are blue/grey (1), light / dark grey (2), light / dark blue (3), light / dark red (4), white / light grey (5), or light / mid orange (6). |
|
Instant Review |
-
Display Time
|
- 1 sec - 3 sec - 5 sec - Off |
Controls length of time the most recently captured image appears post capture, whether a histogram is shown, and where areas of over / underexposure are flashed. |
- Histogram |
- On - Off |
||
- Bright / Dark Area |
- On - Off |
||
|
Color Space |
- sRGB - Adobe RGB |
|
Selects which color space should be used for JPEG images. The sRGB color spaces has a narrower gamut, but can be displayed without conversion on most PC displays. The Adobe RGB color space has a wider gamut and is better suited to color space-aware printing, etc. |
|
RAW File Format |
- PEF - DNG |
|
Selects whether Raw data should be saved in Pentax's proprietary .PEF format, or Adobe's open Digital Negative (.DNG) format. |
|
Green Button
|
- Green button
- Custom image - Optical preview - Digital preview - RAW button function - Center AF point |
Defines the function of the Green button. By default, this button is used to reset specific variables to their default value - for example, holding in the Exposure compensation and Green buttons together resets the compensation value to zero, etc. Alternative functions are to call up the Custom Image settings screen, preview depth-of-field in the optical viewfinder, shoot a preview image with the current settings for display on the LCD, switch file formats temporarily or permanently, or reset the autofocus to the center point when using the Select AF point function. Note: Firmware version 1.01 adds Cross Processing.
|
|
|
Memory |
- Flash mode - Drive mode - White balance - Sensitivity - EV Compensation - Flash Exposure Comp. - Cross processing - Digital filter - HDR capture - Shooting info display - Playback info display - File No. |
|
Allows you to select what settings are saved when you turn the camera off. All except Cross Processing, Digital Filter, HDR Capture and Shooting Info Display are selected by default. |
|
Shake Reduction |
- On - Off |
|
Enables or disables the sensor-shift type Shake Reduction function, which corrects for blur caused by camera shake, but should be disabled when the camera is on a tripod. |
|
Input Focal Length |
- Set focal length from 8 to 800 |
|
Only available if Shake Reduction switch is on and lens in use does not support automatic lens information communication. Allows input of a lens focal length in 34 steps from 8 to 800mm. |
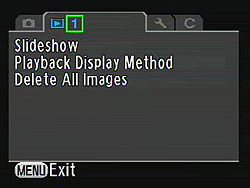
Playback Menu:
| Playback Menu Options | |||
|
Top-Level Selection |
Second-Level |
Third-Level |
Notes |
|
Slideshow |
- Interval |
- 3 sec - 5 sec - 10 sec - 30 sec |
Sets slideshow interval, transition effects, and whether or not the slideshow should start over after the last image is shown. |
|
- Screen Effect |
- Off - Fade - Wipe - Stripe |
||
|
- Repeat Playback |
- Off - On |
||
|
Playback Display Method |
- Bright/Dark Area |
- Off - On |
Over/underexposed areas flash on playback. |
|
- Quick Zoom |
- Off - 2x - 4x - 8x - 16x |
Sets initial magnification when enlarging images. |
|
|
Delete All Images |
- Delete All - Leave All |
|
Allows all images to be deleted simultaneously, including protected images. Deletion proceeds after acknowledgement of a confirmation screen noting the number of images to be deleted, and whether or not there are any protected images amongst these. |
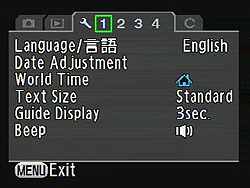
Setup Menu:
| Setup Menu Options | |||
|
Top-Level Selection |
Second-Level |
Third-Level |
Notes |
|
Language |
- English - French - German - Spanish - Portuguese - Italian - Dutch - Danish - Swedish - Finnish - Polish - Czech - Hungarian - Turkish - Greek - Russian - Korean - Chinese (Traditional) - Chinese (Simplified) - Japanese |
Selects the language in which the camera should display all menus, error messages, etc. |
|
|
Date Adjustment |
- Date Format |
- mm/dd/yy - dd/mm/yy - yy/mm/dd - 12h - 24h |
Sets the date and time, as well as the format in which both should be displayed. |
|
- Date |
- Set date |
||
|
- Time |
- Set time |
||
|
World Time |
Setting the Time |
- Hometown |
Allows both a hometown and destination city to be selected from a list of 75 major cities worldwide (with maps showing the location in North America, Central and South America, Europe, Africa / West Asia, East Asia, and Oceania). For both hometown and destination, the status of daylight savings time can be indicated. The camera can then be quickly switched back and forth between hometown and destination clocks without needing to manually correct the time. |
Destination |
- Destination city |
||
Hometown |
- Hometown city |
||
|
Text Size |
- Standard. - Large |
|
Selects whether to use the standard font size in all menus, or increase the size of the font for the currently highlighted option in any menu. |
|
Guide Display |
- 3 sec - 10 sec - 30 sec - Off |
Activates display guides on LCD when the exposure mode is changed or camera is switched on for set amount of time. |
|
|
Beep |
- On |
- In-focus - AE-L - RAW - Self-timer - Remote control |
Sets whether the camera beeps or not for a variety of different operations. |
- Off |
|||
|
Brightness Level |
- 15 arbitrary units from -7 to +7 |
Adjusts overall brightness of LCD display. |
|
|
LCD Color Tuning |
- 2D grid with Blue/Amber axis, Green/Magenta axis |
|
Adjust the LCD color in 15 levels for each direction. Turning the e-dial selects either a photo for the background of the adjustment screen, or a standard screen showing luminance scale from black to white. |
|
Video Out |
- NTSC - PAL |
|
Selects composite video signal. |
|
USB Connection |
- MSC - PTP |
|
Selects USB mode (Mass Storage Class or Picture Transfer Protocol). |
|
Folder Name |
- Date - PENTX |
"Date" names files xxx_MMDD. "PENTX" sets file naming in form of xxxPENTX, sequentially from 100 to 999. |
|
|
Copyright Information |
- Embed Copyright Data |
- Off - On |
Embeds name and copyright strings into EXIF. |
|
- Photographer |
- Enter alphanumeric string |
||
|
- Copyright Holder |
- Enter alphanumeric string |
||
|
Auto Power Off |
- 1 min - 3 min - 5 min - 10 min - 30 min - Off |
|
Sets time before camera shuts off after inactivity. |
|
Select battery |
- Auto Detect - Lithium - Nickel-Metal Hydride - Alkaline |
|
Identifies what type of batteries are currently in the camera, allowing more accurate determination of charge remaining, Auto detection should usually work, except in low temperatures. |
|
Reset |
- Reset - Cancel |
"Reset" returns all settings to defaults, with the exception of Language, Date and time, World time cities and daylight savings time, Text size, Video output, Copyright information, and all Custom Setting menu items. |
|
|
Pixel Mapping |
- Pixel Mapping - Cancel |
|
For remapping bad pixels, allowing the camera to automatically correct them as photos are captured. |
|
Dust Alert |
- Press the shutter release button |
|
For taking a high contrast image to detect dust on the sensor. Camera should be aimed at a uniformly bright subject. |
|
Dust Removal |
- Dust Removal |
|
First option activates Dust removal, which shakes the sensor to free dust particles when you press OK from this menu. Start-up action determines whether the camera should perform dust removal on every startup. |
- Start-up Action |
- On - Off |
||
|
Sensor Cleaning |
- Mirror Up - Cancel |
|
"Mirror Up" locks the mirror up for sensor cleaning. This should only be performed with fully charged batteries. The camera will attempt to sound a beep if it detects the battery charge is running low, which is a final warning to remove tools from the camera before the shutter closes and is damaged. |
|
Format |
- Format - Cancel |
|
"Format" erases all images, even protected ones. |
Custom Menu:
| Custom Menu Options | |||
|
Top-Level Selection |
Second-Level |
Third-Level |
Notes |
|
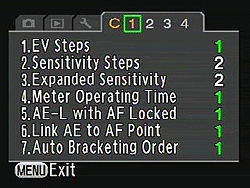
1. EV Steps |
- 1: 1/3 EV - 2: 1/2 EV |
|
Determines whether the exposure compensation function should use a step size of 1/3 or 1/2 EV. |
|
2. Sensitivity Steps |
- 1: 1 EV Step - 2: As EV Steps |
|
"As EV Steps" adjusts ISO based on what variable is set in the previous Custom menu item (EV Steps) Alternatively, ISO sensitivity can be set to use a 1 EV step size. |
|
3. Expanded Sensitivity |
- 1: Off - 2: On |
|
Allows the ISO range to expand to 100 - 12,800. |
|
4. Meter Operating Time |
- 1: 10 sec - 2: 3 sec - 3: 30 sec |
|
Determines how long the metering system should wait before powering down during inactivity. Longer values reduce battery life. |
|
5. AE-L with AF locked |
- 1: Off - 2: On |
|
If set to "On" exposure is also locked when a focus lock is achieved. |
|
6. Link AE to AF Point |
- 1: Off - 2: On |
|
"On" links the AE and AF points during multi-segment metering only, so that both values are set from the same point. |
|
7. Auto Bracketing order |
- 1: 0 - + - 2: - 0 + - 3: + 0 - - 4: 0 + - |
|
Sets shooting order for bracketed exposures, with zero being the metered shot, '-' being underexposed, and '+' being overexposed. |
|
8. WB when using Flash |
- 1: Auto white balance - 2: Unchanged - 3: Flash |
|
When flash is used, white balance can be auto, stay as set, or switch to Flash white balance. |
|
9. AWB in Tungsten Light |
- 1: Subtle Correction - 2: Strong Correction |
|
Adjusts strength of automatic WB correction in tungsten light. |
|
10. AF/AE-L Button |
- 1: Enable AF1 - 2: Enable AF2 - 3: Cancel AF - 4: AE lock |
|
Determines the function of the AF/AE-L button. Choices are Enable AF1 (focus set with either the AF/AE-L button or shutter-button half press), Enable AF2 (focus set with only the AF/AE-L button, not the shutter button), Cancel AF (AF/AE-L button disables AF while held in), and AE Lock (the AF/AE-L button sets exposure only, not focus). |
|
11. AF with Remote Control |
- 1: Off - 2: On |
|
If on, performs an autofocus operation when the remote control is used to trigger the shutter release. If off, photo is taken immediately without focus adjustment, regardless of position of AF/MF slider. |
|
12. Remote Control in Bulb |
- 1: Mode1 - 2: Mode2 |
Mode 1 is push to start, push again to stop; Mode 2 is push and hold. |
|
|
13. Slow Shutter Speed NR |
- 1: On - 2: Off |
|
Sets whether Noise Reduction is applied when shooting at low shutter speeds (This takes longer between exposures because it has to capture a dark frame after the main exposure) Regardless of this setting, slow shutter speed NR is always applied on exposures of 30 seconds or longer. |
|
14. High-ISO NR |
- 1: Medium - 2: Low - 3: High - 4: Off |
|
Sets the level of noise reduction used for high sensitivity photos. High ISO NR is always applied at ISO 6,400 or above, regardless of this setting.
|
|
15. High-ISO NR Start Level |
- 1: ISO 800 - 2: ISO 400 - 3: ISO 1,600 - 4: ISO 3,200 |
|
Sets at what sensitivity High-ISO noise reduction is activated. |
|
16. Release While Charging |
- 1: Off - 2: On |
|
"On" allows shutter release while flash is charging. |
|
17. Flash in Wireless Mode |
- 1: On - 2: Off |
|
"On" fires built-in flash as master in wireless mode. Off uses the built-in flash as a control flash only. |
|
18. Saving Rotation Info |
- 1: On - 2: Off |
|
If set to on, the K-x embeds rotation tags in the EXIF headers of image files, which can be used by the camera and some software to automatically orient images correctly. |
|
19. Auto Image Rotation |
- 1: On - 2: Off |
|
Turns auto-rotation in playback mode on or off. This will rotate portrait-orientation photos to display upright (with black borders on either side) when the camera is held in landscape orientation, but does not change the display to match the orientation of the camera during playback. |
20. Power Lamp |
- 1: Standard - 2: Low - 3: Off |
Determines whether the power lamp should light at full power, with a lower intensity, or not light at all when the camera is switched on. Regardless of this setting, the power lamp always lights during USB data transfer. |
|
|
21. Catch-in Focus |
- 1: Off - 2: On |
|
If using a manual focus lens in single or auto AF modes, the K-x can trip the shutter release automatically when it determines that the subject is in focus. |
|
22. Using Aperture Ring |
- 1: Prohibited - 2: Permitted |
|
Setting one prevents image capture when the aperture ring isn't set to A. |
|
Reset Custom Function |
- Reset - Cancel |
|
Resets all Custom Functions to default. |
 Fujifilm GFX 50S Review
 Fujifilm X-T3 Review
 Olympus E-M5 III Review

Follow Imaging Resource