Nikon D40 Viewfinder
Like most DSLRs, the Nikon D40's viewfinder is an optical through-the-lens type, with the LCD monitor being used for image playback and menu access only. (That is, there's no live image preview available.) The D40's viewfinder is quite similar to that of the earlier D50, although there are some modest improvements in a couple of areas. For one, the D50's viewfinder provides a slightly higher magnification, 0.8x vs the 0.75x of the D50. This makes for a bit larger display, making it a bit easier to see subject details. The D40's dioptric correction adjustment (for eyeglass wearers) also has a slightly broader range, from -1.7 to +0.5 diopter, vs the -1.6 to +0.5 range of the adjustment on the D50. It has an eyepoint height of 18mm, which is the same as on the D50. Like the D50, the D40's viewfinder is a pentamirror design, rather than the more costly, but brighter pentaprism.
The viewfinder is actually one of the bigger distinguishing features between the D40 and D80: The D80 uses a pentaprism design, has a magnification factor of 0.94x, an eyepoint of 19.5mm, and a diopter adjustment range of -2.0 to +1.0. While the D40's viewfinder is every bit as capable as those on many competing DSLRs, the D80 clearly wins on size, brightness, comfort, and flexibility.

The Nikon D40's viewfinder readouts do a good job of communicating camera status and exposure settings, a slightly trimmed-down list of information from that found on the D80 largely matches that of the D50, and makes for a simple and relatively uncluttered display. One clear difference relative to both the D50 and D80 though: The D40 has no liquid-crystal overlay in the main viewfinder window. Instead, the active AF area lights up via a far more obvious red LED brackets.
Viewfinder
Coverage
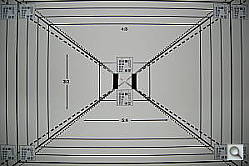
Very good accuracy with the optical viewfinder.
 |
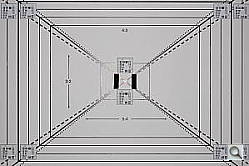 |
| 18mm eq., optical | 55mm eq., optical |
The Nikon D40's optical viewfinder proved pretty accurate, showing about 98% frame accuracy at wide angle, and about 97% at telephoto. That said, results were shifted vertically just a little in the final image.
Nikon D40 LCD Display
As is the case with virtually all digital SLRs, the LCD panel on the D40 can't be used as a viewfinder. It does, however, provide a great deal of information about your pictures after you've shot them. A variety of playback options are offered, including image-only, four flavors of overlaid information, a 4- or 9-image thumbnail display, and a zoomed playback mode with variable information. The screenshots below show several of the information displays that are available.
| Playback Information Screens | |
 |
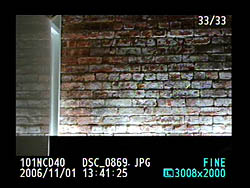 |
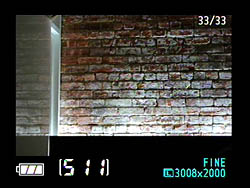
| This is the "instant review" display shown in shooting mode just after an image has been captured. It shows image sequence number, shots-remaining on the card, size/quality, and battery condition. | The default playback-mode information screen. Folder & file names, date/time, image sequence number, and image size/quality. |
 |
 |
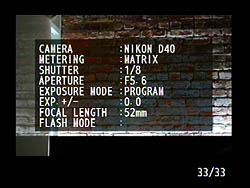
| The first of two more detailed information overlays. | The second detailed information overlay screen. |
Its playback screens were one of the things we liked most on the D80 (and the D200 before it), so we were very happy to see a lot of that functionality carried over to the D40 as well.
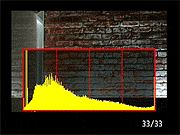 Of the various screens, one of the more interesting options on the Nikon D40 is the histogram screen. Histogram displays are common on professional digital cameras (and many amateur models now as well), regarded as almost mandatory by many pros for evaluating exposure levels. A histogram is simply a graph of how many pixels there are in the image at each brightness level. The brightness is the horizontal axis, running from black at the left to white at the right. The height of the graph shows the relative number of pixels having each brightness level. This sort of display is very handy for determining under- or overexposure. Ideally, the histogram would stretch across the entire width of the display, using the full range of brightness values available. An underexposed image will have a histogram with all the data lumped on the left-hand side, with nothing reaching all the way to the right. Likewise, an overexposed image will have all the data lumped on the right hand side.
On the D40, a luminance (brightness) graph is the only option for the histogram display; the RGB+L histogram display option from the D80 having been dropped. We here at IR like being able to see what's going on in the individual color channels, but for the novice user the D40 is aimed at, the individual red, green, and blue histogram displays might have been more confusing than useful.
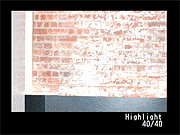 A histogram display is very helpful in telling whether you've got the exposure right, but to my mind isn't adequate by itself. With digital cameras, it's very important not to blow-out the highlights in a picture (they're similar to color positive film in that respect), since once you hit the maximum brightness, the image just saturates, and any highlight detail will be lost. A histogram display does a pretty good job of telling you how the image as a whole is doing, but what if there are just a few critical areas that you're worried about for the highlights? If only a small percentage of the total frame is involved, it won't account for many pixels. That means any peak at the "white" end of the histogram graph would be pretty small, and easy to miss (or just plain invisible). What to do? The folks at Nikon recognized this problem some time ago, and so have provided another special display mode on the D40 (as on most of their dSLRs) that they simply call "highlights," accessible via the Playback settings menu, under "Display Mode." This mode blinks any highlights that are saturated in any of the color channels. It does this by taking the nearly-white areas on the LCD and toggling them between white and black. The shot above right shows the blown highlights blinking on an otherwise uninteresting shot of an overexposed brick wall.
The D40 also offers the D80's excellent options for display magnification. You have the normal thumbnail or normal-sized displays available, but can also enlarge the display up to 19x (for maximum-resolution images) to examine critical focus and framing. Pressing the Magnify button enables zoomed playback, and each subsequent press of it zooms in a step closer. Pressing the "unmagnify"/Thumbnail button zooms you out. Any time you're zoomed in, you can scroll around the magnified image by using the Multi-controller. A particularly nice feature is that you can use the Command Dial to scroll between images on the memory card, at the same zoom level, and with the same relative position in each. This is especially helpful when you want to check the same detail in multiple versions of the same shot.
 Fujifilm GFX 50S Review
 Fujifilm X-T3 Review
 Olympus E-M5 III Review

Follow Imaging Resource