Canon PowerShot S5 IS Design
The Canon PowerShot S5 IS may be made of plastic but it still looks and feels like a solid camera. Its digital SLR-like design, with plenty of external controls, matches the camera's arsenal of sophisticated features. Measuring 4.6 x 3.15 x 3.06 inches (117.0 x 80.0 x 77.7mm) and weighing just over a pound with battery and SD card, the Canon S5 IS will prove to be a tight fit even in a coat pocket, but can be toted around in a camera bag or hang from your neck or shoulder with the included neckstrap. The camera is comfortable to carry and won't weigh you down when you're out and about.
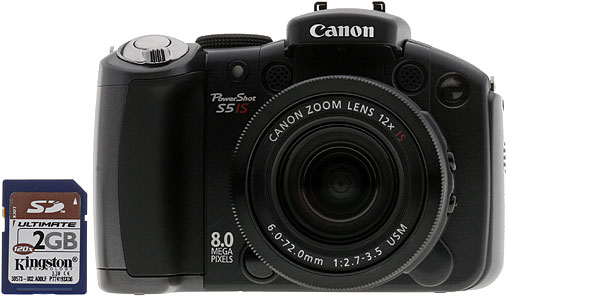
The front of the camera is dominated by the Canon PowerShot S5 IS's high profile grip and its 12x, 36-432mm (35mm-equivalent) telescoping optical zoom lens, which extends about 1-inch when the camera is powered on. A Ring Release button sits at the lower left of the lens and disengages the forward lens ring so that a conversion lens or filter can be attached. Dual microphones, to capture stereo sound, sit above the lens. The small lamp on the upper left of the camera (when looking straight on) functions as the redeye reduction lamp, as well as the self-timer and tally lamp. On the opposite side, a larger lamp emits a bright AF assist green light when focusing in low light conditions.

On the right side of the Canon PowerShot S5 IS (as viewed from the rear) are the USB port, A/V, and DC-in jack, which are protected by a rubber cover. At the top edge of the grip is an eyelet for attaching the camera strap.
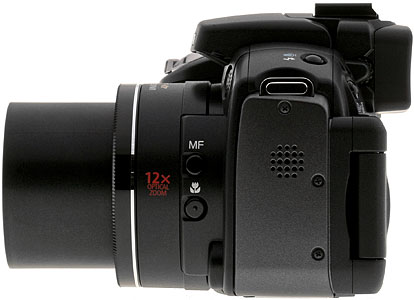
On the left side of the camera (as viewed from the rear) you'll find the second eyelet for attaching the camera strap as well as the Canon S5 IS's speaker. The Manual Focus and Macro focus buttons are visible on this side of the lens barrel.
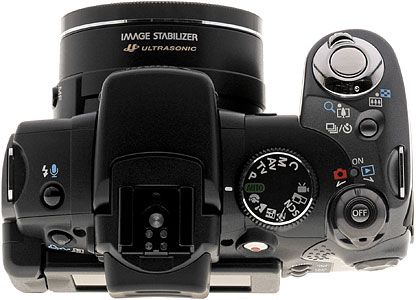
The camera's top panel is home to the built-in pop-up flash and the newly added hotshoe for attaching an external flash. To the left of the flash is the flash/voice record button. The Mode Dial is located to the right of the flash. Atop the grip you'll find the Shutter button surrounded by the Zoom lever and the Continuous Shooting/Self-Timer button. The Canon PowerShot S5 IS's Power button is the final control on the top panel. The Off button is surrounded by a lever that, when jogged to the right, puts the camera in Record mode; jog the lever to the left for Playback mode. A small light above the power button indicates Record (orange); Playback (green); connected to PC (yellow).
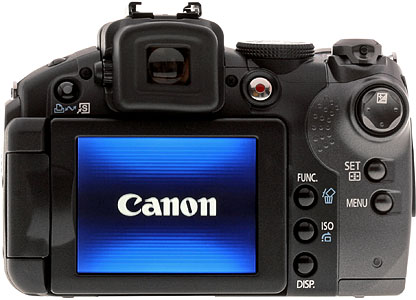
The remainder of the Canon PowerShot S5 IS's controls are found on the rear panel, along with the Electronic Viewfinder and 2.5-inch articulating LCD. The LCD occupies most of the rear real estate and can be flipped out and positioned flat against the camera or rotated for convenient overhead and low level shooting. For protection, the LCD's screen can be closed facing the back of the camera. When the LCD is closed and the camera is powered on, the Electronic Viewfinder (EVF) is activated for viewing and composition. The EVF can also be activated by pressing the Display button on the lower right side of the camera. Additional controls include the Direct Print/Shortcut button and Diopter control to the left of the EVF. A dedicated Movie button sits to the right of the EVF. On the top right, you'll find the four-way controller to navigate menus; pressing the controller up opens the Exposure Compensation menu. The Set and Menu buttons are aligned beneath the four-way controller, just to the right of the Function/Delete, ISO/Jump, and Display buttons.
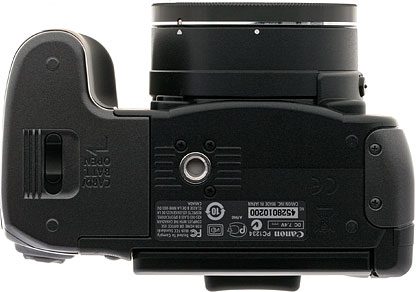
The bottom of the Canon PowerShot S5 IS is home to the battery/SD/SDHC card compartment, which is protected by a large and sturdy hinged door. The adjacent tripod mount is metal but its close proximity to the compartment severely limits battery and media card changes when using a tripod. It's also not centered under the lens, making panoramics a little more difficult to capture.
Canon PowerShot S5 IS External Controls
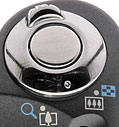
Shutter Button: Positioned atop the camera's grip, the Shutter button sets focus and exposure when halfway pressed. When fully pressed, it engages the shutter.
Zoom Lever (see previous image): The Zoom Lever surrounds the Shutter button and controls the zoom in Record mode. Pull the lever to the right to zoom into telephoto; push the lever left to zoom to wide angle. In Playback mode, the Telephoto position of the Zoom lever is used to enlarge the image to view details. The Wide position of the Zoom lever is used to display up to nine images at one time; jog the lever into Wide position again to access a Jump feature to move from one set of nine images to another. You can also move between Menu tabs without scrolling to the top of a menu by moving the zoom lever left or right.
![]()
Continuous Shooting/Self-Timer Button: Located behind the Shutter/Zoom lever, this button sets the camera's drive mode. Options are Single, Continuous, Continuous Shooting with Autofocus, or Autofocus LV (Live View), which uses a manually set focus position, 10 second Self-Timer, 2 second Self-Timer, and a Custom Self-Timer. Hold this button down for one second to display the camera's Clock, date, and time.

Mode Dial: Positioned atop the camera between the grip and flash, the Mode Dial selects the shooting mode from Auto, Program AE, Shutter-speed priority, Aperture-priority, full Manual, and Custom settings, Movie, and Stitch Assist (for shooting multiple images and "stitching" them into a panorama). Direct Scene Mode options are Portrait, Landscape, Night Snapshot, and Sports. For more Scene Mode options, the SCN selection offers: Night Scene, Indoor, Foliage, Snow, Beach, Fireworks, Aquarium, Color Accent (one color is retained while the rest of the image is recorded in black and white), Color Swap (a single color can be replaced by another color).
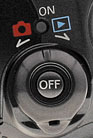
Power/Mode Lever: Positioned to the right of the Mode Dial, this control turns the power on by pressing the small lock button on the back and jogging the rear of the controller it to the right (so that the pointer faces the icon for Record Mode on the left) or to the left (so that the pointer faces the icon for Playback Mode on the right). Power is turned off by pressing the center Off button.

Movie Button: This button, located to the right of the Viewfinder, starts and stops Movie mode recording, regardless of the Mode Dial setting. The Shutter button can be used to capture a still image while recording.

Four-way Controller: The four-way controller is used to navigate menus, change Aperture and Shutter settings in manual exposure modes. In Playback mode, the controller is used to scroll through and within images. When pressed in the up direction, the Exposure Compensation (EV) menu is opened, providing the ability to over- or under-expose images by +/- 2. In Manual mode, the up/down positions are used to change Aperture settings; in Auto mode, the EV option is disabled.
![]()
Set/AF Frame/Face Detection Select Button: Positioned below the Four-Way Controller, this button confirms menu settings. In Record mode, the button can be pressed to highlight the AF which can be moved via the Four-Way Controller or pressed to enable Face Detection. In Manual Focus mode, the frame cannot be moved but by pressing the Set button, the camera will use Autofocus to fine-tune the manual focus point.

Function/Erase Button: In Playback mode, this button deletes captured images. In Record mode, the Function button provides direct access to the most-often changed settings (see Operation tab for more).
![]()
ISO/Jump Button: Located just below the Function button, in Record mode this control cycles through ISO options: Auto, Hi, 80, 100, 200, 400, 800, 1,600. In Playback mode, pressing this button allows you to quickly cycle through captured images. You can also specify Jump criteria: Shot date, My Category (if you have stored images according to categories), Folder, Movie, in increments of 10 images or 100 images.
![]()
Display Button: This button cycles through various display options in both Record and Display modes. In Record mode you can switch between LCD and Electronic Viewfinder, as well as change the amount of information displayed (i.e., full or minimal shooting data); Display options can be customized in the Record Menu. In Playback, you can choose from no shooting information, minimal shooting information and full shooting data including a histogram.

Shortcut/Print/Share Button: This button, positioned to the left of the EVF, can be assigned a function in the Setup menu. Options include: Metering mode, Custom, or preset White Balance, Digital Teleconverter, AE Lock, AF Lock, or Display Off. When hooked up to a PictBridge-compatible printer, the button is used to print selected images; when connected to a Windows computer loaded with Canon software, the button provides easy, one-touch transfer of images from camera to computer.
![]()
Flash/Voice Record Button: When the Flash is manually opened, this button offers Flash options: Auto (with or without Red-eye depending on Record Menu setting) or Fill Flash (forced on, with or without Red-eye depending on Record Menu setting). In Playback mode, you can record a voice memo to accompany individual images.
![]()
Manual Focus: Located on the side of the lens barrel, this button turns the Manual Focus option on and off.
![]()
Macro: Positioned just below the Manual Focus button on the side of the lens barrel, the Macro button cycles through Macro and Super Macro modes.

Lens Ring Release: Tucked under the lens on the camera's front panel, this button releases the lens ring. Once unlocked, the lens ring can then be turned and removed to accommodate accessory lens kits.
 Fujifilm GFX 50S Review
 Fujifilm X-T3 Review
 Olympus E-M5 III Review

Follow Imaging Resource