Focus Fallibility: Lens Testing Fallacies
posted Thursday, June 19, 2008 at 10:20 PM EDT
It should come as no surprise that the expanding interest in lens performance generated by the digital SLR explosion has resulted in much greater testing and review of SLR lenses by various organizations. Unfortunately, as far as we can determine from published accounts of various testing methodologies, a lot of the test data being posted is of suspect value, for a very simple reason: Inadequate control of focus. The purpose of this article is to call attention to this issue, and hopefully to encourage current and would-be lens testers to adopt more rigorous procedures that properly control for focus.
The Goal: Test the Lens and Only the Lens
It may seem like a completely obvious statement, but the goal of lens testing should be to test the capabilities of the lens itself, not the camera it's attached to. This is much harder to do than one might think. Even in the case of a lens being tested on an optical bench, with no camera in sight, there still remains the question of the optical characteristics of the point-sensor that's used to measure the MTF characteristics. How large a sampling area does it have? What sort of optics are involved in getting the light from the exit pupil of the lens into the sampling aperture of the sensor? How repeatable are the results?
When you use a digital camera as the measurement device, the problem becomes much more complex. Try as you might, there's no way to completely remove the camera's sampling optics from the equation. The camera's anti-aliasing filter, sensor microlenses and in-camera image processing all contribute to the final image data. (If you think simply processing images from RAW files can eliminate differences between camera platforms, you're fooling yourself. - But that's a subject for another article.)
It should seem obvious that you ought not to rely on a camera's AF system to determine focus for lens testing purposes: Any error in the AF system will result in lower sharpness figures and probably poorer chromatic aberration performance as well. Removing any impact of the camera's AF system from the testing process turns out to be easier said than done though: After all, you still do need to focus the lens somehow. Whether you rely on the camera's AF system or attempt to focus the lens manually, focus accuracy can have a profound impact on your test results.
The Impact of Focus Errors on Lens Test Results
When we first began researching lens testing (we've been doing this for over 3 years now, as of this writing in May, 2008), we very quickly became aware of the huge effect a relatively minor shift in focus could produce. Not at the center of the frame (where minor shifts in focus indeed remain minor), but at the edges; in chromatic aberration as well as sharpness.
We also very quickly became aware of how much variation was to be found in camera AF systems, from lens to lens, and even from shot to shot. We've come to say around the lab that the actual performance of modern AF systems is the "dirty little secret" of the camera industry. (Typical AF performance is probably good enough for most users most of the time with most lenses, but AF systems achieve truly optimal focus relatively rarely.)
Some current lens testers at least recognize that focus is important, given that they emphasize how carefully they're focusing the lenses. But when they cite (for instance) careful inspection of a Live View display as their standard of optimal focus, it becomes evident how much uncontrolled variation may still be present in their data. - And what about camera platforms where no Live View option is available?
Here's an excellent case in point: We tested the Carl Zeiss ZF 28mm f/2 lens (for Nikon F-Mount) in late May, 2008. The illustrations below show blur plots that were all captured at f/2 with this lens, at a shooting distance of roughly 5.5 feet (about 60x the focal length, so we're well outside any "near field" effects in the optical characteristics). The only difference between the two shots shown was a truly miniscule difference in focus: Notice how the minimum (sharpest focus) points of the graphs at the center of the frame show virtually identical sharpness.

Using the "BxU" blur units output by DxO Analyzer, the differences between the center sharpness of these two examples was about 0.14 unit. This is a difference in blur that would almost certainly be indistinguishable to the human eye, even viewed 1:1 on-screen, or at enormous print sizes (30x40 inches or greater). Nevertheless, the impact on sharpness in the corners and along the edges of the frame is dramatic.
We realized early on that very minor focus errors could make one lens look much worse than another, when in fact their actual performance might be closely equivalent. These almost microscopic differences in focus were well within the range of variation that even the best camera AF systems produced. - And they were well beyond what we could distinguish with our eyes, either through the viewfinder, or using even magnified Live View displays. To see this, let's take a look at typical results from a camera's AF system, manual focusing through the viewfinder, and manual focusing via a Live View display.
Camera Autofocus: Definitely Not the Answer
There are two problems related to using the autofocus system of the test-bed camera to focus the lens. First and most obviously, so-called front- and back-focus issues are common and well-understood to degrade focus accuracy. You might think that it'd be possible to simply adjust the camera body so its AF sensor was placed at exactly the right point to deliver accurate focus every time. What we've found though, is that front- or back-focus can vary from lens to lens with the same body. We don't pretend to understand the reason for this, but have seen enough situations where different lenses have focused differently on the same body that we have to accept it as fact. (We've heard that camera manufacturers can "tune" groups of lenses and bodies to all focus properly with one another, but that's obviously not a viable option for our lens testing, particularly as we test many third-party lenses that the manufacturers of the test bodies wouldn't be inclined, or perhaps able, to tweak.)
Even if we were able to guarantee that there were absolutely no front- or back-focus problems with a given lens/camera combination, we've found that there's often quite a bit of variability in autofocus operation: Even when using a high-contrast target with a large-aperture lens, there's more than enough micro-variation in focus from shot to shot to invalidate test results.
The left side of this graph shows the blur results at center frame of ten successive shots, captured by a Canon EOS-40D and Sigma 70mm f/2.8 macro lens. Focus was perturbed between shots and then reset using the camera's autofocus system. We found that we could reduce the variability between shots somewhat by forcing the camera through several focus cycles (by half-pressing the release button on the remote trigger we were using) before actually snapping the shutter. This procedure was used for all the points displayed. (Meaning that the focus variation would likely have been considerably greater if we only gave the camera one shot at each focus setting.) The subject was a DxO target with a roughly 3x3 inch USAF resolution target superimposed on the center. Focal distance was 12 feet, the camera was mounted on a heavy optical rail, shutter release was via a wired remote, and mirror lockup was used. The lens was shot wide open, at an aperture value of f/2.8.
After the ten AF shots were captured, the lens was switched to manual-focus mode (without changing the focus point from that which was last selected by the AF system), the camera was slid back a few inches on the optical rail, and then a second series of shots was captured, moving the camera one inch between shots. The blur results from a portion of this series are shown on the right side of the graph above. A total of twenty shots were taken while sliding the camera along the rail; the results shown are from the first ten shots of that series.
With the camera's AF system disengaged, the focus rail series shows how the focus varied with respect to position, and exactly where the point of optimum focus was.
The focus rail results show that the camera's AF system never found the point of optimal focus, as it was back-focusing by a few inches at the 12 foot subject distance. Even were it not for the back-focusing though, the variability from shot to shot was almost 11% of the value being measured. That much variability would be enough to wreak havoc with test results for a lens that was sensitive to small variations in central focus.
(It should be pointed out here that only the worst-case focus errors shown in the graph above would be discernible to the naked eye: Camera AF systems generally work well enough to deliver images that are acceptably sharp for human observers. The reason we care so much about focus accuracy is because of the extent to which microscopic focus errors at the center of the frame can cause wild variations in sharpness in the corners of the frame with some lenses - As seen above with the example of the Carl Zeiss Distagon 2/28.)
"Careful" Manual Focusing through the Viewfinder: Definitely not the Answer
So if the camera's AF system wasn't up to our needs, how about focusing the camera manually? Given the extreme sensitivity of our measurements, we were pretty sure that focusing while looking through the camera's optical viewfinder wouldn't be accurate enough, but for the sake of thoroughness, we felt we should try it nonetheless.

As this graph shows, manual focusing through the viewfinder was indeed a complete non-starter of an idea. (Note, by the way, the expanded scale on this graph, the vertical scale is twice that of the previous chart: Variations on this chart are thus twice as large per unit of height as those in the AF example above.) It's possible we could have gotten better results if we'd had a magnifying eyepiece to attach to the camera's viewfinder optics, but we question how much improvement that could really add. It's also possible that a split-image or multiprism viewfinder screen could help matters somewhat, but the disastrously poor results with the normal viewfinder make us wonder whether any attainable improvement would really be sufficient.
It also bears pointing out that focusing via the viewfinder screen is subject to the same front- or back-focus issues as are autofocus systems. The central issue with both is that you're judging focus in a plane that may or may not be the same optical distance from the lens flange as the sensor is. It doesn't matter whether the focus-determining element is an AF sensor or a viewfinder screen, if its position is even very slightly off, the result will be front- or back-focusing.
Close, But No Cigar: Manual Focusing via Magnified Live View
It was abundantly clear that the viewfinder-based focusing was entirely inadequate for our purposes. But what about Live View? Increasingly popular on DSLRs, and available on most major camera platforms, could this be the answer? One major factor in its favor is that it would completely eliminate the issue of different optical path lengths between the image sensor, AF sensor, and viewfinder focusing screen. (At least it will in implementations that derive the Live View image from the main image sensor itself. Solutions using a secondary image sensor would once again be subject to path length issues.)
The Canon EOS-40D not only offers a Live View mode, but optionally allows you to magnify the image on the LCD screen by up to 10x. Would that provide enough visual resolution to give the level of focus accuracy we needed?
Unfortunately, the answer once again was "no," but at least we got a little closer this time. The graph above shows the results of a series of 10 focus attempts, made using the 40D's Live View function, with the image enlarged 10x on the screen. To give us the best chance of seeing every last detail presented on the 40D's LCD screen, we used a roughly 3x handheld magnifying glass to scrutinize the live image. A great deal of care was lavished on each trial: We often spent a couple of minutes for each shot, fiddling with the setting while looking at details such as the fine loops of digits printed on the USAF target and the clarity with which both the lines and space between the lines of the target were rendered. While we absolutely nailed the focus some of the time, there was still unacceptable variation between runs.
The results here are clearly much better than those achieved by either the camera's own AF system or by manually focusing using the optical viewfinder. In this particular run, we came within 0.02 blur units of the optimal focus setting (as determined by a subsequent rail run) on four of the ten attempts. While the overall results were much better than with the other focusing methods though, the worst-case example was still 22% high, well within the "unacceptable" range. Given that, manual focusing via even a highly-magnified Live View display simply isn't reliable enough to use for lens testing.
In evaluating the above results, it bears pointing out that we were working here with one of the easiest-to-focus lenses we've tested to date. The Sigma 70mm f/2.8 Macro lens offers a much larger than normal amount of focus-ring travel, making it much easier to make tiny adjustments to its focus setting manually. In an attempt to provide faster AF performance (by minimizing the distance the optics must travel), many lenses run from closest focus to infinity in less than a quarter-turn of the focus ring. Needless to say, minute focus adjustments are all but impossible with such lenses.
The Solution: Focus Bracketing
So what's left? It appeared that there was no way we could focus accurately enough to deliver truly consistent results with the lenses we were testing.
Ultimately, the solution was obvious, but its implementation proved to be a further hurdle to overcome. Quite simply, we needed to shift our thinking from an approach of trying to focus the lens perfectly to one of determining where the lens was indeed focused. While focus ring movement for fine adjustments is often microscopic, the difference in focal distance was not. While it was very difficult to move the focus ring in increments of 1/100 inch or less, it was a very simple matter to move the camera forward or back anywhere from a fraction of an inch to several inches. (Duh!) Likewise, while it was essentially impossible to determine focus accuracy in real time, on the camera; it was an easy matter to run an image file through DxO Analyzer and see how sharp or blurry it was.
The Yellow (and Black) Submarine to the Rescue
Our ultimate solution was to mount the camera on an optical rail, use the camera's AF to get an approximately correct focus setting, and then switch to manual focus mode and simply move the camera forward and back until the point of truly optimal focus was found. We needed more than just an optical rail though, because we had to adjust the camera's height up and down to accommodate different-sized test targets (and different-sized camera bodies). We also needed to be able to move the whole assembly in or out by as much as 40 feet, when shooting with different lenses. (One long rail wouldn't do the trick, as we'd end up with the forward part of the rail in the frame when we were shooting from more distant positions.) We also needed to be able to make small left/right adjustments, as well as azimuthal rotations, to insure that the lens was in fact precisely centered on and perpendicular to the target's surface.
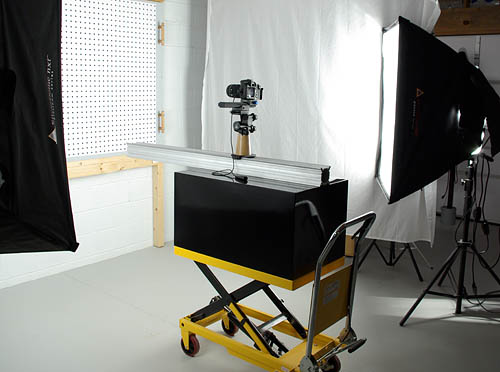
The photo above shows the purpose-built contraption we came up with. The base is an industrial-duty hydraulic-lift table on wheels. A large (and heavy) box attached to the top of this supports a 2-meter section of heavy extruded-aluminum optical rail at such height that the action of the lift table can adjust it across the range of heights needed to match the center heights of the various targets we use.
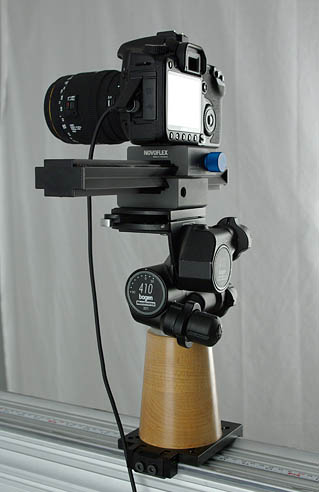
Mounted atop the optical rail is a geared tripod head (to provide the minor azimuthal and elevation adjustments needed for precise alignment), and a rugged Novoflex focusing rack providing minor X-axis adjustment as needed. A wooden pylon turned from rock maple further raises the camera above the rail, permitting more travel along the rail with wide-angle lenses, without the rail encroaching on the frame.

A measuring tape adhered along the top of the rail provides precise repeatability between "rail runs" used to determine the optimal focal distance and subsequent test shots used to measure lens characteristics.
The whole assemblage is quite massive, easily weighing several hundred pounds. - So tripod wobble is not the slightest concern. The combination of mounting pylon, gear head and cross-slide are less than perfectly rigid, but we've found them to be more than adequate to the task, particularly given that we employ remote releases and mirror lockup when shooting our test images.
Head lens tech Jim Tanner christened the contraption the "Yellow Submarine", in homage to the Beatles's song of the same name and the resemblance of the mounting pylon to a sub's conning tower. In truth, the black spacer-box overshadows the yellow lift-table underpinnings, but a little artistic license in the naming surely seemed admissable.
Happily, the ungainly contraption works beautifully. Our test procedure begins by first trundling the "sub" to the appropriate distance from the target for the lens we're testing, and then getting everything accurately aligned with the target: Centered on the target, with the line of sight perfectly perpendicular to the plane of the target. This is actually fairly easily accomplished by the age-old expedient of propping a mirror against the target's surface. When the image of the center of the lens in the mirror is exactly in the center of the viewfinder, the line of sight is perpendicular. We've found visual observation to be entirely adequate in determining this. A little playing with a laser early on convinced us that a laser was really pretty superfluous to the process; thanks to the mirror trick, human eyeballs are more than adequate to the task. (And a laser beam that doesn't pass through the camera optics can actually produce errors of its own, rather than prevent them: We've found situations where the optical axis of the lens/camera assembly is at a slightly different angle than the body and lens barrel would suggest. If you relied on external alignment with such lens/camera combinations, you'd end up with an angular error relative to the true optical plane of the sensor.)
Once everything is properly aligned, our protocol is to set the lens somewhere roughly mid-rail and let the camera's AF system do its best to set focus at that point. If the camera in question is having difficulty with the repeating-dots pattern of the DxO target (as many do), we'll manually focus as best we're able. It's important to note that at this point the focus setting is only approximate, and that's all we need it to be.
With the focus approximately determined, we switch the lens to manual focus (so the camera's AF system won't perturb the setting), and move the lens back some distance from its initial position. The distance involved will vary with the lens under test, the shooting distance, and the aperture being tested. It can be anywhere from a couple of inches to the full length of the rail when shooting at 20+ feet and very small aperture. We then take a series of shots, usually 10 or so, moving the camera forward in equal increments between each shot. (Again the size of these subject-distance steps can be anywhere from a fraction of an inch to several inches, depending on the particulars of the situation.) The images from these "focus-bracketed" shots are then run through DxO Analyzer and the blur values at the center of the frame plotted as a function of distance.
The result is generally a graph like the one above, a roughly parabolic shape, with the point of maximal focus (minimum blur) easily seen somewhere along the length of the rail. In most cases, we can then simply select the bracketed shot that's on the minimum. In some cases, we may need to go back and shoot a tighter bracket across a smaller range of distances, to more precisely determine the blur minimum. Or, we may be able to interpolate the position of best focus, and simply move the camera to that distance to snap the actual test image. Occasionally, we'll find that the camera had a particular problem focusing on the (admittedly difficult) DxO target with a particular lens, and so ended up grossly front- or back-focusing. In these cases, the curve may not reach a minimum over the entire length of the rail, so we'll need to try another focus setting and run another bracket.
We do find that the close shooting distances and greater depth of field found with very wide-angle lenses sometimes result in our not seeing a clear minimum in the focus-vs-distance plot of the sort shown above. In these instances, what appears to work best is to simply bracket the focus manually, by turning the focus ring of the lens in tiny increments. Since these focus settings wouldn't be reproducible (that is, we wouldn't be able to return precisely to a given setting), we shoot a full series of shots (e.g., all apertures) at each distance setting. We then process the blur data from all the shots for each setting, to produce graphs of the sort shown above. From these, we can identify the focal setting that produced the sharpest focus for each aperture, which we then use for the remaining measurements (chromatic aberration, distortion and vignetting) for that aperture and focal length.
Regardless of the specific method though, the bottom line is that we always find the point of absolute best focus, and the accuracy of the camera's focus system (or our own ability to focus the camera manually) matters not at all.
Summary
For critical lens testing, trying to precisely set the focal distance of the lens can be an exercise in futility, regardless of how you try to do it. Rather than relying on setting focus accurately, it's vastly preferable to set it approximately, and then determine the actual focal distance through direct measurement of image sharpness. Once you've determined the correct focal distance, perform the rest of your measurements at that lens/camera position.
We've taken time to share the above because we believe that better, more accurate lens test data can only help the market, regardless of who does the actual testing. It's our hope that this information will help other lens-testing organizations improve the accuracy of their results, helping the market and community as a whole. At the same time, disclosing our own methodology is an important part of our readers being able to trust the results we produce. Bottom line, greater openness about test methods helps everyone, ourselves very much included. It's time-consuming to produce articles of this sort, but we hope to publish more of them in the months to come, to share more details of how we do our testing and to encourage ongoing, open discussion of test methods within the community.