How to photograph indoor sports on a budget: A primer for beginners and novices
posted Thursday, January 8, 2015 at 6:16 PM EDT
Shooting indoor sports is tricky, especially on a budget, because you have several critical components working against you in tandem: fast-moving action & low light.
If you remove either of these, then capturing the other becomes a piece of cake (with a little practice, at least). But in combination it's a tough nut to crack without a full frame (or at least APS-C) camera body and a mighty fast lens (meaning big and bright) and preferably one with some zoom range.
On a budget it becomes even trickier though because budgets generally restrict either sensor size or maximum aperture of the available lenses, which costs you dearly in the ability to achieve fast enough shutter speeds. And this is just the beginning of the trouble, as you also need a camera that can focus reasonably well (quickly and accurately) in burst shooting mode. All of these factors in combination severely limit your potential to become the next paid shooter for Sports Illustrated or ESPN The Magazine while on a budget (let's say ~$1000 - $1500 for a complete rig for the sake of this article, which is less than half the price of an enthusiast sports camera and a good f/2.8 zoom lens).
"Dave, you said this was going to be a primer, not a downer!"
OK, so now to the good news. Camera gear is catching up, and it's a great time to get your indoor sports shooting career going (or at least get great shots of your kid's next indoor volleyball game or hockey match). So pull out your pencil and notebook, or better yet, just bookmark this page for future reference, and let's get down to it.
In short, to capture a good indoor action shot, you generally need to achieve ALL of the following, and I'll discuss ways to pull this off on a budget with specific examples I shot recently at a few NCAA basketball games. And because we're using basketball as the focus for this piece, just consider these five items below to be your "starting five" players.
Now for the introductions...
Ladies and gentlemen, would you welcome please:
At the point guard position: "Nail Focus"
It likely goes without saying, but an out of focus subject means a picture that isn't worth anything to anyone, as there's little you can do in post-production to save an out-of-focus image. Achieving tight, crisp focus is part photographer skill and part camera functionality, and is often taken for granted these days because most cameras can do a good job focusing on still subjects in good lighting. But focusing in low light on fast action is no easy feat, and we'll delve into this a lot more in just a bit.
And starting tonight at shooting guard: "Freeze T. Action"

It all depends on the speed your subject is moving, but for most indoor sports like basketball, volleyball and hockey, the speed of the players and the ball or puck generally demands that you shoot at 1/500 at a minimum, but 1/800 and faster is generally where you really start to freeze the motion and avoid the dreaded motion blur. But this is where you hit the proverbial roadblock, as speeds like 1/800s and faster generally tax budget-priced cameras heavily in low to moderate lighting conditions in the way of too much high ISO noise. But not to fear, we'll explore some good workarounds on a budget for you in a bit.
And at the small forward position: "Noise Ain't Cool"

Four-year-olds are noisy, and good photos are not. Unless your sensor and aperture are rather large, or you have a ton of available ambient light, you're going to need a higher ISO to allow you to achieve a fast shutter speed on a budget. But the higher your ISO climbs, so does the noise, and that's a law (Nikon has learned to bend that law with some of their higher-end cameras, but that's a different article.) For this reason, you need to acquire a camera that can handle ISO 800-1600 (and preferably all the way to IS0 4000 or higher) without getting too noisy, and for this you'll need to learn more about sensor sizes and why they're so important for this reason. We'll delve into this down below.
And up tonight at the power forward position: "In Your Face"

Getting close to the action can be the difference between a boring shot and a great one, which means you generally need some telephoto range and/or some resolution from which to crop a good photo. The telephoto route is usually the better bet for several reasons, coming up, but this begins to really get tricky on a budget, as the apertures typically start to dim on all budget-zoom cameras and lenses. But not to worry, as we've got one easy workaround to discuss in a bit.
And give a big hand for the starting center tonight: "You!"
Most team sports have a player called "the center." For this piece, the center is you as a photographer acquiring the best gear you can afford, aiming to position yourself for the best distance and angle, learning to dial in the best settings for your rig and having the discipline to wait out the best shots. We'll go over all of this in plenty of detail!
So these are the basics, and there's a lot more to keep in mind as well. But first...
Before we go any further, please be advised: There are currently no camera rigs on the market costing anywhere close to $1000 or less (new) that can achieve the holy grail combination needed for professional sports photography of a large sensor (low noise as ISO rises), large aperture of at least f/2.8 (fast shutter to freeze action), a good zoom range (to get you closer to the action) and stellar continuous autofocus performance (for focusing on moving targets). This combination is the realm of the big rigs, and why people pay the big bucks and build their biceps to be able to tote them around. Your kit lens on your new DSLR is good for general-purpose photography and can produce outstanding images if used correctly, but it's not so useful in the typical indoor sports arena. And the continuous autofocus of most budget DSLRs is good but not stellar in those mid-level price ranges.
In other words, we need to bend the rules in a few ways to get ourselves into contention on a budget, and we'll need to learn a few new tricks. This rule-bending and trick adoption may vary depending on the rig you choose and your own shooting conditions (light level and proximity to your subjects), but we'll try and lay out as many options here as possible. When you step into your next gym, you'll be armed with the right rig on a budget and the best tricks up your sleeve.
"Dave, wait... this is starting to sound like it's going to be above my head!"

It probably will be at first if you're just starting out, but bear with me. It's taken me a long time and I'm still learning the ropes and bugging my colleagues for training and tips, but I'm hoping this will get you there much faster than it took me. Also, I don't want any of you dropping out of further reading because you start to feel overwhelmed, so I'm going to make you a deal -- in many of the following sections I'll provide a "bail-out area" below the details, so if you start sinking at any point just take a deep breath and then drop down and read the bail-out section instead, and then proceed to the next section.
[And for you adventurous readers out there, I've added a bonus page after this primary piece for anyone looking for "extra credit" and further exploration.]
They say it's best to start at the beginning, and to this I say...let's start at the end! In other words, take a quick glance forward in time to the first great indoor sports shot you're going to achieve, the one that makes you excited to share online and gets friends, family, co-workers and colleagues looking amazed and asking how you got it. A fabulous shot of anything from your favorite pro athlete scoring to your child's first hockey goal celebration. Picture the shot and the reactions, how much better your shot is than Sally's smartphone shot, or even your neighbor Pat's DSLR-with-kit-lens shot. Let that feeling sink in, and then we'll explore how you're going to pull it off.
Driving the lane
Let's dive a bit deeper now into the general mechanics of all this. I'll try not to talk over anyone's head, but there are a few things that are critical to your success here. In each category we'll likely be throwing out a deeper concept than you're used to if you're new to all this, but I'll try and balance it out with simple ways to remember what to do in the moment. I sometimes spend an hour prepping in my office for an indoor shoot, only to get out there in the crowd and the noise and go a bit blank on everything I just studied for the shoot. For this reason, I started bringing along a cheat sheet in the side-pocket of my camera bag... certain settings I'd like to experiment with or various modes. I don't always use it, but it's there if I need to ground myself, so I advise you to do the same. And don't forget... if you start to feel over your head at any point below, just drop to that area's "bail-out area" and see if that makes more sense to you.
Now let's get to know your starting five players a bit better.
Nail Focus
Cameras can focus for you automatically, or you can focus manually. In sports shooting where there's constant movement, it's hard to pull off manual focus unless you pre-focus on one spot and wait until the movement gets there, because the players are usually moving faster than you can adjust focus on your own. But learning the art of pre-focusing on a particular spot is actually a good thing to learn to do, especially on a budget. I don't advise doing this technique exclusively, but for parts of the game or match, especially if you feel you're not getting many "keepers" while in autofocus, there's no reason not to try this.
Simply turn your camera to manual focus (this is sometimes located on the lens itself and sometimes within the camera), focus on something like the net of the basketball goal, wait until players are coming in for a score (and hopefully an opposing block) and start firing. This can also be done on AF-S (single shot focus) by half-pressing to focus and leaving it there until you fire. In either case it's best to be in "burst" or "sequential" shooting mode, where the camera fires the shutter multiple times in rapid succession. This will give you several options to choose from on that particular drive to the basket, and if your pre-focus was close to the mark, then a burst should usually result in at least one good, sharp image (assuming your shutter speed and ISO setting match the limits set forth in the sections below).
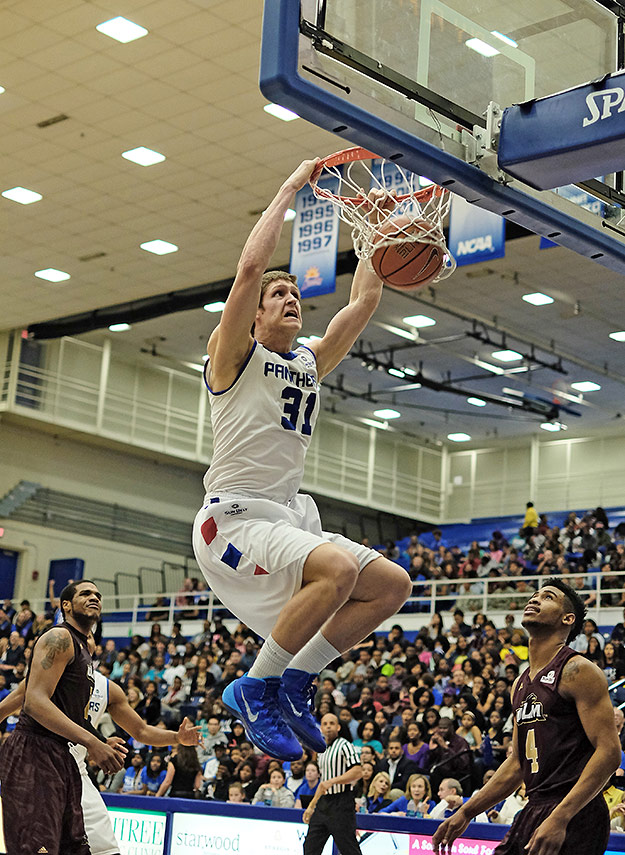
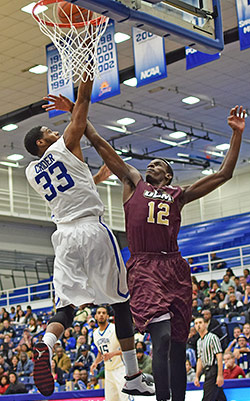
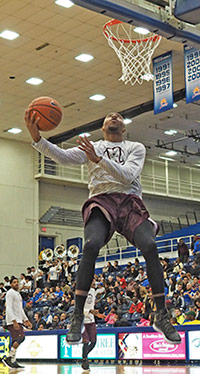
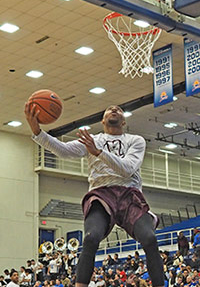
[original image]
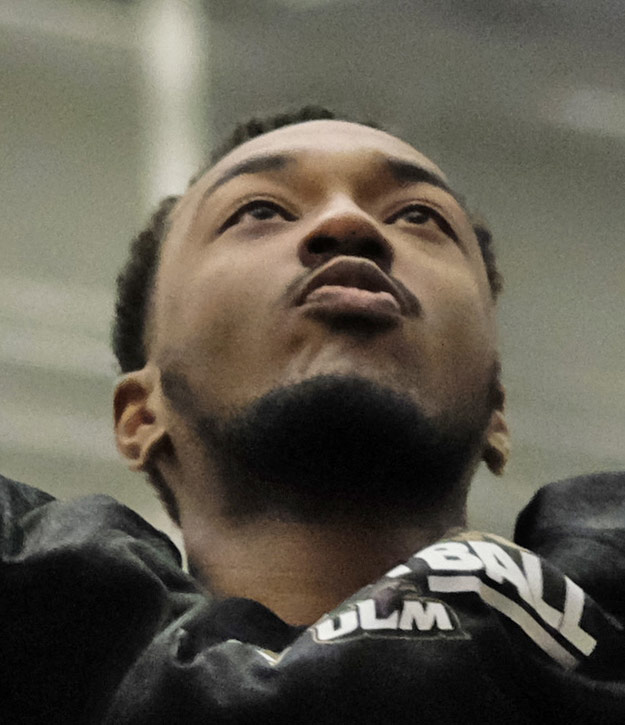
Above is an example using the pre-focus technique in combination with burst mode. I simply pre-focused on the net (using AF-S) and waited for the action to come to it, and in this case it certainly did. The opposing players' reactions are what make this image more enjoyable than just a standard dunk, as well as the raised knees of the dunker, which puts his whole body at or above the crowd for effect.
But for most of the time you'll want to allow the camera to lock focus for you. Autofocus settings are becoming more and more complex, and this is a good thing for seasoned shooters but often a confusing one for beginners. The basics are AF-S (single, still shooting) and AF-C (continuous AF). In AF-C the camera will continue to alter focus as subjects move around. This sounds like a natural for indoor sports, but the speed of the action and the relatively low light makes it a tough thing to pull off on a budget. To make things more complicated, some cameras cannot continuously autofocus while in burst mode, and some can if you switch to a slower burst speed. You'll need to figure this out with your camera's instruction manual, as you won't likely want a burst mode that's not changing focus for you, unless you're trying out the manual focus technique above and are aware that only part of your sequence might be in focus.
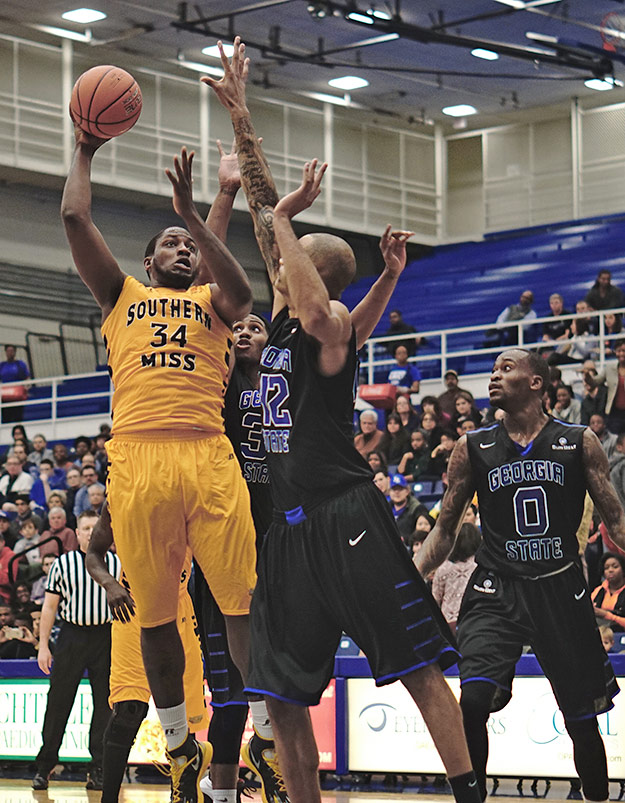
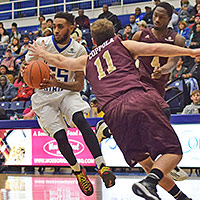
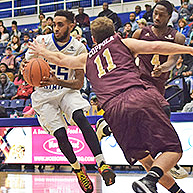
[original image]
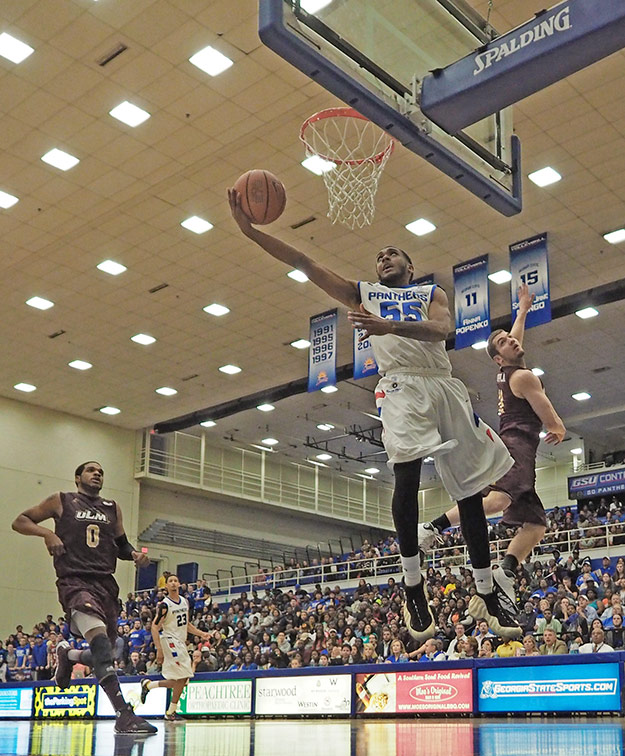
For this shot I used AF-S and caught the player as he was passing in front of me. The wider angle 34mm eq. lens helps add to the overall effect here, as we're able to watch players, fans and the referee all witnessing the moment. The shutter speed of 1/500s is about the slowest speed I would ever want for indoor basketball, and would have preferred 1/640s even if it meant the ISO jumping to 1000 or 1250. But for this particular shot 1/500s freezes most of the action fairly well.
Keeping the camera in AF-S can work if you're careful to continue to re-focus often (with a half-shutter press), but it's tough to catch movement towards you with any degree of accuracy, because by the time you've locked focus the players will have often moved. I find in AF-C that most cameras in this price range tend to lose focus often, swimming wildly in and out of focus before reacquiring, and sometimes at the expense of missing a good moment in the game. But there's really no way to get around the fact that, on a budget, you will likely need to try out all three basic AF modes (manual, AF-S and AF-C) to determine which are best suited for your needs. Hopefully some combination will get you the shots you're after, because it's not a crime to have 9 out-of-focus shots if the 10th shot is awesome and resting proudly on your mantle.

Bail-out area (focus): All camera rigs are different, but don't get overwhelmed. All you need to do is figure out yours. Try AF-S, AF-C and also manual focus. Practice using each mode, and if you're adventurous you can even try specialty modes like "tracking focus" if your camera has it. If all else fails, go to manual focus, pre-focus on a spot where there's usually good action on the court or the ice, and wait for the players to get to that spot and fire like crazy when they get there.
Freeze T. Action and Noise Ain't Cool
These two players are partners and work together most of the time, so it's best to talk about them in tandem. The concept of freezing the action is simple: athletes are usually in motion, and the best shots are often when they're flying across the ice or through the air on the way to the basket. For this reason a fast enough shutter speed is critical, and depending on just how much light there is in your location, you're now at the mercy of how wide your aperture can go to let in light, and how much ISO room you have to breathe before the noise starts to overwhelm. The absolute key on a budget then is making sure you have a large enough sensor to keep a handle on moderate ISO noise in the middle ranges (800-3200) and a lens with a large enough aperture to let in plenty of light (f/2.8 or larger).
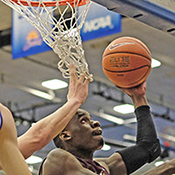
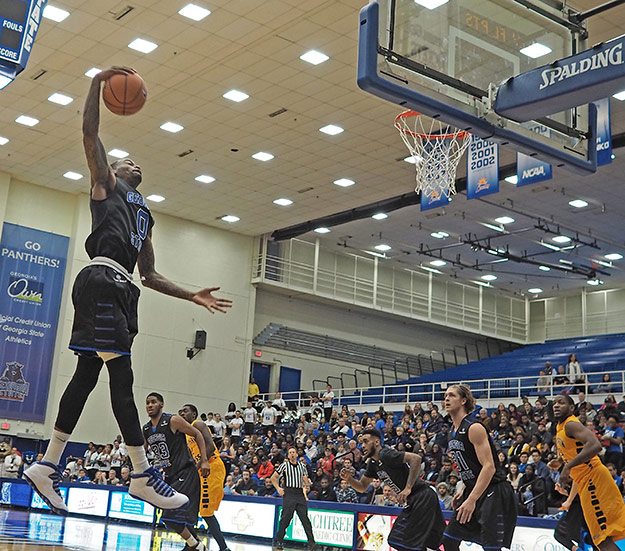
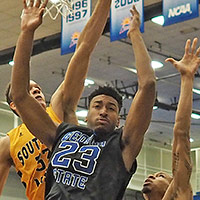
[original image]
Shot by my partner William Brawley, who was reviewing the E-M10 at the time, this is one of my favorite indoor sports images. It has bodies flying through the air, other players rushing on and a very nice sense of dynamics. It also has a good combination of shutter speed to ISO, where a typical "sports" mode may have pushed the shutter speed faster and thus the ISO higher, this manual exposure yielded a very nice blend. At ISO 1600 there is only a trace of noise, and only when you zoom in a good bit, and obviously the 1/1250s shutter speed captured the moment.
I spend most of the game trying to achieve the best balance between shutter speed and ISO noise. By finding a shutter speed that's fast enough to capture action and not going too far above that speed, you are effectively maximizing your shot's potential, because ISO will only climb (in ISO auto mode) as high as it must for the right exposure, and thus not climbing high enough (we hope) to induce noticeable noise. For this reason I tend to stay in shutter priority mode (usually "S" on your mode dial) although for some cameras this doesn't work because they may stop the aperture down (seemingly arbitrarily) and thus forcing the ISO to go higher unnecessarily.
If your camera has Program Shift, which means switching your mode dial to "P" and then using a control dial to shift the shutter speed and aperture at the same time, you can try this out. I haven't had much luck because on a budget many cameras either don't allow the shift or don't behave in a logical manner when shifting. One camera in this bunch (I won't name names here) wouldn't allow program shift to open the lens all the way, which I found uber-frustrating at best. So of course you could go to manual mode, but sometimes shooting in different directions changes the exposure enough that I don't always like to stay in manual mode. Ultimately, you'll need to experiment with various modes on your own camera and decide which works best in the moment, but shutter priority mode is the best place to start for my tastes.
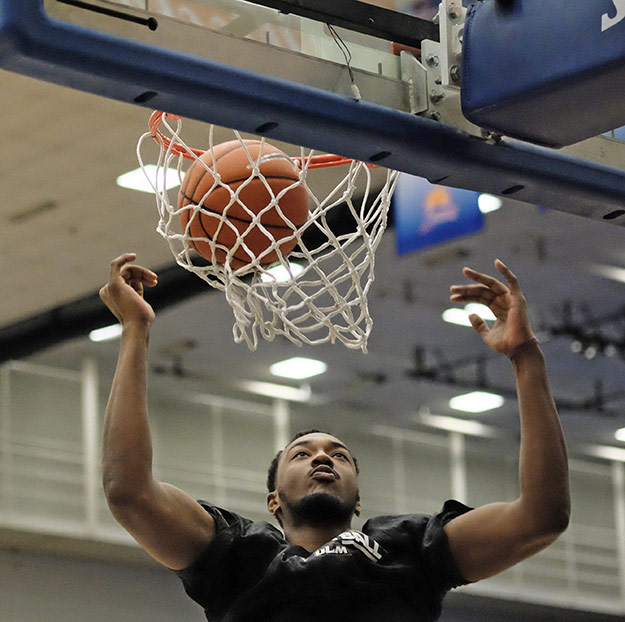
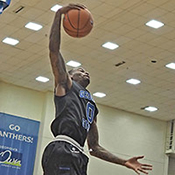
[original image]
Pushing the limits to ISO 6400 allowed for a super-fast shutter speed of 1/1600 here while cranking the aperture wide open to f/2.4. This is the highest ISO I'd ever recommend on an APS-C camera, and Fuji's tend to do better than most in dealing with higher ISO noise. Below is a 1:1 crop of the same image at full resolution to give you an idea of just how much noise is actually present. In this case, it's a manageable level, but I don't advise ever going this high with a Four Thirds sensor, as even some of the APS-C sensors can't quite handle it as well as the X-T1 does here.
I find it critical to limit how high ISO goes within the camera, and most cameras today allow you to do this, including the five budget choices we shot with here. For Four Thirds sensors, I generally limit it to ISO 1600, and for APS-C I like to remain below ISO 3200, although the ISO 6400 shot above is not bad. This is just my taste for a reasonable noise floor, and yours may vary depending on your usage and shooting situation. If you really need a higher ISO in order to prevent dreaded motion blur, then by all means crank it higher! Large prints may start to suffer, but medium sized prints will hold up for a few stops higher. Small to medium online usage will only show if you crop in, at least until ISO gets a bit higher.
Bail-out area (shutter speed and ISO): If you don't want to be worried about all this detail, then do the following: Buy a camera with a sensor that's either called "Four Thirds" or "APS-C", and a prime lens with an f/1.8 or larger aperture (smaller number). Choose the focal length dependent on how close to the action you'll be - if you'll be courtside, then 35mm or 50mm eq. is a good bet, but if you're further back in the stands, perhaps 75mm eq. or longer. Keep the aperture at f/1.8 or f/2.0 for indoor sports whenever possible, dial the shutter speed to 1/800s and check to see what ISO you are at. If the ISO is at or below 1600, then start firing away. If it's at or below 800, go ahead and notch up the shutter speed to 1/1000s or even 1/1250s if your ISO doesn't top 1600. Ultimately you'll need to be the judge of how fast a shutter you need for the sport you're shooting vs how high your camera can handle ISO noise.
In Your Face
We've now discussed focal lengths a bit, but let's recap a few basics here. I realize that many of you want a zoom lens for sports shooting, and this is a natural no-brainer choice. But as stated earlier, and there is no getting around this, you can't have a good indoor sports zoom lens on a budget, because they don't (yet) make one. You need a minimum of f/2.8 as your "maximum" aperture for light gathering, but all the better if you can go to f/2.0 or f/1.8 (and even f/1.4 on a few budget lenses). We're aiming to keep this budget piece at ~$1500, and a constant f/2.8 zoom lens for Micro Four Thirds or APS-C camera bodies will put you too far above the line once you factor in the cost of the camera body itself.
And there's another factor to consider as well, because even if you have the money for a full frame camera and a huge lens to put on, that rig will be very large in comparison to the ones used for this piece. This is fine if you're in a special photographer area, but it may not please the people standing around you in the stands. Again, it all depends on your situation, but even if money isn't an object it's nice to have a small rig for certain times when a large one isn't practical.
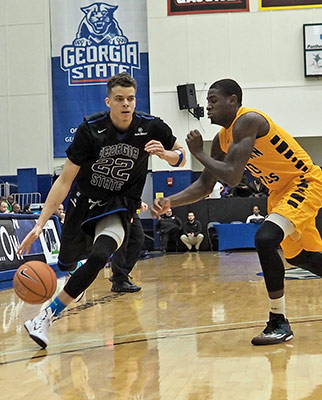
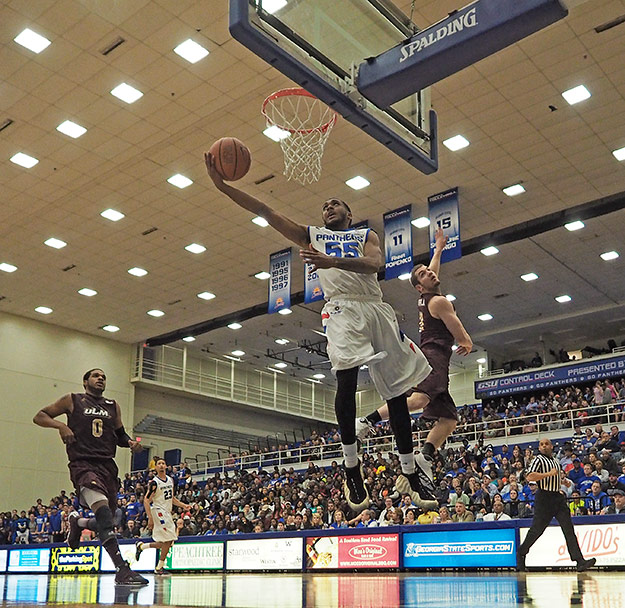
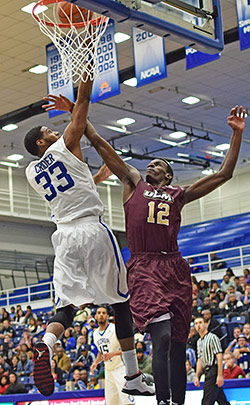
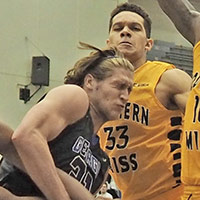
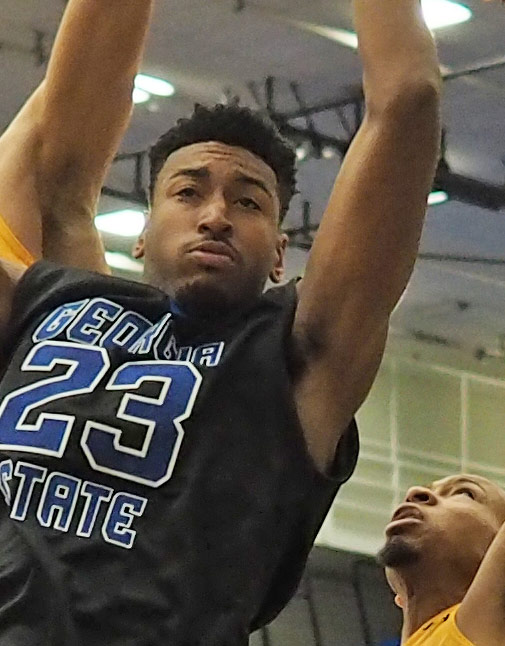
[original image]
Shot with the popular A6000 combined with a terrific prime lens for the money, the Sony 50mm f/1.8, this image keeps noise in check while remaining at ISO 800. The shutter speed of 1/640s also does a good job of freezing the action, although if the players were moving faster we'd likely want to gamble with a higher ISO and faster shutter speed. This shot is made more interesting compositionally by the presense of the two additional opposing players in combination with the shooter's expression, giving the shot a somewhat menacing appeal.
For all of you determined to use your new kit lens, you simply can't gather enough available light in the average gym (even this division 1 NCAA gym we've been shooting in) to be able to freeze the action while adequately limiting your high ISO noise. It's simple physics, and it's simply not possible. On a budget, you need a fast prime lens for indoor sports shooting or your shots will be either blurry or noisy or both. So the trick is trying to get one that will be good for where you'll be in relation to the players, and if possible, buy more than 1 so that you have several options.
Bail-out area (choosing the right lens): Even if you don't want to know what "aperture" means or does, you still need one that can go to f/2.8 or larger (meaning a smaller number like f/2.0, which simply means a larger physical opening for more light to pass through). No budget kit lens as of this writing can achieve that, so you need to acquire a prime lens with a large aperture, and fortunately for all of us they do exist on a budget (see page 2 for a full rundown of all gear used here). As far as which length to choose, take your kit lens to the game where you'll likely be sitting and rock the zoom in and out until you hit the "sweet spot," and note that focal length, then try and buy a fast, prime lens as close as you can to that focal length. If you can afford it, buy more than one at different focal lengths! (Make sure and read the addendum section on page 2 for what "equivalent" focal length means before you do this exercise and make a purchase -- very important.)
You!
Above all else, be patient with yourself. It's a big deal to make the decision to try and learn how to pull this off well. Bravo for even trying! If you get one really good shot in a two-hour indoor basketball game on a first time out you're shooting better than par. Keep experimenting with the settings, especially focus modes and also shutter speeds as it relates to ISO settings. Learn the balance that works best for your rig, location and style. Try shooting from different angles and distances, and build on what you learn each time.
Additional exploration
We've now covered much of the basics, as well as covered some guidelines for the type of gear most likely to get you to home base on a budget. Now let's talk about some additional specifics that will help you tweak and fine-tune your results. For those of you with some experience, by all means proceed on to Page 2 if your brain is not yet on overload, but for beginners it's OK to take a break at this point, go and get some real-world practice, and then come back for Page 2 when you're ready to dig a little deeper. We'll discuss more topics like metering, composition, post-production processing, etc. and will also discuss the rigs we used to capture these images.
Take me to Page 2!
More indoor sports articles:
• Nikon D5500: The best indoor sports camera for under $1000 •
• Indoor sports with a fixed lens camera? Try the Panasonic LX100! •
[A special thanks to my mentors Dave Etchells, Luke Smith, Rob Murray and William Brawley for their guidance and patience with my endless questions. And a big thanks to the Georgia State Athletic Department and basketball program for allowing us to photograph their games. Lastly, thanks to Nikon, Fuji, Sony and Olympus for the sample equipment used in this piece.]
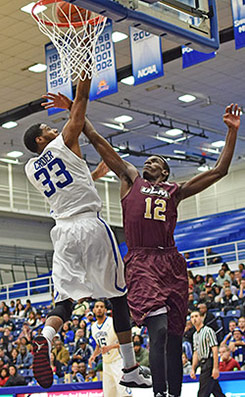


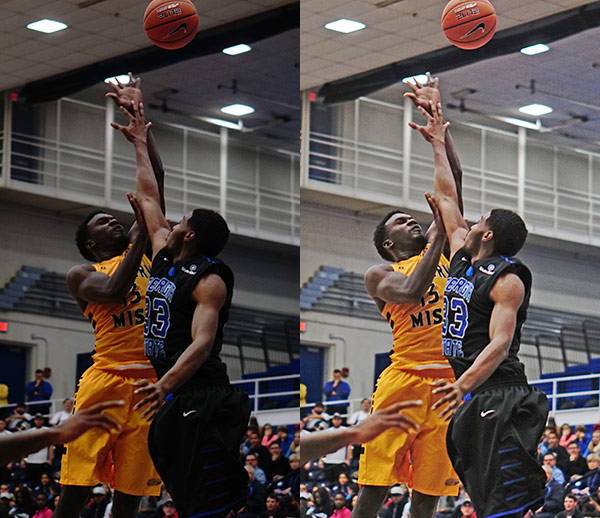
(The left image is the original while the right has had a number of tweaks after the fact.)
Shot by my partner William Brawley, who was reviewing the E-M10 at the time, this is one of my favorite indoor sports images. It has bodies flying through the air, other players rushing on and a very nice sense of dynamics. It also has a good combination of shutter speed to ISO, where a typical "sports" mode may have pushed the shutter speed faster and thus the ISO higher, this manual exposure yielded a really good blend. At ISO 1600 there is only a trace of noise, and only when you zoom in a good bit, and obviously the 1/1250s shutter speed captured the moment.