Rejoice, Olympus E-M1 shooters… in-camera focus stacking is here! (via the new firmware v4.0)
posted Saturday, December 5, 2015 at 9:29 AM EDT
Wake up with IR! Here's today's cup of Caffeine Priority.
Olympus recently released a major firmware upgrade for both their flagship E-M1 as well as their enthusiast-grade E-M5 II camera, and both got a whole host of cool new features including focus bracketing, but the E-M1 was the only OM-D to receive in-camera focus stacking. This feature is versatile enough to warrant a more in-depth article on the subject, but I couldn't wait to load up the new firmware and take a few shots for a quick post. (Scroll on down if you'd rather see the 6 sample images first!)
As macro shooters know, depth of field becomes extremely shallow at macro distances which can make it difficult if not impossible to keep a 3D subject entirely in focus, even when the lens is fully stopped-down for maximum DOF (that's why you'll often see macro lenses with tiny minimum apertures of f/32). Focus bracketing is a well-known photographic technique by which you take shots at multiple focus points and then "stack" them in post-processing after the fact to increase the total depth of field. It's a matter of taking the in-focus areas from each shot and bringing them all together in a single image. (In a way, it's kind of like shooting with a range of different exposures and then stacking those in post for a classic HDR look.)
For several years now many cameras have handled HDR stacking "in-camera", saving you the trouble of going through the motions after the fact. With this firmware upgrade, Olympus has brought not only focus bracketing to the E-M1 but in-camera focus stacking as well, letting the camera take the focus sequence and then do all the laborious stacking work for you!
I'm new to focus stacking in general, and assumed it was meant to bring as much of an image into focus as desired, while allowing for wider apertures in order to not worry about softness due to diffraction limiting while stopped-down. What I didn't realize, though, is just how powerful this tool can be for certain purposes. This post today is just a quick look at my first foray into using in-camera focus-stacking with the now-upgraded E-M1, but I doubt it will be the last you'll hear from us here at IR regarding this handy little tool.
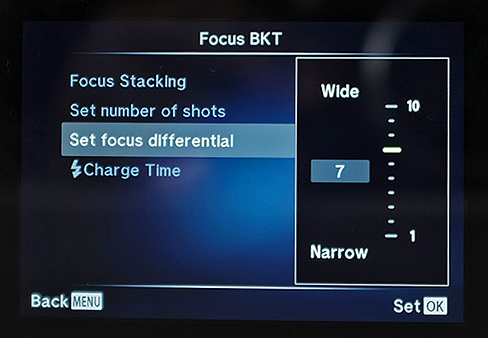
There wasn't yet a manual available for this feature, being from a firmware upgrade, but I did find this handy little page I found on Olympus' website regarding both focus bracketing and focus stacking, which helped get me into the ballpark. [Editor's note: an updated manual is now available here.] With bracketing, you can control a larger number of variables, including how many shots you'd like taken (up to 999!), but with in-camera focus stacking you only have one basic adjustment option other than your standard camera settings, and that's "focus differential". That sounds a little technical, but it simply controls whether you'd like a larger degree of focal range to be bracketed, a smaller one, or something in between. I'll show you examples I shot using the same subject across a variety of these below, and it'll become a lot more "clear" (pun definitely intended!).
I decided I needed an expert on this stuff, so I called in our publisher Dave Etchells:
"Actually, let's talk about that "focus differential" setting a little bit, before getting into the samples. Understanding it is really the key to getting what you need from the focus stacking feature on the Olympus E-M1.
The key thing to know about focus differential is that the units are depth of field at the current focal length and aperture. The camera firmware knows just how big the lens' DOF is at every combination of focal length, subject distance and aperture, and that's how it determines the amount it adjusts the focal distance between shots. This means that the focal distance difference between shots will be much greater at f/16 than at f/2.8, which makes perfect sense when you think about it. (The need to move the lens' focusing elements further at higher f-stops also explains the variations in timing that Dave P. talks about below.)
Understanding that the units are based on the lens' current depth of field, it's clear that any setting other than "1" is going to leave some parts of the image less than perfectly in-focus. So at a focus differential of 2, you'd expect to see some areas of very slight softness in the image, corresponding to parts of the subject that are at distances in between the ones the camera set the lens for. The bigger the number you choose, the greater the more-or-less sharp DOF you'll have in the final image, but the more you'll notice bands of softness across your image. Depending on your subject and how big you intend to display the final image, this may be more or less of an issue for you. (For instance, if you're only going to use the image at say 640x480 on a web page, you'd never notice any blur banding until you got to much larger numbers.) You'll see this effect in Dave's examples below."
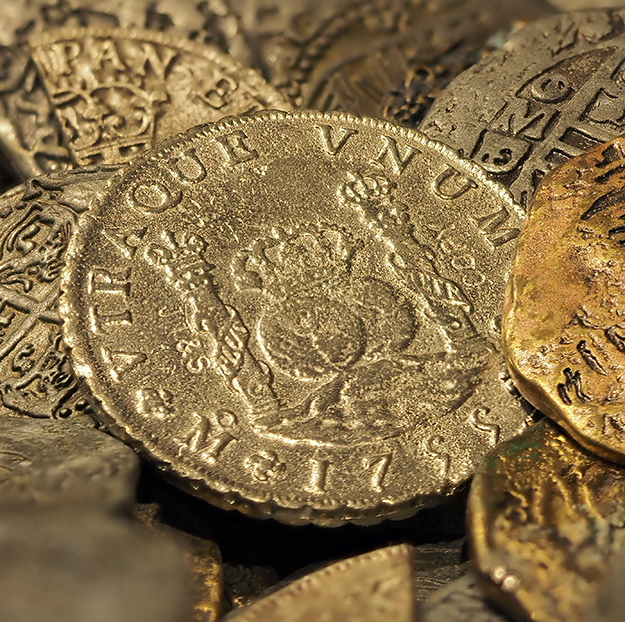
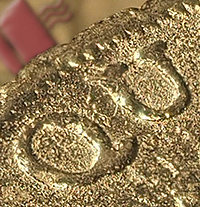
So if you're eager to try out the E-M1's focus stacking, one thing you need to know right off the bat is that the feature is only available with three Olympus lenses - the 60mm f/2.8 macro, 12-40mm M.Zuiko PRO and the 40-150mm M.Zuiko Pro. I expect Olympus will add more in the future via additional firmware upgrades, but this at least gives you three great options across a nice range of lens types to get you started. I chose to start with the 60mm f/2.8 macro lens on a common macro subject: Coins! (In this case, some of my favorites, replicas from the Spanish Doubloon era.)
With the E-M1's focus stacking, you're going to get 8 images shot in high-speed continuous burst mode, generally amounting to a 1-second burst. This makes a tripod highly recommended, although I've yet to try a handheld shot to see if it will micro-align the images after the fact. You can shoot with RAW enabled, and it will save all the RAW and JPEG images that it shoots, but the final "combined" version is a JPEG file. And speaking of that final version, there is an interesting aspect to it, in that the camera crops in a noticeable amount to form the final image (which is to be expected as it needs some "wiggle room" to allow for changes in scale as the focal setting of the lens changes). It then up-sizes the final image back to a 16-megapixel file, so it's actually up-res'ing the image just a bit.
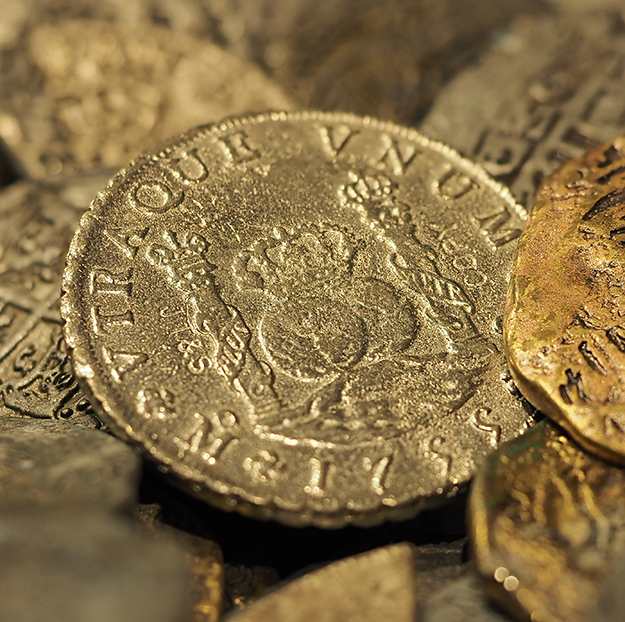
OK, enough of my yakkin'... let's dive into the samples! The first is without focus stacking, to give you a traditional single-shot comparison. I chose to use f/2.8 for this series, to give a shallow depth of field and to help show the full effect of the stacking. And, as it turns out, I wouldn't have been able to stop down much anyway with the light level I had to work with, given some interesting constraints that I'll discuss down below. The focus differential control mentioned above allows for 10 levels, so I chose to shoot at levels 1, 3, 5, 7, and 9 for a broad comparison. The images shown are all cropped in just a bit to better showcase the stacking here, but clicking on any image will take you to a carrier page where you have access to both the full resolution image as delivered straight from the E-M1 as well as all EXIF data (and all 6 images live in the Olympus E-M1 gallery).
[Focus Stacking off]
Getting close to your subject with a macro lens at f/2.8 produces the expected shallow depth of field as seen above. Focus stacking is intended to correct this to a user-selectable degree, all in-camera!
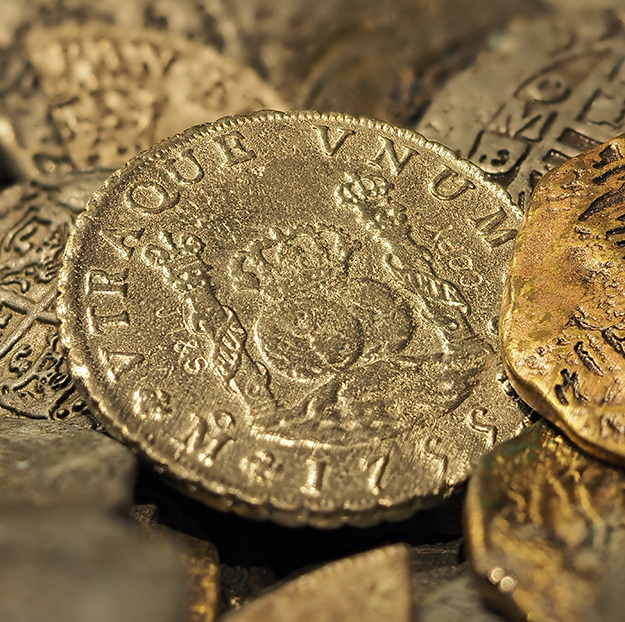
[Focus Stacking - level 1]
This shot shows the most narrow use of stacking, where the focal distance steps are arranged such that each one picks up exactly where the DOF of the one before it ends. The net result is that it's rendered just a bit more of the center of the coin to be in sharp focus, leaving the rest of the image and bokeh relatively untouched.
[Focus Stacking - level 3]
With level 3, the top of the primary coin is now in focus, but the deeper background and most of the foreground is still out of focus. Even though there are three DOFs between successive shots, you can't see any evidence of blur bands, at least at this reduced image size.
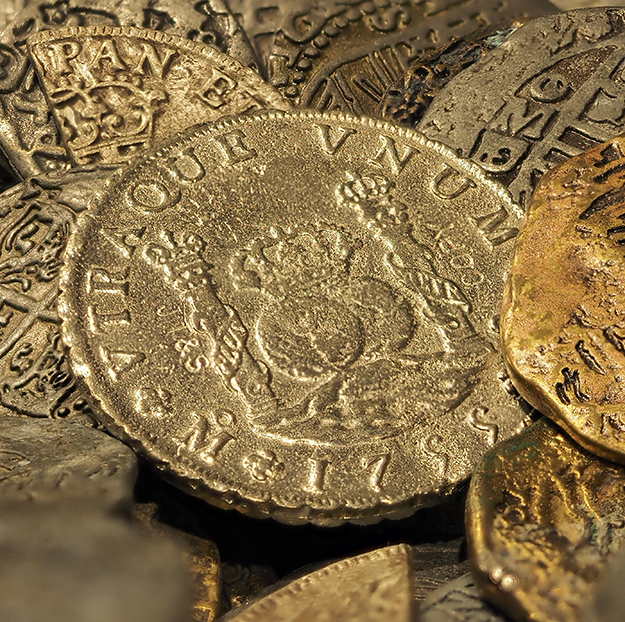
[Focus Stacking - level 5]
Here at level 5, the bottom of the coin now also comes into fairly sharp focus, in addition to more of the background elements. This is my favorite setting for this particular shot, as the primary subject matter is completely in focus, but some subject-to-background separation is maintained as well. At web-display sizes like this, you still don't see much focus banding.
[Focus Stacking - level 7]
Level 7 begins to bring even some of the background elements into focus, and might be a setting you'd choose if this were desirable for your subject matter. And of course the primary coin here is in focus pretty much throughout, at least at this subject distance (more on that in a bit). If you look really closely, you might notice some parts of the "in-focus" area are just a smidge softer than other parts, even at this reduced image size.
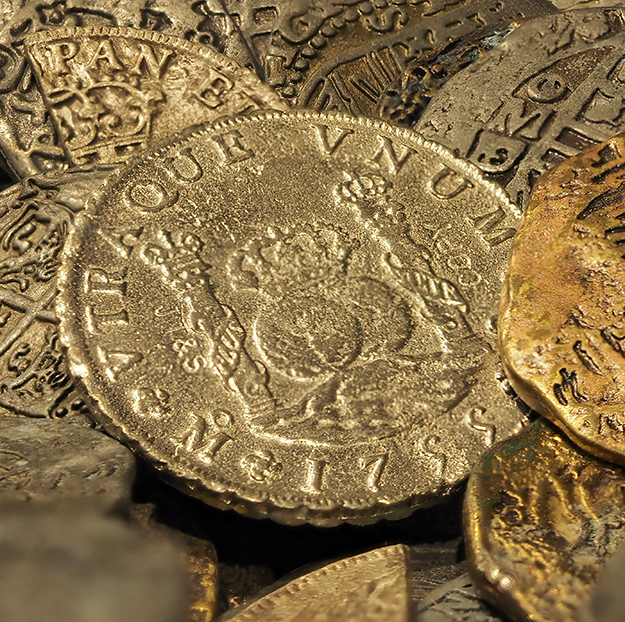
[Focus Stacking - level 9]
Level 9 brings all but the closest and furthest objects into focus, which again could be very useful for certain situations. Here, though, the DOF gaps between successive shots become obvious, even in an image downsized as much as this one. I'll show this in more detail in the next section on "blur banding" which uses this image as an example.
There are several constraints with focus stacking to be aware of, and the first is that for whatever reason I was unable to activate the self-timer, so I had to be careful to press the shutter gently to avoid camera shake (didn't have my remote handy). When I tried to change the drive mode, it simply remained in High Speed Silent mode. The E-M1 will fire off 8 shots in roughly one second, which constrains you to a 1/8s shutter speed as the slowest available. Because of this, and the fact that ISO is limited to a top setting of 3200 while in this mode, your depth of field choices can be somewhat limited in certain lighting situations.
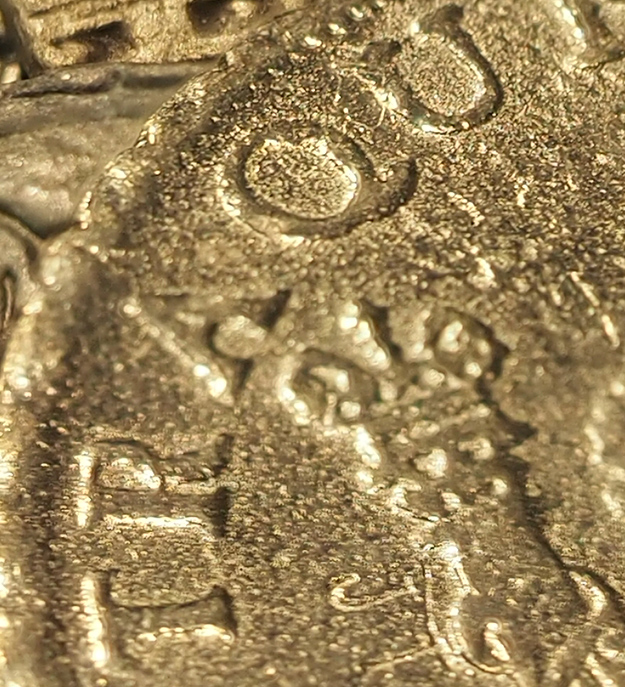
These constraints aren't deal-breakers, but definitely something to be aware of, especially given that you may encounter "blur banding" in your image (where the changes in focal distance exceed the lens' depth of field), leaving some in-between image areas out of focus. It's an interesting effect, actually, but not likely one you'd choose deliberately, as seen in the crop below, taken from the shot captured with the level 9 setting.
UPDATE 12/7! Thanks to a very helpful question in the comments section down below from our reader Jim Salvas, I decided to further scope just which shots the camera is shooting in which order regarding the actual focus point. In my testing it seemed that the final rendered image was getting a bit more of the background in focus relative to the foreground, and sure enough, it is! The first of the 8 images is shot at your chosen focus point, and it then jumps into the foreground for 2 shots, then leapfrogs the focus point and shoots 5 successive shots into the background. The result is roughly 60% of the focus stacking occurs in the background, with 40% in the foreground.
I couldn't think of any logical reason to set it up this way, but Dave Etchells has a theory on this: That for a typical insect shot, you may focus on the eyes, then want a bit of the foreground in focus, and then more of the background for the insect body. Well, hey, you have to start somewhere, and that's where we'll start! If anyone kows any better, or has a better theory, we're all ears in the comments section down below! In the meantime, if you actually want the focus to be centered within the stacking, you'll need to nudge the focus point into the foreground somewhat in order for the stacking to hit your preferred center point of focus. (Thanks to reader Erik Aaseth for the helpful correction here, as we had initially reported this as 'nudge towards the background.')
One more interesting thing to conclude this first focus stacking expedition is that at the helpful suggestion of our publisher Dave Etchells I decided to clock the speed of the 8-image burst, just to report to you that it was indeed roughly one second, and confirmed that it is. However, I found that if I stopped stop down below roughly f/10, the burst will slow to more than a second. Senior lens technician Rob Murray and I recorded times as high as 2.3 seconds at f/22. We were fairly close to our target though, and when moving back a bit this number dropped to more like 1.5 seconds. It's still something that you'll want to keep in mind, because some of you will be using this feature on insects that tend to move, and others perhaps on flowers where there could be a breeze. One full second is the fastest time we clocked, so too much movement will be a show-stopper in any event, but note that it becomes much more of an issue when you're working with very small apertures, to achieve the absolute maximum depth of field.
Stay tuned, as we'll bring you more examples of this intriguing new feature soon! To learn more about the overall firmware upgrade please see the "v4.0 upgrade features" link below. Also, our ever-persistent technical editor Zig Weidelich just found a link to the new E-M1 users' manual complete with the v4.0 upgrades, also below.
Olympus E-M1 owners: Get the firmware upgrade!
v4.0 upgrade features • Olympus E-M1 • Olympus 60mm f/2.8
Updated Olympus manual with version 4.0 features included
• • •
[Want another cup of Caffeine Priority? ...Let us pour you one!]

Caffeine Priority is a new series of short photo-tidbits to ease you into your day, and give us a chance to share a bit more of what life’s like behind the scenes here at IR. We're more like a group of friends testing and talking about cameras and lenses than the buttoned-down, big-corporation world that some of our friends at other companies work in; hopefully these little snippets will share some of that. So... grab another coffee and join in the conversation with us down below!