The new bokeh champs? Olympus cracks the code for beautiful bokeh with its F1.2 Pro prime lens series
posted Wednesday, February 14, 2018 at 8:00 AM EDT
If you're a photographer, chances are you're at least somewhat familiar with the word "bokeh". Originally a Japanese term for how lenses render the out-of-focus parts of an image, it's rapidly turning into the latest photography buzzword.
Most people have little idea of what bokeh really means, though, thinking that any kind of blurry background is "good bokeh." If they knew just slightly more, they might think it's just a matter of having enough iris blades to make a reasonably circular aperture.
It turns out bokeh is way deeper than this, though, and once you know what to look for, you won't be able to avoid seeing it. Fair warning, reading further could be dangerous to your budget; truly great bokeh is hard to find and doesn't come cheap. Olympus seems to have cracked the code with its recent f/1.2 lens lineup though. Read on for the details of how they managed it (and probably more than you ever cared to know about bokeh in the first place!)
Bokeh: The backstory
Pronounced almost like the English word "okay", but with the final syllable clipped (you can hear an example at JapanDict), bokeh is a transliteration of the Japanese characters "ボケ". It's not the easiest term to translate directly into English -- blur or defocus are probably our closest equivalents -- but it refers to the character or visual feel of out-of-focus areas in your photos.
Good or bad, every one of your lenses has its own bokeh characteristics. The kind most coveted by photographers is called feathered bokeh, and it's often described with words like "smooth", "buttery" or "soft". But there are other common kinds of bokeh as well: Ring-shaped bokeh (often called "soap bubble", "bright-edge" or "bright-line" bokeh), and solid bokeh define the other end and middle of the bokeh spectrum, respectively. These are referred to with less desirable-sounding words like "harsh" or "busy", but with the right subject, they can also be useful artistic tools in their own right. (There's also the dreaded "onion-ring" bokeh, which pretty much nobody thinks looks good. That's a topic for another whole article, though...)
A master-class in bokeh, courtesy of Olympus
Recently, we were fortunate to receive an in-depth briefing on the topic (a master-class, really) by Olympus Japan's Shigeru Kato, General Manager Optical System Development Dept 3, Optical System Development Division. Kato-san is basically Olympus's head guy, when it comes to matters of optical quality and rendering, so this was a rare opportunity.
Our discussion with Kato-san focused (sorry, no pun intended ;-) on bokeh in the context of Olympus' recently-launched f/1.2 lens lineup. Even if you're not a Micro Four Thirds photographer, though, you'll want to read on regardless, as the information about different types of bokeh is applicable regardless of mount and lens brand.
The three main types of bokeh: Feathered, Ring and Solid
Before we continue any further, let's take a moment to look at the different kinds of bokeh. With a picture truly worth a thousand words, we'll let some sample photos do most of the talking here. All three comparison images are cropped from the same basic scene, shown below.

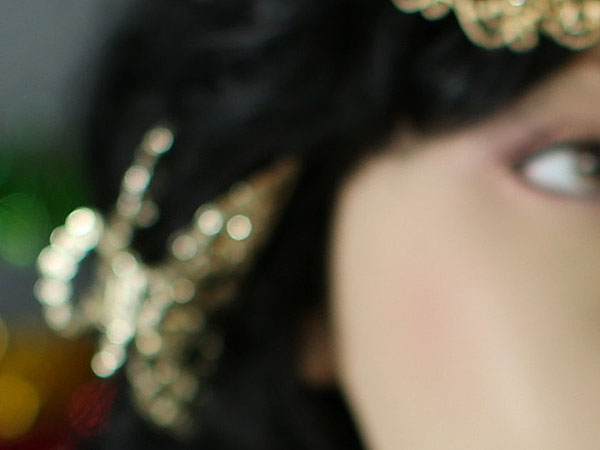
First up, let's start off with the most desirable of the trio, feathered bokeh. This is the most sought-after; it's smooth and creamy, and background objects are recognizable, just softly blurred:

Next up is solid bokeh. This is what most people probably think of when they hear the term "bokeh." Out of focus highlights are rendered as smooth circles (assuming the lens does in fact have a smoothly circular aperture). It's not bad, but it loses the shape of background objects, losing context for your shot.
And finally, there's is ring bokeh, also known as soap bubble or bright-edge bokeh. Some photographers like this for some subjects, as a kind of special effect, but it's generally jarring and pulls your eye from the main subject.

The difference between the three types is pretty plain to see. In feathered bokeh, specular highlights grow much larger, softly blur into each other and the background or foreground very nicely, thanks to their gently feathered edges. Solid bokeh, meanwhile, yields smaller specular highlights which have quite hard edges, making for a somewhat busy look. And finally, ring, bubble or bright-edge bokeh is by far the busiest of the trio, with a bright, hard outside ring that gradually feathers away towards the center, rather than at the outside.
Why should you care?
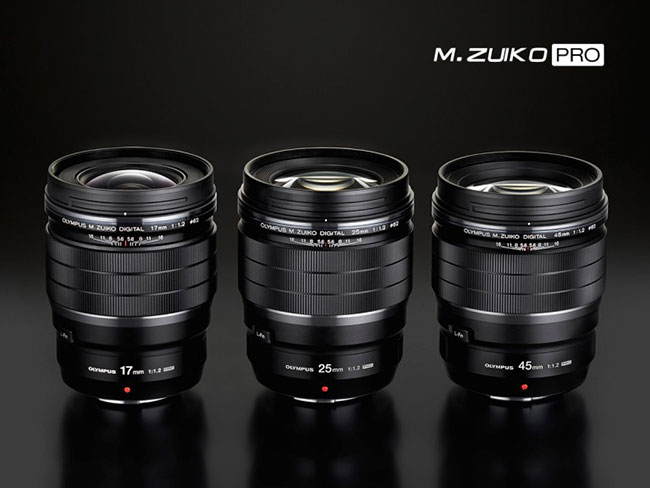
Artistically, most people tend to gravitate towards feathered bokeh for a pretty simple reason. The soft, creamy backgrounds that feathered bokeh yields can mute distracting, busy backgrounds. Lenses that can do this well, like Olympus' M.Zuiko Digital ED 17mm, 25mm and 45mm F1.2 Pro models naturally help draw the focus to your sharply-rendered subject, just where you want it.

Solid and ring bokeh are just the opposite. They make for much busier backgrounds, even in significantly out-of-focus areas, an effect you probably don't want for most of your shots. But for the right subject, these too can be great artistic tools, which is why some photographers buy lenses which intentionally provoke soap bubble bokeh, such as the Meyer Optik Görlitz' Trioplan 100mm F2.8.
Make no mistake, though, lenses like these are specialist, niche products that don't sell in huge numbers, because 99% of the time, photographers prefer the soft backgrounds of feathered bokeh. (Ring bokeh, in particular can be tricky to use well.)
Probing the mysteries of bokeh
It seems that bokeh has been as mysterious to lens designers as it is to photographers: Creating lenses with smooth, feathery bokeh has generally been a bit of a hit-or-miss proposition. (Or rather, it's been tricky to manage great bokeh without having to accept trade-offs in other areas, like resolution or distortion.)
Kato-san told us this is where Olympus was able to bring their own unique expertise to bear. Olympus has decades of experience in the high-end microscope market, and were able to borrow high-precision measurement technology from that division to create an ultra-high precision aberration measurement instrument.
They then used this device to precisely quantify the optical performance of a variety of lenses that were legendary for their beautiful, feathered bokeh. By doing so, they learned that the key to attractive bokeh is carefully-controlled spherical aberration. (We strongly suspect that their instrument showed more than just a basic spherical aberration curve, but it'd be no surprise that Olympus would want to keep some of the key details to themselves.)
Bokeh in action
The diagram below, courtesy of Olympus, shows how spherical aberration affects bokeh. At the top, you can see a rendering of light travelling to the right from two subjects -- the tree and woman -- towards a lens and image sensor. The lens has been focused so as to render the woman sharply on the image sensor.
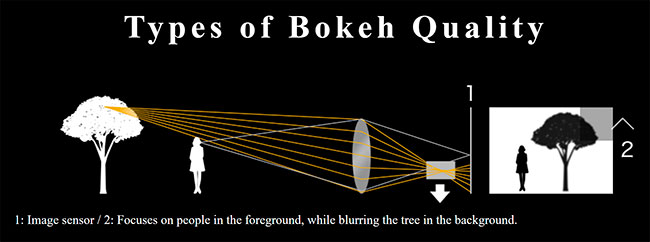
The tree, though, is farther from the lens, so light rays emanating from it are focused in front of the sensor plane. By the time those light rays have reached the sensor surface, they've spread out and become defocused.
As a quick aside, we should note that there are some important notes to make about this part of the diagram. Firstly, note that what's being shown is the path taking by light rays coming from a single point on the tree and the woman's body - so what's shown isn't an entire image being projected onto the sensor, but rather just the light from two single points; one on the tree and one on the woman. Secondly, were there another tree closer to the camera than the woman, that too would be rendered out of focus, but in that case because the light rays from it would come into focus behind the sensor surface - and so wouldn't yet have converged to a single point before they hit the sensor.
The most important part of this illustration, though, is what it shows happening to the light rays from the tree before they reach the sensor's surface. Note how the rays from the edge of the lens and the center of the lens don't pass through a single point on their way to the sensor.
This is spherical aberration, and is the key difference between good and bad bokeh that Olympus discovered with their aberration-measurement instrument. Let's look at it in more detail...
Bokeh by design
The diagram below shows ring, solid and feathered bokeh types side by side, and in particular shows how the light rays from the edges of the lens converge (or don't) with those from its center.
The bokeh images here show how a point-source of light (think of a tiny light bulb or specular highlight in the background) would appear in the final image. Note that all of these illustrations correspond to how light from an out-of-focus background image is projected onto the image sensor. The illustration on the right ("Feathered Bokeh") shows the same behavior as was diagrammed in the graphic above, showing how light rays from the tree in the background behaved.
The simplest case of solid bokeh is shown in the center section, where all the light rays from background object in fact do come to focus at a single point, just one that's in front of the plane of the sensor. It doesn't matter whether the light rays pass through the edges of the lens or the center, they're all brought to focus at the same point in space, albeit some distance in front of the sensor itself.
When all of the light rays behave the same like this, it's probably no surprise that the resulting bokeh is smooth and solid, essentially forming a perfect image of the lens' aperture. (These illustrations assume a perfectly circular aperture; if the lens had fewer, uncurved iris blades, the resulting bokeh image would replicate the shape of the aperture, but would still have uniform brightness across its extent.)
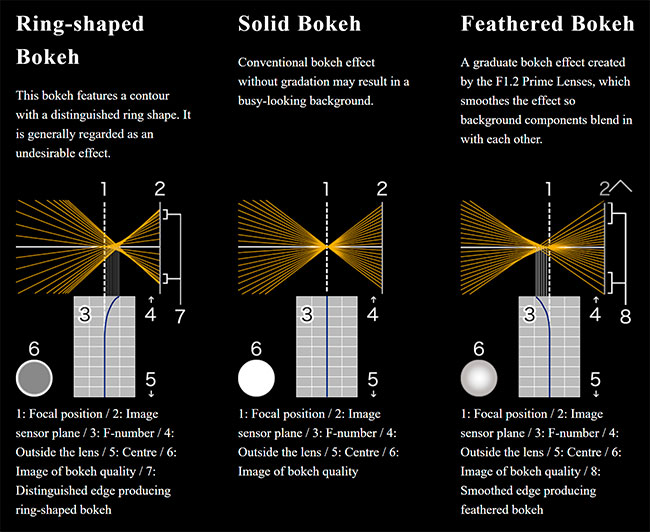
On the left, we can see that in ring bokeh, the light rays passing through the edges of the lens come into focus behind (closer to the sensor) where those from the center of the lens do.
It's a little hard to visualize from the illustration, but if you follow the lines representing light rays closely, you'll see that those closest to the center converge (cross each other) right at the dotted line labeled "Focal position". Those coming from the edges converge well behind that point, closer to the sensor's surface.
And at right, we see that feathered bokeh is the exact opposite. Here, light rays coming from the edges of the lens actually come into focus a bit further from the sensor, and the closer we get to the outside edge of the lens, the further ahead of the sensor they are focused.
If you follow the rays from the edges of the lens all the way to the sensor, you'll see that they are more packed together in the example on the left (ring bokeh), but are more spread out in the example on the right (feathered bokeh).
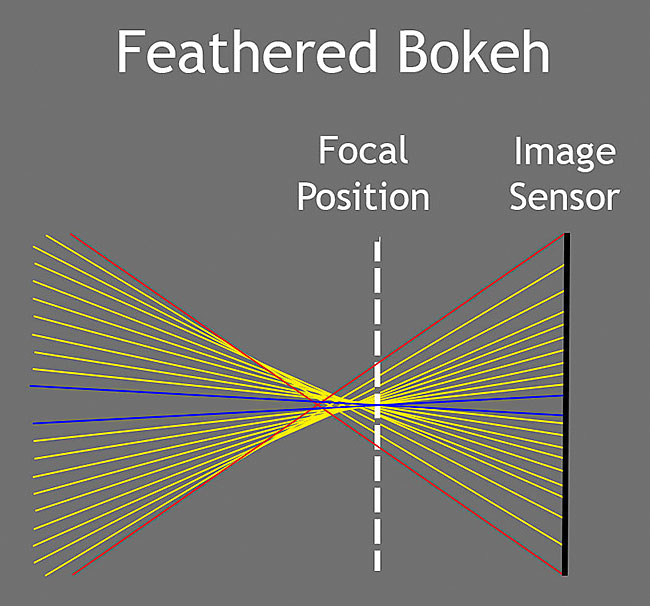
It's a little hard to trace the outer and central rays in the previous diagram from Olympus, so we made the one above, to highlight how the peripheral and central rays converge in a lens with feathered bokeh. Again, this is just a conceptual illustration; in reality, the light rays from a given point on an in-focus subject would converge at the sensor's surface, not at some imaginary point in space in front of it. But the basic idea is clear; in a lens producing feathered bokeh, light rays from the edges converge at a point in space further above the sensor than do those passing through the lens's center.
This was the fundamental discovery the Olympus engineers uncovered with their aberration-measuring instrument: Lenses with beautiful, creamy bokeh had spherical aberration such that peripheral light rays came to focus in front of those from the center of the lens. Lenses with solid bokeh were technically perfectly corrected, in that edge rays and central rays converged at the same point, while those with ring-shaped bokeh had the peripheral rays coming to focus behind the central rays.
Feathered and ring bokeh are just two sides of the same coin
What all of this means is that feathered and ring bokeh are actually two different sides of the same coin, with solid bokeh being something akin to a "neutral" position between the two extremes. This is nicely illustrated in the real world, in that a lens showing feathered bohek for background objects will show ring bokeh for foreground ones, and vice versa.
Ninety-nine percent of the time, we photographers are most concerned about how background objects are rendered, so we want feathered bokeh there, and don't care so much about how foreground objects will appear. Consequently, we tend to like lenses where the peripheral light rays come to focus in front of those from the center of the lens.
And the same is true in reverse: Use a lens with ring bokeh like that Trioplan we mentioned earlier, and you'll find that specular highlights in the foreground will actually show feathered bokeh, rather than the ring bokeh seen in background objects that's considered characteristic of those lenses.
The 17mm f/1.2 was tricky to manufacture, too
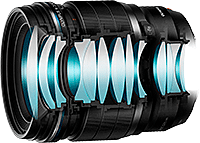
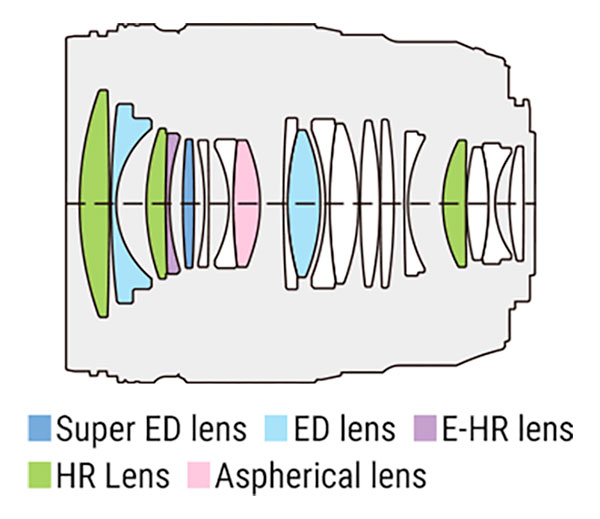
Forearmed with all of this hard-earned knowledge from its aberration measuring machine, Olympus has been able to design its M.Zuiko Digital ED F1.2 Pro lens lineup to intentionally induce feathered bokeh. You can see the optical formulas underlying the 17mm, 25mm and 45mm primes below, that let them achieve that end.
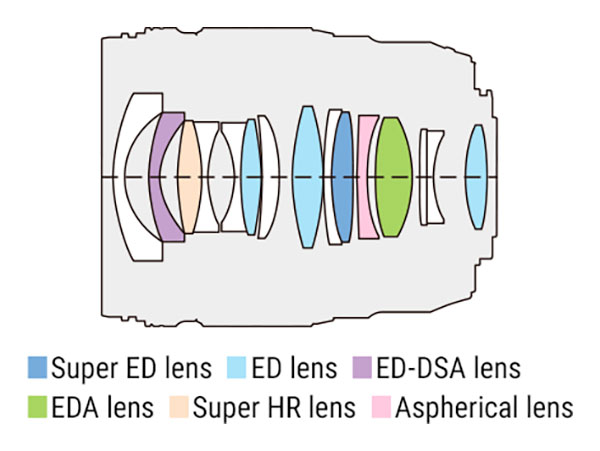
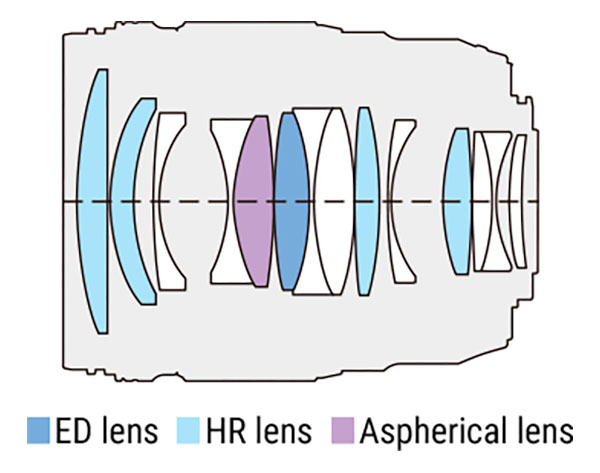
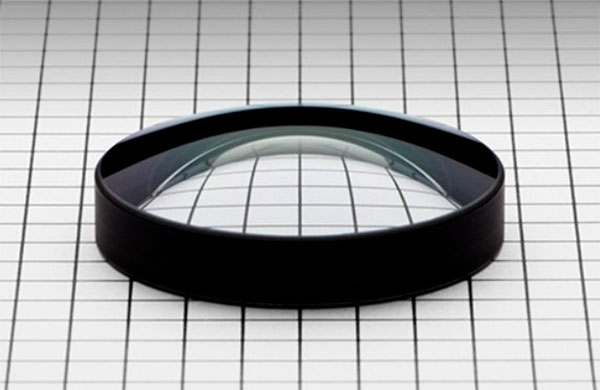
But designing a high-performance lens and actually manufacturing it are two very different things. That turned out to be especially true for the ED-DSA lens element in the 17mm F1.2 Pro lens. This is, says Kato-san, the industry's first mass-produced, extra-low dispersion, dual super-aspherical lens element, and turning it from design to final creation proved to be exceptionally challenging.
Aspheric lens elements are made using precision glass molding of specially prepared and shaped optical glass blanks. But lenses with really steep profiles like those of the ED-DSA element -- which uses much thicker glass at its outside edges and is very at the center -- are especially difficult to manufacture because the wide variations in thickness mean that the lens tends to cool unevenly.
And that's not all, either. The special extra-low dispersion glass used in this element is even more prone to shattering during the cooling process. Extremely precise temperature control is thus required to prevent cracking as the newly-formed ED-DSA element cools. Precise temperature control is always an issue when molding aspherics, but the huge variations in thickness across the ED-DSA element made it especially tricky to manufacture.
Another issue with molded aspheric lenses that most people aren't aware of is that the tungsten-alloy aspheric molds can't simply be machined to match the shape of the final lens element, but rather have to be designed to take into account the shrinkage of the glass as it cools. This is expecially tricky with a lens having a really wide thickness variation like the ED-DSA element. At first thought, this might not seem terribly complicated; I mean it should just be a matter of making the mold oversize in proportion to the thickness of the glass at any point, right?
It turns out to be way more complicated than that, though. It might be that simple, if you could cool the glass infinitely slowly, so every part of the lens would be exactly the same temperature throughout the cooling process. Infinite cooling times are obviously non-starters for manufacturing, though, so there's a trade-off between avoiding thermal stresses, while still having a reasonable manufacturing process. So in any practical process, as the glass cools in the mold, different parts of the lens are tugged in different directions, as various parts cool, contract and harden before others.
While manufacturing engineers have developed very sophisticated computer models of the cooling process, it's an enormously complex problem and still far from an exact science. So designing aspheric lens molds still involves some level of trial-and-error, especially when dealing with such an extreme lens profile as in the Olympus 17mm F1.2's ED-DSA element.
Despite these obstacles, Olympus managed to both design and manufacture an f/1.2 lens lineup now consisting of three models, including the most recent 17mm f/1.2, with the only just-now-possible ED-DSA element.
Side-by-side comparisons with solid bokeh rivals
So what can you expect from feathered-bokeh lenses like Olympus' F1.2 Pro optics, and how do the results compare to more traditional, solid bokeh lenses? See the images below for some samples shot with the Olympus 17mm F1.2 Pro, 25mm F1.2 Pro and 45mm F1.2 Pro lenses mounted on an E-M1 Mark II body, alongside images shot with a competitor product of similar specifications, that produces the more traditional solid bokeh instead of feathered. (Olympus didn't reveal which specific competitor lenses these were, but you may be able to guess their identity, given the combinations of focal length and aperture ;-)