You did WHAT to our camera? IR weather testing version 1.0
posted Tuesday, February 26, 2019 at 7:40 AM EDT
(日本語版はこちら)
A little background
Our regular readers will be familiar with the basic weather-sealing test we did a bit over a year ago, in the run-up to our 2017 Camera of the Year awards. That test was indeed pretty basic, but it still aimed to reproduce conditions cameras might encounter during real-world shooting in bad weather. In that first round, we tried to simulate both rainfall and mist, and exposed all four of the cameras we tested to the same conditions at the same time.
While the results were very revealing, this first attempt of ours had a lot of limitations. For one, the amount of water was only estimated to be equivalent to typical bad-weather conditions. It also wasn't very repeatable, so the results were only relevant to the four specific cameras that were tested against each other at the same time.
Going forward, I wanted to come up with an approach that would be both better controlled and repeatable. I was also interested in finding ways that the test could be more quantitative than simply pass/fail, going beyond whether or not a camera malfunctioned or stopped working altogether.
In pursuit of this, I met with top mechanical designers from a number of companies while in Japan for the CP+ show in late February of last year. Those meetings were incredibly informative, and I sincerely thank all of the people who gave so freely of their time to meet with me. (!)
I learned a bit about how companies test cameras themselves, and what their internal standards are for weather sealing, but most of the conversations were subject to very strict non-disclosure arrangements, so I'm not free to share them here. (The sole exception was Olympus, who gave me permission to freely pass on the information they shared with me; more on that later.)
If one thing was clear, though, it was that there's no common standard across manufacturers, or even across model lines from any given manufacturer. (The latter makes sense; manufacturers design cameras for different uses, so it's not surprising that different models would be subjected to different levels of testing, with different expectations.)
What I did find in common among all the manufacturers I spoke with was an interest in having some outside agency who could test and certify cameras and lenses for weather resistance. Besides the lack of any useful standard, if manufacturers advertised certain levels of water resistance, it could open them up to a lot of warranty claims that would be very difficult to validate. Currently, most camera warranties don't cover water damage, so the decision whether a failure is covered or not is very simple: If the manufacturer finds any evidence of water having gotten inside the camera, the warranty doesn't cover the failure. If the manufacturer advertised that the camera was weatherproof, though, there'd be no way of determining just how much water the camera was exposed to. Who's to say whether water got into the camera after being used in a light rain, or after having been dunked in a river?
Given these concerns, there's a clear role for an organization like Imaging Resource to test and report on weather-resistance. Everyone would understand that we were exposing the cameras to simulated rainfall under very specific conditions, so YMMV (Your Mileage May Vary) in real-world shooting. But there would still be a consistent basis for comparing how well-sealed different cameras were on a relative basis.
This past year has been an extraordinarily busy one for all of us at IR, myself particularly, so I haven't been able to follow through on the results of my post-CP+ meetings until just recently. Now, though, I've advanced to what I consider to be version 1.0 of a weather-testing standard for IR, a huge leap forward relative to where we were a year ago, and with some clear directions to pursue to further refine our tests.
Why do we need a weather-testing standard?
I need to pose this question rhetorically so I can address it, but I suspect it'll be very obvious to most of IR's readers. :-0
Almost every camera manufacturer claims some level of "weather resistance" for at least some of their models. But saying that a camera is "weather resistant" doesn't really mean anything, because there's no standard for evaluating such claims. Manufacturer A's "weather resistance" might mean that a camera can handle a light mist for 5 minutes, while manufacturer B's similar claim might mean that it could withstand an hour of a heavy downpour. Sure, manufacturer A's camera is more "weather resistant" than a bare circuit board exposed to the elements, but does that mean anything for photographers? Meanwhile, manufacturer B's products wouldn't sound like they were any more weatherproof than those from manufacturer A.
The same holds true even within a single manufacturer's product lines. It's common for camera makers to describe their higher-end models as weather-resistant, but make no claims at all for their more entry-level models. There might be significant differences between entry-level models from Manufacturer C and Manufacturer D that would be of interest even to entry-level users, but there's no way for users to tell if that's the case. (Even entry-level users worry about whether their cameras can stand up to light rain or splashing.)
Everyone "knows" that water and electronics don't mix, but how worried should we be about using our cameras and lenses in varying levels of bad weather? Some models you can literally take into the shower with you, while others need to be coddled in even slightly wet conditions.
It's clear that weather-resistance is an important issue for a wide range of photographers, but there's no standard available that's relevant to typical photographic use cases.
Why existing weather-testing standards don't make sense for photography
It's a valid question whether or not the photo industry needs a weather-testing protocol of its own, vs. just using already-established standards that are well-defined and familiar.
The environmental-sealing standards most often referred to are those defined in international standard EN 60529 (IEC60509:1989, British BS EN 60529:1992), the source of the often-seen "IPx" ratings, such as the "IP67" rating which you'll sometimes see associated with very environmentally-resistant consumer electronics. (For example, Apple's iPhone X carries an IP67 rating.)
The problem with the "IPx" ratings is that they were developed for industrial or commercial electrical equipment, where the exposure to dust or liquids might be very intense, but of limited duration. As such they just don't correspond to realistic photographic use cases.
For example, the lowest level of water exposure specified by IPx1 is 60mm/hour of "rain" (~2.4 inches/hour), but only for 10 minutes. While it's possible that a photographer might dash out into a torrential downpour for a few minutes to snap a few photos, that's not at all what most of us normally do. (If it's raining that hard, chances are whatever we would have been shooting has been cancelled anyway. :-)
It's much more likely that we'll be out in much more moderate rainfall, but for a much longer period of time. (Think of hiking and shooting rainy landscapes, nature photography in the rain, or shooting from the sidelines of a sports game on a rainy day.)
It's possible that cameras and lenses that would do fine with much lower rainfall rates -- even over a period of hours -- would fail when subjected to the "torrential downpour" case. It's equally possible that cameras which can survive a brief but thorough dousing might have problems with longer-term exposure to lesser amounts of water.
IR's weather testing, version 0.1
As mentioned above, we made our first effort at weather testing in the runup to our 2017 Camera of the Year awards.
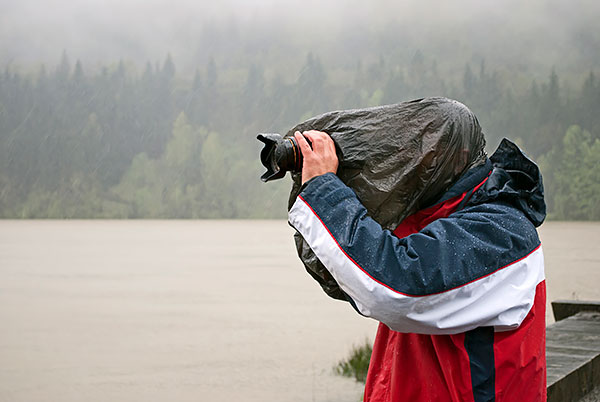
In this first round of testing, we tried to replicate conditions of moderate natural rainfall and mist, using a garden hose with two different sprayer nozzles. One delivered a "shower", the other a fine mist, both of which by themselves were heavier than you'd encounter in nature. To compensate for that, we directed the sprayer output upward (so the droplets would fall from a height of several feet, having velocities determined by gravity, rather than the hoze nozzle), and waved the spray back and forth, so the average "precipitation rate" would be closer to natural conditions.
At several points during the test, we paused and operated the controls of the cameras, using the same pattern of operation on all of them.
For these tests, the cameras were placed upright on a mesh tabletop, so the water would strike them from the top, and water wouldn't pool around their bases.
The results of the test were interesting and valuable, in that the four cameras reacted quite differently, ranging from no effect at all to complete failure. The test showed very clear differences in the water sealing levels of the cameras tested, but it had a lot of limitations.
For one, while we attempted to replicate natural rainfall and mist conditions and all four cameras we tested were exposed to the same conditions, the setup didn't provide for measuring either the precipitation rate or the total water exposure. So it worked well to distinguish between the cameras tested, but wasn't very reproducible going forward, and we didn't really know how well we'd simulated natural conditions.
We also noticed that with the cameras sitting perfectly level, resting on the tabletop, water could pool on the top panels, and the amount of water that pooled that way varied quite a bit, depending on how flat each camera's top was. While it's possible that this could occur if you had a camera mounted on a tripod, it's quite unlikely that a camera in real-world use would be so perfectly level that water could puddle on its top that way.
Our first weather test also only exposed cameras to water coming from above. In actual use, in addition to normal straight-and-level landscape-orientation shooting, photographers shoot in portrait orientation, both grip-up and grip-down, and cameras also often spend periods of time hanging front-down from a neckstrap or hip holster, so their rear surfaces may be exposed to rainfall for extended periods of time as well.
Meetings and discussions with manufacturers
Following our first round of weather testing, I did a lot of research on characteristics of natural rainfall -- drop sizes and velocities, distribution of precipitation rates, etc. Following the CP+ photo tradeshow in Yokohama, Japan in late February, 2018, I met with senior engineering staff of several manufacturers to get their feedback, learn how they tested and rated their cameras internally, and to discuss what might make for a good, photographically-relevant test of weather sealing that could be applied industry-wide.
These were extremely interesting and productive meetings, and I learned a lot about how various manufacturers seal their cameras, what sorts of conditions they assume for typical use-cases, and how they test their cameras internally.
Unfortunately, as you might expect, a lot of this information is highly proprietary, so I'm not at liberty to share most of it either with our readers or the other manufacturers I spoke with. It was nonetheless very (!) useful in further developing our own tests and methods of evaluating how well the cameras stand up to them. (As we'll discuss below, measuring weather-sealing effectiveness is far from straightforward, and a "big idea" I had for doing so turned out to be unworkable, at least as I'd originally conceived it.)
One of the most positive results from the meetings I had, though, was how uniformly supportive the reactions were that I received from essentially every manufacturer I spoke with. There's almost universal support for someone to develop an independent certification process for weather sealing.
One manufacturer's weather testing approach
The one manufacturer that gave me permission to share their test methods was Olympus. Within their product line, they make a distinction of whether they're claiming weather sealing for a product or not. For products that aren't marketed as being weatherproof -- or more properly, weather resistant -- they simply construct them to their normal standards of build quality, without worrying about weather sealing. Such models are also not subjected to water-exposure testing.
For any cameras that they do market as being weather resistant, though, they go to considerable lengths to ensure that they are in fact very weatherproof.
I mentioned earlier that the minimum level of water exposure for "IPx" weather-resistance testing corresponds to a rate of about 2.5 inches per hour for a total of 10 minutes. Despite this being a rather extreme rate of "rainfall", compared to anything most real-world photographers would be willing to stand out in, Olympus not only uses that level -- they also expose the cameras to that amount, for 10 minutes per side. That means their cameras are exposed to a total of 60 minutes of that extreme level of rainfall.
It turns out that their evaluation criteria after this exposure is equally severe. After the water-torture test, technicians disassemble the entire camera, being extra-careful to make sure that they don't accidentally introduce any water into the camera's interior in the process. (This requires a lot of care; even if a camera doesn't leak, there'll be water wicked into the crevices where body parts come together. It's all too easy for that wicked water to get dragged into the camera interior as you remove the various body parts and panels.)
Here's their criteria: If they find any trace of water anywhere inside the body, they consider that a failure, and go back to the drawing board to improve the sealing for next time.
I was frankly astonished by this; it's way more severe than most photographers would ever encounter in real life, and explains all the written reports and YouTube videos I've seen of people simply rinsing mud off their E-M1 cameras under a faucet.
As noted, I can't share details of other manufacturers' approaches, but I can say that Olympus' testing goes a lot beyond anything I heard about from other camera makers.
That said, though, there's a wide range of sealing, from the level Olympus uses on their officially weather-sealed models to the lowest-cost entry-level consumer models. And even among entry-level models, there's a lot of room for different approaches. (One manufacturer told me that they'd like to see IR conduct weather testing across the board, because they felt that even their lower-end models would show themselves to be more water-resistant than similar models from their competitors.)
What's reasonable? (How much water for how long?)
This is, of course, a critical question. All kinds of photographers are going to have all kinds of different weather-related use cases, so how do we come up with something that would be representative of "real world" conditions? At its most basic level, the question is how much water, and for how long?
To some extent, a camera's weather resistance is a function of both precipitation rate and duration, although it's almost certainly not a linear relationship. That is, less water for longer is probably somewhat equivalent to more water for less time, but 1cm/hour for one hour is likely very different in its effects than is 10 cm/hour for 6 minutes (or 1/10th of an hour).
The relationship between intensity and time also plays out in terms of what photographers themselves are willing to put up with, and what they're likely to subject their gear to. While many of us might brave a 4 cm/hour downpour for a few minutes, we're not likely to stand out in it for hours. On the other hand, many of us would cheerfully tolerate a 0.1 cm/hour drizzle all day long.
We expect that this might evolve as we continue to develop our weather-testing protocol, but for what we're calling "version 1.0" of our testing approach, we settled on a precipitation rate of 1cm/hour for an initial exposure of 35 minutes.
For our US readers, this is about 0.4 inches of rain per hour, a pretty decent rain, but far from a downpour. (A heavy thunderstorm might correspond to a rate of one inch per hour; a couple of inches per hour is pretty torrential.)
What kind of water?
Uh... the wet kind, right? ;-)
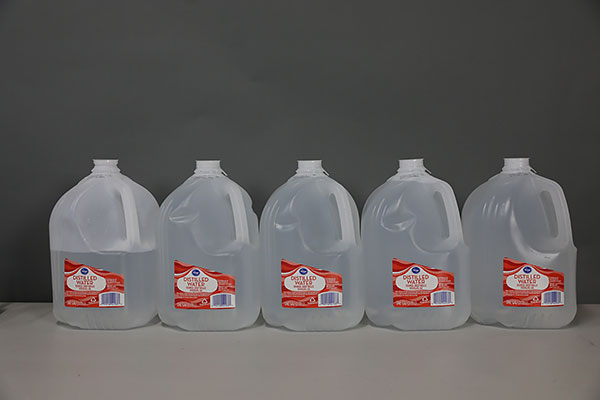
Actually, water can vary a lot when it comes to mineral content. At one end of the scale there's laboratory-grade distilled water, which has nothing in it but H2O molecules, while at the other end is something like Dead Sea brine. Normal ocean water has quite a lot of salt in it, but even freshwater streams and household tap water contains some dissolved minerals. Other than small amounts of atmospheric dust and possibly dissolved air pollutants in heavily industrial areas, raindrops are pretty pure.
The reasons this is important are twofold: First, water containing minerals is more conductive, so is more likely to short out internal connections; even a small amount might interfere with normal operation. Second, when the water dries, any minerals it was carrying are left behind. These minerals can be either electrically conductive or insulating, but either kind can cause problems, depending on where they end up. Conductive minerals (like salt) can short out internal circuit connections, either killing the camera completely, or do things like make it think the shutter button is pressed all the time. If the insulating kind of minerals end up between switch contacts (like the shutter button, again), the camera won't see the control actuated when you press or turn it. Rainwater and distilled water don't leave minerals behind when they dry.
Worst of all, enough of the wrong kind of minerals can corrode the camera's circuitry and controls, causing permanent damage.
As noted, rain water is usually pretty pure, suggesting that household-quality distilled water will do a good job of simulating it. We also want to make sure that that our drenching won't permanently damage any cameras or lenses we test, so distilled water is clearly the way to go, and what we're using.
(As a side note, if your camera malfunctions after getting wet from a rainstorm, just put it in a dry place with its body cap off and the battery and card compartments as well as any flaps or doors covering audio/video/power connections open, and chances are it will be just fine after drying out. Note, though, that it can easily take a week or more for a wet camera to fully dry, and that anything other than pure rainwater may be a death sentence. Still, if your camera gets doused by rain, there's a good chance that it'll be fine, once it's had a chance to dry out.)
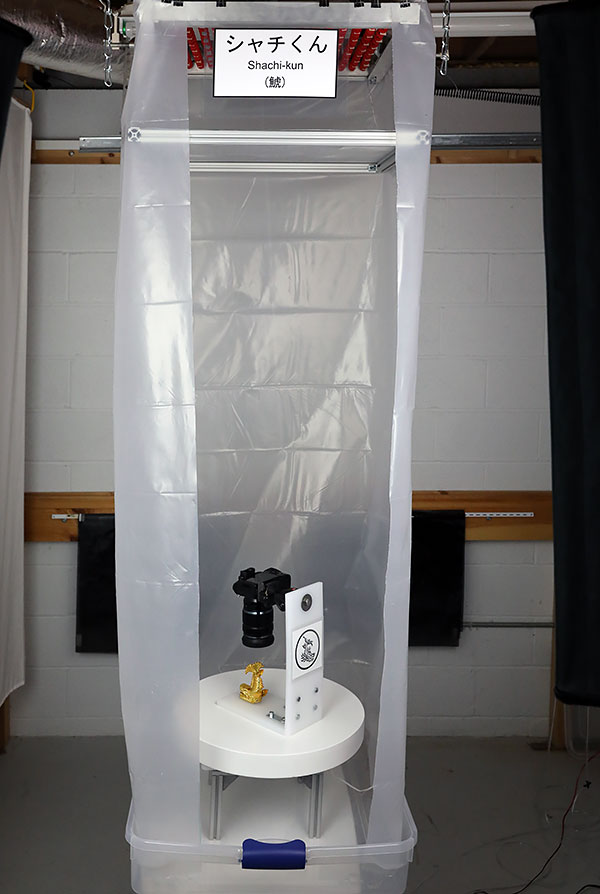
The Version 1.0 water challenge
Incorporating all the considerations mentioned above, I've created what we call our "Version 1.0" water-exposure system. It's still far from perfect, but nonetheless lets us expose cameras to a very well-controlled and consistent level of simulated rainfall.
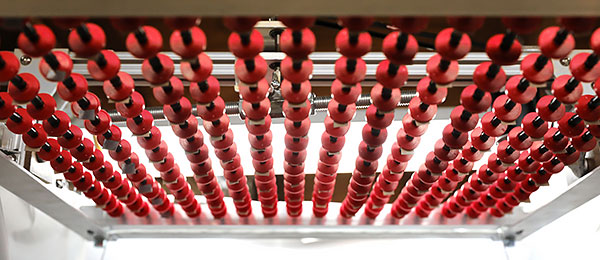
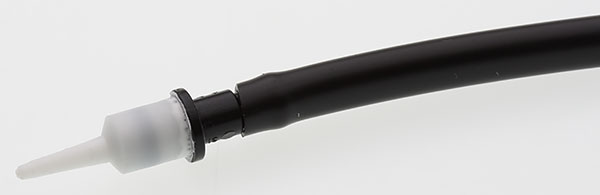
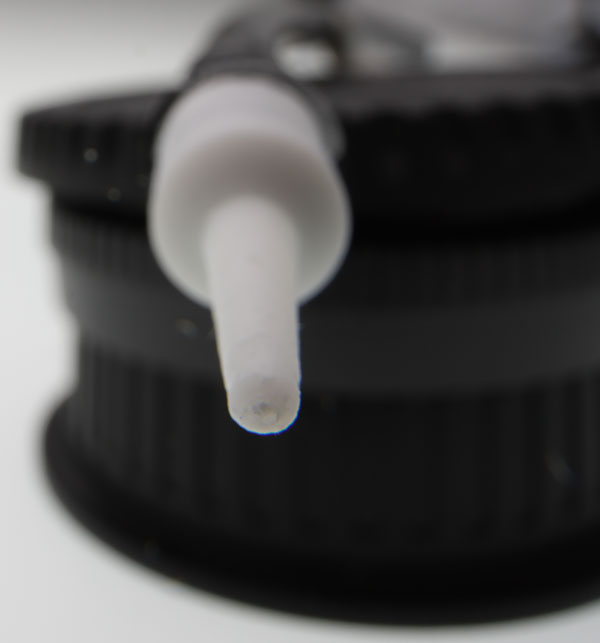
Drippers v1.0
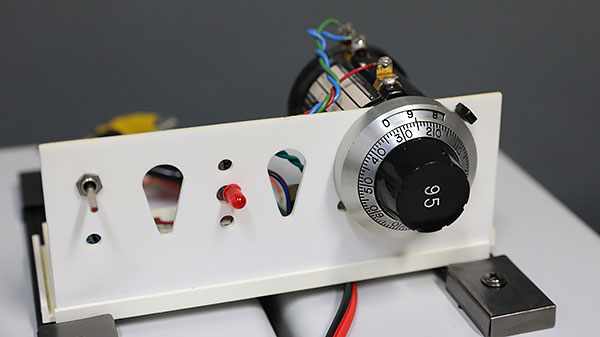
The heart of the system is an array of droplet emitters on a 30 x 30 cm grid. This is a bit less dense than the 20 x 20 cm grid used in the IEC IPx tests, but we felt that a sparser array made sense, given the lower overall precipitation rates we're using. It also made a big difference in the number of drippers we needed. At 30 x 30 cm, we need 256 emitters to cover the area we're interested in, but a spacing of 20 x 20 cm would require 625 emitters. (!)
Our version 1.0 system uses agricultural drip-emitters, operated at a low, carefully-regulated flow rate. Given that these drippers are designed to deliver much higher flow rates at fairly high pressures, it's very tricky to control their flow at very low volumes. There are some proprietary things we've done to manage this, but one of the simpler measures we've taken is to pulse the water pressure applied to them. This is working quite well, but I'm also working on fabricating our own custom "Version 1.5" drippers, which will provide lower, very well-controlled flow rates at modest pressures. (I'm making good progress on this, and have figured out how to make drippers with long, incredibly fine holes in them on a one-by-one basis. The challenge now is to scale this up to the point that I can fabricate the hundreds of drippers needed for the full system.)
Despite my desire for improvements though, the current drippers and the pump system we've developed to feed them lets us regulate total water exposure to a precision of plus or minus just a few percent.
The total area of our current dripper array is 18 x 18 inches (a bit under 0.5 x 0.5 meter), more than sufficient for the sorts of camera/lens systems we'll be testing.
Controlling water volume and verifying total water exposure
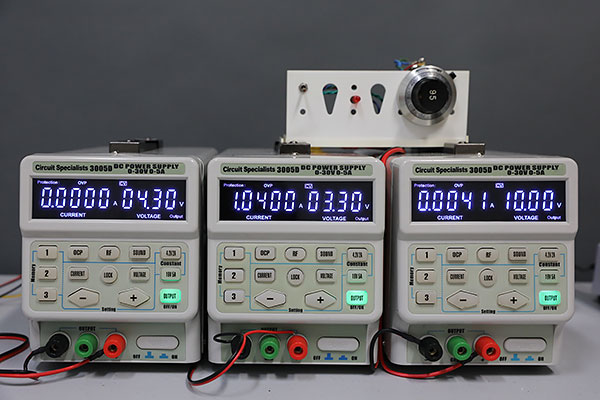
As noted above, we test at a water-delivery rate equivalent to a rainfall of 1 cm/hour, and as you can probably tell from the whole discussion here, we're doing everything we can to ensure that our tests are repeatable and consistent. This means not only controlling the precipitation rate, but monitoring the results as well, to make sure the cameras are seeing the amount of water exposure that we think they are.
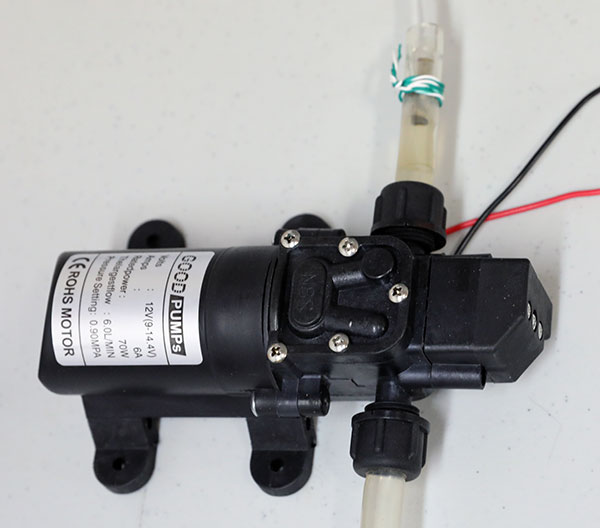
Precipitation-rate control comes down to the pump system we use to deliver water to the dripper array. Currently, we're using a small DC-powered diaphragm pump, run from a laboratory power supply. We've characterized its flow rate vs. the applied voltage, and use a combination of a well-regulated drive voltage and duty-cycle adjustment to deliver exactly the amount of water we want.
Frankly, I'd like to have something a bit more deterministic than our current water-delivery system. The current system works well enough, but I'm planning to switch to a positive-displacement pump, that meters out a precise amount of water with each revolution of the pump mechanics, regardless of what pressure it's delivering. This will be part of version 1.5 of the system, tied to the custom emitter design mentioned above. That system should be able to deliver continuous precipitation with both rate and total volume controlled to an accuracy of 1%.
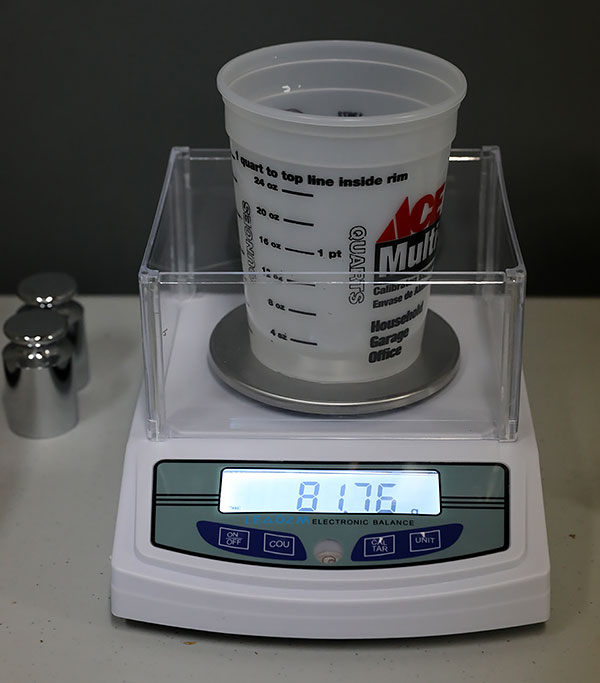
Monitoring the total water delivery is a bit easier. We put a plastic cup with a precisely-measured throat diameter on the turntable, at the same radial position on the turntable as the camera being tested. At the end of the test, we measure the amount of water collected. We do so using a high-resolution laboratory balance, which lets us measure the total water delivered to a precision of a few hundredths of a milliliter. With our current dripper array and pump system, the total water delivered for each test has a tolerance of plus or minus a few percent.
Drip Height
Rain drops fall from a great height, so have some velocity when they hit the earth - or your camera. Drops hitting at higher velocities are more challenging for weather sealing to resist than ones that fall from just a few inches, because higher velocity means that there's more force behind them when they hit. A drop of water barely dribbling onto a camera or lens is much easier to resist than one falling from the sky.
I did calculations on the terminal velocity (maximum speed) of water drops as a function of droplet size, and found that even moderate-sized droplets reach 70% or more of their maximum velocity after falling only 6 feet (2 meters) or so. Smaller-sized droplets (0.5mm diameter or less) have lower maximum velocities, which they reach even more quickly.
So in our test setup, we've placed the dripper array ~5-6 feet (~1.5-2 m) above the device being tested. This means that droplets will hit the device under test at close to the same velocities as natural raindrops would.
The issue of droplet size
We're also concerned about having a reasonable range of droplet sizes. Natural rainfall consists of varying sizes of drops, but they're almost always smaller than the kind of drops produced by dripping from a nozzle. Think of dispensing medicine from a dropper: Surface tension holds the drop to the end of the dropper until it's fairly large, even if the tip of the dropper is quite small.
Because of this, the drippers used in official IEC IPx tests produce fairly large drops, as did our version 1.0 dripper array. (One camera-company representative called them "water bombs" when he saw a previous version of our dripper system working.)
The issue with droplet size is that large drops hit with much more force than smaller ones do. When a large droplet hits something, it produces more pressure on the surface beneath it, which can force water into small cracks, or up and around baffle-type sealing structures that water from smaller drops would never penetrate.
We dealt with this in a few different ways, but one key was to build a diffuser structure, to break up the larger droplets on their way to the test fixture. You can see the diffuser structure in the shot of the system above, just below the system's nameplate. (Sorry, the details of the diffuser are proprietary.)
I haven't tried to measure the range of droplet sizes our system currently produces, but they range from small, mist-like particles to what I'd judge to be moderately-large raindrops. Overall, I think the whole system is giving us a pretty good simulation of natural rainfall.
Randomizing the droplet patterns
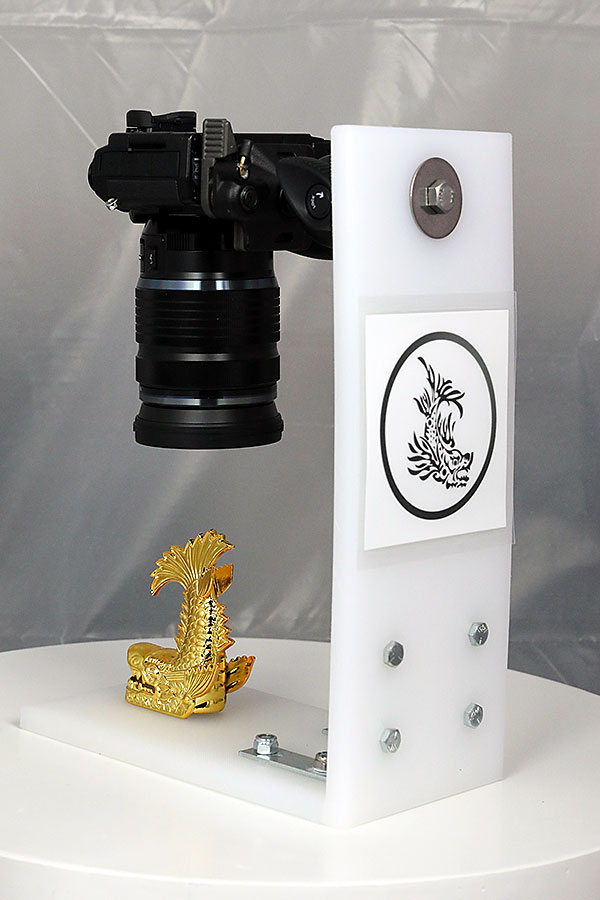
One feature we copied from the IPx standard tests was to rotate the device under test beneath the dripper array. If the camera wasn't moving, a control button that happened to be directly beneath a droplet emitter might see a lot more water than a nearby one that happened to be located between drippers. To prevent this, the camera/lens being tested is mounted on a tripod ball-head, held on an L-shaped support that's itself mounted on a rotating turntable. With the device under test positioned a bit off-center on the turntable, we can be assured that drops strike its surfaces randomly. The turntable in our setup rotates at about 3 rpm, or one revolution every 20 seconds.
Camera orientation
If you're photographing in a rainstorm, rain is going to hit your camera from a variety of angles, depending on the sort of photos you're taking. A lot of the time, the camera will be facing straight ahead and upright, in "landscape" orientation, but you might also hold it vertically for "portrait" format shots, and may shoot those either with the grip up or the grip down. Finally, if your camera is on a neckstrap, it's likely going to be dangling facing down for some part of the time, so rain will hit its back surface. About the only part of the camera that won't be exposed to water falling from above is the bottom. (The bottom may get wet if you set the camera down on a wet surface, but we aren't currently testing for that.)
The time frame of 35 minutes mentioned earlier may seem oddly precise (why not 30 minutes or 40, for that matter?), but it came as a result of the need to test the different orientations, together with the amount of time we wanted it to spend in each orientation.
Individual users probably spend widely varying amounts of time with their camera in any of these orientations, but we somewhat arbitrarily decided to allocate roughtly 55% of the total test time to the straight-ahead landscape position, 15% to each of the portrait orientations, and 15% to the face-down position.
That's admittedly arbitrary, but we think it's at least reasonably representative, and the dominance of the straight-ahead orientation is if anything a harsher test than as if we'd favored the portrait positions more. This is simply because cameras' top panels have far more control buttons and dials penetrating their surface than there are on either of the two sides.
We figured we'd initially aim for a roughly 30 minute exposure duration, and so arrived at this 35 minute long sequence:
-
Straight ahead: 10 minutes
-
Grip up: 5 minutes
-
Grip down: 5 minutes
-
Facing downward: 5 minutes
-
Straight ahead again: 10 minutes
-
Total Exposure time: 35 minutes
Is 35 minutes the right amount of time to test for?
The 35 minute test just described is just our current starting point. Weather resistance varies so widely between cameras that we fully expect to expand our testing to include both longer and possibly shorter test durations, so we'll be able to characterize the full range of weather proofing seen in cameras today. From our first few experiments, it seems that well-sealed, high-end cameras have absolutely no problem with the test as described, whereas entry-level models with little or no sealing can often encounter problems.
As we collect data from testing many different cameras, we'll be able to develop a better sense of how we might want to extend the test, most likely establishing several levels of performance. (For example, some cameras may be able to withstand several hours of this kind of treatment, while others may not be able to tolerate even 15 minutes of it. Time and more tests will tell, and we'll extend our tests as seems appropriate.)
What happens during the test itself?
It's important to note that the camera isn't just sitting there passively during the test. Besides rotating it beneath the dripper array, we run through a script of control actuations every 2.5 minutes throughout the test. We do this on the theory that pressing a button or rotating a dial is probably more challenging for the camera than if it was just sitting undisturbed.
As with camera orientation, every user will be different in what controls they use the most under various circumstances. Also, just running through a script every couple of minutes is probably fairly light usage compared to someone who is actively shooting during a rainstorm, but we had to make a tradeoff between the amount of time spent fiddling with the controls vs having the camera in its assigned orientations. We do keep the camera under the dripper array while we're working the controls, to not reduce the total water exposure, but we do hold it in our hands to make the adjustments. While we're doing that, it will be in a different orientation than when it's mounted on the test fixture.
We spent some time thinking about what camera operations are probably the most common, and incorporated those into our script, with some operations happening more often than others. While our choices were again somewhat arbitrary, the specific functions we picked are meant to be more of a reasonable middle ground, rather than being intended to precisely match any specific real-world usage pattern. The main thing is that we're actuating some camera functions on a regular basis, without biasing the functions we happen to be using either for or against any camera's user interface design.
Here's the point of that last remark: Different cameras assign different functions to various combinations of buttons, dials or even their touch-screen. (Touch-screen operation in wet weather is yet another topic to be considered; they don't always work well when wet.) One of the camera engineers I met with made the point that using a touch-screen lets you access different camera functions without exercising the seals around physical dials or buttons. Cameras with touch-screens might thus have an inherent advantage in weather sealing. But we wouldn't see that advantage if we just randomly pressed different buttons on the camera body itself.
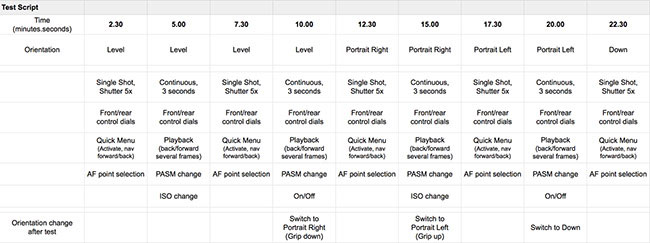
So here's what we came up with for the set of camera functions to access during our test. We run through this script every 2.5 minutes while the camera is being tested. As mentioned before, we're careful to hold the camera under the dripper array while we're performing these actions.
-
Shutter actuation:
-
5 shots in single-shot mode, on odd-numbered 2.5 minute cycles
-
3 second of continuous-mode shutter press, on even-numbered 2.5 minute cycles
-
-
Operate front/rear control dials, every cycle
(These typically control frequently-accessed functions, like shutter speed, aperture or exposure compensation) -
On odd-numbered cycles:
-
Quick menu operation (activate, navigate forward/back, make a selection, change the setting, then change it back)
-
AF point selection (whether via dial control, joystick, touch interface, etc.)
-
-
On even-numbered cycles
-
Playback mode (activate playback, move forward/back several images)
-
PASM mode change
-
-
Every two cycles (that is, on 5-minute intervals), alternate between:
-
ISO change
-
Toggle camera on/off
-
The choice to activate the controls every 2.5 minutes was a little arbitrary. We wanted the cameras to remain in the specified orientations for most of the test time, but needed to balance that against wanting to operate the controls at least somewhat frequently. We also wanted to end up with roughly 30 minutes of total exposure time, divided between the different orientations as described above, so a 2.5 minute cycle for control actuation seemed like the best fit.
Evaluating the results: Aiming for more than pass/fail
Now comes what's arguably the hardest part of weather testing, namely assessing how well or poorly different cameras and lenses are sealed. This is especially important if you're interested in distinguishing different levels of weather-resistance between devices. This is also where I invested quite a bit of effort in what turned out to be a blind alley, at least for now.
The most basic evaluation of weather resistance is simply whether a camera stops working or not. (Or, short of dying completely, did it show any unusual behavior?) That's a very rough meaure, though. What if a significant amount water got into the device, but didn't affect its operation during the test? That water could then cause it to fail at some other time, though, when the camera was simply held in a different orientation, or after the water had more time to seep deeper into the electronics. Or what if a tiny speck of water that normally wouldn't be a problem happened to end up in just the wrong place at the wrong time?
Ideally, we'd like to know just how much water made its way into the camera, not just whether the camera stopped working or not.
Hmm... How much water? How could we tell how much water a camera had absorbed? It occurred to me to wonder how much any absorbed water would weigh.
This seemed like a good direction to pursue: Could we weigh cameras accurately enough to detect even small amounts of water that got into them?
After a lot of effort, I eventually came up with a solution that could weigh cameras massing as much as a couple of kilograms (2000 grams, or about 5 pounds), to a resolution of less than a milligram (0.001 gram). Woo-hoo! A great solution, right?! As it turns out, the answer was "yes, but..."
One of the most important things I learned from my discussions with senior camera engineers was that a lot of camera seals are made from a foam material. It seals joints and gaps very effectively, but the foam itself can absorb water. These foam seals work perfectly well at preventing water from getting inside the camera, but the seals themselves absorb water and will thus gain weight when they get wet. One manufacturer even provided me with samples of the foam seals they used in one of their cameras, to test and experiment with, and yes, even a single seal can absorb enough water that it could make it seem that the camera had leaked, even when it hadn't.

The bottom line: Mostly pass-fail evaluation for now :-/
So after months of developing an ultra-precise camera-weighing system, it seemed that all my effort was for nothing; I couldn't distinguish between water that made its way to places inside the camera where it shouldn't be and water that was simply absorbed by the foam seals themselves. I haven't entirely given up on the idea of using mass-gain to measure water ingress, but to make it work, I need to find a way to account for water that's absorbed by the seals. I have some thoughts for how to do this, but for now have had to shelve that approach.
For now, we have to depend on functional tests and visual inspection.
The role of visual inspection
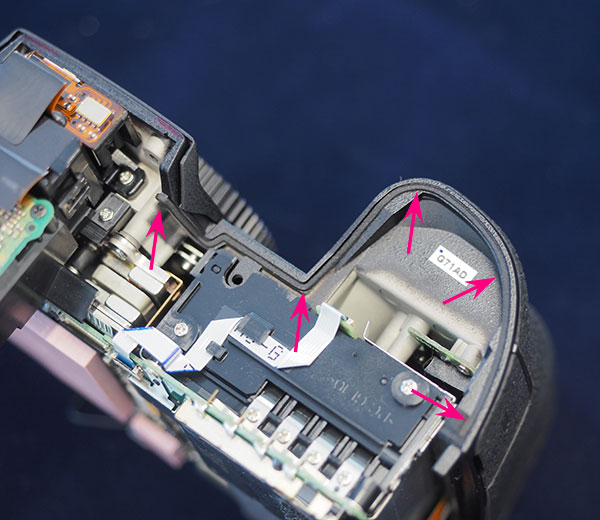
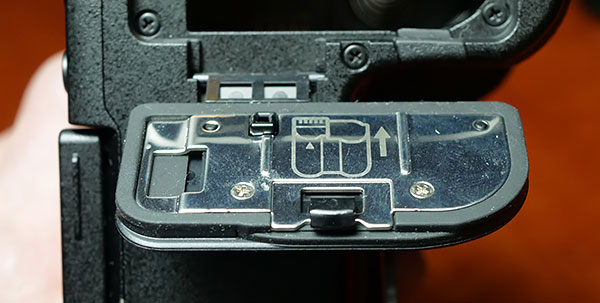
Beyond basic go/no-go, pass/fail evaluations, though, we can tell quite a bit about a camera's weather sealing simply by carefully inspecting the camera after the water exposure. Over the course of examining the half-dozen or so cameras we've put through the system so far, I've found that there are noticeable differences between different cameras' sealing systems, even in readily-accessible areas like the battery and memory card compartments. (As long as we use a lens that has weather sealing on its mounting flange, we've never found any sign of water entering the camera body from around the lens mount. So that path for water ingress can be largely ruled out.)
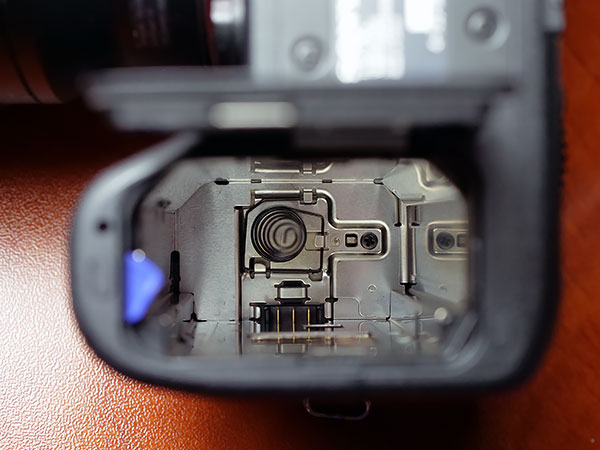
We've definitely found water inside the battery or memory card compartments on several occasions, though, and sometimes under flaps covering audio or USB ports. (The latter is very rare, though.)
The battery compartment is usually located beneath the shutter button and the controls on the right-hand side of the camera. There are a lot of openings in the top of the camera body to accommodate those controls, so it makes sense that this would be a common area to find leaks. Because these controls are some of the most critical for camera operation, water leakage here is also the most likely to cause problems. (Typical failures we've found are for the shutter to become unreliable, and things like aperture and shutter speed settings to become hard to set or erratic.)
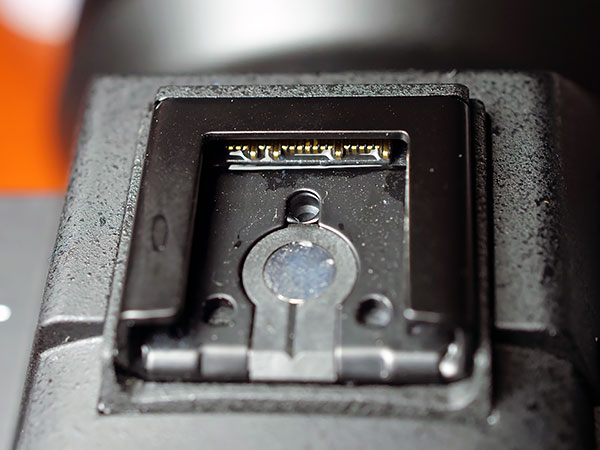
We can also get an idea of how well a camera is sealed, just by looking carefully at what the gaskets or other sealing look like around the battery and memory card compartments, and around any external connection ports, such as USB, HDMI or other audio/video connections.
It's of course possible that manufacturers would put more seals in these areas than in other, hidden parts of the camera, but it makes sense that the amount of sealing we see in these areas would be representative of the camera as a whole, and we often see fairly visible differences between models.
So our current evaluation process is to carefully note any unusual camera behavior during the test (we record video of each test to help with this), and then very carefully inspect every part of the camera we can get to without disassembling it. We pay close attention to any miniscule amounts of water we might see in the battery or memory card compartments, even if the camera didn't malfunction during the test.
Drying the cameras out after the test
As I mentioned earlier, we use distilled water in our weather testing, both to best simulate natural rainwater, and also so as not to leave any minerals behind in the cameras when they dry out again.
It's quite surprising how long it can take a camera to dry out after it's once gotten wet. I did some tests at the outset of this project that showed that it can easily take a week for a doused camera to fully dry out. I monitored the drying process by observing the weight of the camera, measured with sub-milligram accuracy. The weight was still changing microscopically at the seven-day point, but most of the water seemed to be gone after 5 days. Still, I was surprised that it took that long for things to really dry out inside.
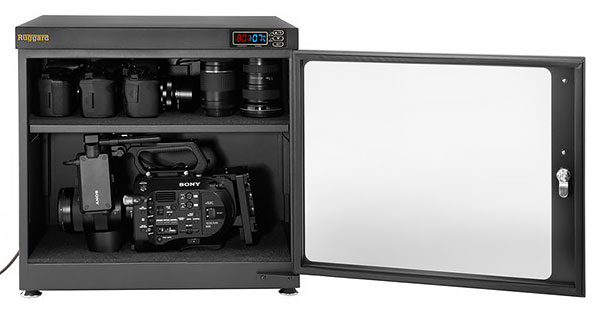
After our weather tests, we set the cameras inside a dry-cabinet, with all their ports, compartments and the lens flange uncapped. We let them sit there for at least a week before we put them back in their storage boxes or subjecting them to further weather testing.
We use an 80 liter Ruggard electronic dry cabinet for this purpose, which works really well. (We highly recommend it.) This model sells for $250, and can hold as many as 10 bodies and lenses at a time (or even more, depending on how we arrange them), adequate to our needs. The Ruggard dry cabinets use a solid-state (Peltier effect) dehumidifying module, so are pretty much silent when they're working, and are available in capacities from 18 to 600 liters, depending on your needs. You can adjust the desired humidity level, but we run ours flat-out, which means that it maintains a relative humidity level of just 20-25%. This is very dry air; the drier the better when it comes to drying out your gear.
If you shoot in damp or rainy conditions at all frequently, we highly recommend having a dry cabinet of some sort. They're not very expensive, with the smallest Ruggard model costing only $130. It's big enough to dry out a body and a couple of lenses at a time. Even if you have quite a bit of gear, you can probably get by with a fairly small dry cabinet: Unless you're living in rainforest conditions, you don't need to store all your gear in the dry box; just having one to dry things out after they get wet will be sufficient.
(That said, if you often shoot in conditions much colder than where your cameras and lenses are stored, you may well want to keep all your gear in a very dry environment. That's because any slight moisture inside your lenses can condense on the individual lens elements when you take them into lower temperatures. Just going from tropical heat to an air-conditioned room can fog up your lenses, and of course, going from a cozy home out into below-freezing conditions can cause fogging as well. If you've had trouble with lens-fogging, you may want to invest in a larger dry-cabinet, to keep all your gear in.)
Summary: Where we're at now and where we go from here
With our version 1.0 weather-testing setup, we can now expose cameras to simulated rainfall in a very well-controlled and repeatable way. The system produces a range of droplet sizes that are representative of natural rainfall, falling from a sufficient height that their velocities also reasonably approximate those of natural raindrops.
Limitations of our current droplet emitters mean that we need to pulse the "rainfall", on for about 10 seconds and off for 20. The version 1.5 emitters we've developed and are currently working on mass-producing will deliver a continuous, slow precipitation rate. Despite the pulsed nature of our simulated rainfall in version 1.0, though, we're able to control the overall amount of water seen by the cameras under test to a precision of just a few percent. We aim for a rainfall rate of 1 cm/hour, about 0.4 inches/hour, in Imperial units. This corresponds to a pretty good rain, but is far from what you'd see in a heavy thunderstorm.
We've developed a script for actuating camera controls during the water exposure, to simulate the kind of motion the seals would see in normal usage, although the amount of control usage in real live will obviously depend a lot on the individual photographer and the shooting situation. The current script results in 35 minutes of total water exposure, with the camera held in 5 different orientations during the water exposure.
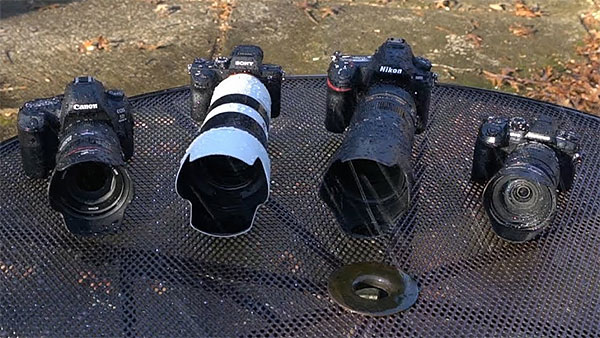
As I write this, we've run about a half-dozen different cameras through the version 1.0 protocol. The models we've run through the process so far are the Canon EOS R, Fujifilm X-T3, Nikon Z7, Sony A7 III, and as an example of an older, likely less well-sealed model, the Sony A7 II. Most of these cameras survived the water exposure in good shape, although both Sony models had some minor glitches, apparently associated with the accessory contacts on the hot shoe. All of them functioned fine again, after they had a chance to dry out in our dry cabinet.
Beyond just seeing whether the cameras malfunction during the test itself, we also carefully inspect the parts of the camera interior we can access without disassembling the body, looking for any traces of water that might have made their way inside, and also examine the sealing structures on the camera's battery and memory card compartments, electrical ports, etc.
All of the cameras we've tested so far have been higher-end models, and all have only seen 35 minutes of water exposure, per our current test script. Going forward, we'll be testing lower-end models as well, and also exposing higher-end models to the simulated rainfall for longer periods of time.
Ultimately, we want to be able to tell the difference in levels of weather sealing ranging from essentially none at all to extremely well-sealed. At the low end, we expect many entry-level cameras to malfunction relatively early in our current test (possibly calling for shorter test durations for that category), while at the high end, we plan on extending the duration of water exposure, to be able to clearly distinguish between a wide range of weather resistance levels.
We're publishing this just before the CP+ 2019 show in Yokohama, Japan, and I'll be meeting with senior mechanical engineers from a number of companies, both at the show and over the course of the week following. The feedback I received from camera-company engineers last year was extremely helpful in developing our testing approach, so I'm looking forward to hearing their thoughts on our current methodology.
But what do you, our readers think? I'd love to hear your own thoughts on weather resistance and our testing approach. The more feedback we receive, the better and more useful our tests can become, to meet the needs of consumers wanting to know how weatherproof (or not) various cameras are. Please leave your thoughts in the comments below!