Canon PowerShot A570 IS Design
The Canon A570 IS looks bigger than it really is, no doubt because of its boxy shape. But the 3.52 x 2.53 x 1.69 inch (89.5 x 64.3 x 42.8mm) shell weighs only 8.32 ounces (236 grams) with two AA batteries and an SD card installed. It's stocky but small enough to fit in a coat pocket to tag along anywhere. The body design is almost identical to the A550.
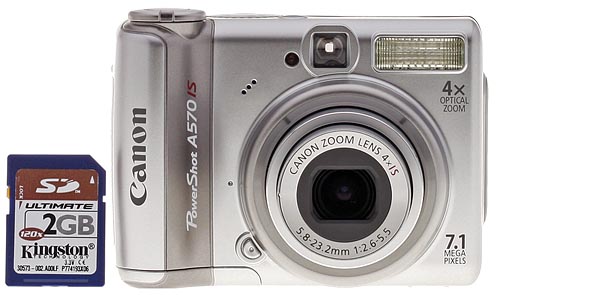
The front panel of the Canon A570 IS is where the f2.6-5.5 35-140mm zoom pops out an inch when you power the camera on. Even at telephoto it only extends an 1/8 further than that, though. It's surrounded by a removable plastic ring covering a flange that accommodates a conversion lens adapter. A release button for the ring is to the lower left of the ring. Above the lens and in the right corner is the flash. To the left of the flash is the optical viewfinder window and just left of that is the AF-assist light. Three holes reveal the microphone, to the left and a bit below that. At the far left is the grip formed by the AA battery compartment.
The wrist strap attachment is alone on the right side of the A570 IS.
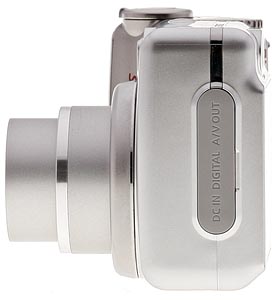
The left side is where you'll find the rubber flap protecting the DC In, AV Out, and USB ports.
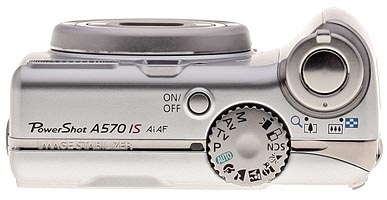
The top panel of the A570 IS bunches the controls on the right side. At the top of the grip, on the forward part of the panel, the Shutter button is surrounded by the Zoom Lever. Extending just a bit past the back edge of the panel, the Mode dial is behind and to the left of the Shutter button. Just to the left and forward of that is the small Power button. The very small Power lamp sits just to the left of the Mode dial.
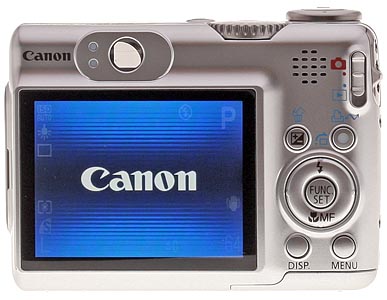
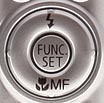
On the back panel, the 2.5-inch LCD takes up the lower left. Just above it is the optical viewfinder with two LED status lamps. In the right corner is the camera's speaker and just right of that, on the far right edge, is the Mode switch, with settings for record and playback. The main control buttons are just to the right of the LCD below the speaker. The Function/Set button is surrounded by a four-way navigator with Macro and Flash controls. Above the navigator are the EV/Erase button and Print/Share button. Below it are the Display and Menu buttons. It's a configuration familiar to Canon fans for some time now.
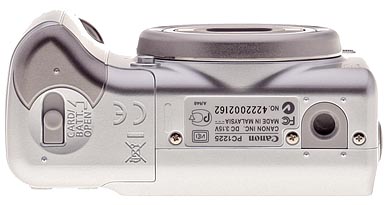
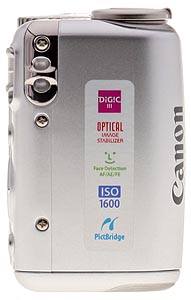
The A570 IS has a flat bottom with a plastic tripod mount to the right and the battery/memory card compartment to the left covered by a sliding plastic cover than can be locked. In addition to the memory card, the battery compartment holds the AA cells and a small CR1220 battery in a plastic drawer that keeps the clock ticking when you pop the batteries out.
Canon PowerShot A570 IS External Controls
Shutter Button: Surrounded by the Zoom lever, this button sets focus and exposure when halfway pressed, and fires the shutter when fully pressed.
Zoom Lever (see image above): Surrounding the Shutter button on the top panel, this lever controls the optical and digital zoom in Record mode. In Playback mode (when not using the playback zoom), the wide setting displays a nine-image index display of all images on the memory card, and accesses a "Jump" function that lets you scroll through index display screens quickly. Alternatively, the magnify position enlarges the currently displayed image as much as 10x, so that you can check on fine details.
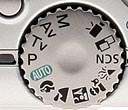
Mode Dial: Also on the camera's top panel, this large, notched dial sets the camera's Record mode with a stiff click. Canon divides the modes into three types. The Creative Zone includes Programmed Auto, Shutter Priority, Aperture Priority and Manual. The green Auto mode is completely automatic. And the Image Zone includes Portrait, Landscape, Night Snapshot, Kids&Pets, and Indoor modes as well as Special Scene modes (Night Scene, Foliage, Snow, Beach, Fireworks, Aquarium, and Underwater) plus Stitch Assist and Movie mode. Full details follow:
 Programmed Auto: The camera sets the shutter speed and aperture automatically, but you can adjust exposure with the EV setting. You can also change the ISO, Flash mode and Metering mode to affect exposure.
 Shutter Priority: You select the shutter speed and the camera selects the aperture.
 Aperture Priority: You set the aperture and the camera sets the shutter speed.
 Manual: Allows you to set both the shutter speed and aperture independently of each other.
 Auto: The camera controls everything about the exposure, except for Flash and Macro modes, Image Size, and Quality settings.
 Portrait: Uses a large aperture setting to blur the background while keeping the primary subject in sharp focus.
 Landscape: Employs a small aperture setting to maximize depth of field, keeping both the background and foreground in focus.
 Night Snapshot: Allows you to take snapshots of people against twilight or night backgrounds by reducing the effects of camera shake without using a tripod.
 Kids&Pets: Offers a faster shutter speed for capturing fast moving little ones.
 Indoor: Prevents camera shake blur and maintains the subject's true color when shooting under tungsten or fluorescent lighting.
 Scene Modes: Accesses more specific preset shooting modes, including Night Scene, Foliage, Snow, Beach, Fireworks, Aquarium and Underwater.
 Stitch-Assist: Allows you to record a series of images, either horizontally, vertically, to be "stitched" together into one large image, or panorama on a computer.
 Movie: Records 640 x 480 pixels and 15 or 30 fps; 320 x 240 pixels and 15, 30, or 60 fps; or 160 x 120 pixels at 15 fps with sound and zoom.
![]()
Power Button: To the left of the Mode dial, this button turns the camera on or off.

Mode Switch: In the top right corner of the back panel, this switch selects between Record and Playback modes.
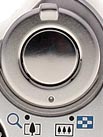
Multi-Controller Rocker Button: The Canon A570 IS's four-way rocker button isn't marked with arrows, but actuates Left, Right, Up, and Down, simulating arrow keys to navigate through settings menus. In Record mode, the Down button toggles through the Focus modes (Macro, Manual Focus, and Auto Focus), while the Up button selects the Flash mode (Auto, On or Off). In Playback mode, the Left and Right buttons scroll through captured images. When an image has been enlarged, all four arrows pan within the view.
Function/Set Button (see image above): In the center of the multi-controller, this button confirms menu selections. It also displays the following Function menu in Record mode (though selections vary with mode):
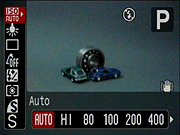 ISO: Sets ISO to Auto, Hi, 80, 100, 200, 400, 800, or 1600.
- White Balance: Sets the white balance to Auto, Daylight, Cloudy, Tungsten, Fluorescent, Fluorescent H, Underwater, or Custom.
- Drive Mode: Options include Single, Continuous, 10-second timer, 2-second timer, and Custom timer.
- My Colors: Vivid, Neutral, Sepia, B/W, Custom Color or Off.
- Flash Power: Adjusts flash output from -2.0 to +2.0 EV in 1/3 step increments.
- Light Metering System: Sets the metering mode to Evaluative, Center-Weighted, or Spot.
- Quality: Specifies the amount of compression or frame rate. Still image options are Superfine, Fine, and Normal. Movie options are 30 or 15 frames per second. Fast Frame 320 x 240 movie mode is 60 fps.
- Resolution: Specifies the image resolution. Still image resolutions are (L) 3,072 x 2,304; (M1) 2,592 x 1,944; (M2) 2,048 x 1,536; (M3) 1,600 x 1,200; (S) 640 x 480; (Postcard) 1,600 x 1,200; and (Wide Screen) 3,072 x 1,728 pixels. Movies are 640 x 480, 320 x 240 or 160 x 120.
![]()
Exposure Compensation: Above and to the left of the multi-controller, this button adjusts exposure compensation values from -2 to +2 stops in 1/3 increments.
![]()
Print/Share Button: Above right of the multi-controller, is the Print/Share button. When connected to a printer or Windows computer, this button lights up, indicating that sync or printing is one button press away. This can be programmed to change either ISO, White Balance, Digital Teleconverter, Display Overlay or Display Off.
![]()
Display Button: Below left of the multi-controller and adjacent to the lower right corner of the LCD monitor, this button controls the information and image display modes in Record and Playback modes.
![]()
Menu Button: Below right of the multi-controller, this button calls up the settings menu in Record and Playback modes. It also dismisses the menu screen and backs out of menu selections.

Card/Battery Compartment Latch: Nestled in the center of the card/battery compartment door on the bottom of the camera, this sliding switch unlocks the door, so that it can slide forward and open.
 Fujifilm GFX 50S Review
 Fujifilm X-T3 Review
 Olympus E-M5 III Review

Follow Imaging Resource