Panasonic DMC-GF1 Modes and Menus
 Capture Modes: When powered on, the Panasonic GF1 defaults to Record mode. The Exposure Mode dial on top of the camera sets the main shooting mode, with the following options:
 Intelligent Auto: This mode places the camera entirely in control of most exposure variables, and when using autofocus, requires a focus lock before the shutter can be triggered. The user can still access the self timer, adjust the exposure compensation, enable or disable the flash, select between single / continuous autofocus or manual focus modes, enable or disable autofocus tracking, enable or disable image stabilization (modes 1 or 2 only), and enable or disable face recognition. It is also possible to enable or disable guide lines on the LCD display, change the aspect ratio, and select the still image quality and dimensions. When shooting movies, you can specify the quality, dimensions and compression (except for the 16:9 WVGA Motion JPEG mode), and disable or set the strength of the wind cut function.
 Program AE (with Shift): This mode places the camera in control of both aperture and shutter speed, while the user has access to all other menu functions. Once the camera's exposure system has been activated by half-pressing the shutter button, the user can shift the aperture value and shutter time by rotating the rear dial. (The overall exposure remains the same, but you can ask the camera to use a larger or smaller aperture or faster/slower shutter speed.) When shooting movies, most functions are available, but the aperture and shutter speed both remain under automatic control.
 Aperture Priority: Lets the user control the aperture setting while the camera selects the best shutter speed. (The aperture range varies with the lens in use.)
When shooting movies, most functions are available, but the aperture and shutter speed both remain under automatic control.
Aperture Priority: Lets the user control the aperture setting while the camera selects the best shutter speed. (The aperture range varies with the lens in use.)
When shooting movies, most functions are available, but the aperture and shutter speed both remain under automatic control.
 Shutter Priority: The opposite of Aperture Priority, allows the user to set the shutter speed, from 1/4,000 to 60 seconds, while the camera selects the most appropriate aperture setting.
When the flash is activated, the fastest shutter speed drops to 1/160th second. When shooting movies, most functions are available, but the aperture and shutter speed both remain under automatic control.
Shutter Priority: The opposite of Aperture Priority, allows the user to set the shutter speed, from 1/4,000 to 60 seconds, while the camera selects the most appropriate aperture setting.
When the flash is activated, the fastest shutter speed drops to 1/160th second. When shooting movies, most functions are available, but the aperture and shutter speed both remain under automatic control.
 Manual: Provides complete user control over the exposure, including both aperture and shutter speed settings. A Bulb shutter setting also becomes available in this mode, allowing variable length exposures for as long as you hold down the shutter button, to a maximum exposure time of four minutes.
When shooting movies, most functions are available, but the aperture and shutter speed both remain under automatic control.
Manual: Provides complete user control over the exposure, including both aperture and shutter speed settings. A Bulb shutter setting also becomes available in this mode, allowing variable length exposures for as long as you hold down the shutter button, to a maximum exposure time of four minutes.
When shooting movies, most functions are available, but the aperture and shutter speed both remain under automatic control.
 Motion Picture P: The DMC-GF1 allows shooting of movie clips in all its various Record modes, but only the Motion Picture P mode allows control of aperture and exposure compensation used for movie capture. The aperture range varies with the lens in use, and the precise shutter speed remains under automatic control although it can be tweaked in the desired direction using exposure compensation. ISO sensitivity is controlled automatically in this mode, and the autofocus mode is fixed at single-point.
 Custom1: Four sets of shooting modes and settings can be stored in the GF1, and the first of these sets can be accessed in this mode. Settings for all of the custom modes can be made via the Cust. Set Mem. option on the first screen of the GF1's Custom Menus.
 Custom2: The second, third and fourth sets of custom shooting modes and settings referenced in the previous item can be accessed in this mode.
 Scene Mode: Adjusts camera settings (color rendering, flash mode, etc.) to optimize for different subject types: Portrait, Soft Skin, Scenery, Architecture, Sports, Peripheral Defocus, Flower, Food, Objects, Night Portrait, Night Scenery, Illuminations, Babies (including keeping track of birthdays for two different children, so the Panasonic software can display the child's age along with the photo), Pet, Party, and Sunset.
 My Color Mode: Lets you adjust color, brightness, or saturation of the image on-screen. (That is, the preview image shown on the LCD will reflect the color adjustments you've selected.) Here, the "Color" adjustment shifts the overall hue of the image from yellow at one extreme to blue at the other.
The adjustment can either be made automatically via a number of presets, or manually via the "Custom" setting. Presets include Expressive, Retro, Pure, Elegant,
Monochrome, Dynamic Art, and Silhouette.
My Color Mode: Lets you adjust color, brightness, or saturation of the image on-screen. (That is, the preview image shown on the LCD will reflect the color adjustments you've selected.) Here, the "Color" adjustment shifts the overall hue of the image from yellow at one extreme to blue at the other.
The adjustment can either be made automatically via a number of presets, or manually via the "Custom" setting. Presets include Expressive, Retro, Pure, Elegant,
Monochrome, Dynamic Art, and Silhouette.
 Movie Record Button: Pressing this dedicated movie record button will start and stop movie recording. Movies will be recorded using whatever mode is currently selected. This button can be enabled or disabled in some modes via a Custom Settings Menu setting. Confusingly, the Intelligent Auto mode provides only limited options on the Custom Settings menu, and the Movie button will retain whatever setting it had when it was last set. So users might find themselves in iA mode unable to trigger a movie when they want to, and also unable to find the option on the Custom Settings menu that would let them do so. (In fact, the camera will tell you to check the setting for the Movie Record button if you press it and it's disabled, but in iA mode, there's no way to turn it back on again.)
 Playback Mode: The Playback button on the rear panel accesses Playback mode, where you can review captured images. The left and right arrow keys, as well as the up and down keys, scroll through the images on the card. You can enlarge captured images or display them in index or calendar formats for quick viewing.
Panasonic GF1 Menus
Pressing the Menu button provides access to the camera's full menu system. The following options are available in most camera modes as menu tabs down the left side of the display. (Full auto mode greatly reduces the available options, to simplify camera operation.)
Panasonic GF1 Record Menu:

| Record Menu 1 Options | ||
|
Top-Level Selection |
Second-Level |
Notes |
Film Mode |
- Standard |
Allows control over the color rendering of images, analogous to using different film types. Each film mode can be adjusted to fine-tune the strength of contrast, sharpness, saturation, and noise reduction to the photographer's tastes. The two My Film modes allow customised settings to be saved for later recall, and the Multi Film setting will cause the camera to alternate between the photographer's choice of two or three film types in sequence with each press of the shutter button. In Intelligent Auto or Scene modes, only the Standard and Standard (B&W) options are available, via the Quick Menu button - The menu items shown at left do not appear in iA mode in response to the Menu/Set button. |
|
Aspect Ratio |
- 4:3 - 3:2 - 16:9 - 1:1 |
Select normal, 35mm film or HDTV wide screen aspect ratios for images. The maximum image width at full resolution is always 4,000 pixels for the non-square options, the aspect ratios wider than 4:3 just crop top and bottom. The 1:1 aspect ratio crops the sides (and oddly the top/bottom ever so slightly), so the maximum pixel size is 2,992 pixels square. NOTE that you can have different image sizes set for each aspect ratio, so you could shoot full-resolution at 4:3, but (for instance), small-size files at 3:2, for making 4x6 inch prints. |
|
Picture Size |
- L - M - S |
Specifies the pixel dimensions of the pictures you will take. (Options are roughly 12, 6, and 3 megapixels in 4:3 aspect ratio mode.) |
|
Quality |
- Fine - Standard - RAW & Fine JPEG - RAW & Std JPEG - RAW (no JPEG) |
Specifies the compression level and type of files saved for each shot. (Nice that you're not restricted to lower-quality JPEGs when shooting RAW+ JPEG) |
|
Face Recognition |
- Off - On - Memory - Set |
Up to 6 faces can be registered, with name, priority and age. To enhance recognition accuracy, up to 3 separate photos can be registered for a single individual's face. (Shoot from slightly different angles, to broaden the recognition.) |

(This menu does not appear in iA mode)
| Record Menu 2 Options | ||
|
Top-Level Selection |
Second-Level |
Notes |
|
Stabilizer |
- Off - Mode 1 - Mode 2 - Mode 3 |
This menu only appears if a Panasonic image-stabilized lens is attached to the GF1. Optical Image Stabilizer modes. Mode 1 is continuous, Mode 2 is on when the shutter is pressed, Mode 3 is used when panning. (Mode 3 only compensates for up/down motion of the camera.) Note that the 20mm F/1.7 lens offered in some kits with the GF1 does not provide an image stabilizer function, but the 14-45mm F/3.5-5.6 lens does offer support. |
|
Flash |
- Auto Flash - Auto Flash w/red-eye reduction - Forced Flash on - Forced Flash on w/red-eye reduction - Slow Sync. - Slow Sync. w/red-eye reduction |
Selects the flash mode. |
|
Red-Eye Removal |
- Off - On |
Dynamic Red-Eye reduction. If this option is enabled and the flash is in any of the red-eye reduction modes, the camera will examine the captured images and remove any red-eye that it finds. (This function was called D.Red-Eye on the GH1, the name has been changed on the GF1 but the function appears to be the same.) |
|
Flash Synchro |
- 1st - 2nd |
Select either first or second shutter curtain sync. (Use second-curtain sync for motion trails that follow your subjects, rather than lead them, when shooting with slow shutter speeds.) |
|
Flash Adjust |
- +/-2 EV scale |
Adjusts flash power higher or lower, in 1/3 EV steps. (Note: This adjustment is independent of the ambient exposure compensation, accessed via the rear dial - So you can adjust flash and ambient exposure independently.) |

(This menu does not appear in iA mode)
| Record Menu 3 Options | ||
|
Top-Level Selection |
Second-Level |
Notes |
Metering Mode |
- Multi-pattern - Center-Weighted - Spot |
Selects the metering mode. |
|
I. Exposure |
- Off - Low - Standard - High |
Intelligent Exposure mode adjusts contrast and exposure to handle high-contrast subjects. This menu option varies the amount of the effect applied to your photos. (The effect is always enabled in iA mode, and the amount is adjusted automatically.) |
Long Shutter NR |
- On - Off |
If enabled, the camera will shoot a "dark frame" for noise subtraction on long exposures. This doubles the time for each shot for long exposures, but reduces image noise. |
ISO Limit Set |
- Off - 200 - 400 - 800 - 1600 |
Sets maximum ISO sensitivity limit when using Auto or Intelligent ISO, or can be set to Off. When set to Off, Auto ISO is limited to 400 by default, Intelligent ISO is limited to 800 by default or 400 when using flash, and the limit is ISO 1,600 for movie recording. |
ISO Increment |
- 1/3 EV - 1 EV |
Default is 1 EV steps in ISO adjustment, but 1/3 EV steps can be handy for maintaining a specific shutter/aperture speed combination. |
(This menu does not appear in iA mode)
| Record Menu 4 Options | ||
|
Top-Level Selection |
Second-Level |
Notes |
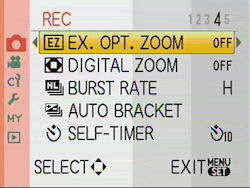
Ex. Opt. Zoom |
- On - Off |
When shooting at less than maximum image size, integrates an intelligent digital zoom with the lens' zoom ring, providing a greater zoom range without pixel interpolation. |
Digital Zoom |
- Off - 2X - 4X |
Adds a fixed digital magnification (w/lower image quality) of 2x or 4x. |
Burst Rate |
- H - L |
High or Low speed burst rate. High speed is 3 frames/second, low speed is 2 frames/second. |
Auto Bracket |
- Step - Sequence |
The Step option lets you shoot groups of 3, 5 or 7 pictures with user selectable EV steps (1/3 or 2/3 EV between shots). The sequence of the bracketed shots (under/nominal/over) can also be set by the user, to 0/-/+ or -/0/+. |
|
Self Timer |
- 10 Seconds - 10 Seconds/3 shots - 2 Seconds |
Configures the Self Timer mode. The 10 second/3 pic mode shoots a sequence of 3 shots after an initial 10-second delay, with a couple of seconds between shots in the sequence. (Handy for making sure nobody blinked/everyone was smiling.) The 2-second delay is handy if you're using a lightweight tripod, or want to just rest your camera on a table, convenient rock, etc. to take the shot. |

(This menu does not appear in iA mode)
| Record Menu 5 Options | ||
|
Top-Level Selection |
Second-Level |
Notes |
Color Space |
- sRGB - Adobe RGB |
Select the color space for images to be recorded in. |
|
Audio Record |
- Off - On |
Audio is recorded for 5 seconds after each image is captured. |
Panasonic GF1 Motion Picture Menu:

(This menu has reduced options in iA mode)
| Motion Picture Menu 1 Options | ||
|
Top-Level Selection |
Second-Level |
Notes |
|
Record Mode |
- AVCHD Lite - Motion JPEG |
Selects the video file format. AVCHD Liteis meant for playback on an HDTVvia HDMI. Motion JPEG makes much larger files, but doesn't produce as many compression artifacts with moving subjects. |
|
Record Quality |
AVCHD Lite Mode: - SH (1280x720, 17 Mbps) - H (1280x720, 13 Mbps) - L (1280x720, 9 Mbps) |
Specifies the video file quality (compression level). The options available vary depending on whether AVCHD Lite or Motion JPEG is selected for the recording mode. The Motion JPEG WVGA setting is not available in Intelligent Auto mode. |
|
Motion JPEG Mode: - HD (1280x720, 30 fps) - WVGA (848x480, 30 fps) - VGA (640x480, 30 fps) - QVGA (320x240, 30 fps) |
||
|
Continuous AF |
- Off - On |
Selects whether focus should be fixed from the first frame of the movie, or continuously adjusted during movie recording, which brings the possibility of noise from the focusing system being picked up by the GF1's microphone. |
|
Metering Mode |
- Multi-pattern - Center-Weighted - Spot |
Selects the metering mode in Creative Motion Picture Mode. (This option not available in iA mode) |
|
I. Exposure (not listed in the Motion Picture section of the draft manual, so I can't confirm for certain if the options are unchanged). |
- Off - Low - Standard - High |
Selects the intelligent exposure level (contrast compensation) in Creative Motion Picture Mode. (This option not available in iA mode, I.Exposure is automatically applied, as the camera decides its needed.) |

| Motion Picture Menu 2 Options | ||
|
Top-Level Selection |
Second-Level |
Notes |
Wind Cut |
- Off - Low - Standard - High |
Selects the microphone wind filter setting. |
|
Digital Zoom |
- Off - 2x - 4x |
Sets the amount of digital zoom when recording movies. |
Panasonic GF1 Custom Menu:

| Custom Menu 1 Options | ||
|
Top-Level Selection |
Second-Level |
Notes |
|
Cust. Set Mem. |
- C1 Set1 - C2 Set1 - C2 Set2 - C2 Set3 |
You can maintain up to 4 separate custom shooting profiles, saving most of the settings on the camera. They can then be quickly accessed via the CUST1 and CUST2 options on the mode dial. |
|
LCD Disp. Style |
- Viewfinder style - LCD monitor style |
Viewfinder style shrinks the live preview display and puts the shooting information at the bottom, LCD monitor style lets the live preview cover the full area of the screen, and overlays the shooting information over the image. |
Histogram |
- Off - On |
Display live histogram in Record Mode. You can position the histogram display anywhere within a horizontal band covering about 70% of the display area. (Histogram can't overlap with shooting information overlay areas.) |
Guide Line |
- Off - Grid - Grid + Star - Positionable horiz/vertical lines |
Select grid overlay pattern. The fourth option lets you position single horizontal and vertical lines anywhere in the frame you want. |
Expo. Meter |
- Off - On |
Selects where or not the exposure meter should be shown when correcting exposure, performing program shift, or setting the aperture or shutter speed. If set on and information display is active, the meter will be shown for four seconds after each change, with areas of the range that will result in poor exposures marked in red. |

| Custom Menu 2 Options | ||
|
Top-Level Selection |
Second-Level |
Notes |
|
AF/AE Lock |
- AE - AF - AF/AE |
Controls the AF/AE lock button's function. When pressed, lock the Auto exposure, Auto Focus or both. |
|
AF/AE Lock Hold |
- Off - On |
Normally, the AF/AE Lock button locks exposure/focus only while you're holding it down. With this option selected, pressing the AF/AE Lock button toggles the lock. (That is, once it's been pressed, the lock remains in effect until you press it again to release it.) |
|
Preview Hold |
- Off - On |
Controls the Preview display option in Record mode. (For previewing effects of exposure, depth of field, and shutter speed.) When Preview Hold is enabled, the Preview button toggles the mode on and off. Otherwise, the Preview function is only active while you're pressing the Preview button. |
Pre AF |
- Off - Q-AF (Quick-AF) - C-AF (Continuous-AF) |
Quick AF focuses automatically whenever the camera stops moving, Continuous AF adjusts the AF all the time. Either mode will reduce AF times when you're switching between close and distant subjects, but both will use more battery power. (Continuous more so than Quick.) |
Direct AF Area |
- Off - On |
When enabled, lets you modify the position and size of the AF area while shooting. Arrow keys move the AF area around, control dial adjusts the size. |

| Custom Menu 3 Options | ||
|
Top-Level Selection |
Second-Level |
Notes |
|
Focus Priority |
- Off - On |
When enabled, the camera will only open the shutter when the subject is in focus. Does not apply to movie recording. |
|
AF Assist Lamp |
- Off - On |
When enabled, AF assist light will illuminate when shooting in dim lighting. |
|
AF + MF |
- Off - On |
Allows manual focusing after autofocus is done. |
MF Assist |
- Off - On |
Enables automatic zoom of the viewfinder image whenever the manual focus ring is moved. (While the shutter button is still being held down.) (Zoom is selectable between 5x and 10x, by rotating rear dial.) |
Record Area |
- Picture - Motion Picture |
Crops the viewfinder display to either 4:3 (Picture) or 16:9 (Motion Picture) aspect ratio, apparently as a guide for images that will be displayed on different-format output devices. |

| Custom Menu 4 Options | ||
|
Top-Level Selection |
Second-Level |
Notes |
|
Remaining Display |
- Remaining Shots - Remaining Time |
Selects between displaying number of still image frames and minutes of movie recording left. |
|
Motion Picture Button |
- Off - On |
Enables/disables the Motion Picture Button. |
Dial Guide |
- Off - On |
When enabled, the camera momentarily displays an icon telling you to push the rear dial to switch between exposure settings. |
Menu Resume |
- Off - On |
If set on, the camera will remember the last menu screen you were using, even if the camera is turned off. |
Pixel Refresh |
Start Processing? - Yes - No |
Maps-out bad sensor pixels. Panasonic recommends doing this when stuck / hot pixels are noticed, and power-cycling the camera once the function has completed. |

| Custom Menu 5 Options | ||
|
Top-Level Selection |
Second-Level |
Notes |
|
Sensor Cleaning |
Start Processing? - Yes - No |
Performs dust reduction function (also done at each startup). |
|
Shoot W/O Lens |
- Off - On |
If set on, you can activate the shutter button without a lens mounted. (Useful for cleaning the sensor manually?) |
LVF Disp. Style |
- Viewfinder style - LCD monitor style |
Only available when the optional external viewfinder is attached to the camera. Functions identically to the LCD Disp. Style option at the top of the Custom Menu, but in reference to the external viewfinder rather than the internal LCD display. |
Panasonic GF1 Setup Menu:

| Setup Menu 1 Options | ||
|
Top-Level Selection |
Second-Level |
Notes |
|
Clock Set
|
- Hr/min/M/D/Y |
Sets cameras time, date, display sequence, and clock style (24-hour or AM/PM) |
|
World Time |
- Destination - Home |
Lets you quickly switch time/date between two locations, "Home" and "Destination". |
|
Travel Date |
- Travel Setup - Location |
You can set Arrival and Departure dates, as well as Location. Travel info is added to your photos. |
|
Fn Button Set |
- Film mode - Aspect Ratio - Quality - Metering mode - I. Exposure - Guide Line - Record Area - Remaining Display |
Selects what the Fn Button does. (Fn button doubles as down-arrow key.) (Record Area and Remaining Display are as on Custom Menu 4 above.) |
|
Economy |
Power Save: - Off - 1 Min - 2 Min - 5 Min - 10 Min |
Turns camera and/or LCD monitor off after a specified period of inactivity. |
|
Auto LCD Off: - Off - 15 Sec - 30 Sec |
||

| Setup Menu 2 Options | ||
|
Top-Level Selection |
Second-Level |
Notes |
|
Auto Review |
Review: - Off - 1 Sec - 3 Sec - 5 Sec - Hold |
Selects the time that an image is displayed on the LCD monitor after the picture is taken. Camera can also automatically display a 4x zoomed review. Same options for Review and Zoom, both can be enabled at the same time (will display first normal, then zoomed review image). |
|
Zoom: - Off - 1 Sec - 3 Sec - 5 Sec |
||
|
Highlight |
- Off - On |
If on, any blown highlight areas will blink when the image is played back on the LCD screen. |
|
Monitor / Viewfinder |
Adjust brightness and/or contrast & saturation in 7 steps |
Adjusts LCD when LCD in use, EVF when optional external viewfinder is in use. |
|
LCD Mode |
- Off - A* (Auto Power LCD) - * (Power LCD) |
Enables auto brightness adjustment of LCD screen in response to bright surroundings. Alternatively the "*" option increases brightness all the time. |
|
Scene Menu |
- Off - Auto |
Chooses whether or not the sub-option menu automatically appears when the camera is switched into one of its scene modes. |

| Setup Menu 3 Options | ||
|
Top-Level Selection |
Second-Level |
Notes |
|
Beep |
- Muted - Low - High |
Sets the beep volume for the focus confirmation, self-timer and the alarm. |
|
Volume |
- 0 to 7 |
Adjusts the volume of the speakers. |
|
No. Reset |
- Yes - No |
Resets the file numbering. |
|
Reset |
- Yes - No |
Resets most menu options back to their default settings. You have the option to reset either or both the Record settings (including face recognition) and Setup / Custom settings. |
|
USB Mode |
- Select on connection - PictBridge (PTP) - PC |
Selects how the camera connects with your computer or printer. Set to always appear as a storage-class device (PC) or as a PictBridge controller, or to select each time the camera is connected. |

| Setup Menu 4 Options | ||
|
Top-Level Selection |
Second-Level |
Notes |
|
TV Aspect |
- 16:9 - 4:3 |
Matches the video output's aspect ratio to that of your TV. |
|
HDMI Mode |
- Auto - 1080i - 720p - 480p |
Selects the HD video output format. |
|
Viera Link |
- Off - On |
When enabled, the GF1 can be controlled by other Panasonic Viera home electronics (TVs, projectors, home theater systems) its connected to via its HDMI link. Not all operations are possible via remote control, and use of the camera's buttons is limited while Viera Link is active. (Some other brands of HDTV may also be able to control the camera, but control may not be as extensive as with Panasonic Viera models.) |
|
Version Disp. |
- Body Firmware - Lens Firmware |
Displays the version of firmware in the body and lens. |
|
Language |
- English - Francais - Espanol - Portugues |
Select the menu language. (US models only: Units sold in other parts of the world will have different language menu options.) |

| Setup Menu 4 Options | ||
|
Top-Level Selection |
Second-Level |
Notes |
|
Format |
- Yes - No |
Formats the memory card. |
Panasonic GF1 My Menu:

The Panasonic DMC-GF1's My Menu shows the five most recently-used menu options, handy for accessing frequently-used controls quickly. Unlike some My Menu features, you can't explicitly assign controls to this menu, rather, the most-recently used ones appear here automatically.
Panasonic GF1 Playback Menu:

| Playback Menu 1 Options | ||
|
Top-Level Selection |
Second-Level |
Notes |
|
Slide Show |
- All - Picture Only - Motion Pic. Only - Category Selection - Favorite |
Controls the slide show. Four fade effects are available: Natural, Swing, Urban and Off. You can specify duration, music, repeat and audio play. (Duration control is only available when the Fade Effects are off.) Category selection allows playback of images only from one specific category - Face Detection, Portraits (including Baby and Soft Skin), Scenery (including Architecture and Sunset), Night, Sports / Party, Baby, Pet, Food, Travel Date, and Movie. |
|
Playback Mode |
- Normal Play - Picture Play - AVCHD Lite Play - Motion JPEG Play - Category Play - Favorite Play |
Selects the playback mode. Only the selected types of images/movies will be visible when playing images back. Normal play displays all image types. Category play is described in the previous menu item. |
|
Favorite |
- On - Off - Cancel |
In Favorite mode, you can mark images as your "Favorites", and then choose to show only those images in slide shows and/or Playback mode. When enabled, the down-arrow button marks/unmarks favorites in playback mode. |
|
Title Edit |
- Single - Multi |
Add text comments to pictures. The text comments appear in playback mode, overlaid over the image. The text does not alter the original image, but is tagged in the EXIF header. Face recognition, Baby, Pet or Travel date info can be automatically entered - but not simultaneously in one image. Images recorded with other devices, as well as Protected, Raw or movie files cannot be tagged. |
|
Text Stamp |
- Single - Multi |
You can stamp the recording date, date+time, age, travel date or title onto photos. A new small-size image is saved with the stamped information embedded in it. |

| Playback Menu 2 Options | ||
|
Top-Level Selection |
Second-Level |
Notes |
|
Resize |
- Single - Multi |
Allows you to resize your pictures. (Only resizes down to smaller sizes.) |
|
Trimming |
- Displays picture |
Lets you crop pictures by zooming in until you have the framing you want, then pressing the shutter button. Raw files, and those with attached audio or text stamps cannot be trimmed, and face recognition information is lost in the trimmed image. Only provides for about a 2x zoom, regardless of image resolution, but you can zoom & trim multiple times. (No limit on number of times you can zoom and trim.) |
|
Aspect Conv. |
- 3:2 - 4:3 - 1:1 |
Lets you change the aspect ratio of images captured as 16:9 ratio to one of the other available ratios. Raw files, and those with attached audio or text stamps cannot be converted, and face recognition information is lost in the converted image. Curiously, you also can't convert the aspect ratio of images initially captured at ratios other than 16:9. |
|
Rotate |
- Clockwise - Counter-clockwise |
Allows you to manually rotate the selected picture. |
|
Rotate Disp. |
- On - Off |
When enabled, if a picture was shot with the camera held vertically, it will be displayed on the LCD vertically. (NOTE that the GF1 always tags portrait-format files in the EXIF header, this menu option just controls how they're displayed by the camera.) |

| Playback Menu 3 Options | ||
|
Top-Level Selection |
Second-Level |
Notes |
|
Print Set |
- Single - Multi - Cancel |
DPOF (Digital Print Order Format). You can select which photos to print, how many, and whether a date stamp is added. |
|
Protect |
- Single - Multi - Cancel |
Protect pictures that you do not want deleted. (Note though, that they aren't protected against memory card reformatting.) |
|
Audio Dub. |
|
You can add or replace audio memos to the currently selected image. Clip length is limited to just ten seconds, although pressing the Menu / Set button causes recording to stop immediately. Audio dubbing doesn't work for protected or Raw images, or for movie clips. |
|
Face Rec Edit |
All face recognition info for the selected image can be cleared, or tagged with a different individual. Images which didn't have face recognition data recorded at capture time cannot be tagged. |
|
 Fujifilm GFX 50S Review
 Fujifilm X-T3 Review
 Olympus E-M5 III Review

Follow Imaging Resource