Exploring the E-M5 II's "High Resolution" mode
by Dave Etchells and Dave Pardue
Table of Contents |
|---|
For photographers interested in shooting high resolution imagery for landscapes, architecture or studio product photography, the E-M5 II comes equipped with a special high resolution mode designed to yield a 40 megapixel JPEG image competitive with those available from 36MP full-frame cameras like the Nikon D810 and Sony A7R, and a 64-megapixel RAW file. Really? A camera with a 16-megapixel sensor is going to somehow output 40/64-megapixel files? From our first briefing on this mode, we've been impatiently waiting to put it to the test in our lab! After all, the Sony A7R was our overall Camera of the Year for 2013, and the Nikon D810 won that honor just last year, so this is a rather bold claim for a Micro Four Thirds camera to make!
Before looking at the results (OK -- go peek if you'd like and then come back here) let's take a quick glance at the mechanics of this feat. It's actually pretty clever; one of those things you wonder why it hadn't been done already, once you learn what they're doing. First and foremost, be advised that you must use a tripod in order to take advantage of this new mode, and your subject(s) must be motionless unless you're deliberately aiming for odd motion blur effects.
In High Resolution mode, the E-M5 II fires eight sequential images across a roughly one-second time period using the electronic shutter, while at the same time using its voice coil-powered sensor-shift image stabilization system to move the sensor very slightly between shots. The net result is eight images, shifted by sub-pixel amounts from each other, that are then combined into the final super-res image. The end result is either a 40-megapixel JPEG file or that JPEG plus a 64-megapixel ORF file and a 16MP ORI file (not yet supported in common post-processing software). The 64MP ORF file can only be processed with a special Photoshop plug-in, which we haven't seen yet as of this writing.
As you'll see below, one positive side effect of the E-M5 II's "oversampling" of the image is that it pretty much completely eliminates moiré. The multiple exposures also significantly reduce image noise at the ISO 1600 limit imposed in this mode. The overall results are flat-out amazing, subject only to the limitation of completely stationary camera and subject.
OK, let's get to the fun part: the comparisons!
[Editor's note: all crops are from in-camera JPEGs with default settings. The E-M5 II images have been slightly down-sampled in order to show a similar size for the comparisons. Clicking on any image will take you to the straight-from-the-camera lab test image. You may also access the RAW files for most of these from each camera's lab samples page.]
 |
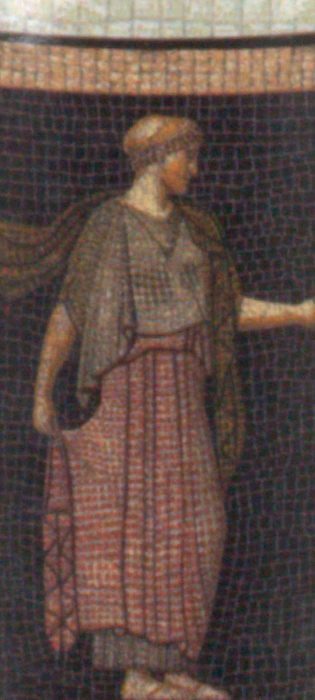
Olympus E-M5 II at base ISO |
 |
Nikon D810 at base ISO |
 |
Sony A7R at base ISO |
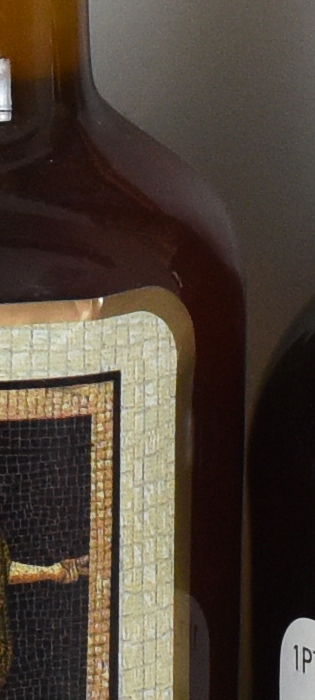
All three models show incredible detail in the fabric swatches of our test target. The A7R is likely applying a bit more default JPEG sharpening, though the crisp detail works well in these areas. And yet, both full frame 36MP cameras exhibit obvious moiré patterns in the red fabric swatch, where the E-M5 II which also doesn't have an AA filter has none at all. This makes the comparison a lot more intriguing. |
 |
Olympus E-M5 II at base ISO |
 |
Nikon D810 at base ISO |
 |
Sony A7R at base ISO |
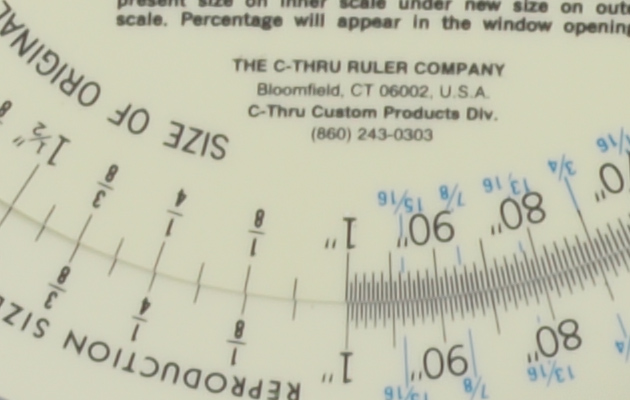
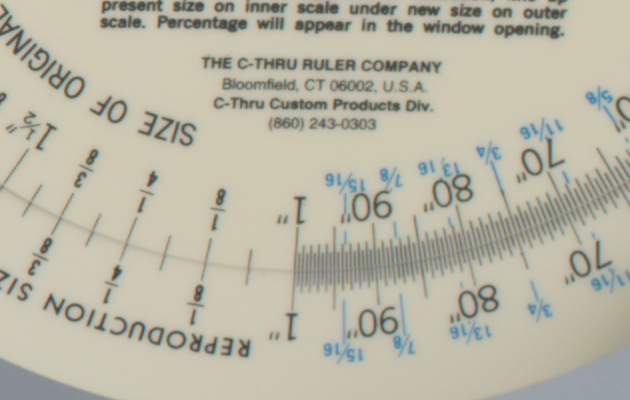
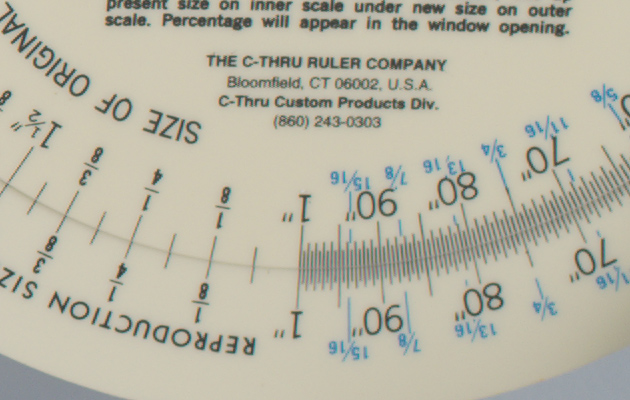
The small lettering and fine lines of the ruler are strikingly clear in the E-M5 II image. Each camera exhibits minor haloing from sharpening, but the clarity from the E-M5 II in most areas is impressive. |
 |
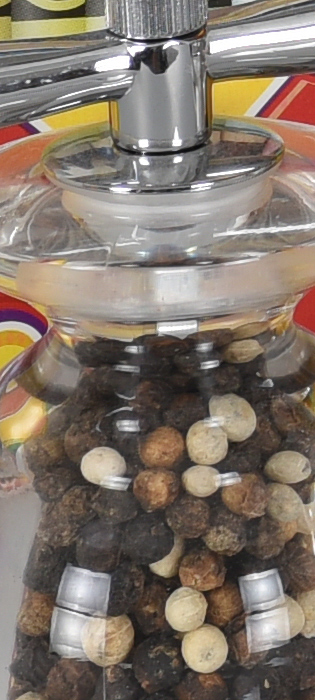 |
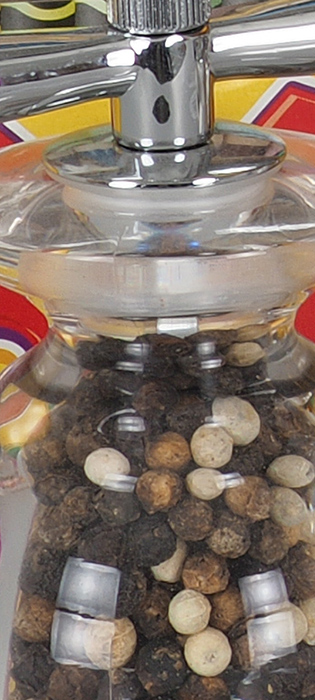
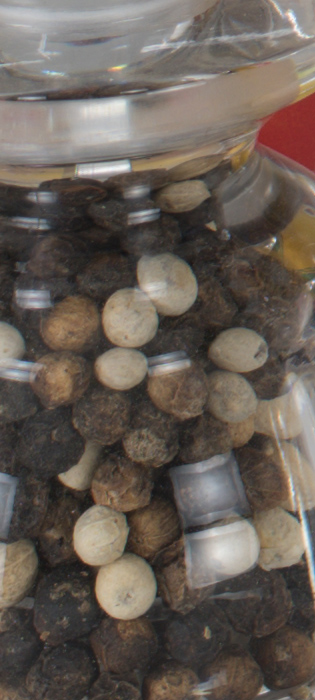
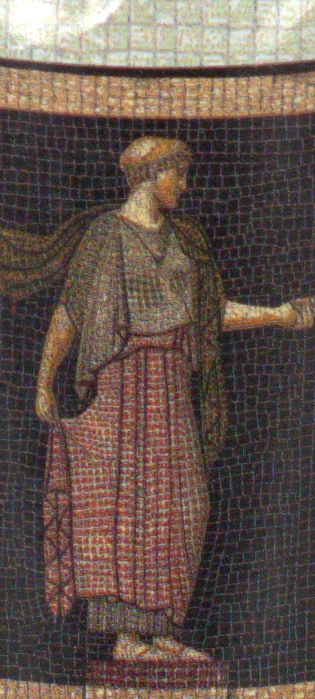
Olympus E-M5 II at base ISO |
Nikon D810 at base ISO |
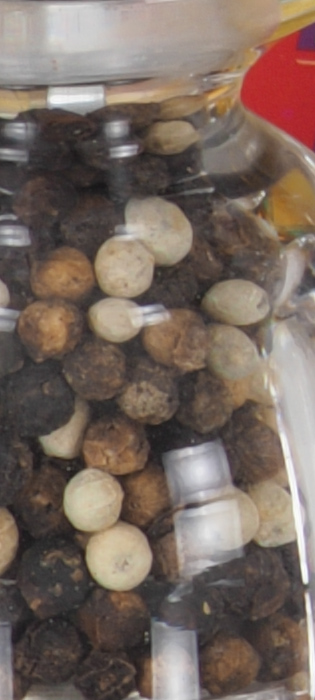
Product photographers will likely find this comparison eye-opening, as the E-M5 II is able to extract a great deal of detail from these peppercorns! (Best pinch your nose before getting too close.) |
|
 |
 |
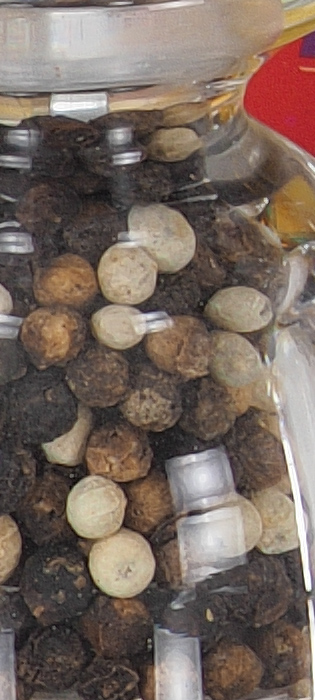
Olympus E-M5 II at base ISO |
Nikon D810 at base ISO |
Similar to the peppercorns, the E-M5 II also pulls an amazing amount of detail from these fabric swatches! You can clearly see most all of the thread patterns in the cloth. |
|
 |
 |
Olympus E-M5 II at base ISO |
Nikon D810 at base ISO |
Similar to the first comparison in this series, both cameras yield images with good overall clarity, with the D810 yielding a bit better contrast and depth. And yet, the E-M5 II displays no trace of the obvious moiré found in the D810 crop in the green part of the label. (Not to pick on the D810; we've seen this moiré with a number of high-resolution cameras.) |
|
Update: Based on a helpful reader request, below are true 1:1 crops to show the E-M5 II at the full 40mp alongside the D810 at 36.3mp:
 |
Olympus E-M5 II at base ISO (full 40mp 1:1 crop) |
 |
Nikon D810 at base ISO |
This comparison shows the E-M5 II as delivered from the in-camera JPEG at the full 40mp resolution at a 1:1 crop. This is with default sharpening, but for anyone interested in seeing the lowest sharpening setting please click here. |
In high-resolution mode, the E-M5 limits your ISO choices to a maximum of 1600. Let's take a look at that; the results are again surprising.
 |
 |
Olympus E-M5 II at ISO 1600 |
Nikon D810 at ISO 1600 |
Most sub-frame cameras begin to display obvious noise in shadowy areas of our target as ISO climbs to 1600 and higher, but the E-M5 II displays just a trace more here than the D810, which is legendary for its high ISO performance. Its clarity in the mosaic tiles is also just a shade better in some areas from the E-M5 II. |
|
The conclusion from our lab testing is that the Olympus E-M5 II's new high resolution shot mode is truly ground-breaking for applications involving shooting non-moving imagery from a tripod. Landscape photographers, architectural photographers and studio product photographers can rejoice! It's flat-out amazing to see this kind of performance from such a compact, affordable camera!
Exploring the E-M5 Mark II's High-Res Shot Mode RAW files
by William Brawley and Dave Etchells
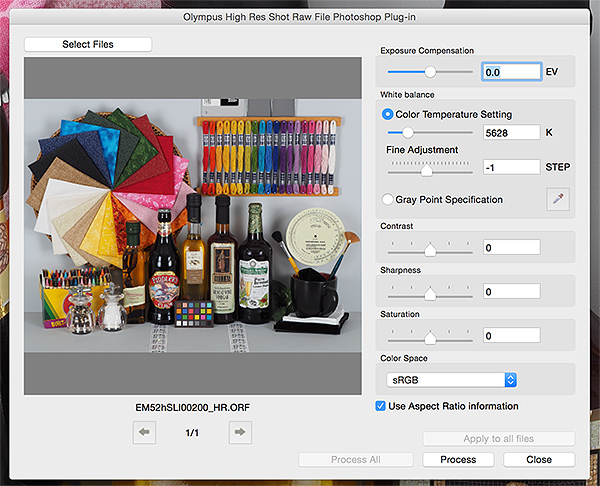
The High-Res Shot mode on the new Olympus E-M5 II offers not only 40-megapixel JPEGs (39.9MP, 7296 x 5472 pixels), but also the option of very high-resolution 64-megapixel RAW files (63.7MP or 9216 x 6912 pixels). Olympus provides a free High-Res Shot plug-in for 64-bit Adobe Photoshop CS5 and newer (note that we were originally told CS4 and newer), to allow for editing to your heart's content. Below are some conversions we've made with it as well as some initial impressions using it.
In use, for all intents and purposes, the Olympus PS plug-in takes the place of the Adobe Camera Raw intermediary step that you'd see when opening a RAW file in Photoshop, and provides a similar, though vastly limited set of adjustments options such as exposure compensation, white balance, contrast, sharpness, and saturation. The plug-in also allows for both single image and batch file processing. Once processed, the RAW file can be opened and further adjusted in Photoshop just like any other converted RAW image file.
 |
|
A screen shot of the new Olympus High-Res Shot Raw File Plug-in for Photoshop.
|
Now for our side-by-side comparisons. While our previous comparisons of JPEGs compared to the Nikon D810, its 36-megapixel resolution images are noticeably different to the E-M5 II's 64-megapixel high-res RAW images. Here, we instead opted to compare to the Pentax 645Z, which produces 51.1-megapixel images, the highest native-resolution camera we've tested thus far. In the 100% crops below, one set of crops are displayed with minimum sharpening and no additional post-processing performed to give you an idea of the relative sharpness between the two cameras, while the second pair shows images with some unsharp mask sharpening applied in Photoshop.
(Note: Click the Olympus image crops below to download the full-size converted JPEG files. We're also providing links to their respective RAW files. As of this posting, the Olympus High Res Shot Raw Photoshop Plug-in is available to download, but one must input a valid serial number for an E-M5 II in order to initiate the download. The Pentax 645Z crops below link to their corresponding RAW files.)
 |
E-M5 II High-Res RAW, Base ISO -- Plug-in Sharpness: -2 (minimum), no unsharp mask Click image above for full-sized JPEG shown or here for RAW file. |
 |
Pentax 645Z RAW, Base ISO -- Adobe Camera Raw with no NR or sharpening |
 |
E-M5 II High-Res RAW, Base ISO -- Plug-in Sharpness 0 (default), USM: 250%, radius 0.3 pixels Click here to download the RAW file. |
 |
Pentax 645Z RAW, Base ISO -- ACR with no NR or sharpening, USM: 250%, radius 0.3 |
|
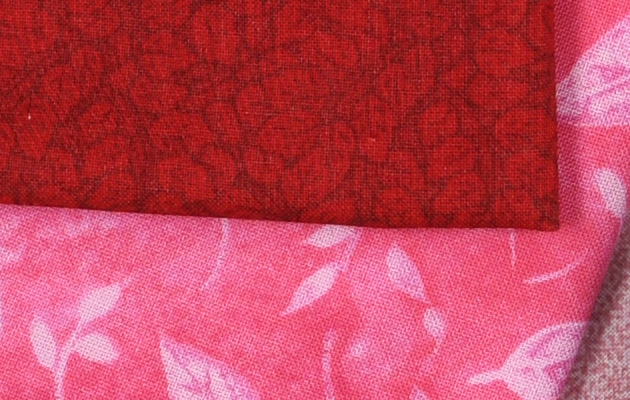
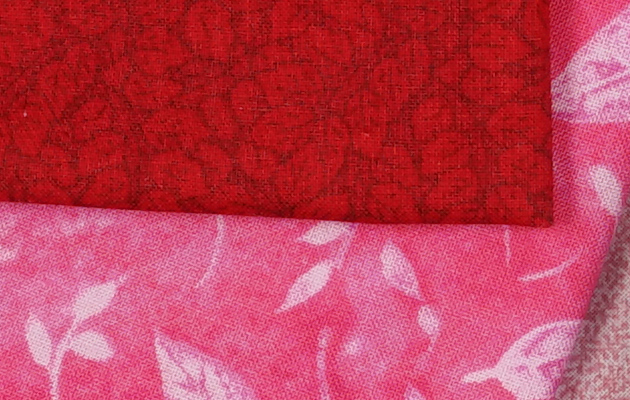
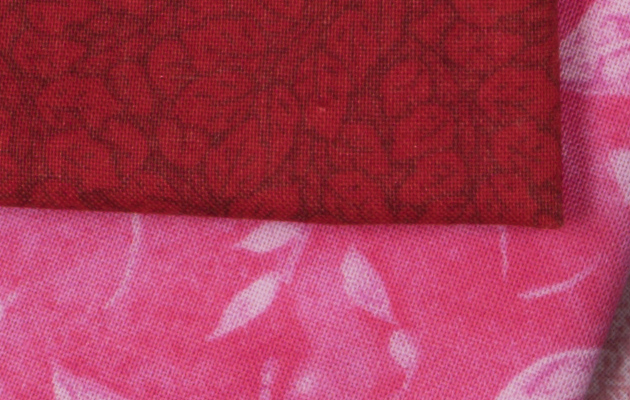
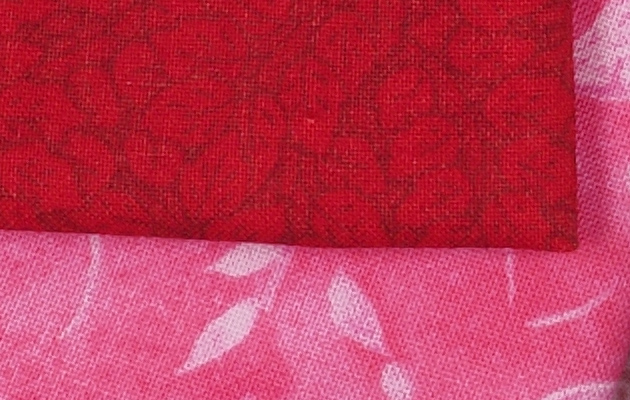
With sharpening turned down to a minimum in the plug-in (though it still applies some sharpening), the E-M5 II's 64-megapixel image is noticeably softer than the 645Z's image with no sharpening applied. Both were shot with sharp prime lenses at f/8, and while f/8 may not be the optimal aperture for the Micro Four Thirds E-M5 II, it produced the sharpest JPEG images from the camera and plug-in in an aperture series test we performed. Also note that both cameras do not have AA filters. However, with default sharpening applied in the plug-in, as well as an equal amount of Unsharp Mask sharpening applied in Photoshop, the E-M5 II's 64-megapixel image sharpens up nicely, and starts to resemble the 645Z's 51-megapixel image in the red fabric. It's still not quite as detailed as the medium format camera, but it's close which is amazing for such a small and relatively inexpensive camera! |
 |
E-M5 II High-Res RAW, Base ISO -- Plug-in Sharpness: -2 (minimum), no unsharp mask Click here to download the RAW file. |
 |
Pentax 645Z RAW, Base ISO -- ACR with no NR or sharpening |
 |
E-M5 II High-Res RAW, Base ISO -- Plug-in Sharpness: 0, USM: 250%, radius 0.3 Click here to download the RAW file. |
 |
Pentax 645Z RAW, Base ISO --ACR with no NR or sharpening, USM: 250%, radius 0.3 |
|
The E-M5 II image with lowest sharpening is again quite soft, but so is the 645Z's. (In this case, the lens used on the 645Z is likely not as sharp out near the edges of the image where these crops are taken.). However, both cameras easily resolve most if not all the detail offered in these crops (though the 645Z shows a bit of aliasing).
|
 |
 |
E-M5 II High-Res Shot RAW, Base ISO Plug-in Sharpness: -2 (minimum), no unsharp mask Click here to download the RAW file. |
Pentax 645Z RAW, Base ISO ACR with no NR or sharpening |
 |
 |
E-M5 II High-Res Shot RAW, Base ISO Sharpness: 0, USM: 250%, radius 0.3 Click here to download the RAW file. |
Pentax 645Z RAW, Base ISO No ACR sharpening, USM: 250%, radius 0.3 |
|
Again, the 51-megapixel 645Z out-resolves the E-M5 II's High-Res RAW conversion, but there's no denying the amount of detail from both cameras is incredible.
|
|
 |
 |
E-M5 II High-Res Shot RAW, Base ISO Plug-in Sharpness: -2 (minimum), no unsharp mask Click here to download the RAW file. |
Pentax 645Z RAW, Base ISO ACR with no NR or sharpening |
 |
 |
E-M5 II High-Res Shot RAW, Base ISO Sharpness: 0, USM: 250%, radius 0.3 Click here to download the RAW file. |
Pentax 645Z RAW, Base ISO No ACR sharpening, USM: 250%, radius 0.3 |
|
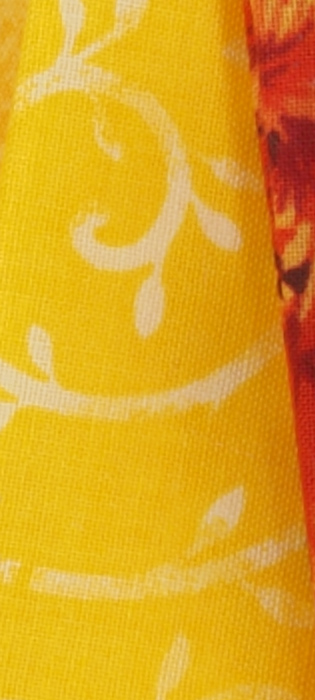
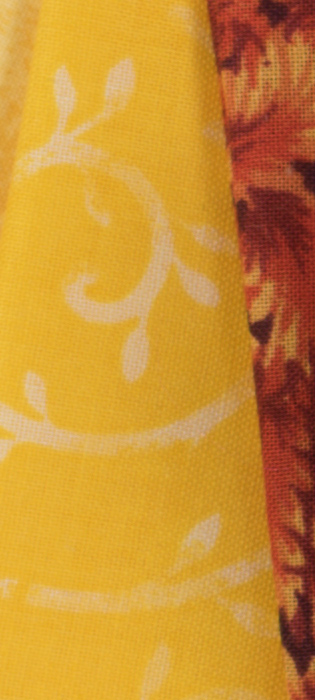
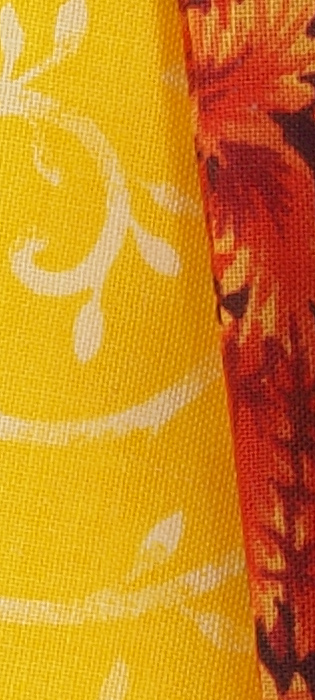
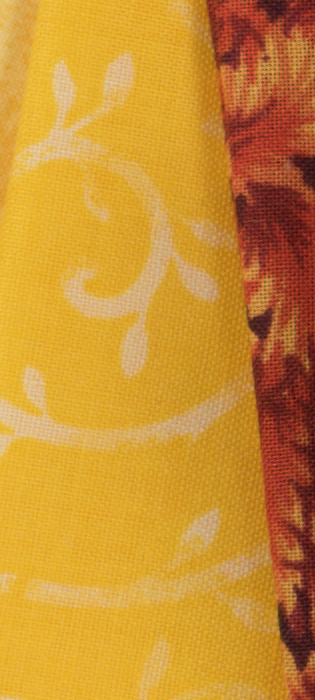
As we found in the in-camera JPEG image comparison with the Nikon D810, the Olympus E-M5 II's RAW High-Res Shot mode does exceptionally well at capturing very fine, lower contrast detail such as in this yellow fabric swatch at base ISO. |
|
 |
 |
E-M5 II High-Res Shot RAW, Base ISO Plug-in Sharpness: -2 (minimum), no unsharp mask Click here to download the RAW file. |
Pentax 645Z RAW, Base ISO ACR with no NR or sharpening |
 |
 |
E-M5 II High-Res Shot RAW, Base ISO Sharpness: 0, USM: 250%, radius 0.3 Click here to download the RAW file. |
Pentax 645Z RAW, Base ISO No ACR sharpening, USM: 250%, radius 0.3 |
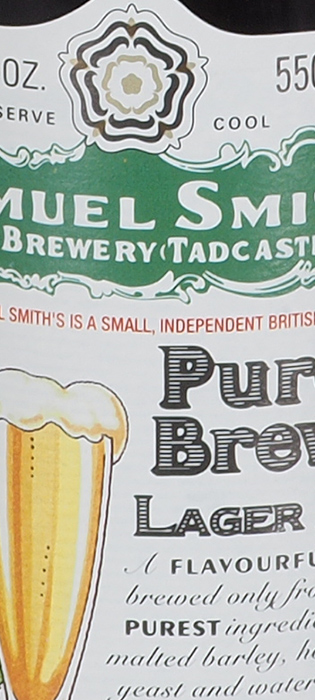
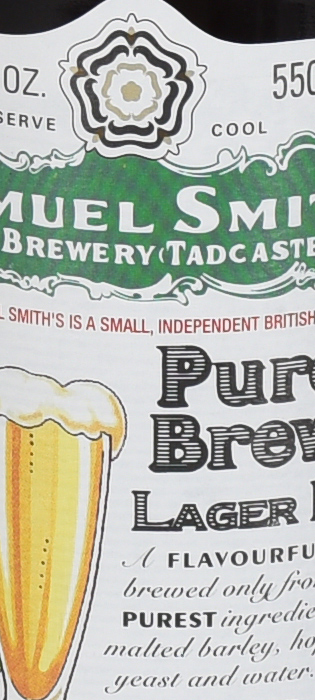
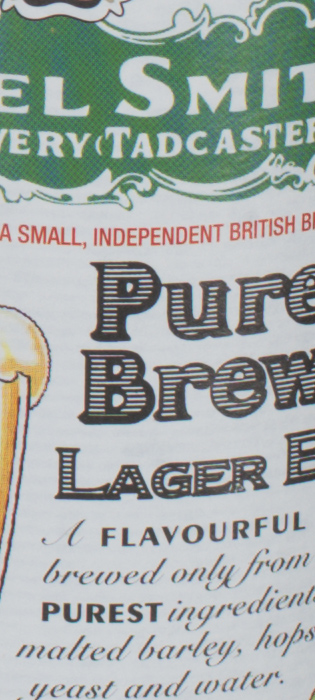
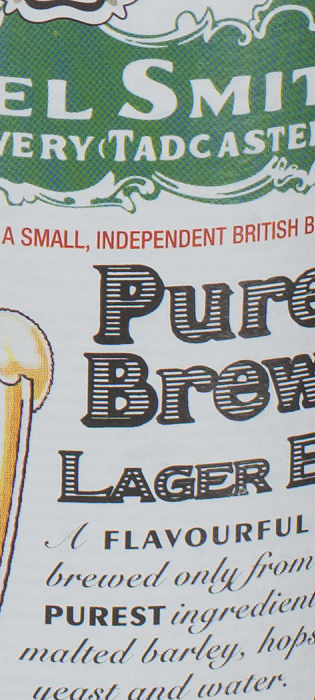
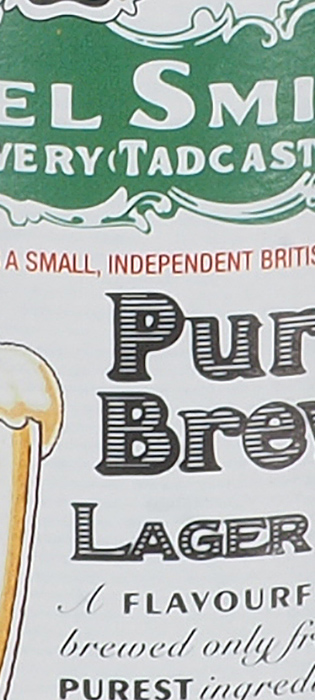
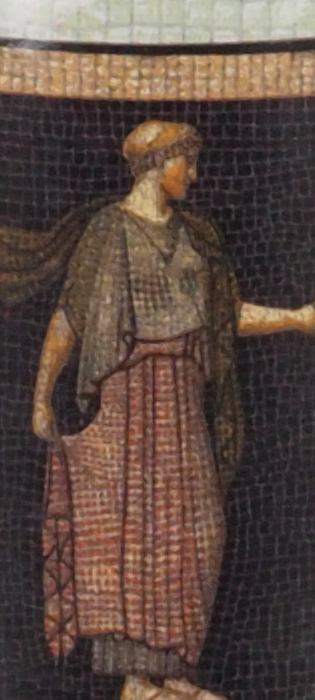
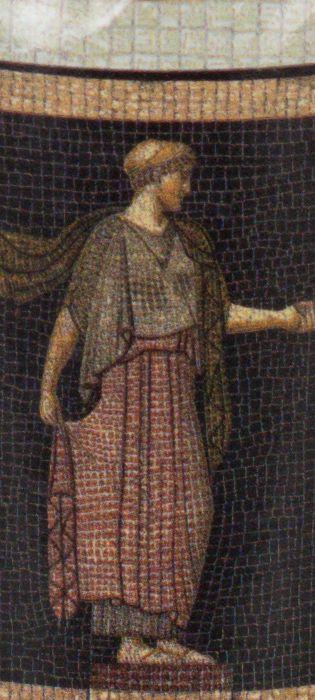
These crops are very interesting. Here, we can see the Pentax is able to at least begin to resolve the halftone dots in the green Samuel Smith logo (along with producing some moiré), while the E-M5 II can't begin to resolve them at all, producing instead what looks to be an almost solid color. (The logo's background pattern consists of very small black dots printed on cyan with yellow dots used to produce green where they overlap the cyan.) No aperture we tried (from f/2.8 to f/8) was able to begin resolving any of dots with the E-M5 II, so diffraction limiting is not to blame. That raises the question of whether the 64-megapixel RAW files really offers any additional usable detail over the 40-megapixel JPEGs. See the next set of crops for a partial answer to that. |
|
|
 |
E-M5 II High-Res Shot RAW, Base ISO Sharpness: 0, USM: 250%, radius 0.3 Click here to download the RAW file. |
E-M5 II High-Res Shot JPEG, Base ISO Sharpness: USM: 250%, radius 0.3 Click for full-res JPEG image. |
Here's what happened when we upsampled the camera's 40-megapixel JPEG file (right) to match the 64-megapixel size of the RAW file (left). We used Photoshop's "Preserve Details (enlargement)" interpolation, and added the same 250%, 0.3 pixel radius USM afterwards. The result has somewhat more prominent sharpening halos, but to our eyes there in fact doesn't seem to be any more detail to speak of. Perhaps one could get better results by working from a minimum-sharpening JPEG and then using sequential sharpening steps afterward, but honestly, we don't have time to try every combination and permutation of upsampling and sharpening; we have a backlog of other testing and review work calling us! We do encourage readers to experiment on their own, though, since all of the files you'd need to work with are available either via the links above and/or on the E-M5 II's thumbnails page. (On the thumbnails page, the 5 digits following "SLI" are the ISO level. Files ending in just _HR.JPG are the from-camera 40 MP JPEG images. Files with "rawPlugin" in their names are 64 MP JPEGs converted from the RAW files with Olympus' special Photoshop plug-in. Filenames with strings in them like Sharp-2, Sharp0, or Sharp2 refer to the sharpening settings in the plug-in, ranging from -2 to +2, with 0 being the default. Images we've applied unsharp masking to will have USM in the file string, with the decimal number being the radius in pixels, and the large integer number being the percentage. Overall, it seems likely that the reason the E-M5 II makes 40 MP JPEG images in its high-res mode is because Olympus determined that that size captured all the useful detail the camera was recording. The 64 MP RAW files size seems consistent with the idea of most faithfully recording information coming off the sensor in its least-perturbed state. (It's four frames of 16-MP information; however they're doing the interpolation and data-combining from the 8 frames captured.) Whatever the case, it's clear that the Olympus OM-D E-M5 II is capable of recording an amazing amount of detail, while simultaneously eliminating color moiré artifacts. That could make it a really excellent camera at a rock-bottom price for commercial product photography. We encourage our readers to have at it with the files we've provided, and share crops of your results in the comments below, if you think you've hit on a processing combination that extracts more information. |
|
 |
E-M5 II High-Res RAW, Base ISO -- Plug-in Sharpness: -2 (minimum), no unsharp mask Click here to download the RAW file. |
 |
Pentax 645Z RAW, Base ISO -- ACR with no NR or sharpening |
 |
E-M5 II High-Res RAW, Base ISO -- Plug-in Sharpness: 0, USM: 250%, radius 0.3
Click here to download the RAW file. |
 |
Pentax 645Z RAW, Base ISO --ACR with no NR or sharpening USM: 250%, radius 0.3 |
|
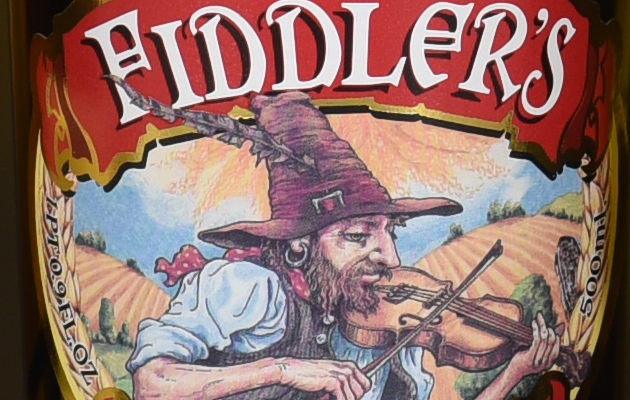
Again, the 645z is on the edge of resolving the halftone dots in the bottle labels, while the E-M5 II's 64MP RAW mode does not. But, the patterns you see in the 645z's versions are actually moiré patterns, not the halftone dots themselves. The E-M5 II's high-resolution images appear to be completely free of moiré.
|
In High-Res Shot mode, the E-M5 II limits your ISO choices to a maximum of 1600. Let's take a look at that again, this time with RAW files.
 |
 |
|
E-M5 II High-Res Shot RAW, ISO 1600
Plug-in Sharpness: -2 (minimum), no unsharp mask Click here to download the RAW file. |
Pentax 645Z RAW, ISO 1600
ACR with no NR or sharpening |
 |
 |
|
E-M5 II High-Res Shot RAW, ISO 1600
Plug-in Sharpness: -2 (minimum), no unsharp mask Click here to download the RAW file. |
Pentax 645Z RAW, ISO 1600
ACR with no NR or sharpening |
|
Here, again we see the much softer image from the E-M5 II, and we can also see the Olympus plug-in version is almost devoid of chroma noise. However it's pretty obvious the plug-in is applying noise reduction, further reducing sharpness and detail compared to base ISO. To confirm this, we converted the high-res RAW files with dcraw below, which turns out to already support deconvolution processing (as do other free, third-party raw converters based on dcraw, such as UFRaw and RawTherapee). |
|
 |
 |
|
E-M5 II High-Res Shot RAW, ISO 1600
Dcraw with no NR or sharpening |
Pentax 645Z RAW, ISO 1600
Dcraw with no NR or sharpening |
 |
 |
|
E-M5 II High-Res Shot RAW, ISO 1600
Dcraw with no NR or sharpening |
Pentax 645Z RAW, ISO 1600
Dcraw with no NR or sharpening |
|
Above, we've converted both ISO 1600 RAW files using dcraw to level the playing field. As suspected, dcraw conversions reveal chroma noise is actually a bit higher than the Pentax 645Z, confirming that the plug-in applies noise reduction, though it's still amazing that a 4/3"-type sensor can produce such low noise levels compared to a medium format camera! Unfortunately, the plug-in does not provide any control over noise reduction, at least not the pre-release version that we tested. Below are links to dcraw conversions at all ISOs supported by High-Res mode: • ISO 100 • ISO 200 • ISO 400 • ISO 800 • ISO 1600• |
|
The conclusion from our testing with High-Res RAW files is that although the Olympus E-M5 II's new High Resolution Shot mode doesn't produce files with as much detail as some (larger and much more expensive) cameras with lower native resolutions like the Pentax 645Z, it is still truly ground-breaking for applications involving shooting non-moving imagery from a tripod. Landscape photographers, architectural photographers and studio product photographers can rejoice! It's flat-out amazing to see this kind of performance from such a compact, affordable camera. Stay tuned, as we'll take it out into the real world and run it through its paces there as well.
How'd they do that? A little technical aside from Dave Etchells:
Right off the bat, I'm sure everyone is going to be asking how you can in any meaningful sense get a 40-megapixel image out of a 16-megapixel sensor. After all, the image sensor is looking at the world as a grid of 16 million little windows, and any subject detail within each of those windows is averaged together. The image comparisons above are pretty telling, but how can they tease out that kind of detail, if the sensor only has 16 megapixels to begin with? I mean, the subject detail within a given pixel could be half white and half black, or the whole area a medium gray, and the sensor would have no way of knowing the difference.
Well, the camera has no way of knowing what's going on at a sub-pixel level, unless it moves the sensor around a bit and watches what happens. Imagine the case just mentioned, where we have a sharp black/white boundary in the subject (let's make it a vertical edge, for the sake of illustration) which happens to be exactly straddled by a sensor pixel. As noted, that pixel is going to see a middle gray. But what happens if we shifted the sensor a half-pixel left and right? Shift it one way, and the pixel will be all the way on the black side, so it will "see" black. Shift it a half-pixel the other way, and it'll be all the way on the white side, so it will "see" white. Knowing that the three images were grabbed with a half-pixel shift in between, the camera can infer that there must have been an abrupt black/white transition in the subject, centered on the location of the original pixel.
The case of a simple black/white transition is easy to figure out, but what happens when there's all sorts of tonal and color detail changing across the image? How can you sort all that out? It turns out there's some fancy math to do just this; the technique is called deconvolution. It's been in common use for several years now, originally developed for use in reflection seismology, but used extensively in many forms of imaging. NASA in particular has used it to sharpen and correct images from planetary spacecraft and even the Hubble Space Telescope (before it got its corrective "goggles" installed). It's also been used in microscope imaging, and in fact by Olympus themselves. Here's an example from Olympus' own microscopy site, showing the original image on the left, the processed one on the right. It's pretty amazing how much fine detail can be extracted from a fuzzy image!
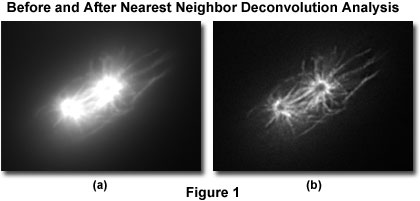 |
Here's an example of what deconvolution can do with a microscope image, courtesy Olympus themselves. The image on the left was the original, the one on the right the result of fairly straightforward deconvolution processing. |
So that explains what's likely going on inside the Olympus OM-D E-M5 II. As someone who was involved with image processing as far back as 1977 or so, it's amazing that this capability can now be built into a compact, portable camera. (The E-M5 II almost certainly has way more processing power than NASA "supercomputers" from the '70s!)
 Fujifilm GFX 50S Review
 Fujifilm X-T3 Review
 Olympus E-M5 III Review

Follow Imaging Resource