Video: Fantastic tips for photographing waterfalls
posted Friday, August 12, 2022 at 4:00 PM EDT
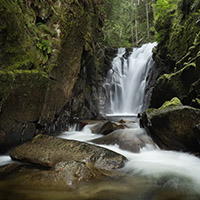
We join photographer Adam Gibbs at Headquarter Creek on Vancouver Island to photograph a waterfall tucked away in a small canyon. Like many of Gibbs's videos, it's a great behind-the-scenes look at a talented photographer at work. However, this time, Gibbs includes a post-processing tutorial, showing how to blend images with different shutter speeds to achieve amazing results in Adobe Photoshop.
Let's see how Gibbs fared out in the field. Equipped with waterproof pants, Gibbs took his Fuji GFX 100S and GF 32-64mm lens. As for filters, Gibbs shoots with Kase filters.
When photographing a waterfall, you often want to capture the entire waterfall. You always want to provide visual context for the waterfall, so you should incorporate useful visual elements to help create a compelling image, like rocks in the foreground or interesting textures and colors to the left or right of the waterfall.
Before capturing his images, Gibbs considers a few things. How you want to render the waterfall is critical. Do you want it to have a silky-smooth look (slower shutter speed) or textured action (faster shutter speed)? You must decide what type of shot you want first. If you can't decide, there's nothing wrong with taking test shots at different shutter speeds. Shutter speed also matters if there's foliage in your shot that's moving in the wind. If you want it sharp, you must use a faster shutter speed. Another consideration is the depth of field. You must stop down your lens if you want everything in sharp focus in a single shot. The wider the lens, the less you must stop down. If you're using a longer focal length, you may need to stop down to F16 or even F22. It depends on the lens and the situation.
Sometimes, the type of photo you want has conflicting considerations. If you want a fast shutter speed but a lot of depth of field, you may not be able to do both in a single frame; instead, needing to use focus stacking. Likewise, if you want a slow shutter speed but a shallow depth of field, you may need to use a neutral density filter to achieve a slow enough shutter speed.
In Gibbs's case, he typically goes for a shutter speed like 1/5s. That's relatively quick. He also wants everything in sharp focus, so he'll probably stop down to around F16. The plan is to capture a series of images at different shutter speeds and then paint in certain parts of the image later in Photoshop. It's very important to think about these possibilities before shooting and not move your tripod until you're certain you've captured everything you might need. It may seem like a lot to accomplish but taking it one step at a time keeps it manageable.
Now it's time to join Gibbs in his office for photo editing. When combining images, you generally try to match the exposures as closely as possible before blending. Once your images are ready in Lightroom, select the images you wish to combine and then right-click > open as layers in Photoshop. With the images now opened as layers in Photoshop, go to Edit > Auto-Align Layers. This is to ensure that everything lines up. It's easy for a tripod to move slightly while shooting. The framing can also change if you adjust focus distance.
To learn how Gibbs uses layer masks to combine different images into a single composite, watch the full video above. For more great videos like this, visit Gibbs's YouTube channel. To see more of his photography, visit his website, follow him on Instagram, and check out his Vero.
(Via Adam Gibbs)