=================================================================
To subscribe, unsubscribe or change your email address, visit:
http://www.imaging-resource.com/IRNEWS/index-subs.html
Support the Newsletter!
- Find the best price for anything at http://ir.pricegrabber.com
- Shop Amazon, Adorama at http://www.imaging-resource.com/buynow.htm
=====================================================
THE IMAGING RESOURCE DIGITAL PHOTOGRAPHY NEWSLETTER
=====================================================
Volume 15, Number 16 - 26 July 2013
----------------------------------------------------------------------
Copyright 2013, The Imaging Resource. All rights reserved.
----------------------------------------------------------------------
Welcome to the 364th edition of The Imaging Resource Newsletter. In this issue, we have excerpts from our reviews on two cameras that are pushing the boundaries of compactness -- the Canon EOS Rebel SL1 DSLR and the Ricoh GR. We also introduce a new contributor to IR, nature photographer Paul Harcourt Davies who shares his approach and tips for wide-angle macro photography. Finally, we feature a selection of Quick Hits, Dave answers some reader mail, and we single out several of the best stories published on our site over the past two weeks. Happy reading!
TOPICS
----------
Camera Review: Canon EOS Rebel SL1 Shooter's Report (Excerpt)
Feature: Wide-Angle Macro Photography - Capturing Close-Ups with Impact
Camera Review: Ricoh GR Shooter's Report (Excerpt)
Quick Hits
We've Got Mail
New on the Site
Next Issue
Signoff
GET SOCIAL WITH IR
---------------------------
If you want to stay up-to-date with the latest camera and photography news, get notified when IR posts its latest camera or lens review, and much more, please get social with us on your favorite networking sites by:
By doing so, you'll also be supporting our efforts to deliver the best camera and photography content on the planet. (Google in particular apparently pays lots of attention to Google+ in deciding site/page relevance for its search results, so "circling" us there and +1-ing our site and pages would be an especially big help.) Thanks! We appreciate it!
SPONSORS
--------------
This issue is sponsored in part by the following companies. Please show your appreciation by visiting the links below. (Visiting our sponsor's links really helps support this newsletter, thank you for your attention!) And now a word from our sponsors:

* Olympus *
It resists sand, rain, and dust,
Because Mother Nature doesn't always like
to have her picture taken.
The OM-D E-M5 system is rugged enough to take anywhere.
Olympus - Capture your stories
Learn more about the Olympus OM-D E-M5 at: http://www.imaging-resource.com/cgi-bin/nl/pl.cgi?oly13
* Sigma *
Sigma's new Global Vision lenses feature the latest technology
and combine optical performance resulting in a tour de force
that meets all of your photographic needs.
Our new lenses include the new
35mm F1.5 DG HSM 'Art',
17-70mm F2.8-4 DC Macro OS HSM 'Contemporary' and
120-300mm F2.8 DG OS HSM 'Sport'.
Our cameras, featuring the Foveon X3 sensor, include the SD1 and the
DP Merrill, produce the highest quality digital images.
Learn more about Sigma offerings at http://www.imaging-resource.com/cgi-bin/nl/pl.cgi?sg13
-----------------------------------------------------------------------------------------------------
Are you in the digital photo business? This newsletter is read by more than 47,000 direct subscribers (plus additional pass-along readers), all with a passion for digital photography. For information on how you can reach them, contact us at editor@imaging-resource.com.
-----------------------------------------------------------------------------------------------------
REVIEW: Canon EOS Rebel SL1 Shooter's Report (Excerpt)
-----------
(Check out our in-depth Canon SL1 review, complete with gallery photos, comparison crops, lab test results and our final conclusion: http://www.imaging-resource.com/PRODS/canon-sl1/canon-sl1A.HTM)
by Eamon Hickey
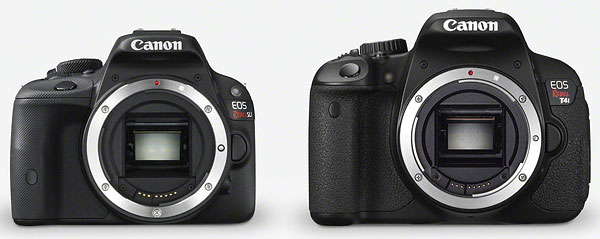
The Canon SL1 consumer DSLR was designed as an entirely new solution for photographers looking for a smaller, more compact interchangeable lens camera system, and to capitalize on the growing popularity of mirrorless compact system cameras. As someone who has shot with traditional (film and digital!) SLRs for more than 30 years, but who is now a big fan of CSCs, I was very interested in seeing just how good an answer the Rebel SL1 turns out to be.
Size and handling. The first thing I noticed after unpacking the Canon Rebel SL1 was its weight -- it really is surprisingly featherweight for a DSLR. It's also, of course, uniquely compact for a DSLR, but that difference didn't seem as striking to me. I'm sure that's partly because my test camera came with the EF-S 18-55mm f/3.5-5.6 IS STM kit lens, which is fairly light but not particularly small in stature. But it's also because the SL1 is noticeably thicker than the CSC cameras I've used; the camera has to make room for its mirror.
After charging the battery and fitting a strap to the camera, I slung the Canon SL1 over my shoulder and headed out for a two-hour walk around New York City's Greenwich Village on a beautiful sunny day. One of the Village's landmarks, Washington Square Park, was abuzz with activity, and I spent more than an hour shooting street performers and other people enjoying the park. These included a small troupe of Irish step dancers, accompanied -- in the park, remember -- by a baby grand piano on wheels, plus an aspiring guitar god, a unicyclist and more.
 |
The Canon SL1 simply captures solid pictures on sunny days and in low light. |
Despite its small size, the Rebel SL1 felt immediately familiar and comfortable in my hands, allowing quick, stable and secure handling and shooting. Canon has managed to shrink the SL1's dimensions without compromising the camera's basic SLR-style handling and ergonomics in any significant way -- at least for me. The one slight exception is that I am naturally a left-eyed shooter, which pushed my face well into the control area on the right side of the Rebel SL1's back. I thumbed myself in the nose a few times, trying to access the exposure compensation button, and I've never had quite that much trouble on any other DSLR. But I don't really count this against the camera; I've known for a long time that left-eyed shooting was a personal vice I should be trying to conquer.
 |
Skin tones and auto exposure are handled reasonably well by the Canon SL1. |
On subsequent days, I took the Canon SL1 on similar walks in Central Park and along the Hudson River, and I carried it with me on several nights out. On all those outings, the camera's weight remained hardly noticeable. It definitely negates the portability advantage that smaller CSC cameras have over standard DSLRs. But in terms of size, the SL1 still doesn't match up with most mirrorless models, especially with the sizable kit lens attached. You're just not going to slip the Canon SL1 into a coat pocket or a slim bag along with your iPad Mini and a bottle of water.
Performance. In just my first few shots in Washington Square Park, I confirmed what I had expected: the Canon Rebel SL1 is a quick and responsive camera. All the buttons and dials responded instantly when I changed settings or accessed features. I never found myself waiting for the Rebel SL1 to respond to my inputs.
While shooting the dancers, I was trying to capture moments of peak action, and this is the kind of situation where the feel, responsiveness and especially the delay of the shutter release cycle can make a real difference. The Canon Rebel SL1's shutter response turned out to be typical of entry-level SLRs, which means it's fairly quick and perfectly adequate for the vast majority of hobbyist photographers. (Pro DSLRs are definitely faster, as they should be.)
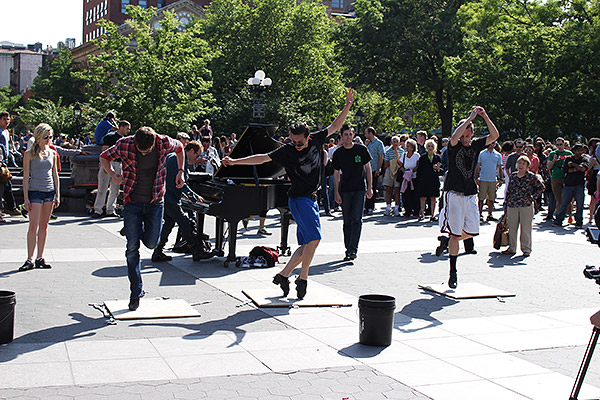 |
The Canon EOS Rebel SL1 allowed me to separate autofocus activation from shutter release to capture peak action with no AF delay. |
On the dancer shots, I also used the Canon SL1 in continuous drive mode, which shoots at about four frames per second. Combined with the reasonably responsive shutter, this allowed me to get several interesting shots of the dancers in action.
Just how fast is the Canon SL1? Find out by clicking here to see our full battery
of rigorous, objective speed and operation tests conducted in the IR Lab.
I did, however, run into one relatively modest performance shortcoming. Irish step dancing goes fast and furious, and I was firing off multiple sequences of continuous bursts to try to capture all the many cool moments happening in front of me. I had the Rebel SL1 set to record simultaneous RAW+JPEG images, and it can only shoot five frames in that mode before the image buffer fills up and the frame rate falls way off. This isn't out-of-the-ordinary for an entry-level DSLR, but it caused me to miss a lot of shots. On later outings, I tested the Rebel SL1 in RAW only (i.e. with no simultaneous JPEG) and got eight frames before the buffer filled. For some sports shots on one of those later outings, I switched to capturing Large JPEGs only and never filled the buffer -- testing this mode, I could get more than 25 images at full frame rate, which is more than six seconds of action, easily good enough for any practical purpose I can think of.
As I walked around Washington Square Park taking grab shots of the action around me, I was impressed with the Rebel SL1's autofocus when used in its normal mode -- using phase-detection AF with the eye-level optical viewfinder and the mirror in its normal down position. It was very fast and decisive on every subject I shot, from the dancers in bright sunlight to backlit people sitting on a park bench.
The optical viewfinder is, of course, the biggest difference between a DSLR and a CSC model, but I don't feel like there's too much to say about the viewfinder in the Canon SL1. It's pretty typical of entry-level DSLR cameras, which means it's decent but noticeably less impressive than the big, bright viewfinders in high-end DSLRs, especially full-frame models.
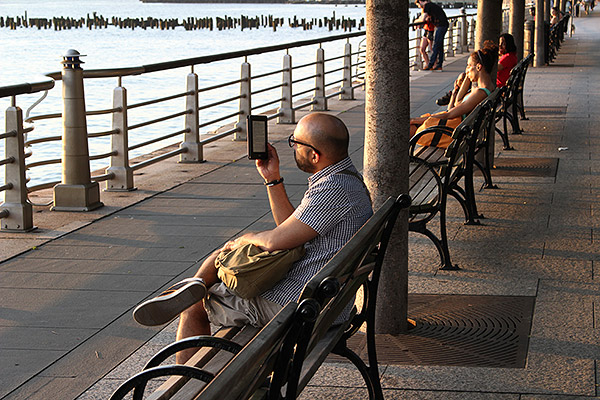
 |
The SL1's images showcase good color and detail, even in a heavily backlit scene at medium ISO taken at Hudson River Park. |
On a different outing to Hudson River Park, I also tried the Canon SL1's Live View mode for taking some pictures of flowers, and folks walking along the river promenade. Using the LCD for viewing, the Live View mode employs a Hybrid CMOS II AF system which is unique to the SL1 so far and combines phase- and contrast-detect autofocus technologies (but, it must be noted, only when focusing in the center of the screen; otherwise it only uses contrast detection AF). I had no trouble viewing and framing with the LCD except in the brightest direct light, probably because the Hybrid CMOS II AF uses a lot more of the Live View screen -- in fact, about 64% of the screen in total -- than models such as the Canon T4i and T5i.
I found the SL1's Hybrid AF to be adequately fast, but not quite up to the standards of the best CSC cameras in my opinion. In my use, it was about half as fast as the Rebel SL1's standard phase-detection mode AF. That said, it was still faster than DSLRs I've tested that utilized solely contrast-detect AF for Live View still picture shooting -- and more importantly, a huge improvement over the T4i which had remarkably slow AF in Live View and video, even though it had an earlier version of the Hybrid CMOS AF technology.
 |
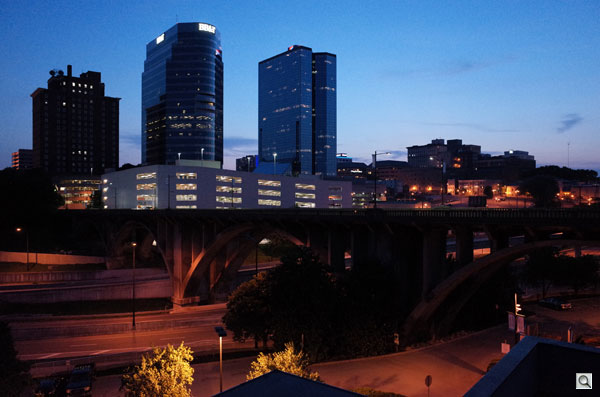
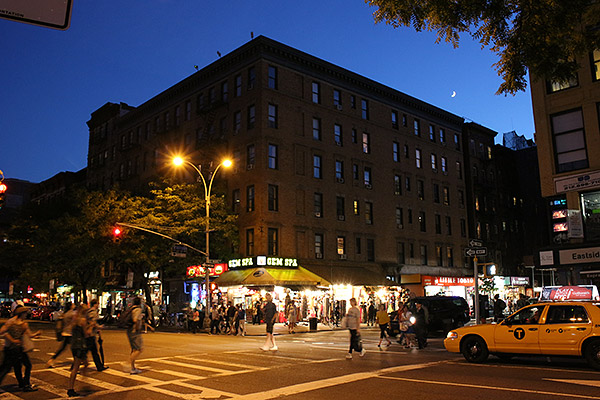
The SL1 performed well in this high ISO test taken at dusk in the East Village. |
When I headed home at the end of my Hudson River Park shoot, it was dusk edging into night, which gave me a chance to try both of the Canon SL1's AF systems in dim light. As I shot pictures of some East Village landmarks like McSorley's Old Ale House, both AF systems were impressively decisive despite the low light levels. Here, the Hybrid CMOS II AF system in Live View mode worked almost as fast as the SL1's phase-detection AF system with the viewfinder. I found that pretty impressive.
To really give any AF system a challenge, you need to shoot sports, so on a subsequent day I took the Canon SL1 to a park near my apartment where I know I can find young -- and sometimes not so young -- men battling it out in pickup basketball games. I shot continuous bursts at 4 fps using AI Servo AF mode with the Rebel SL1's phase-detection AF system, and the camera did a really good job. It was able to easily follow fast-moving action and gave me a high percentage of in-focus shots. This remains one area where DSLR cameras significantly outperform nearly all CSCs. I should mention one caveat: this was not an absolute AF torture test for the Rebel SL1 because the kit lens I was using only opens up to f/5.6 (at 55mm), which provides enough depth-of-field to hide small focusing errors.
Controls. The control systems on DSLR cameras are pretty well worked out by now, and so the buttons and dials on the Canon SL1 were instantly familiar to me, as they would be to anyone with experience taking pictures with DSLRs, especially Canon SLRs.
Before my first shoot with the Rebel SL1, I set up the camera to separate autofocus from the shutter release button. On my trip to Washington Square Park, when capturing images of the dancers, I simply autofocused once on the center dancer, and then I could fire the shutter multiple times with no AF delay, as I tried to capture the peak of the action. It's also always been a snap to switch between manual and automatic focus on Canon DSLRs -- with a switch on the lens -- so the SL1 provided all the focus flexibility I needed.
On my trip to Hudson River Park, I did a lot of switching from one sensitivity to another, as I went from shooting front-lit landscapes and people to backlit flowers -- sometimes to allow narrower apertures, sometimes to allow faster shutter speeds. With its dedicated ISO button, the Canon SL1 made it easy to quickly make these changes.
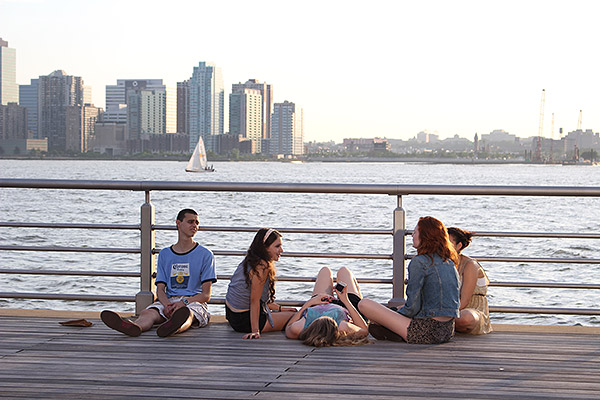 |
The SL1's autoexposure bracketing can help on a tricky backlit scene such as this at Hudson River Park. |
Like nearly all entry-level DSLRs (and CSCs, for that matter) the Canon SL1 has only one main control dial, but within that constraint, its exposure control system is quick to operate. In Hudson River Park, I used it mainly in Aperture Priority exposure mode, and I could quickly set positive or negative exposure compensation from shot to shot. I used this in combination with autoexposure bracketing for many backlit shots, and was able to get good exposures for several tricky images, including a group of teenagers backlit against the Hudson River, and a bed of flowers in dappled sunlight with backlit runners jogging by. As I mentioned earlier, my only small issue was that my nose covered the Rebel SL1's exposure compensation button, and I ended up with a thumb inside a nostril once or twice before I figured it out.
The Rebel SL1 mostly conforms to the Canon family menu style, which isn't necessarily brilliant but is perfectly acceptable. Most functions are quick to understand and access, and the My Menu, which you can customize with your own most-used function settings, is very handy. By my second shoot with the SL1, however, I had largely switched to using the Quick Control system, which lets you access important features and functions using the camera's touch-screen LCD. I was happy to discover that two very useful functions that are sometimes buried in menus are available directly with the Rebel SL1's Quick Control system: autoexposure bracketing and flash exposure compensation. Very nice.
The Canon SL1 includes a variety of scene modes and special effects filters, but I didn't find it particularly intuitive to activate them. That said, I used the HDR Backlight Control mode to shoot an image of a new building down the block from my apartment. The sun was low in the sky in the background, and the Rebel SL1 automatically combined three images into one HDR shot that easily captured more detail than I could get in a single image.
Later that same day, I shot a streetscape using the Handheld Night Scene mode, and the Canon SL1 automatically combined four images into a single, sharp shot with a half moon set against a deep blue nighttime sky over St. Mark's Place in the East Village.
 |
I tested the Handheld Night Scene mode in the East Village and was pretty happy with the results. |
Lens. My test Canon Rebel SL1 came with the EF-S 18-55mm f/3.5-5.6 IS STM kit lens. As we mentioned above, this lens is specifically designed for quiet operation when shooting video, and sure enough, it's essentially soundless. I shot several video clips on busy 2nd Avenue in the East Village and could not hear any lens noise from either focusing or zooming.
Functionally, I was mostly impressed with the EF-S 18-55mm f/3.5-5.6 IS STM lens. It autofocuses not only silently but also very quickly. In five different shooting days with it, I left its Image Stabilization on for nearly every shot, and it let me make sharp handheld shots down to 1/10 second (zoomed to 55mm).
In manual focus, however, the lens leaves a lot to be desired; the manual focus ring is significantly underdamped and the focus throw is very short. I shot a few test images using manual focus, but it just was not very satisfying. The zoom action on the 18-55mm f/3.5-5.6 IS STM lens is also mediocre -- overall, it just feels plasticky, but this is almost certainly the price we have to pay for the very low weight of the lens.
Overall, however, I found the 18-55mm to be a pretty decent kit lens, better than most you'll find that come packaged with entry-level DSLRs.
How good is the Canon SL1's EF-S 18-55mm f/3.5-5.6 IS STM kit lens?
Find out by clicking here to see our optical test results.
Image quality. We evaluate the image quality of the Canon Rebel SL1 in detail, using standard test images side-by-side with some top competitors, later in another section of this review, but I'll add some subjective impressions from my test shots.
I used careful technique -- a high shutter speed, medium f-stop, careful focusing and stabilizing -- to shoot images designed to show me what kind of detail the Canon Rebel SL1's 18-megapixel sensor can record. The SL1 doesn't disappoint. Even though it may not have as much resolution as some competing entry-level DSLRs such as the Nikon D3200, there's more than enough detail to make very large prints. (A fact which we confirmed in our Print Quality Analysis further down in the review.)
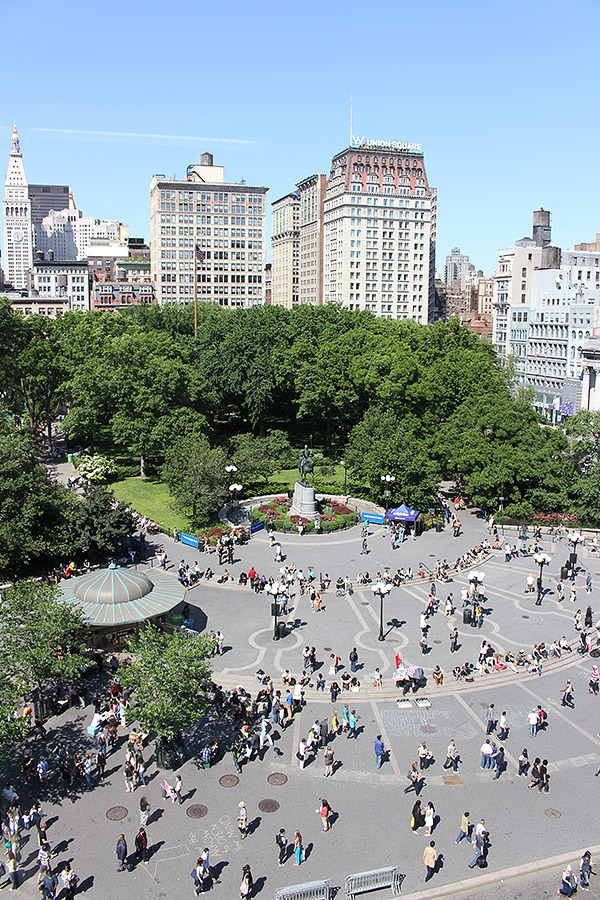
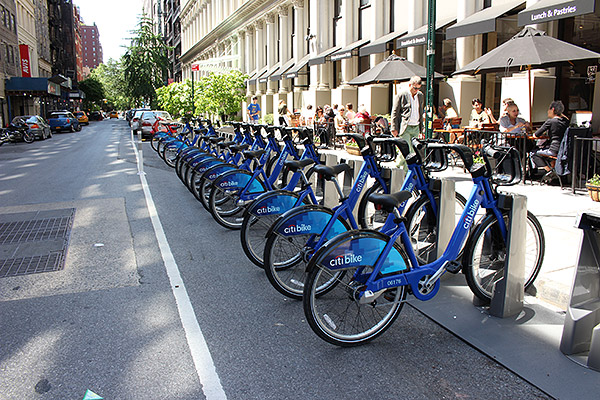 |
The Canon SL1 performed well in high contrast scenes such as this street scene that demonstrates the camera's dynamic range. |
Also, I shot a lot of other contrasty subjects and many backlit scenes into the sun setting over the Hudson River, and the Canon SL1 was able to capture a decent amount of dynamic range. All of my test images were shot at the camera's default JPEG settings, which produced good skin tones but colors that are, to my eye, not particularly inspiring, although reasonably neutral and accurate. I also shot a large number of high ISO images (up to ISO 6400), and these were quite good, with a nice balance of noise reduction and detail at the default JPEG settings.
Click here to view the IR Lab's in-depth Canon SL1 image quality test results.
Movies. To test the Canon Rebel SL1's movie mode, I shot a series of short clips one evening on 2nd Avenue, one of the most active streets in the East Village. I found the camera's movie mode controls a bit unintuitive. However, once I figured them out, they were fairly flexible, allowing focusing while recording and also providing reasonably advanced exposure control options. The Rebel SL1 provides a good range of video resolution and frame rate options (up to 1,920 x 1,080 Full HD at 30 fps, or 1,280 x 720 HD at 60 fps).
The resulting clips were very stable, courtesy of the image stabilization of the 18-55mm lens, and also very sharp. As noted above, I couldn't detect any noise from the lens in the recorded clips, as the EF-S 18-55mm IS STM is both smooth and silent. Most importantly, unlike what we found with the Rebel T4i, the AF speed didn't exhibit any noticeable lag or otherwise get in the way.
All in all, the SL1 proved to be quite good at recording videos -- better than most entry-level DSLRs that I've used.
So what's our final verdict on the Canon SL1? See our full Canon SL1 review online, where you'll find detailed image quality comparisons against other cameras, full performance test results, more gallery images, a list of pros and cons, and our ultimate conclusion: http://www.imaging-resource.com/PRODS/canon-sl1/canon-sl1A.HTM
-----------------------------------------------------------------------------------------------------
FEATURE: Wide-Angle Macro Photography - Capturing Close-ups with Impact (Part 1)
-------------
by Paul Harcourt Davies
Macro shots have tremendous photographic appeal as they get us up-close-and-personal with a wide variety of subjects, be they insects or flowers or intricate details of much larger objects. But what if there was a way of using non-macro, non-telephoto lenses to accomplish this task? What if you could capture up-close images with great impact that not only show your primary subject to advantage -- but also give background context to it, telling the full story?
Well, this approach is something I specialize in. Some people call it wide-angle macro. And I want to show you how wide-angle lenses -- both primes and zooms -- can help you explore vistas you may not have realized these lenses can capture.
The time-tested advice for achieving better wide-angle shots has always been to include "foreground interest" such as rocks, trees or flowers to lead the eye of the viewer into the frame. For even greater impact, you can set the camera in a low position for a change in perspective that emphasizes the subject dramatically.
��� ��� ��� ��� ��
Personally, I like to turn that advice on its head a bit -- contrariness is a way of life for me. I believe the trick for successful wide-angle close-ups is to let that foreground interest dominate and move in as close as your lens will allow.�The background becomes secondary but tells you a lot about where and how a subject lives and your picture suddenly becomes much more informative.
The foreground interest is the point of the picture rather than the landscape, not vice versa with these pink primulas in the Dolomites (northern Italy). Photo by Paul Harcourt Davies
How wide angle adds close-up impact
Wide-angle lenses can be particularly effectively to create close-ups with impact. After all, the wider the angle of view and shorter the focal length, the greater the distortion of perspective you can create to exaggerate the parts of a subject closest to the lens.
��� ��� ��� ��� ��
This close and wide approach is great for many subjects -- take flowers, for example.
Flowers are the part of a plant we usually notice first. They're colorful and stand out (to our eyes, at least) against dark leaves, serving as beacons that attract bees, butterflies and other bugs for pollination purposes. The perspective distortion that comes with using ultra-wide lenses up close exaggerates flowers set in the foreground as we move from the three dimensions of reality to the two dimensions of an image. I believe it creates heightened visual interest because it mirrors the way we registered those flowers in the first place: We notice the flowers first and then take in where they are situated.
The perspective distortion of ultra-wide lenses brings immediate attention to a subject at close quarters, giving increased impact to your shots. These are sand lilies on the island of Sardinia. Photo by Paul Harcourt Davies
So how do you go about shooting wide-angle macro? It all begins with using the right lenses.
Lenses for wide-angle macro
You don't need to use any special wide-angle macro lens for this type of photography.�In fact, any wide-angle zoom or prime will work to a greater or lesser degree -- even those that come equipped on compact digital cameras. Some lenses, of course, will function better than others simply because they're better, sharper lenses.
What lenses and focal lengths work best? Well, given the wide choice of fixed-focal-length lenses, zooms and rectangular fisheyes, the answer may well lie with the wide-angle primes you may have consigned to the bottom of your camera bag.
Yes, it's time to dig out your 20mm, 24mm, 28mm and 35mm lenses -- any of these should suffice.
The most important factor of the lens you choose is the distance of closest focus -- this is usually quoted as the distance from the sensor plane to the subject. You can find out from the lens specs how close this will be to the front element of the lens by subtracting the length of the lens. If you don't have access to the specs, you can simply test this out in the field by trial and error. Ideally, you want the minimum focus distance to be less than 30cm (about 12 inches).
A crab spider hides behind a flower at the close-focus limit of my venerable 28mm Nikkor -- just 20cm from the sensor. Cropping the picture aspect to 2:1 accentuates the wide feel. Photo by Paul Harcourt Davies
Primes vs. zooms
Primes tend to be much better than zooms, and their manual focusing versions best of all in this respect. With manual lenses it's simply a matter of incorporating a longer thread length, a solely mechanical aspect of the lens mount that allows you to get closer to your subject.
But that's not to say that zooms can't be used. After all, many photographers now get their experience of different focal lengths of lens via a zoom as a first purchase or kit lens. But I wouldn't recommend a zoom with much range. Typically lenses such as an 18-55mm or especially an 18-200mm won't perform as well for the wide-angle macro task. Since they're designed for a wide range of purposes, they feature compromises in design -- one of them usually being a minimum focus distance that is much farther than ideal.
For this reason, the best zooms for wide-angle macro tend to be those with a max zoom range of 2x, such as a 10-20mm,14-24mm,16-35mm or similar. Unfortunately, they inevitably cost a great deal more than the kit zooms because the design and construction are a great deal more complex.
Wide angle zooms with a range of no more than 2x offer some of the best close-focus distances. Here a Sigma 10-20mm (at 12mm) captures the Fly Agaric mushrooms (a 2:1 crop again emphasizes the wide approach). Photo by Paul Harcourt Davies
What about fixed-focal-length lenses with autofocus? A few will take you in close but this does not seem to have been made a priority by many manufacturers these days. I've found, however, that Sigma seems to be in tune with the needs of close-up and macro enthusiasts. They produce 20mm, 24mm and 28mm AF lenses that are extremely sharp, offer a maximum f/1.8 aperture (in fact, wider than you need for wide-angle macro) and focus closer than most as the table below shows.
Sigma Wide Angle Lens |
Closest Focus |
Max Magnification & Reproduction Ratio |
20mm f/1.8 EX DG Aspherical |
0.20m |
0.25 x (1:4) |
24mm f/1.8 EX DG Aspherical |
0.18m |
0.37 x (1:2.7) |
28mm f/1.8 EX DG Aspherical |
0.20m |
0.34x (1:2.9) |
Getting even closer with extension tubes
There's a way to get closer to your macro subject (with a more magnified image) than the internal thread on a lens allows: an extension tube. An extension tube is basically a metal ring that lets you increase the separation between an interchangeable lens and the camera's sensor. As you move the lens away from the sensor, light rays spread out to give a larger image circle. If you imagine the sensor at the center of this circle, it covers a smaller portion of the image and so the image appears magnified.
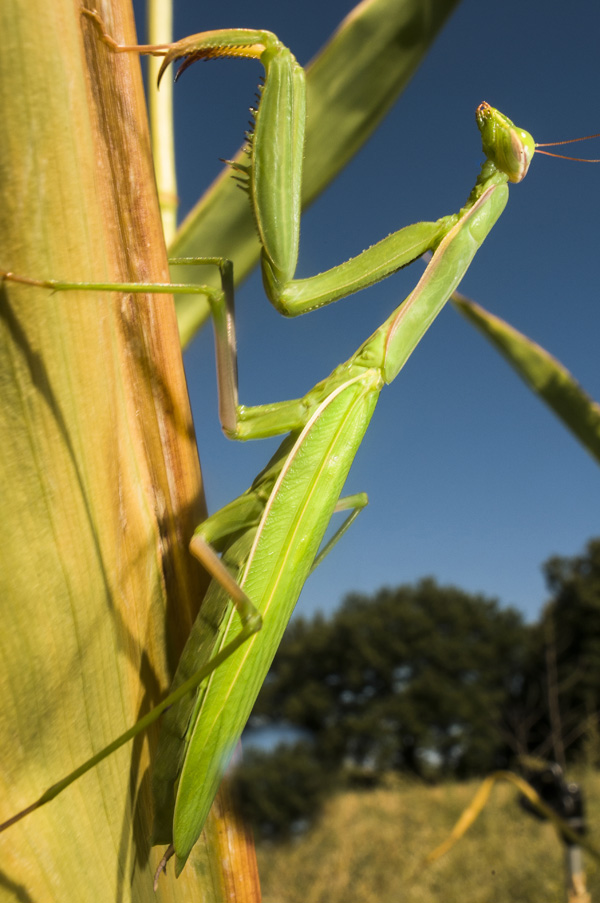
Still going strong after nearly three decades, my Nikkor 28mm f/2.8 AIS used with a single 8mm extension tube just filled the frame with an evening shot of this praying mantis. Photo by Paul Harcourt Davies
Commercial extension tubes have a lens mount at one end and camera mount at the other -- the simplest ones cost a few dollars online. However, those that offer coupling of metering (and even) autofocus between lens and camera are costly items of precision engineering. They are made by a handful of camera manufacturers and by Kenko.
Using extension tubes can be an ideal way to get greater magnification with a wide-angle lens and the pictures can be extremely dramatic. However, the thinnest or narrowest extension tubes often produce an extension of 10-12mm, and with an ultra-wide lens this gets you very close to the subject -- perhaps too close.
Here are a couple factors to consider about using extension tubes:
- 'Thin' (or narrow) extension tubes are few and far between. Canon once made a manual 5mm tube for their FD lenses and Nikon's thinnest, the PK11A, gives 8mm of extension, but offers only manual coupling
- With a 20mm lens, even a small extension means you are almost touching the subject, which can cause lighting problems with the shadow you and the lens cast and, most important, scaring off insect and animal subjects.
For those who like using their calculators, you can easily work out the magnification an extension tube produces by using this formula:
M (magnification) = d (added length of tube) / f (focal length)
In other words, the smaller the focal length of a lens the bigger the effect an extension tube has. As an example, an extension tube of 8mm used with a 20mm lens produces a magnification of 8/20 or 0.4x (which is 1:2.5).
This formula works for the lens set on the infinity mark -- you'll get a bit more magnification than this from the internal extension provided by the focus mechanism.
So, any camera body (even a high-end point-and-shoot!) paired with a wide-angle lens is all you need to start capturing some wide-angle macro images. Don't worry about going out and buying new equipment to achieve the task at first; use the best options you already have available. Any limitations you come across can be solved later. The important thing is to get out there and see what your equipment -- and your imagination -- can capture.
Read Part 2 of our Wide-Angle Macro Photography series for tips and tricks including positioning, depth of field and more.
Paul Harcourt Davies is a long-time professional photographer, and an author of 19 books with a background that fuses technical and artistic elements to his life-long passion for photography of the natural world. We reviewed his e-book (that he co-wrote with frequent collaborator Clay Bolt): Wide-Angle Macro: The Essential Guide a few months ago, and we knew we wanted to share more of his insights and amazing images with our readers. (You can order a
copy of the book here.) An experimenter and innovator by nature, he has long been on a mission through his writing and lectures to bring the techniques of macro photography to others. For the last 10 years he has been based in Umbria, central Italy, renovating an old farmhouse with a wild garden from where he organizes tours, workshops and much else.
-----------------------------------------------------------------------------------------------------
REVIEW: Ricoh GR Shooter's Report (Excerpt)
-----------
(Check out our in-depth Ricoh GR review, complete with gallery photos, comparison crops, lab test results and our final conclusion: http://www.imaging-resource.com/PRODS/ricoh-gr/ricoh-grA.HTM)
by Mike Tomkins
When Ricoh rejuvenated its GR Digital series -- and in the process put forth an answer to Nikon's introduction of the Coolpix A -- with its first large sensor, fixed prime-lens camera, I must admit I was thrilled. I've long been intrigued by the GR Digital line, thanks to their strong reputation in the Asian market, but their limited availability in the USA coupled with the fact that I wasn't sure I wanted to give up my zoom lens conspired to keep the GRD-series cameras out of my hands.
The Ricoh GR, though, was different: that big sensor was a major attraction for me, and for a while now I've been stocking up on (and learning to shoot with) prime lenses on my Pentax digital SLR -- so while I'm still primarily a zoom shooter, the thought of a fixed prime wasn't as intimidating as it once seemed.
Throw in the broader availability thanks to Ricoh's acquisition of Pentax, and not only was I ready for the Ricoh GR, but it was ready for me. And yes, I was excited. Doubly so, given that I also had access to the Nikon Coolpix A -- its closest competitor by far -- and at the very same time, no less! (Both cameras landed on my desk on the same day, allowing me to make side-by-side comparisons without either camera having first gained the advantage of familiarity.)
|
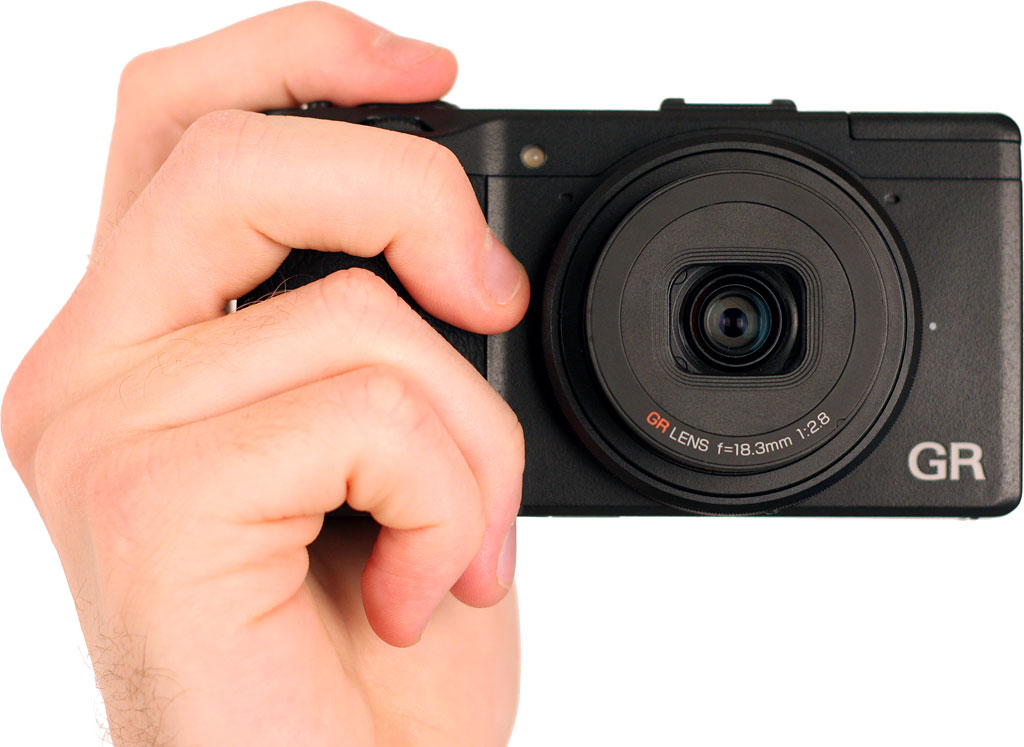
The Ricoh GR's body is noticeably more comfortable in-hand than is the Nikon. That's thanks largely to its much more generous, rubber-wrapped hand-grip, which gives plenty of purchase for your fingers. |
Build quality. With it having been a few months since I wrote our Ricoh GR preview, I'd forgotten that its body was crafted from magnesium alloy, and in our Coolpix A review I mistakenly referred to the GR as plastic-bodied. A few readers corrected me, for which I'm grateful, but even armed with that knowledge -- and indeed, having refreshed my memory further with the alloy body image near the start of this review -- the Ricoh GR still feels more like a plastic-bodied camera to me than it does metal. Perhaps it's something to do with the coating or finish on the body, which doesn't feel as cool-to-the-touch as the Nikon. Perhaps it's simply because it is lighter, and there's a degree of panel creak not present in its rival. More likely, it's a combination of the above. For whatever reason, the Ricoh simply doesn't feel quite as sturdy and finely-crafted as the Coolpix, but as I said in my review of that camera, I wouldn't expect it to, given
its significantly lower price tag.
Ergonomics. What's far more important is that the Ricoh GR's body is the more comfortable of the pair in-hand. Not only is it lighter, but it has a much more generous handgrip, and it feels better-balanced as well. I wasn't comfortable carrying the Nikon for long periods, and preferred to keep it on a shoulder strap, as I do with most cameras of this size. The Ricoh GR I kept in my hand most of the time, using only its bundled wrist-strap. I did find myself wishing the strap could cinch down on my wrist for a little added security were I to accidentally drop the camera, but I didn't feel the need for a shoulder strap at all.
Controls. I wasn't so happy with the Ricoh's control layout, though. For one thing, I'd have preferred a real twin-dial design, where I see the Ricoh GR as having more like a dial-and-a-half. The rear "dial" is actually a clickable rocker, and while that design lets it perform more functions, it isn't as quick to adjust as a true dial. And I must admit, I did miss the control ring around the lens of the Nikon, which made adjusting manual focus an altogether more pleasant experience than it is with the Ricoh. (There's a lot more fiddling involved in a manual focus adjustment on the GR, and that's a shame.)
Nor was I a big fan of the locking Mode dial, and ordinarily that's a design feature I love. The GR's Mode dial is simply too small for the locking design to be anything other than awkward, though. Adjusting the dial involves changing your grip on the camera, which rather defeats what is otherwise a good layout for single-handed shooting. A lock-free dial with a firmer detent as in the Nikon would have been preferable to me. And the tiny, recessed Power button -- while fine normally -- would be tricky to locate by touch with cold-numbed fingers, let alone gloved ones. I preferred the Nikon's Power lever.
|
I wasn't so comfortable with the Ricoh GR's rear-panel controls, finding them a bit cramped. If you like shooting single-handed, though, you'll almost certainly prefer the GR to the Coolpix A.
|
But there's certainly an element of personal taste in all of this. For example, I also wasn't thrilled by the rocker at top right of the rear panel, which falls naturally under your thumb. It looks much like a zoom control, even though the camera has a fixed prime lens, and indeed in Playback mode it does control zoom. It's in Record mode that I didn't get along with this control, though, as it serves to adjust exposure compensation -- which to my chagrin, I was forever accidentally changing if I left the camera switched on between shots. When IR founder Dave Etchells played with the GR, though, he was delighted by the very same control that bedeviled me, because of the quick access it gave him to exposure level adjustments.
And there are certainly features of the Ricoh's design which I preferred to those of the Nikon, too. For one thing, having a front dial that falls under my shutter finger is a big plus. The twin dials of the Nikon are both on the rear panel, and I often found my index finger reaching for a dial that wasn't there on that camera. I also loved the combined AEL/AFL and C-AF switch with its centrally-located button, which made light work of controlling both focus and exposure locking. And if you're a fan of single-handed shooting, the Ricoh's layout is much more conducive to that. Most functions of the Nikon require either a twin-handed hold, or that you adjust your grip to reach a control with your right hand.
|
Shooting with a wide-angle prime, you're forced to think about your framing. With a zoom lens, I'd have cropped in a bit tighter here, but I could hardly stand in the road -- and so that forced me to rethink my framing. Of course, cropping later is an alternative, if you don't need the extra resolution. |
Aligned with Pentax. As a Pentaxian, I was happy to find that Ricoh has adopted Pentax parlance for the main shooting modes -- that is to say, P, Av, Tv, and M, instead of the more common P, A, S, and M. Those coming from other brands may take a moment to get used to the change, though. I was also thrilled to find that Ricoh has taken Pentax's smart TAv mode on board, as I use this regularly on my K-5 digital SLR. In a nutshell, this allows you to dial in both shutter speed and aperture, then let the camera attain the metered exposure by adjusting the ISO sensitivity. You get full control over your image, and the camera chooses the lowest possible sensitivity for you. It's a shame Ricoh didn't also adopt Pentax's Green button for the GR, though there's really not space for any more controls on the rear deck, so it's an understandable omission.
Customization. Speaking of control, the Ricoh GR gives it to you in spades. Its interface sometimes bucks tradition: For example, there's no Drive mode control, just a Self-timer button and a separate Continuous Shooting option in the menu system which you can optionally assign to one of the other controls. However, those occasional quirks aside I have used few cameras that have anywhere near the degree of customization offered by the Ricoh GR.
You can select up to five different settings (from 13 choices) to be controlled by the rear "dial", which Ricoh refers to as the Adjust lever, and optionally, have a sixth function -- ISO sensitivity control -- serve as the control's default function if it's flicked without first being pressed to activate an alternate function. You can switch shutter speed and aperture control between the front and rear dials, and separately, whether they control playback magnification and image selection, or pan around a magnified image. No less than 26 different functions apiece can be assigned to the Effect, Fn.1 and Fn.2 buttons. Focus and exposure lock can be decoupled from the AEL/AFL button, and you can choose whether or not the lock is retained when you let go of the button. You can even choose between focus priority and release priority.
And then, there are the three My Settings positions on the Mode dial, each of which can store different camera setups -- including control assignments -- for different shooting situations. And you can register a further six settings groups to the camera's memory for storage, then swap them out with those assigned to the Mode dial. Direct ISO control for the Adjust lever was about the first function I changed from the default, as I find instant access to sensitivity to be a really great feature. Beyond that, I kept fiddling -- it took me a fair while to decide how I wanted the camera to set up. Once done, though, the camera fits like a glove.
|
The GR's prime lens and OLPF-free sensor yield razor-sharp, detail-rich imagery. Here, you can just about read the finer text on the duck, goose, and fish food vending machine at the center of the shot. |
How good is the Ricoh GR's fixed 28mm-equivalent lens?
Find out by clicking here to see our optical test results.
Manual focus. If there was one thing that I missed from the Nikon Coolpix A, it was that camera's ring around the lens barrel, used for manual focus adjustment. My Sony RX100 has a similar feature, and I'd have loved to see it on the Ricoh GR as well. It's a very intuitive interface element, and even if in truth it's fly-by-wire, a good implementation gives the impression of a direct connection between the physical control and the adjustment being made.
Manual focus adjustment on the Ricoh GR is performed first by pressing the Macro button, and then rotating the front dial. That is both less direct, and makes adjustments much slower. I tried counting how many clicks of the dial it took to get from infinity focus to the nearest macro, and lost count after a finger-numbing 200 clicks. Sure, you won't often need to manually step all the way through the range -- you can flick the AF function lever to C-AF mode and press the AF button to perform a single AF operation when in Manual focus mode, getting you in the ballpark -- but it's still just not as nice an interface as that of the Nikon's focus dial.
Autofocus. Beyond that, though, I found focusing on the Ricoh GR to be perfectly acceptable. Its contrast detection autofocus system to be fast enough for the subjects I'd shoot with a prime lens-based camera -- this isn't a camera I'd pick up for sports shooting, after all. It was able to keep up with my very active four year old son, and although in low light it did sometimes struggle to get a focus lock, when provided with a subject offering reasonable contrast it usually hit the nail on the head. I'm intrigued by the fact that the Ricoh GR turned in a much better focusing performance in our lab than did the Nikon Coolpix A, because my subjective assessment in the field was that the Nikon generally finished focusing first, if only by a slim margin -- but really, I think both cameras perform just fine in this area.
Real-world shooting. In other respects, the shooting experience was very similar to that of the Coolpix A. Exposure metering was typically very accurate, consistently turning out accurate exposures for the overwhelming majority of my shots, and only needing compensation with more challenging, harshly-lit scenes that flummox almost every camera. Burst performance was a bit mediocre, but probably sufficient for typical family and street shooting. (Again, this really isn't a sports camera.) It's bizarre that enabling raw file shooting raises the burst shooting performance well beyond that claimed by Ricoh, and a shame that it also slashes buffer sizes to well below those of the Nikon. That did occasionally leave me waiting, as with review cameras I always shoot bracketed exposures in raw+JPEG mode, so if I changed my mind about framing for a subject, I'd have to wait a few seconds for the buffer to clear before I tried again.
Just how fast is the Ricoh GR? Find out by clicking here to see our full battery
of rigorous, objective speed and operation tests conducted in the IR Lab.
Prime lens. If you're not used to shooting with a prime lens, it's a learning experience, and one which I believe makes you a better photographer. When you can't simply zoom in or out, you're forced to really think about your composition more, and to look for a framing opportunity you might otherwise have missed. With that said, Ricoh does try to ease the transition from a zoom lens in a couple of ways. For one, just like on the Nikon there's a removable ring encircling the front of the lens, allowing you to mount an adapter.
Ricoh uses a bayonet rather than a screw thread as on the Nikon, and doesn't limit you just to filters or lens hoods -- there's also an optional wide-angle conversion lens. All attach via a short, plastic adapter barrel. The conversion lens will take you out to a 21mm equivalent, but while it will fit in a pocket, the optic is quite bulky and heavy in use. I found myself preferring to leave it at home, but if you simply want to cover a couple of focal lengths and don't want an interchangeable-lens camera, you may find the option attractive. There's a soft, rubber lens hood bundled with the conversion lens, and the lens adapter can also accept a hard, plastic lens hood. I didn't find flare to be a significant issue, but if you have the camera on a shoulder strap, it's likely worth leaving the hood attached just to help protect the lens from minor knocks.
There's also a 35mm crop mode which works both for JPEG and raw files. It's a nice touch, although I personally preferred to shoot full-res images and crop after the fact. That, after all, gives me better cropping accuracy than I'd likely manage in the field, and lets me change my mind after the fact. If you're used to shooting with a selection of prime lenses, though, you may appreciate the ability to preview your 35mm-cropped framing at capture time.
Monitor. Initially, I felt that the Ricoh GR's display wasn't as good as that on the Nikon, which rather surprised me -- this is, after all, an RGBW display, most likely a Sony WhiteMagic unit like that on my Sony RX100. It turned out, though, that Ricoh simply defaults to a very low brightness level. Manually turning up the brightness in the menu system yielded a display that was more attractive than that of the Coolpix A, with rich color and good detail. And if I set both displays to their maximum brightness, the Ricoh's display was noticeably the brighter off the duo. If you're willing to dial back the brightness, the lower default of the Ricoh coupled with the RGBW design likely contributes significantly to the extra 26% battery life you'll get after the Nikon runs its cell out, according to CIPA testing figures.
User interface. I did think Ricoh's menus were far too small, though. In an effort to get as many options on screen as possible, the GR uses extremely small fonts that aren't terribly easy to read outdoors, and are downright impossible under strong sunlight without shielding the display with your hand.
Click here to view the IR Lab's in-depth Ricoh GR's image quality test results.
Image quality. In terms of image quality, it's a very close thing indeed. Both Ricoh and Nikon had similar detail, which is to say, lots of it. Images were really sharp, with lots of detail. Noise levels were again very close between both cameras, with up to ISO 3,200 being very usable, and above that point being a step too far for me except in a pinch. I thought Ricoh's images had slightly better chroma noise levels, but I really had to pixel-peep to see much of a difference. Ricoh's color was very accurate -- and if anything, just slightly undersaturated, where most cameras tend towards oversaturation. However, the auto white balance was typically just a little cold for my liking, and that swayed me in favor of Nikon for color.
Where Ricoh really did well was with its lens. It was sharp with good contrast, low chromatic aberration, and it definitely bested the Nikon for both vignetting and distortion, although both cameras were more than acceptable here. (And I'd expect no less from a prime lens.) The corners were a tad soft wide open, but not unreasonably so, and stopping down a little had even the corners giving loads of detail.
If I had to call it, I think I'd come down on the side of preferring the Ricoh's image quality, because I'm a raw shooter and its biggest issue -- the cool white balance -- is a non-issue for raw. (It's easily fixed for JPEG, too, but with raw the white balance isn't baked in until you develop your image.) With that said, the slight vignetting and distortion of both cameras would also be an easy and automatic fix in a modern application like Lightroom or DxO. And if you shoot JPEG, the Nikon looks to offer just slightly better results, turning in larger print sizes in our testing.
|
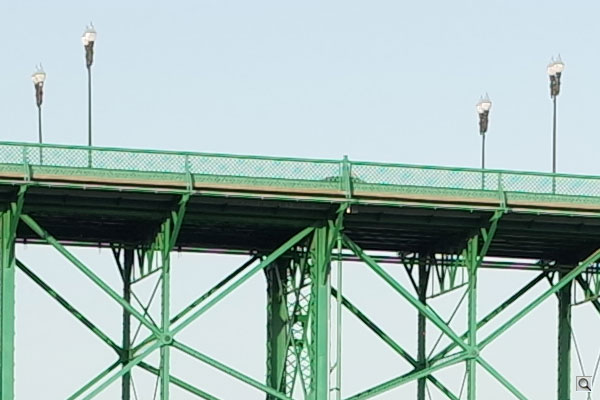
Moir� and false color artifacts appeared occasionally, just as they did with the Coolpix A. In this 100% crop, the Ricoh GR's low-pass filter free design causes artifacts in the fine detail of the fencing. |
Flash. Ricoh's flash also seemed a tad more powerful than that of the Nikon, although there wasn't a huge amount in it. As with the Nikon, red-eye didn't seem to be a significant issue, and there's a standard hot shoe available if you want to shoot a more powerful strobe or bounce flash for a more flattering look. You'll want a pretty small strobe to pair with the lightweight, relatively compact body, though.
Moir� and correction. As I did with the Nikon, I did spot some moir� in shots from the Ricoh GR, a side-effect of its low pass filter-free design. That's really going to be the case with most-any OLPF-free camera, and its severity is going to depend on the subject matter, as well as whether the camera includes algorithms to try and locate and correct for the issue at capture time. I didn't go out of my way to seek out moir� in my shooting, and what I did see in my shots was relatively minor, but that was simply the luck of the draw. It does show up quite strongly in some of our lab shots, certainly.
Unlike Nikon, Ricoh includes a post-capture tool that attempts to correct for moir�. I tried this on my own shots and noticed absolutely no effect whatsoever, likely because the moir� I had found was so minor. With our lab shots, there was certainly an improvement in terms of the false color, and it didn't seem to damage image quality noticeably in other respects, but strong luminance banding remained. Curiously, there seemed to be absolutely no difference between the variant levels of moir� reduction on offer -- all seemed to yield identical results.
Movies. I gave movie mode a quick whirl as I did with the Nikon, but just as I said in my review of that camera, I don't find a wide prime lens terribly conducive to appealing video. The Ricoh GR dedicates a Mode dial position to video, and shares the same shutter button for its still imaging and video features, which means there's a distinct division between the two. (But at least it's not hidden in the menu system, as in the Coolpix A.)
As with its rival, the Ricoh GR doesn't allow focusing during video, nor any form of exposure control beyond simply locking exposure. (You can, however, do this during capture if you want.) If you forget that autofocus isn't available, simply half-pressing the shutter button immediately stops capture, which is a bit unusual -- it's much more common that a full-press is required. Video quality is only fair, and quite a step below that of the Nikon. Shot side-by-side at the same time, the GR's movies are softer and noticeably less detailed. They seem less prone to false color, but there's a prominent flickering on fine detail. (For example, in the clip above, look at the ripples in the water's surface, as well as the structure of the power station beneath the dam.) Both effects are, to me, about equally objectionable, but I give the tip of the hat to the Nikon for the sharper, clearer image. The situation isn't helped, incidentally, by the lack of stabilization
-- motion from camera shake makes this flickering all the more noticeable.
Overall, much like the Nikon A, I don't find video capture terribly useful on the Ricoh GR. It's there at a pinch, but I have a feeling most owners will seldom use it -- and nor would they likely expect to do so. It's not really much of a knock against a street shooter camera focused on still image quality that it doesn't make the best video platform.
Power. The Ricoh GR has noticeably better battery life than does the Coolpix A. I found that I could easily get through a day's shooting without the battery expiring. I'd probably still recommend having a second battery on hand for extended sessions or overnight trips. It's also worth noting that by default you have to charge batteries in-camera, which means you can't be shooting one pack while you're charging another unless you buy an extra charger. (The Ricoh BJ-6 charger is compatible, and I'd recommend picking that up too -- it costs about US$50.) If you only plan on casual day shooting though, you may be able to get away with a single pack and in-camera charging.
|
Choosing between the Ricoh GR and its nearest rival, the Nikon Coolpix A, is a hard task indeed. Both are great cameras, so long as you're ready to move to a fixed prime lens. |
So what's our final verdict on the Ricoh GR? See our full Ricoh GR review online, where you'll find detailed image quality comparisons against other cameras, full performance test results, more gallery images, a list of pros and cons, and our ultimate conclusion: http://www.imaging-resource.com/PRODS/ricoh-gr/ricoh-grA.HTM
-----------------------------------------------------------------------------------------------------
QUICK HITS: The most interesting, most read articles on the IR site in the past two weeks
----------------
Lomography announces Kickstarter campaign to resurrect legendary Petzval lens
By Tim Barribeau
The Petzval lens�is one of the oldest and most storied photographic lenses ever developed. Invented in 1840, it sparked a revolution in portraiture thanks to its ability to handle wide apertures and short exposure. The lens is now difficult to find and expensive, but the folks at Lomography have just announced they are attempting to bring the Petzval lens back to life for the digital age through a Kickstarter campaign.
The Petzval lenses are famed for being incredibly sharp at the center, while providing a unique, swirling bokeh around the edges. To recreate this, Lomography and their Russian manufacturing partners at Zenit went back to the original lens and reinvented the optic to recreate the look and feel of the original but designed for a modern digital or analog SLR.
Read the full story and see the Kickstarter video and images here: http://www.imaging-resource.com/news/2013/07/25/lomography-resurrects-the-petzval-lens-over-kickstarter
-----------------------------------------------------------------------------------------------------
Super-swift Toshiba flash cards promise 240MB/second write speeds, but what's the catch?
By Mike Tomkins
If you want to get the most out of your enthusiast or pro-grade interchangeable-lens camera, investing in a really fast flash card is a good idea. The faster your camera can offload data to the flash card, the sooner you can rattle off another burst of images after your buffer has been filled. (And if you're lucky, you might even get more images in the initial burst, as well.)
A new flash card line announced today by Toshiba promises industry-leading write performance that should not only make for a better burst shooting experience, but allow high-quality 4K video capture as well. The Toshiba Exceria Pro line has a claimed write speed of 240MB/second, but there's a catch.
Find out what the "catch" is about the new Toshiba high-speed cards here: http://www.imaging-resource.com/news/2013/07/16/super-swift-toshiba-flash-cards-promise-fast-write-speeds-but-with-a-catch
-----------------------------------------------------------------------------------------------------
Photographer captures the incredible costumes - and improbable story - of Africa's Herero tribe
By Steve Meltzer
English photographer Jim Naughten spent four months driving across Namibia in southwest Africa to document the costumes and cultural traditions of the indigenous Herero people. His book "Conflict and Costume" tells the story of both the brutality of colonialism and the resilience of the Hereros to overcome it. I was struck by the beauty and strength of Naughten's images, and reached out to him to find out more about them.
"Namibia's geography has�witnessed a turbulent and little documented history of human�settlement, upheaval and war within a particularly brutal�period of European colonization," Naughten told me.
Germany and other European nations had come into the colonial business late in the game after England, Spain and France had long held colonies that had enriched them, Naughten said. In the scramble for Africa, Germany just got a desert -- the Namib Desert -- which is perhaps the oldest desert in the world, a place that remains one of the most sparsely populated and most hostile environments anywhere on earth.
Read the full story and see more of Jim Naughten's images here:http://www.imaging-resource.com/news/2013/07/12/the-heart-of-an-improbable-style-jim-naughtens-photographs-of-namibias-here
-----------------------------------------------------------------------------------------------------
WE'VE GOT MAIL: Questions from readers, answers from IR
-----------------------
Please send us your camera and photography questions and comments (editor@imaging-resource.com). Not only will we respond to each and every one of your letters, but we'll also publish the best ones here as a resource for all our readers.
Understanding 4/3 Lenses
I notice that DxO Labs generally rate the 4/3 lenses as having poor light transmission properties. Is this because the 2x factor applies to f-stop as well as to focal length, for example making an f/1.8 lens in reality f/3.6 ?
Richard Schuh
---------------------
Hi Richard -
It doesn't actually work that way. Their light transmission simply compares how much light gets through the lens to what an optically "invisible" lens would produce at a given aperture. What you're seeing has to do with the internal construction of the lens -- the more internal elements there are, the less light gets through. You'll thus find that highly-corrected lenses (any zoom lens and most macro lenses are particular examples, but really, any lens with a complex optical formula) will have higher T-stop values than simpler optics of the same maximum aperture. If you're seeing generally higher T-stop numbers for Micro Four Thirds lenses, it's likely because you're looking at lenses that are more highly corrected than ones you're comparing with on conventional platforms. Also, note that the T-stop depends on the maximum aperture as well: A lens with a maximum aperture of f/2.8 will necessarily have a T-stop rating somewhere higher than that. The differences bet
ween lenses arising from complexity of optical formula will show up in the difference between max aperture and T-stop value.
For instance, the Panasonic Leica DG Macro-Elmarit 45mm f/2.8 ASPH OIS has a transmission rating of 3.2 T-stops (0.4 stop worse than the max aperture), while the Olympus M.Zuiko Digital 17mm f2.8 has a rating of 2.9 T-stops (just 0.1 stop worse than max aperture). Just looking at the two lenses, it's clear that the Macro-Elmarit has a *lot* more glass in it than the svelte Zuiko 17mm. Step up to a complex zoom lens like the Olympus M.Zuiko Digital ED 12-50mm f/3.5-6.4 EZ, and the difference between T-stop (5.3) and max aperture (3.5) jumps to a full 1.8 stops; zooms typically have a lot more elements in them than primes.
Hopefully that all makes sense. Bottom line, T-stop doesn't depend on format, focal length, or anything else other than what the light has to pass through to get to the sensor. If there are only a few elements, you'll have a low T-stop value; if lots of elements, it'll be higher.
- Dave
-----------------------------------------------------------------------------------------------------
RE: Canon 70D a Game Changer?
Canon is changing the game again... I barely understand why.
Martin Kimeldorf
---------------------
Hi Martin -
It really comes down to the 70D's AF system. Read my writeup about it on our first impressions Canon 70D review -- if you have a half-hour to spare! -- as it explains it about as thoroughly as I'm able to. Canon's team of engineers and product developers behind the tech also *just* published a white paper on the Dual Pixel CMOS AF if you want an even deeper explanation.
However, here's my condensed version: By putting what looks like a truly effective phase-detect AF system directly on the image sensor (and covering a pretty big percentage of the image sensor), they've accomplished a number of key things:
- No more front/back focusing with phase-detect focusing: Since the image sensor and AF sensor are one and the same, there's no chance of misalignment between them.
- No limitation to specific AF points: Anywhere within the roughly 64% of the total sensor area (80% both horizontally and vertically) can be an "AF point."
- No limitation with aperture: Since there aren't any fixed AF points and predefined separations between elements in each pair, you can have phase-detect AF anywhere from wide open to the lens' minimum aperture. No more limitations to f/5.6 or 6.3, etc.
- The wider the aperture, the more precise the focus: Many cameras have special central AF points that give greater accuracy at apertures of f/2.8 or larger. The accuracy doesn't improve for lenses faster than f/2.8, though, because the AF elements are in fixed positions. The 70D's AF system can (theoretically, at least) use a wider and wider "baseline" the wider the aperture is, so accuracy should continue to improve as the aperture gets wider. (Just when you need it, as the DOF will also be getting shallower.)
- Continuous phase-detect AF during movie recording: No more "hunting" to maintain focus, as seen with contrast-detect systems.
We'll of course have to have substantial hands-on time with a sample before we can say for sure whether the system really is as revolutionary as it promises to be, but we're very upbeat about the prospects.
- Dave
-----------------------------------------------------------------------------------------------------
RE: Copying 6x6 Negatives
I have a bunch of 6 x 6 cm Ektacolor Negatives from about 40 years ago I want to copy. �Which would get me the best results, an�Epson Perfection V600 Photo Scanner, a CanoScan 9000F Mark II scanner, or a Nikon D600 with a Nikon Micro Nikkor 60 mm lens (already own the Nikon and lens)? �If it's the Nikon, any suggestions on holding the film to be scanned? Whatever the choice, Photoshop is the next stop.
---------------------
Hi Cory -
An awful lot depends on just how many negatives you have to copy. If it's a lot, the camera-based solution will be vastly quicker, at least for the image-acquisition part of the process. While much slower, the dedicated scanner solutions have a couple of key advantages.
First, they both have an infrared-based scratch-removal system. These work quite well, relying on the fact that IR light passes right through all colors of a photo emulsion, so scratches and dust specks stand out. Once the blemishes are identified, it's straightforward for the software to remove them from the final images. If your film is scratched or dirty, this can be a huge time saver. Another more subtle issue is that of color profiles and converting the images from the color negatives to color positives. It turns out it's not a simple matter of just inverting all the color channels. The issue is that color negative films have a colored base (that orange tint you see when you look at a color negative), that varies in density with the exposure. This means there'll be more or less orange base color mixed in, depending on what the overall exposure is at each point of the image. This makes it pretty tricky to deal with. Most scanning software has calibration curves built i
n (and that can be refined by creating your own profiles) that handle this orange-base problem. Some do better than others, but it'd be tough to do the same manually in Photoshop.
On the other hand, if you're well familiar with Photoshop and building color profiles, and can lay hands on an Ektacolor Q-60 target, you could build a color profile that should do a pretty decent job.
Bottom line, if the images are important enough that you don't mind spending multiple (perhaps *many* multiple minutes) on each, a scanner will almost certainly give you better results. On the other hand, if you have thousands of these things, it'd be worth investing the effort to come up with a camera-based workflow.
If you decide to go the camera route, email back, and we can perhaps discuss some of the practicalities there in another issue.
- Dave
-----------------------------------------------------------------------------------------------------
Smart Camera Reviews
People like me who have followed and trusted your camera and lens reviews would really benefit if you would do likewise for some of the new high-end smartphones. Specs and tech reviews abound, but it would be great if we had insight from a knowledgeable photography resource like you.
Robin Ensom
---------------------
Thanks, Robin.
We're going to try to fit in a few smartphone camera reviews in and around the regular models we test. There's a lot more demand for our reviews of conventional cameras, but there's no question that people want to know how different smartphone cameras perform, to help them decide which phone to go with. No promises on ETA, but we're definitely working on it!
- Dave
-----------------------------------------------------------------------------------------------------
Blur Index Inconsistency?
I've noticed that at least one of your forum members has commented on an apparent inconsistency between the results posted for Dx and Fx cameras on the same lens. �
Here is a comment by thejohnz, posted on Sept. 1 2012, subject line 'Test results for Nikon 24-85 VRii'
'I have this lens along with the D800 and D7000.��When looking at the test results I see a bit of inconsistency between the D800 and D7000 results when just looking at the DX portion of the graph plots.��These cameras have virtually the same pixel pitch, thus when looking at the center areas they should have the same results.��But that is not the case.��This lens looks to be sharper on the D7000 than the D800. The question is why?
My more crude test results show no difference whether this lens is on a D800 or D7000 unless I look at the corners of the D800 test photos.'
The very recent test of the Nikon AF-S 80-400mm lens shows the same apparent inconsistency between results for D7000 and D800E.
This topic has also been raised on the DPReview forums, but of course you are not so likely to spot those posts.�
I'd be interested in your comments.�
Many thanks,
Dave Russell
---------------------
Hi Dave -
Thanks for the note. What you're seeing is a combination of the fact that we can't 100% correct-out the differences between camera bodies, and that the color scale used on our graphs is *so* fine-grained, especially for low blur values, that the actual difference in sharpness between adjacent colors of purple is literally indiscernible. (I've had a long-term "To Do" for completely redoing the graph coloring, going to a continuous-tone scale, without the microscopic steps of the current scheme, but the magnitude of implementing it has so far prevented its execution.)
That said, the two graphs are showing more difference than they ideally would. The total difference between the two is perhaps a half a blur unit or so in the arbitrary scale we're using, an amount that would be just slightly discernible on large prints. We have a pretty meticulous calibration process to help line-up results from different platforms, and it gets things really close, but there's some residual level that it can't correct for. That could account for some of the difference here.
What I actually think is most likely, though, is that because it is a wide-angle lens, it's being shot very close to the target, and that may be affecting performance somewhat. In the early days, we found this happening with tele lenses when we were closer to the target than 30x the focal length or so. (In other words, a shooting distance of 13 feet or so with a 200mm lens.) Some lenses tested softer at that distance than if we shot them at more like 40-50x the focal length.
Our largest lens-testing target is roughly 4 x 6 feet. That's pretty big, but a 24mm lens on a full-frame camera means we're shooting pretty close. This is an unfortunate weakness of any test scheme that relies on a physical target (as opposed to the purely optical MTF testing machines that sell for $100K+): It's hard to have a target large enough to let you shoot wide-angle lenses at reasonable distances. In the case at hand, the distance from target to focal plane is on the order of 3.5 feet with the D800, 1.5x that on the D7000. That's still 40x the focal length, normally considered a great enough distance to be outside the "near field" behavior of a lens, but let's face it: 3.5 feet is a lot different than shooting mountains at infinity, and the difference between 3.5 and 5.25 feet is fairly significant. While the differences shown are actually quite small, I do think that some of what we're seeing is real, showing the difference in lens performance between s
hooting distances of 3.5 feet vs 5.25 or so.
- Dave
-----------------------------------------------------------------------------------------------------
NEW ON THE SITE
-----------------------
At http://www.imaging-resource.com/new-on-ir you can keep track of what's new on our main site. Among the highlights since the last issue:
- History: Early color photos of circus performers from the 1940s and 50s (http://www.imaging-resource.com/news/2013/07/24/check-out-these-wonderful-early-color-photos-of-circus-performers-from-the)
- News: Hasselblad unveils new Stellar compact camera modeled on the Sony RX100 (http://www.imaging-resource.com/news/2013/07/22/hasselblad-unveils-new-stellar-compact-camera-modeled-on-sony-rx100)
- Humor: Guy photo bombs wedding proposal at Disney World, Photoshop parodies ensue (http://www.imaging-resource.com/news/2013/07/23/guy-photo-bombs-wedding-proposal-at-disney-world-photoshop-parodies-ensue)
- First Shots: Pentax Q7 test images - Does the mirrorless camera's bigger sensor finally deliver the quality we've been waiting for? (http://www.imaging-resource.com/news/2013/07/23/pentax-q7-first-shots)
- News: Photographer admits to faking "lava photographer on fire" image that went viral (http://www.imaging-resource.com/news/2013/07/19/Photographer-admits-to-faking-viral-lava-photographer-on-fire-photo)
- Camera Preview: Panasonic FZ70 - Hands on with camera whose stunning 60x zoom laps the competition (http://www.imaging-resource.com/news/2013/07/17/panasonic-fz70-review-hands-on-camera-stunning-60x-zoom-laps-competition)
- Fine Arts: Aaron Siskind Foundation fellowship winners prove that photography as an form isn't dead yet (http://www.imaging-resource.com/news/2013/07/23/aaron-siskind-winners-prove-photography-as-art-isnt-dead-yet)
- Images: Delightful photos of golf balls cut in half - James Friedman explores the hidden beauty of "Interior Design" (http://www.imaging-resource.com/news/2013/07/17/delightful-photos-of-golf-balls-cut-in-half-james-friedman-beauty)
- Camera Review: Olympus XZ-2 - How does this compact camera stack up against its popular predecessor? (http://www.imaging-resource.com/news/2013/07/15/olympus-xz2-review-how-does-it-stack-up-against-its-popular-predecessor-xz1)
-----------------------------------------------------------------------------------------------------
NEXT ISSUE
---------------
Our next issue will be mailed to you in two weeks. See you then!
SIGNOFF
-----------
That's it for now, but between issues visit our site for the latest news, reviews, or to have your questions answered in our free discussion forum. Here are the links to our most popular pages:
Newsletter Archive: http://www.imaging-resource.com/cgi-bin/dada-nltr/mail.cgi/archive/irnews
Daily News: http://www.imaging-resource.com/news
SLR Gear: http://www.slrgear.com
New on Site: http://www.imaging-resource.com/new-on-ir
Review Index: http://www.imaging-resource.com/camera-reviews
IR Photo Contest: http://www.dailydigitalphoto.com
Google + http://plus.google.com/+imagingresource
Facebook: http://www.facebook.com/imagingresource
Twitter: http://www.twitter.com/IR_Lab
Happy snapping!
Dave Etchells and Roger Slavens
editor@imaging-resource.com
|