To make a great photo, half the battle is ignoring the gear-centric portion of your brain
posted Wednesday, September 11, 2019 at 5:38 PM EDT
So much about making a good photo relies on you getting right the things that have nothing to do with what makes cameras popular. For the kinds of photos I like to take, which are timelapses, landscapes, and environmental portraits, there are so many parameters to remember outside of my knowledge of photography.
About two years ago, I wanted to take advantage of some of the varied and beautiful landscapes available in California, and that meant packing up my gear, getting in the car and hitting the road. But in doing this, I got distracted by what I hoped to accomplish to the degree that I neglected to focus on the details that would assure my time wouldn't be wasted. I got stars in my eyes, so to speak.
In this recurring segment of Shoot to Keep called Second Take, we're going to revisit times when I made some serious errors in judgment that caused me not to get the results I was hoping for, and how you can avoid making those same mistakes in your shooting endeavors. If you are unfamiliar with Shoot to Keep, check out our first episode here.
Alamere Falls is one of two coastal waterfalls of note in California and only one of four coastal waterfalls of note in the world. The other three being Waterfall Bay Falls in Hong Kong, the Bowen Falls in New Zealand, and the very famous McWay Falls in Big Sur, California. So as you can see, the coastal waterfall, otherwise known as a tidefall and is the instance where a freshwater waterfall flows directly into the ocean, is pretty rare. It's why Alamere was high on my list of places to photograph, and in my initial attempt at capturing it, why I was insistent on "making it worth it" by shooting as much of it as possible.
I'm not going to spend too much time explaining what went wrong on that first excursion to Alamere Falls, but I will say that I made a ton of mistakes that all branched out into even more errors that culminated in me expending a ton of effort with pretty much nothing to show for it. I did not spend enough time researching the hike, I brought far too much equipment, the equipment I brought wasn't ideal for what I was trying to do, I wasted too much time on the way there, and because I tried to shoot an assortment of photos I ended up feeling unsatisfied with all the results. In short, I tried to do too much on top of poor planning.
Probably the biggest mistake I made on my first attempt was deciding that I wanted to do a series of timelapses along with long exposures as well as some environmental portraits of my friend Caitlin. As you can imagine, each of these types of photography requires different pieces of equipment in order to pull off, and I exacerbated that by bringing all possible things I might want to use with me, rather than deciding to bring just the essentials.
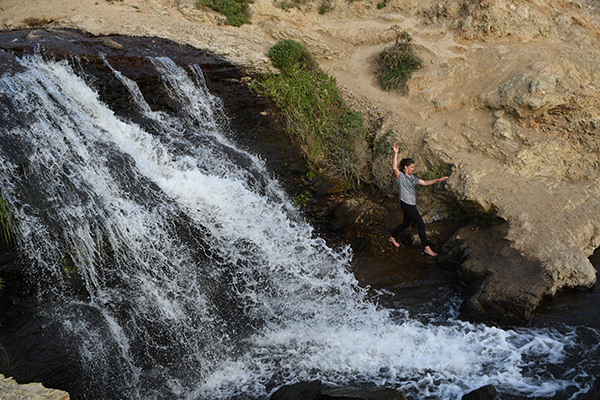
The result was me carrying a backpack that weighed over 50 pounds, and also bringing a 25-pound time-lapse rail on a strenuous hike of over 10 miles. What did I get? Two mediocre timelapses, and this single image of Caitlin:
In this second attempt at photographing the falls, I wanted to fix everything I did wrong on the first hike. I would not make the same mistake of trying to do too much, I would go in with better knowledge of the area, and I would completely change my equipment to match my new, more focused goals.
What were those more focused goals? Rather than try and do three things and get none of them to the quality I desired, I instead chose to do one and really focus on getting the best I could do. So, I decided that to thank Caitlin for putting up with this hike the first time and for coming with me on the second trip, I wanted to make at least one photo for her that she would love. Just one photo of Caitlin and the Alamere Waterfall was the only goal I set for myself.
Since my most egregious mistake was bringing too much gear, let me briefly explain what I had with me the first time, and what I replaced it with this second time.
The first time I hiked those 10 miles, I carried with me:
Additionally, multiple lenses for each, sound equipment and spare memory cards. Oh, and that timelapse/slider rig that by itself weighs over 10 pounds.
This time, instead of bringing all those cameras, I instead only brought two, both of which share a mount so that the four lenses I brought would work with both cameras. I chose the Fujifilm X-T30 and the X-T3 (for shooting the video) along with the 14mm f/2.8, the 16mm f/1.4, the 80mm f/2.8, and the 50-140mm f/2.8. I chose Fujifilm for a few reasons: I was going to get stellar image quality, and the cameras, as well as lenses, are very small and light. I wanted to, as mentioned, focus on getting at least one solid portrait, and record video of the process of course.
Essentially, I compacted the capabilities of all four cameras I had with me last time into two, with a combined camera body weight of less than the 1DX II by itself.
I'm sure some of you are thinking "but wait, why not use a full-frame camera? For portraits, they have to be the best, right?"
I'm glad you asked nameless internet person! The hype surrounding the necessity of full-frame is wildly overblown. There are of course advantages to the format, but they actually don't apply here at all. Full-frame, even mirrorless, require larger optics which means more weight. So even though a camera body like the Alpha series from Sony weighs as much as a Fujifilm, the lenses on the Fujifilm are going to be dramatically less heavy for the range of focal lengths I chose because the sensor on the Fujifilm is smaller. So as a full system, it is smarter to keep my weight down as much as possible especially since the other advantage of full-frame, such as low light performance, is a non-factor here, which I'll get to in the point about golden hour below.
Another advantage of full-frame is the frame of view, but that's also a non-issue here since I had plenty of room to move around to compose properly, and I also chose a suite of lenses that will give me plenty of wide-angle choices as well as compressed, telephoto choices. Even with the crop factor of APS-C, I had a huge range of focal lengths to choose from. Fujifilm is also renowned for image quality, so I did not feel like I was giving anything up to reduce the weight of my backpack load.
After two years of planning and consideration, I decided that for this case, Fujifilm offered the best camera system for the needs of this shoot. And that's important to note: always use the right tools for the job at hand.
Changing my camera setup and the backpack I used, as well as leaving behind the time-lapse rail reduced my weight from over 75 pounds of equipment to less than 30. On a strenuous, more than 10 mile hike, I cannot express how great it was to shed that extra weight!
I made note of golden hour, and I have to say this was one of my biggest mistakes in my initial hike out to Alamere. You see, in my mind, I absolutely had to have golden hour. If we were going to shoot this waterfall, I wanted to do it in the best possible light. That meant leaving for the hike later in the day, staying through the golden hour and then hiking back in what little twilight we had left before it got very, very dark.
I have to say, we got very lucky coming back from the falls because we arrived back at the parking lot just as the last light was fading into darkness. Had we not power-walked back, we would have been in serious danger. This was very stupid of me, and a perfect example of me overthinking and underthinking something at the same time.
I want to mention that in addition to all of this, I had a memory card fail on me while I was out there during my first attempt two years ago. All the photos, aside from a few, that I shot of Caitlin were lost. I wasn't going to make that mistake again, and this time I brought the LaCie DJI Copilot.
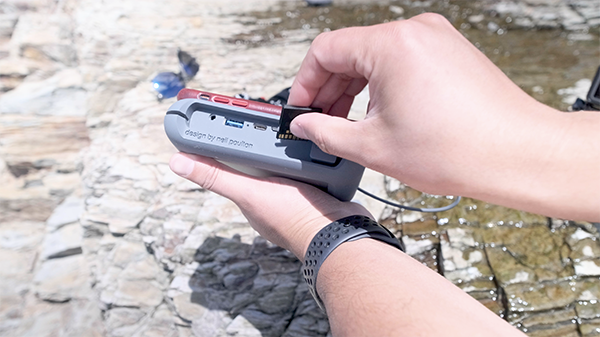
I reviewed this portable hard drive in the past and gave it high marks, and I thought it would be a great companion on this trip. Rather than relying on the photos I took being safe on the SD cards inside the camera, I backed them up on-site to remove any sneaking doubts about the safety of the images I worked so hard to capture.
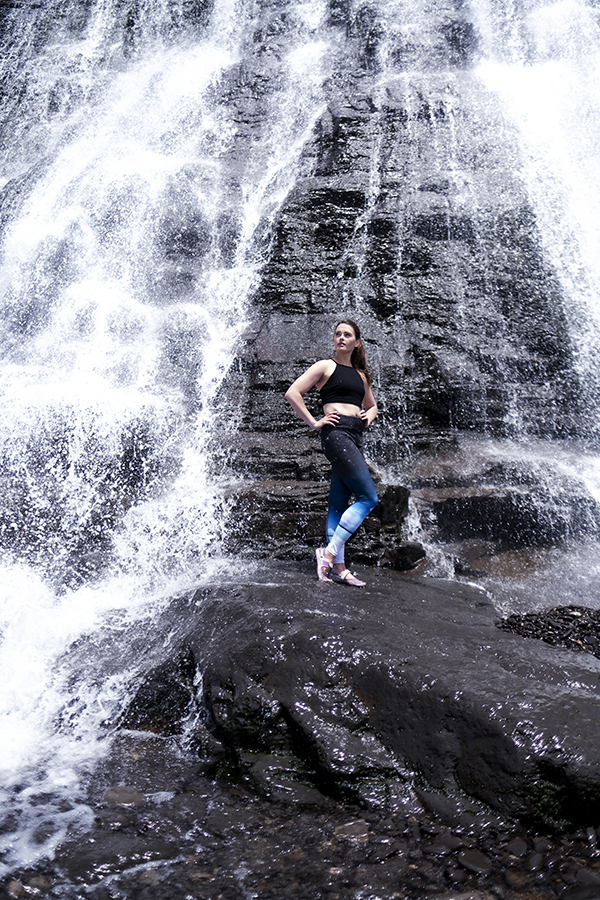
When we got to the waterfall, which was much easier this time thanks to our lighter backpacks and the fact we knew where we were going, I was able to devote my entire mental energy into making a good portrait, rather than spreading myself thin having two or three cameras going all doing different things.
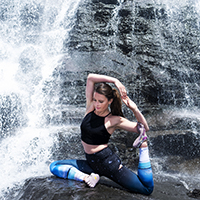
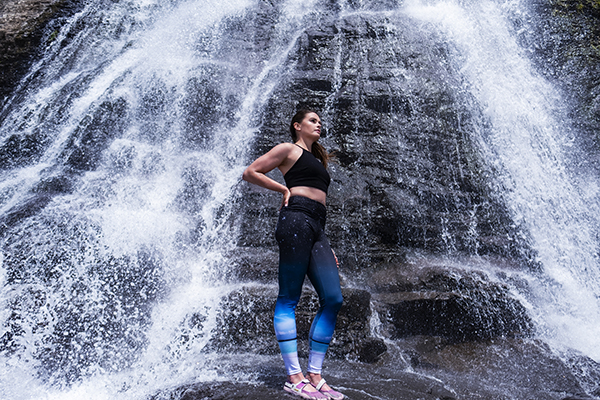
I had a vision of putting Caitlin right up next to the tidefall and shooting in a high-key style (lots of contrast) that would look like she was in a commercial for athletic wear. Now, I'm not an advertising photographer and I absolutely don't pretend to be, but I thought that I would give this style a shot.
At the waterfall, I decided to start out wide and then come in tighter with the longer lenses I brought. That meant mounting the 16mm f/1.4 on the X-T30 and positioning myself so that I could see the waterfall, properly see Caitlin in the frame, but also not distort her with the wide angle by getting too close. I ended up being about 10 or 15 feet away from her to make these shots happen.
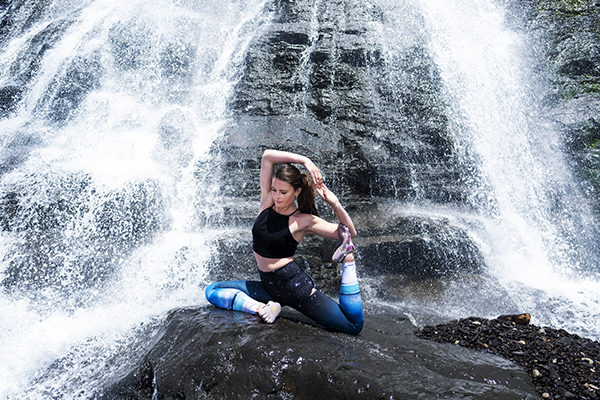
Caitlin, who loves yoga, asked if she could do a Mermaid Pose and found a rock about 6 feet away from me that was large enough on which to position herself. This wasn't a pose I was thinking of when I planned the shoot, but it ended up being one of my favorites. Caitlin wasn't able to hold the pose for very long, due to the torrential water, the uneven surface and the cold (the waterfall is made up of snowmelt, so as you can imagine the water is quite frigid), so it was up to me to constantly be shooting to try and get just one good frame.
Once I felt like I had a few images that fit the goal I was aiming for, I swapped to the 80mm f/2.8 and decided to use the falling water as a backdrop for a portrait. This would be a lot less high-contrast because I would be focusing on facial features, so I did my best to use the natural sunlight to light her face as evenly as possible to reduce the work in post.
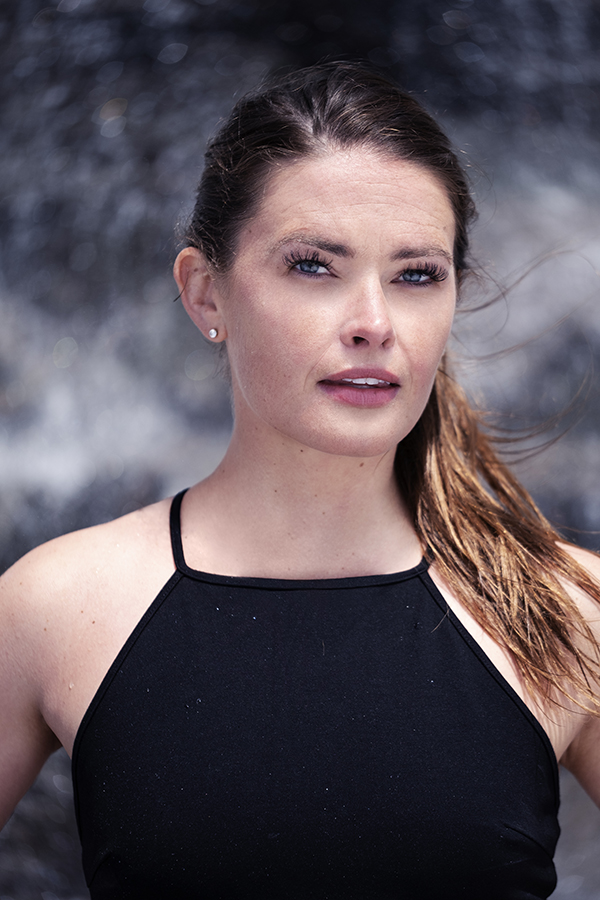
In the final image above, I want to make sure to give credit to my friend Pratik Naik, who is an incredible retoucher at Solstice Retouch. He is by far my go-to man when it comes to beauty or fashion retouching, and especially the case with skin work. Thank you, Pratik!
You'll notice that my notes on how to take these photos were either limited or nonexistent. And that's the point. This shoot was framed by the waterfall, and the main things that mattered about this shoot were getting to the location, having the energy to shoot with a focused mind, and, well, focusing.
When I ignored those things and instead put my mental energy into complicated camera techniques, instead of getting photos I was happy with, I left without even getting a photo of the actual waterfall.
I am an extreme case here. Very few of you will attempt a shoot like this, and of those of you who do, only a small percentage of you will make as many egregious errors as I did during that first attempt. What I hope I did was point out that there are certainly superior tools for specific jobs, and you would do best to consider other aspects of a photography project than just the camera specs that get all the clicks on camera sites.
This episode of Shoot to Keep was sponsored by Fujifilm and LaCie.