Capture One 20 update brings new heal & clone tools, before/after slider, Capture One for Nikon & more
posted Monday, May 18, 2020 at 7:00 AM EDT
Phase One today announced a free update for their popular Capture One 20 photo editing software suite, adding a handful of new features such as new healing and clone tools, an updated Before/After tool, improved Lightroom Catalog importing, and a dedicated version of Capture One for Nikon cameras (in a similar fashion to the standalone Capture One versions for Sony and Fujifilm cameras). There's also a sleek, new logo, as well!
Back in December 2019, Phase One debuted the latest version of their flagship editing software, Capture One 20 -- an update over the previous version, Capture One 12 -- that offers several new features and improvements, including an updated UI, a new color editor tool, a revamped crop tool, updated noise reduction processing and more. This latest free update (aka Version 13.1) is a relatively minor one, all things considered, but it further enhances the functionality of Capture One and makes it a more powerful and more full-featured image processing suite. For those looking for an alternative to the Adobe ecosystem of photo editing and raw processing software, Capture One is a fast, powerful and highly capable choice, with a reputation for excelling image quality and raw processing abilities.
For all the new features and changes introduced with the release of Capture One 20, please visit Capture One's What's New page. Below, let's go through the primary new features introduced with this latest update:
Updated Healing & Clone Tools
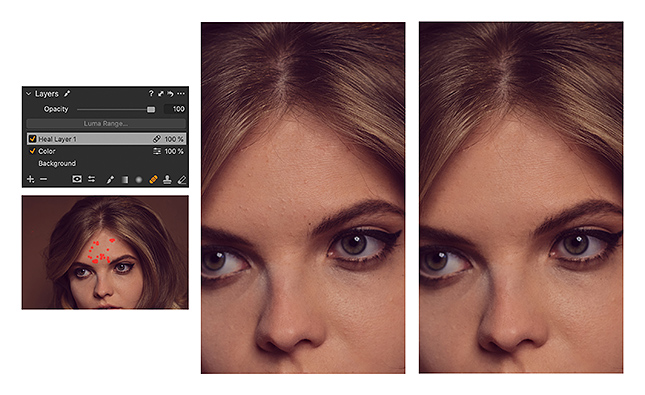
One of Capture One's unique features is the ability to work in Layers, similar to Photoshop, but directly within its Lightroom-like image catalog environment -- making it a more all-in-one solution for both image organizing and detailed image post-processing. When performing retouching or local editing, such as gradient masks, Capture One automatically creates these adjustments onto a new layer, leaving the underlying, globally-edited image untouched.
In previous versions of Capture One, the ability to perform Healing or Cloning operations to remove objects in an image, such as hair, dirt or dust, was fairly limited compared to the tool offered by Photoshop, for example. In the past, you needed to create a new layer in Capture One and manually select a source point in your images and then brush on the healing or clone mask. What's more, Capture One previously only allowed for one healing/clone source point per layer, and with the number of layers limited to just 16, you could potentially run into a limit on cloning/healing if you had many items to retouch.
In the new Capture One 20 v13.1 update, there are now standalone Healing and Clone Brush tools that allow you to draw (brush) directly onto the image (creating a new layer in the process automatically), which is very similar to the Clone and Spot Healing Brush tools used in Adobe Photoshop. As with the equivalent tools in Photoshop, the Clone tool requires you to first select a source point for the Clone brush, while the Healing tool will automatically analyze the image under the masked area and select an appropriate source point elsewhere in the image and attempt to blend it into the masked area to remove the object. If needed, you can move the auto-selected source point as well as delete it altogether and re-do the healing brush. Furthermore, you now have an unlimited number of heal-zones per layer. You can create more than one Clone or Healing layer if needed, as well as control the opacity for these or any other layer you create.
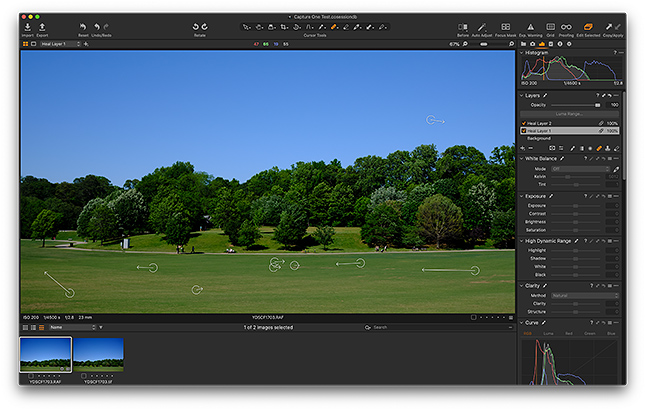
Quality-wise -- using a beta version of v13.1 -- the new cloning and healing brush tools work quite well, especially for fairly basic spot-healing operations, such as blemishes on skin, dust and other specs of dirt, as well as small objects surrounded by uniform, clean or blurred backgrounds. For the healing brush, Capture One does a nice job of quickly selecting an appropriate nearby source point and blending it over the masked area to remove the object or spot. Like with Photoshop, the spot-healing tool in Capture One isn't infallible and can create unwanted cloning artifacts if you're not careful, particularly if the object you're attempting to remove crosses over or borders other objects or edges. In terms of performance, the paint-on brushing is reasonably quick on my 2019 16" MacBook Pro, though there is a slight bit of lag as you paint over the image. Meanwhile, the spot-healing tool in Photoshop 2020 was practically instantaneous and felt more "real-time." However, the ability to do quick, non-destructive spot-healing directly on a raw file within your Catalog or Session in Capture One is convenient; it's a very similar overall user experience to the spot-healing tool within Lightroom Classic.
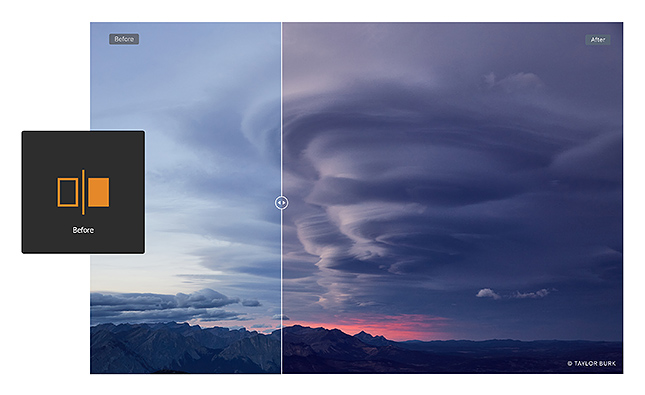
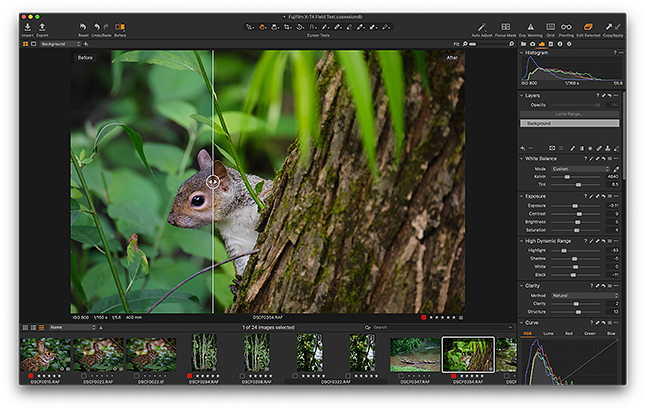
Before/After Tool
The v13.1 update also includes a new Before/After toggle tool that lets you quickly compare an original image to a current version with all of its edits and adjustments. Located in the mail Toolbar (also accessible with the keyboard shortcut 'Y'), the Before/After tool offers two different ways to view and compare your edits to the original file: a Full View and a Split View Slider. As the name suggests, the Full View mode displays the entire image in the viewer pane, and you then simply press 'Y' to toggle back and forth between Before and After views. Meanwhile, the Split View gives you a handy slider tool in the middle of the image, with the "Before" version on the left and "After" on the right. You can click and drag the slider left and right to compare images.
You can even edit images while the Before/After tool is active, though it behaves differently depending on the view mode. In Full View, the tool will automatically turn off if you begin to perform any editing or image adjustments, whereas the Slider view will remain active while you make adjustments. However, for major image composition adjustments, such as rotation, cropping or distortion correction, the Before/After tool will automatically turn off.
Lightroom Catalog Import
Switching to an entirely new image editing software can be a daunting task. The editing workflow process can have a big learning curve, the user interface of the application itself could be strikingly different and, at times, confusing, and even the ability to move your images from one software to another can be a difficult or cumbersome task. Will my images need to move somewhere else in the filesystem? What will happen to my old catalog? What about all my previous image edits and adjustments?
For users of Adobe Lightroom, the default Capture One interface can be somewhat confusing right from the start, as it behaves and is laid out differently than Lightroom. In Capture One, there isn't really a "Library Module" like there is in Lightroom; you essentially begin and live in the Capture One equivalent of the "Develop Module." Furthermore, all of your tools and sliders are on the left-hand side of the window and further divided into different category panels. Luckily, Capture One 20 offers a customizable workspace, including a handful of presets depending on the type of project you're working on (there's a dedicated "Wedding" workspace preset, for example) or your display setup (there are presets for Dual Monitor workspaces).
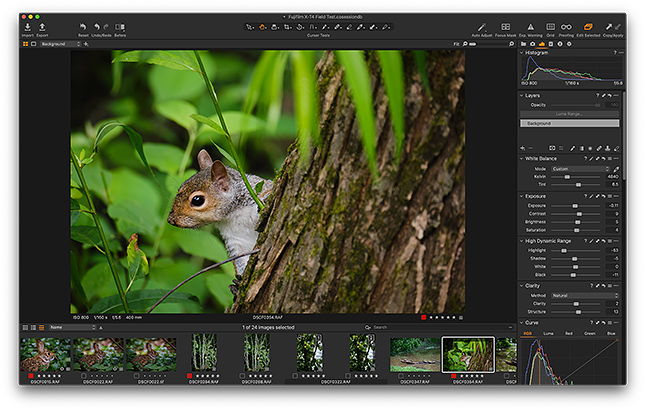
For Lightroom users, there's a handy "Migration" workspace that flips everything around: editing sliders and tools are all placed over on the right, with the essential editing sliders combined into a single, scrollable pane (fewer sub-category panes to click through), and a horizontal film-strip of thumbnails placed along the bottom. As a long-time Lightroom user, I feel much more at home with this workspace layout, with my tools and sliders in more familiar locations.
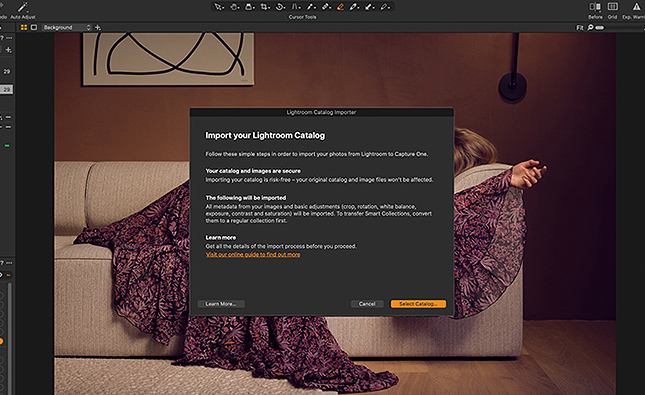
Furthermore, the new v13.1 update offers additional Lightroom migration tools for transitioning users. Capture One 20 already offered a way to import your existing Lightroom catalogs, but now the import process is more explicit; the step-by-step process is now easier to understand. When importing a Lightroom Catalog, the original image files and the catalog are unaffected. Furthermore, the new Capture One update provides the ability to import offline images (Smart Previews in Lightroom). These offline files will be automatically synced into your new Capture One catalog once they are online again, such as when re-attaching the external drive where the original files are located.
Nikon Support
In addition to the full-featured Capture One Pro 20, which includes raw file support for a massive list of digital cameras from a wide array of brands, tethering functionality and more, Capture One also offers specialized versions for specific manufacturers. For example, Capture One for Phase One (formerly called Capture One DB) is a free version of Capture One and offers the full range of features of Capture One Pro but only works with the raw files of Phase One medium format cameras. Similarly, Capture One for Sony and Capture One for Fujifilm are paid (but reduced-price) versions of Capture One Pro that only work for Sony or Fujifilm cameras and raw files, respectively.
Nikon photographers can now get in on the Capture One train with this latest version of Capture One! Like the Sony and Fujifilm counterparts, the new Capture One for Nikon is also a reduced-priced version that offers the full range of Capture One Pro features but with a restriction only to Nikon cameras and Nikon raw files. Additionally, much like how Capture One for Fujifilm supports Fuji's Film Simulations, Capture One for Nikon offers support for Nikon's Picture Style profiles.
New Camera & Lens Support
In addition to the aforementioned new features, this Capture One Pro 20 update also includes additional raw support for new cameras as well as new lens profiles:
New camera support:
- Canon 250D
- Canon PowerShot G5X Mark II
- Canon PowerShot G7X Mark III
- Nikon P950
- Leica M10 Monochrom
- Olympus OM-D E-M1 Mark III
- Zeiss ZX1
- Phase One iXH 150
New lens support:
- Phase One XT -Rodenstock HR Digaron-W 50mm f/4
- Tamron 28-75mm F2.8 Di III RXD
- Fujifilm Fujinon XF16-55mmF2.8 R LM WR
- Ricoh GR III (GR Lens 18.3mm f2.8)
- Canon PowerShot G5 X Mark II
- Sony FE 20mm F1.8 G
Pricing
For existing Capture One Pro 20 customers, the v13.1 is a free update and is now available for download.
For new customers, Capture One offers a variety of pricing options and versions depending on your camera or necessary image editing needs. Capture One Pro 20 is available either as a standalone, perpetual license at a one-time fee, or available as an on-going subscription. The standalone license for Capture One Pro 20 is available for $299, with upgrade pricing from previous versions starting at $159. Capture One for Nikon, Capture One for Sony and Capture One for Fujifilm are available for $129. For those who prefer subscription models, Capture One Pro 20 is available for as low as $20 per month, and Capture One for Nikon, Capture One for Sony and Capture One for Fujifilm subscription plans start at $9.99 per month.
For a complete list of all products and licensing options, please visit the Capture One Store to learn more, or click here to download a free 30-day trial. For a complete list of supported cameras, please see Capture One's Supported Cameras List.
