Nikon D80 Operation
If the Nikon D80 is going to be your first digital SLR, the assortment of buttons and dials might be a little intimidating at first look. After only a short time working with it though, the control layout becomes quite intuitive and very fast to navigate. As we made note of in the Design section of this review, a number of controls have moved around on the body relative to their positions on the D70. Almost all of these changes constitute improvements in the camera's ergonomics, at worst, the changes are relatively neutral. The D80 retains the same mode dial as was found on the D70, so we found ourselves missing the arrangement of buttons and mode dial employed on the D200. We have to admit though, that the easy access to the handful of scene modes provided by the D80's dial is perhaps more appropriate to the amateur market the D80 is designed for.
Overall, the control layout places the main shooting controls on top of the camera and the rest on the back panel, for ease of use. Changing shutter speed, aperture, metering mode, etc. is quick and simple, with changes shown on the small black & white data readout on the top panel of the camera, and some of them in the viewfinder readout display as well.
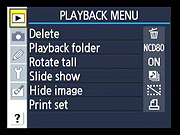 The LCD menu system itself is well-organized and simple to navigate, with five main menu pages. The Custom Settings menu is just a single scrolling list of entries (as in the D50 and D70), rather than the banks of settings seen in the D200. This is perhaps easier for novice users, and arguably a bit faster for shorter lists of options, but the bank system used in the D200 made for a cleaner layout, and made the various functions a bit easier to find.
Top Panel Status LCD
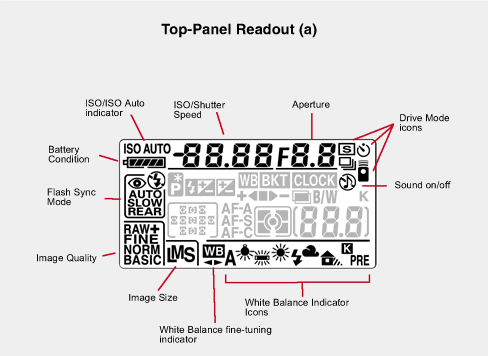
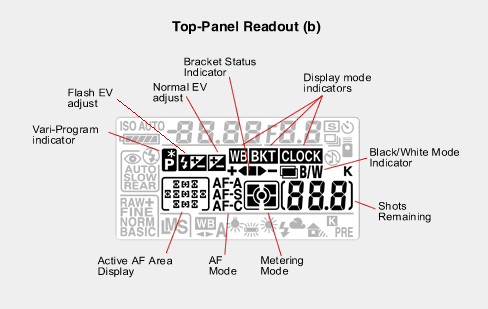
As with most Nikon DSLRs, the top-panel data readout communicates a lot of information about current camera settings, and provides an interface for setting many camera functions, when used in conjunction with the various buttons and Command Dials. The illustrations above show the meaning of the various icons and readouts in this display.
We really like top-panel data readouts of this sort, and hope that Nikon continues to include them on their cameras. Canon removed the top-panel readout on their competing Rebel XTi model and, while the rear-panel displays are gorgeous and readable, we're always conscious that we're using battery power whenever we access them. (We're also more inclined to want to look down on the top of the camera while making adjustments, but that may just be force of habit from our film days.)
The big news with the D80's menu system is that there's now a fifth "Retouch" menu at the bottom of the list, offering a much greater range of in-camera image-manipulation possibilities than we've seen previously on a dSLR. (Or on just about any digital camera, for that matter.) We look at some of the functions available there in more depth on the Operation/Image Retouching subtab of this review.
As always on Nikon dSLRs, the viewfinder display does a good job of keeping you informed of what's going on with the camera, without having to take your eye away from the viewfinder to find out. Those times that you do, the combination of external controls and the monochrome data display can handle most common camera settings without forcing you into the LCD menu system. All in all, a very well laid-out, efficient user interface.
Click on the other sub-tabs above to read about the Nikon D80's Viewfinder, Controls, and Menu system.
Nikon D80 Main LCD
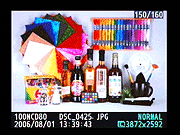
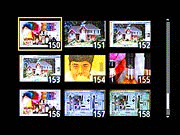 Like those on essentially all digital SLRs at the time of writing, the LCD panel on the D80 isn't usable as a viewfinder. It does, however, provide a great deal of information about your pictures after you've shot them. A variety of playback options are offered, including image-only, six flavors of overlaid information, a 4- or 9-image thumbnail display, and a zoomed playback mode with variable information. The screenshot at right shows several of the information displays that are available.
Its playback screens were one of the things we liked most on the D200, so we were very happy to see a lot of that functionality carried over to the D80 as well.
Of the various screens, one of the more interesting options on the Nikon D80 is the histogram screen. Histogram displays are common on professional digital cameras (and many amateur models now as well), regarded as almost mandatory by many pros for evaluating exposure levels. A histogram is simply a graph of how many pixels there are in the image at each brightness level. The brightness is the horizontal axis, running from black at the left to white at the right. The height of the graph shows the relative number of pixels having each brightness level. This sort of display is very handy for determining under- or overexposure. Ideally, the histogram would stretch across the entire width of the display, using the full range of brightness values available. An underexposed image will have a histogram with all the data lumped on the left-hand side, with nothing reaching all the way to the right. Likewise, an overexposed image will have all the data lumped on the right hand side.
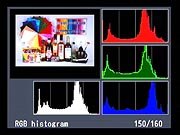 On the D80, Nikon appears to have dispensed with the luminance-only option for the histogram display, opting instead to make the RGB+L histogram display the default. As seen at right, this display graphs the overall brightness (the white graph) as well as brightness values in the Red, Green, and Blue channels separately. Having the three colored histogram graphs available makes it much easier to tell when you're in danger of saturating highlights with strongly colored objects, and also gives good guidance as to whether you've achieved a neutral white balance or not.
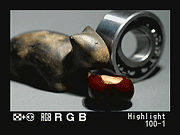 A histogram display is very helpful in telling whether you've got the exposure right, but to my mind isn't adequate by itself. With digital cameras, it's very important not to blow-out the highlights in a picture (they're similar to color positive film in that respect), since once you hit the maximum brightness, the image just saturates, and any highlight detail will be lost. A histogram display does a pretty good job of telling you how the image as a whole is doing, but what if there are just a few critical areas that you're worried about for the highlights? If only a small percentage of the total frame is involved, it won't account for many pixels. That means any peak at the "white" end of the histogram graph would be pretty small, and easy to miss (or just plain invisible). What to do? The folks at Nikon recognized this problem some time ago, and so have provided another special display mode on the D80 (as on most of their dSLRs) that they simply call "highlights," accessible via the Playback settings menu, under "Display Mode." This mode blinks any highlights that are saturated in any of the color channels. It does this by taking the nearly-white areas on the LCD and toggling them between white and black. (This screen shot is actually borrowed from our D200 review, the function works identically on the two cameras.)
One option sadly not copied from the D200 though, is the ability to do a highlight blink based on the individual color channels: On the D80, the highlight blink only shows you areas where the overall luminance is approaching saturation.
 The D80 also offers the D200's greatly excellent options for display magnification, but does so via a somewhat simpler interface. You have the normal thumbnail or normal-sized displays available, but can also enlarge the display up to 25x to examine critical focus and framing. Pressing the Magnify button enables zoomed playback, and each subsequent press of it zooms in a step closer. Pressing the "unmagnify"/Thumbnail button zooms you out. Any time you're zoomed in, you can scroll around the magnified image by using the Multi-controller. This interface is potentially slightly slower than that of the D200, but much simpler, not requiring the simultaneous manipulation of the zoom buttons and Main Control Dial.
 Fujifilm GFX 50S Review
 Fujifilm X-T3 Review
 Olympus E-M5 III Review

Follow Imaging Resource