Image Retouching?
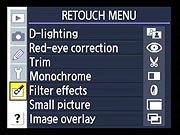 Most digital cameras these days let you do at least some level of image manipulation in the camera, even if it's only to make small copies of images for emailing. With the D80 though, Nikon has gone a long step further, letting the user perform quite a few useful images modifications, without having to resort to the computer. We're not sure we'd call the end result "retouching" ourselves, but the net result does seem to be a significant uptick in capability relative to the D80's competition. For a complete list options, see the D80 "Retouch" Menu table elsewhere in this review. Here, we'll take a brief look at a couple of the more interesting/useful capabilities.
Before discussing the effects in more detail, it bears noting that all the examples below that all the "Retouch" options on the Nikon D80's menu are non-destructive, in that they always store their results in new image files on the D80's memory card, never overwriting the original images. The importance of not losing your original images is obvious, but a nice psychological effect is that it's very freeing, knowing that nothing you do will harm your original images. - So experiment away!
D-Lighting
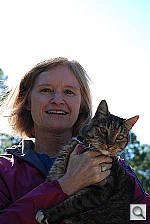
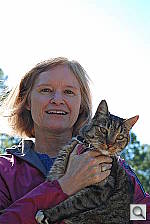
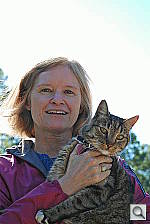
Nikon's D-Lighting option has been around in their Coolpix line of cameras for quite some time now, but it's worth mentioning again, as it's one of the more photographically useful of the in-camera image-modification tricks we've seen. It selectively (and seemingly, quite intelligently) lightens dark areas of the subject. The effect is that of relatively gentle fill illumination, and the camera gives you three options for applying it, varying the strength of the effect.
| D-Lighting Examples (Click on any image to see full-size version) |
||
|---|---|---|
 |
||
| D-Lighting Off (as-shot) | ||
 |
 |
 |
| "Moderate" D-Lighting |
"Normal" D-Lighting |
"Enhanced" D-Lighting |
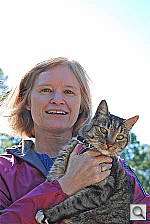
The shots above show a fairly representative backlighting situation, were the subject's back was to the sun, silhouetted against the sky. Which level of D-Lighting you like best will depend somewhat on personal preferences, but I like the "Normal" version the best myself. - The "Enhanced" setting looks slightly artificial to me, and Marti's skin tones are a little ruddy-looking. (D-Lighting tends to preserve color saturation, which can be quite high in shadowed areas of an image. When those areas are brightened up, they can sometimes seem a little overly-saturated.
As you can see, D-Lighting's effects are subtle, but it generally does a good job of doing just what you'd want. This backlit shot of Marti is a good example of a common shooting situation, where D-Lighting's effect can be the difference between a nice shot and one that pretty well misses the mark. Just as important as fixing exposure problems when needed is the principle of doing no harm when less of a fix is called for. In other shots I took, where less correction was called for, D-Lighting was quite restrained, making just the sort of subtle adjustment I would have if I'd been doing the work myself in Photoshop.
Of course, there's no free lunch, so a natural consequence of D-Lighting's boosting of shadow areas is that it will of necessity be boosting image noise along with the image detail you want it to brighten up. Looking at a number of shots with D-Lighting applied to them though, I have to say that this will be a moot point for the vast majority of users. Unless you're shooting at a very high ISO setting (which some users of course will be), the increased noise in the shadow areas is really negligible: You can see it if you zoom in pixel-for-pixel on a computer screen, but in any reasonable-sized print, it'll be essentially invisible.
Bottom line, D-Lighting isn't a panacea, but it can make a very worthwhile contribution to your photography, with a minimum of fuss or muss.
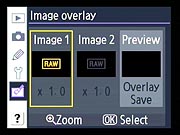
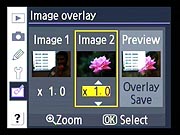
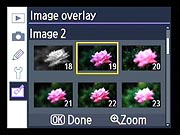
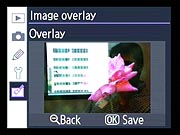
Image Overlay
We wouldn't see ourselves using this effect a whole lot (we'd be more inclined to go to Photoshop for this sort of thing), but the Nikon folks showed us some pretty cool photos created with it, so it's sure to appeal to a lot of creatively-minded but computer-challenged users out there. The concept is very simple: Just overlay two images and combine them into a single new one. Its very well executed though, with a dirt-simple interface and a nice blending of the two images when it's done. (You can adjust the relative strength of each image by using the Multi-Selector pad to change the "x" numbers beneath each image.) The screen shots below show an outline of the process.)
| Nikon D80 Image Overlay feature | |
|---|---|
 |
 |
 |
 |
 |
 |
Filter Effects
This is another (mostly) very subtle option, but the samples below will give you a good idea of what's possible. It's easily the most powerful in-camera image-editing function we've seen to date. Options are Skylight, Warming, and Custom.
Skylight
As with film, the Skylight filter applies a very subtle warming effect to the image, and removes a bit of "haze" from it in the process. The effect is pretty subtle, it might be more evident in an image with more visible haze in it than the example below. Still, this example gives you an idea of what the D80's Skylight filter looks like:
| D-80 Skylight Filter (Click on any image to see full-size version) |
|
|---|---|
 |
 |
| As-Shot | "Skylight" filter |
Warming
Warming produces a more pronounced (but still subtle) warming effect, ideal for restoring skin tones shot in the shade under clear blue skies, or for giving any scene a warmer, more inviting cast. In the example below, I deliberately left the D80's white balance set to "Daylight" for this shot taken in the shade, under a clear blue sky. The original has a pretty pronounced blue cast, the warmed version looks surprisingly close to correct.
| D-80 Warming Filter (Click on any image to see full-size version) |
|
|---|---|
 |
 |
| As-Shot | "Warming" filter |
Custom
The real fun comes with the Custom option though: You basically have the ability to shift the image color in any hue direction you want, with control over both direction and amount of shift, via a nifty 2-D control.
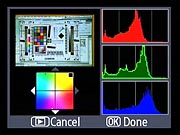
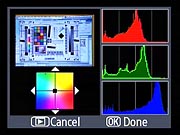 The screen shot at right shows you the main adjustment screen for the Custom filter option. You're shown a small thumbnail of the image being manipulated with the results of the current color filter applied to it, separate Red, Green, and Blue histograms, and the 2-D color control we just mentioned. Nikon's done something very clever here, in that they've provided a full 360-degree range of hue variation, rather than restricting the control to just offering differential adjustments of red and blue versus green, or of changes along yellow-blue and cyan-red axes. Here, all the hues are arranged radially, and the distance you move the cursor dot away from the center of the image, the more the hue will shift in the direction you've selected. In the shot at right, we've begun with a very strongly blue-tinted image (shot from a computer screen, it should really have had a different white balance to begin with). The RGB histograms very clearly show the heavy blue cast, with the green being a little high as well.
 In the shot at right, we've moved the color-control cursor to the far upper right-hand corner, basically asking for a maximum yellow shift. You can see that the thumbnail image is now much closer to being a neutral color, and the blue histogram has come down a lot, to be much more in line with the red and the green. There's obviously still a slightly cyan tint to the image as a whole, but it's much improved overall. This wasn't the best choice for an example of this function, as it's meant to to provide fine-grained control over more subtle color problems. It does give you a pretty good idea of what's possible though - The range of the Custom filter extends quite a bit beyond what's possible with the Skylight or Warming filters, not to mention that it can adjust the color in any direction, not just make it warmer.
Nikon told us that one important change in the D80 was that the color LCDs are all tested and calibrated at the factory, to give consistent color and tonal reproduction. Even with a well-controlled camera LCD, it's still a little dicey relying on what you see on the back of the camera to make critical color judgements (the background lighting could easily throw you off, if nothing else), but we don't think this is really meant to be the final word in color correction. If you really care about color, you'll do your work on a computer, with a color-managed monitor, in a carefully-lit environment. For quick changes, to warm up or cool down an image prior to outputting directly on a PictBridge-compatible printer though, this looks like just the ticket.
As you can see in the first screen shot above, other options on the Retouch menu include red-eye correction, trimming (cropping) images to smaller pixel dimensions, and making small images for use in emails.
There's a clear trend afoot to let users do more with their images directly on the camera, without computer intervention. We can't say how far this will ultimately go, but for the moment, Nikon has taken this further than just about anyone else, particularly in the SLR space.
 Fujifilm GFX 50S Review
 Fujifilm X-T3 Review
 Olympus E-M5 III Review

Follow Imaging Resource