Olympus E-M10 II Field Test Part I
Searching for the ideal family vacation camera
By Dave Pardue | Posted: 08/25/2015
I'm guessing everyone has a slightly different idea of what a perfect vacation camera is for them, but for our core enthusiast readers I'm guessing that a lot of you are like me in that you want a fairly small and lightweight package for traveling, but something that's still not only versatile but can also deliver the goods in the image quality department. Olympus was kind enough to send us an early sample of the E-M10 II shortly before I was leaving for South Carolina for a family vacation, and that gave me the perfect opportunity to see where this camera would stand in the ranks of ideal family vacation companions.
 |
| Olympus E-M10 II shown with the M.Zuiko 75-300mm |
 |
| 1/1000s / f/7.1 / -1.0 EV / ISO 200 / 600mm eq. / M.Zuiko 75-300mm lens |
The Particulars
Twin control dials were once the exclusive domain of premium cameras costing thousands of dollars, and it's nice that some entry-level models now offer this. To me personally as a photographer, it will be difficult to go review an interchangeable lens camera that doesn't have them now, regardless of the price point, as it's just something I've grown to count on. In challenging shooting situations like capturing wildlife in motion or indoor sports it's great to have so much control right there at your fingertips, and to be able to instantly change both aperture and shutter speed with just a wee rock of your finger and thumb and no need to take your eye away from the viewfinder. The E-M10 from last year has twin dials, but the E-M10 II improves upon the both the tactile feel and positioning to a substantial degree for my tastes (see our walkaround for a direct comparison image).
Also mentioned in the walkaround but worth repeating here is that the mode dial is now on the right side, easily switched with your right forefinger and thumb as opposed to being on the left like on the original E-M10. This may not seem like a big deal, but I switch modes quite a bit while on something like a vacation, often using shutter-priority for wildlife, aperture-priority for people and landscape shots and the "art" mode to access my own personal addiction, "Dramatic Tone" (discussed a bit later) so I like the new position a lot better on the E-M10 II. Some photographers may not care about such a small detail, but I'm betting that for anyone who shoots a lot of photos in any outing that you'll appreciate the attention to detail given overall in this control scheme.
 |
Olympus E-M10 II shown with the M.Zuiko 12-40mm f/2.8 Pro lens. The twin control dials have been improved in both their feel and ergonomic positioning, and the mode dial has been thankfully moved to a more accessible position on the right hand side of the EVF. [Editor's note: This Field Test was shot with a pre-production sample, but we'll be receiving a full production unit for our lab testing and Field Test Part II.] |
I love the thumb rest of the OM-D line, and this one borrows from the flagship E-M1 as there is a function button embedded in the slope above the thumb. This is really awesome to me, as once again it's so easy to access without even removing your eye from the viewfinder. The other two function buttons are also easily accessible and obvious, with one being to the right of the shutter button and one to the left of the on/off switch, a natural for your left thumb to activate. All three are highly customizable, with a large range of possibilities for assigning to each.
Now for a small gripe: the lack of a dedicated "drive" button. For this report I switched the drive setting often, jumping from one of the burst modes for wildlife shooting (discussed in a bit), then back to stills for people shots or landscapes, and then to other modes such as the self-timer when needed or the new (and awesome) "silent shutter mode". Even the fixed-lens Stylus 1 that I reviewed in 2013 has a dedicated drive button. You enthusiasts may be asking why not just assign it to a function button, but that's not an option at this time, though it seems an obvious choice for a future firmware update. The function buttons have tons of options, but "drive" isn't one of them. Not to worry though, as you can assign one of the 4-way arrow keys to "drive" -- this does take that key away from being a dedicated focus box positioning key, but you can still use another to pull that screen up and then adjust the focus point that way.
 |
 |
Getting personal: The function buttons, movie record button and four-way pad buttons are all exceedingly programmable to suit your own needs. I wish "drive" were an option for a function button, but I was able to get around it by assigning it to the right arrow on the 4-way pad. |
|
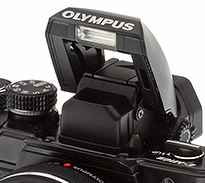
The flash and its pop-up mechanism look and spring to life in seemingly the same way as it did on the E-M 10, but there's a notable difference. On the E-M10 you had a little button to activate the flash, but on the E-M10 II you rock the on/off lever upwards in order to spring it to life. I found this out accidentally (I'd yet to notice the flash icon and didn't have a manual to consult for this report) and was a bit unnerved at first. It's actually a bit cumbersome, and your thumb -- which is the natural digit to trigger this -- can actually get in the way of the flash unit popping up. The jury is still out for me as to whether or not this is a clever switch or an unnecessary one, so I'll wait on calling it a gripe just yet. This is the only model in the OM-D line with a built-in flash, which is an advantage to many photographers who like having one. And it doesn't sacrifice on the hot shoe in order to provide a flash as some entry-level cameras do.
The "Play" button is exactly where I like it to be, and that's at the bottom right. My right thumb can find it without me having to look, making scanning images very fast. Also, it's right by the 4-way pad which is where it should be. Both Olympus and some other companies have moved it around to all sorts of odd locales on other cameras, and I can say that's actually been a deal-breaker for me. It wasn't too bad on the E-M10, being just above the thumb rest, but some cameras have it on the top left of the camera and this is simply not a good place to have that button for any reason. Note to any designers reading: PLEASE put the play button where it belongs -- if not bottom right then at least near the 4-way control pad. The E-M10 II got this and the other buttons just right for my tastes. (Not all of my colleagues agree on this, FYI.)
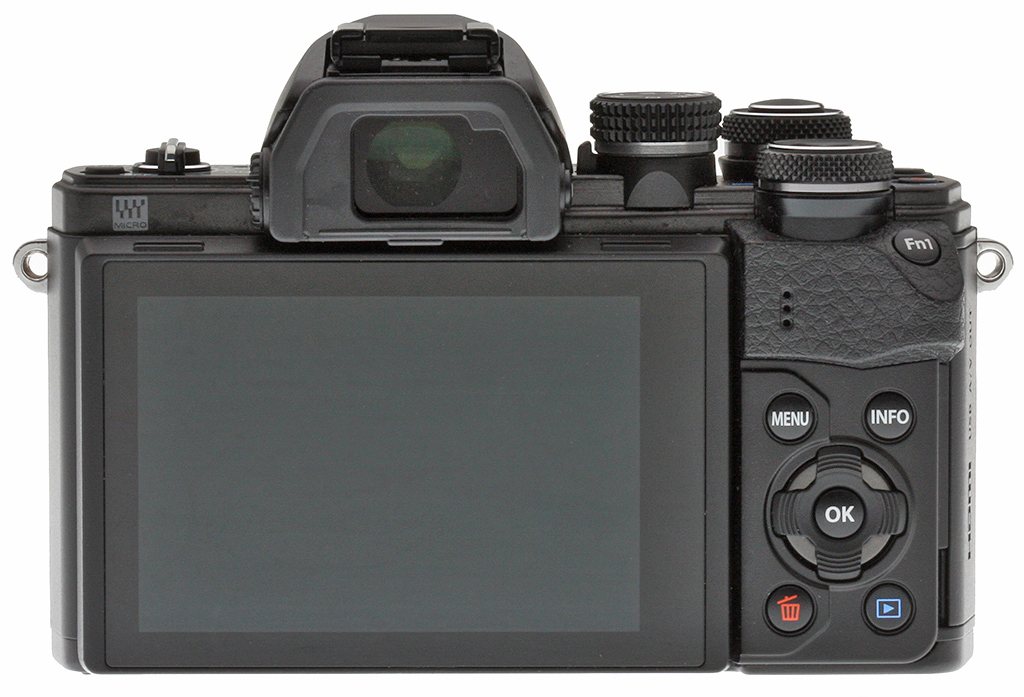 |
| Command center: The controls on the E-M10 II are logical and well-thought-out for my preferences. |
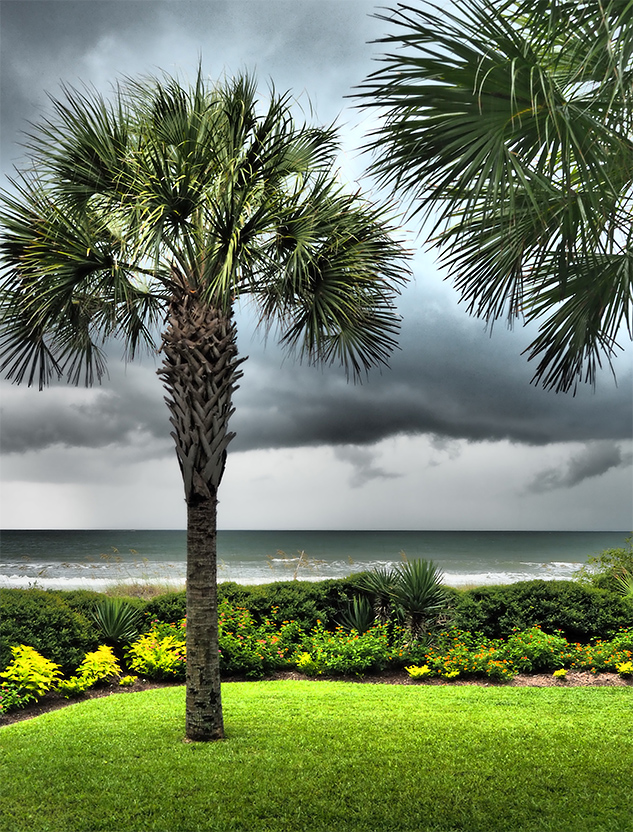
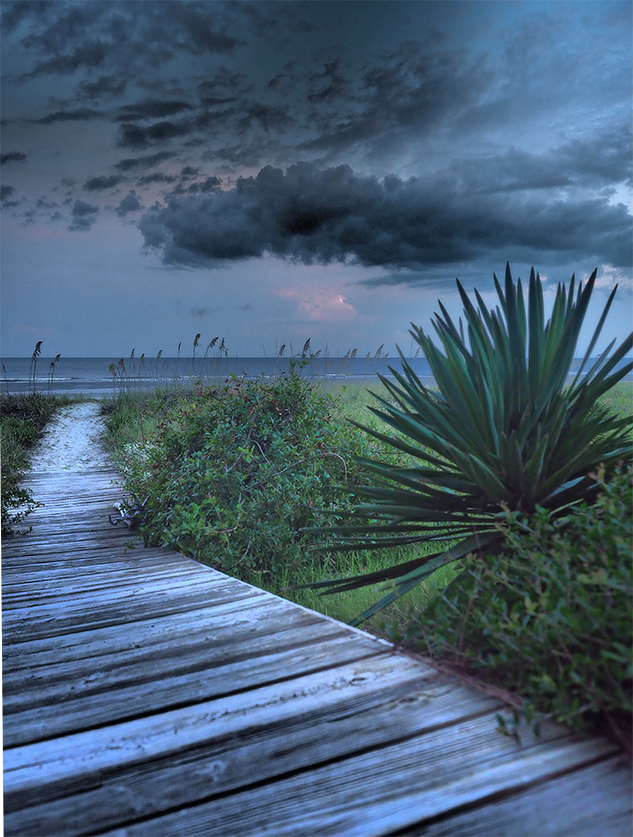
By Land or by Sea
The E-M10 II isn't weather-sealed like it's bigger brother, the E-M5 II (as well as the E-M5 and E-M1), and this is a consideration you'll need to weigh if traveling to water-oriented destinations. I got caught in more than one summer squall with the E-M10 II, and had to take precautions by stowing it in a camera bag and then protecting the bag with my body. The E-M5 II isn't much larger than the E-M10 II, but has a current street price of over $1000 for a body-only version. At that price, it's a highly intriguing option for the enthusiast photographer, and certainly a very good price for what you get. But it's a bit beyond what one could consider a "family vacation camera", at least in my opinion, because for that great an expense you'll be hesitant to let young kids use the "family camera" too.
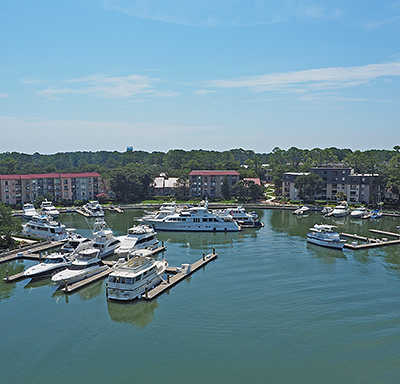
That being said, the rock-solid build quality of the E-M10 II (you really have to hold and shoot with it to know what I mean) is such that I was never concerned with having it near the sand or the ocean, and this allowed me to capture images I was happy to show to the clan at the end of the day. I wasn't given a 14-42mm EZ kit lens for this first report, but I did have the phenomenally good Olympus 12-40mm f/2.8 M.Zuiko Pro lens along for the ride, and this became my go-to landscape and sightseeing lens. It balances quite nicely on the E-M10 II and was a rather elegant combination to hold and shoot with. (You can see that combination pictured above).
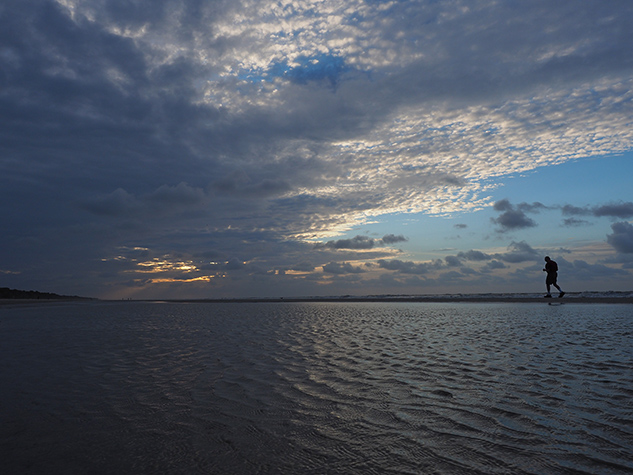 |
| 1/250s / f/9 / -0.3 EV / ISO 200 / 24mm eq. / M.Zuiko 12-40mm f/2.8 Pro lens |
 |
| 1/200s / f/9 / -0.3 EV / ISO 200 / 24mm eq. / M.Zuiko 12-40mm f/2.8 Pro lens |
Capturing images of the obvious tourist attractions is all fine and good (there are plenty in the E-M10 II gallery for you) and I do it because my kids ask me to, but what really gets my creative juices flowing is trying to capture the natural world in a way that evokes the way I felt when I was there. These two images were only slightly processed to balance shadows and highlights, but there is no artificial saturation boost. |
[Images have been slightly modified in post-production -- click any image for access to the full resolution image as delivered straight from the camera as well as all related EXIF data.]
People and pets
Another great divide between enthusiast-grade cameras like the E-M10 II and smartphones or point-and-shoots is the ability to get above-average people and pet shots. The larger sensor, wider available apertures and shallow depth of field potential allow for much greater flexibility and creative control over things like subject-to-background isolation, and I'd not want to miss key vacation moments due to only having a smartphone or point-and-shoot camera. They definitely have their place, and it's great to always have a camera at your disposal, but they're just for casual snapshots for the most part.
Of course, there is a caveat, in that an extensive lens arsenal isn't exactly cheap, but you can add to your collection over time and build it up as you go. Great lenses are timeless, and a lot of fun to use! And the nice thing about the Micro Four Thirds standard is that the best lenses can be made both smaller and lighter by nature than can their rival APS-C or Full Frame cameras and lenses. The shot below of a friend's dog "Snickers" was taken with an Olympus 75mm f/1.8 lens, set at f/2 and taken from only about 10 feet away. Calculating the actual depth of field for that combination yields an in-focus depth of approximately 4 inches, and makes the background elements virtually fade into oblivion. This effect doesn't always work, but I do like it in this shot, and you can't squeeze that kind of background blur from a lesser camera and lens. (You do need to be extra-careful with your focus given the thin depth of field - I didn't quite get his eye for the focus point as the moment was fleeting and I only had a second to get it, but I think it's close enough for this shot.)
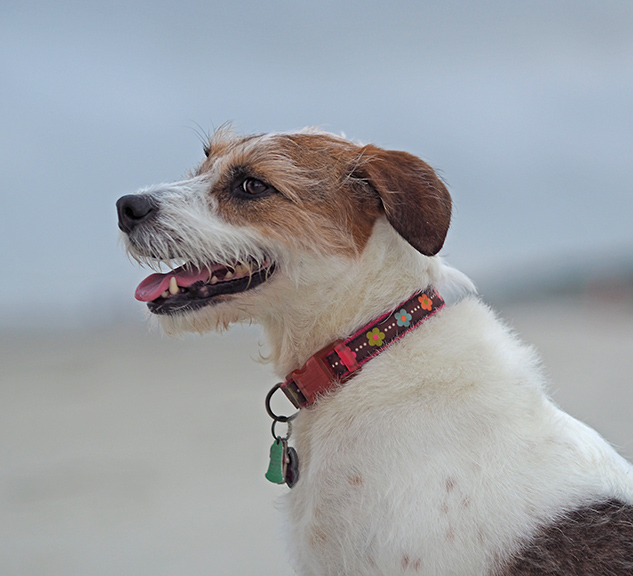 |
| 1/80s / f/2 / ISO 200 / 150mm eq. / M.Zuiko 75mm f/1.8 lens |
 |
| 1/160s / f/2.2 / ISO 1250 / 150mm eq. / M.Zuiko 75mm f/1.8 lens |
Being able to push the sensitivity beyond the ISO 1000 mark is a big advantage for Micro Four Thirds cameras vs their smaller-sensored rivals. I needed ISO 1250 for the above shot in order to achieve a fairly fast shutter speed (little boys and dogs don't usually sit very still) but the noise level is certainly tolerable. (The odd-looking patterns in the bokeh (background blur) seen above and behind them is not moiré, it's a special outdoor bug screen.) |

Speaking of people and pets, the 3-inch 1.04M-dot touchscreen LCD monitor is really terrific, even in sunlight. The tilting design feels pretty much unchanged from the E-M10, and works well for my needs. I love to pull it out to horizontal for people shots, as seen in this image, so that I don't have it up to my eye as that can often make people and pets nervous. Cameras with a variable-angle LCD that can be swiveled out to the side are great for video, but usually that means they can't be tilted up to a horizontal position unless they're out to the side. I prefer not having to move it out to the side to get that position, as that's just too much fumbling and I like it to be in the same plane as the lens for ease in composition anyway. To each his own, as I'm sure some shooters will prefer a variable angle LCD. As well as tilting upwards some 85 degrees, this one can also be angled downward by 45 degrees, so you can easily compose shots while holding the camera over your head.
The Great Escape!
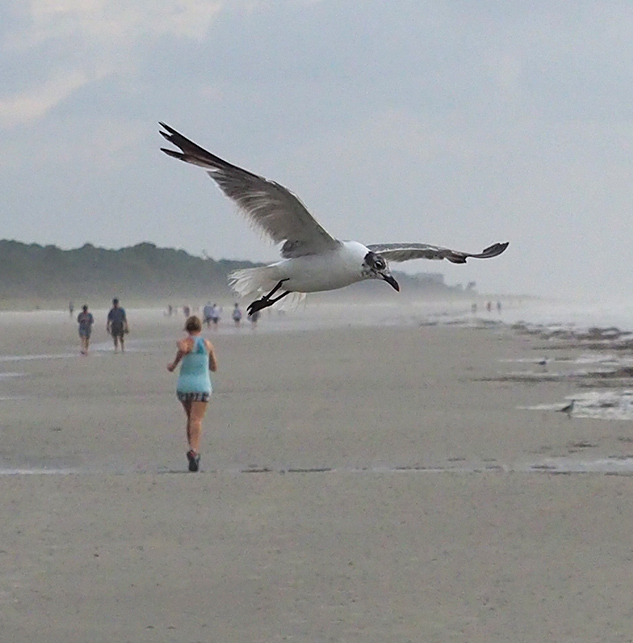
I love my family as much as anyone, but when we're on vacation I still need some alone time, and having a high quality enthusiast camera and a few choice lenses along for the ride provides the perfect escape route for me. Capturing wildlife in its natural element can be both challenging and rewarding, but you've got to have the right gear, and this is where I believe the E-M10 II shines the brightest for the enthusiast photographer. In an "entry-level" package you have an exceedingly capable EVF (more on that in Part II) and burst speeds more than adequate for most enthusiast needs, all while still being imminently portable compared to the classic DSLR wildlife rigs.
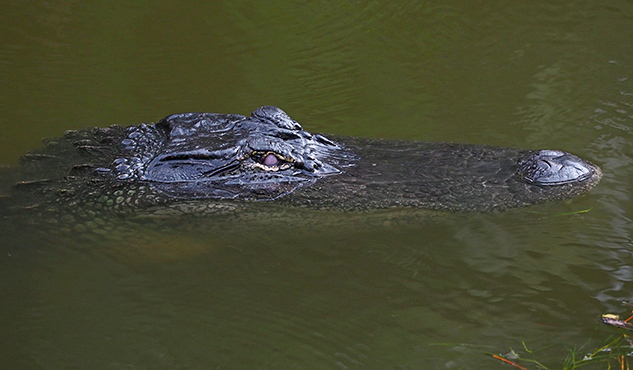
And there's another big reward to be had for the "family guy" in that I was able to go show my kids pictures of things like alligators they saw at a distance but that they'd never be able to get close enough to safely see up-close (and nor would I, were I shooting with a cheaper camera or smartphone). We were staying on a beach with a lagoon on the other side, so I could walk in either direction and generally find some form of wildlife either eating, flying about or drying its wings in the sun. Burst mode ("sequential" in Olympian parlance) comes in both "low" and "high" flavors, and you can custom-configure how many shots-per-second you get from each within the menu. For low you have the option of between 1 and 4 frames per second, and in high between 5 and 8.5 fps.
I didn't have a manual for this first report, but was reminded by William Brawley's excellent E-M 10 sports and wildlife report on the original E-M10 that you can only rely on C-AF in sequential low mode, so that's what I primarily used. I like to shoot to my heart's content when in burst mode and don't like worrying about the buffer filling too fast, nor the memory card for that matter, so I virtually always disable RAW while in burst mode. Some enthusiasts will cringe at this, while some are like me and would rather "travel light" and rely on the JPEGs. Hey, to each his own style, and this camera can accommodate us all. We'll have details about timing and buffer clearing coming shortly, incidentally, just as soon as we've had time to run a production-level camera through our lab testing.
But one thing those reports won't show is how well the C-AF works in the real world, so I enlisted William to walk towards the E-M10 II while I fired off a few burst sequences, just to double-check that it doesn't do C-AF in "high" mode. Sure enough we confirmed that it indeed doesn't, but what we also found was just how well it did at C-AF while in low mode! The burst shown here is a GIF animation of the whole sequence, and I've made 1:1 crops from the first and last frames of the original high resolution images so that you can see how well it nails focus. Granted, this is just a walking test, and some wildlife and sports obviously move faster, but at least this is a starting gauge to show you that it's doing its job really well. We've done walking tests of higher-end "enthusiast" DSLR's some of which didn't fare this well.
Olympus E-M10 II - Sequential Low burst mode |
|
 |
 |
First frame (1:1) |
Last frame (1:1) |
Subject focus tracking: Sequential low provides up to 4 fps and utilized continuous AF to follow the subject. In our walking test, the E-M10 II was able to continually nail focus throughout the range of this test over an 11-frame burst. |
|
Going Long
To see how it fares in the real, real world I enlisted the Olympus 12-40mm f/2.8 Pro as well as the Olympus 75-300mm wildlife lens (both pictured above). Below are some of the results, and there are more in our E-M10 II gallery page as well. I generally used shutter priority with C-AF enabled and the drive on sequential low mode. For my general tastes, I find that Olympus cameras with Four Thirds sensors can handle up to ISO 1600 without much worry regarding noise. Fortunately, it's easy to set a "hard ceiling" on the sensitivity in the menu, and for these wildlife shots I generally kept it to ISO 800 and below, and let the camera select the sensitivity based on where I wanted the shutter speed and aperture to fall.
 |
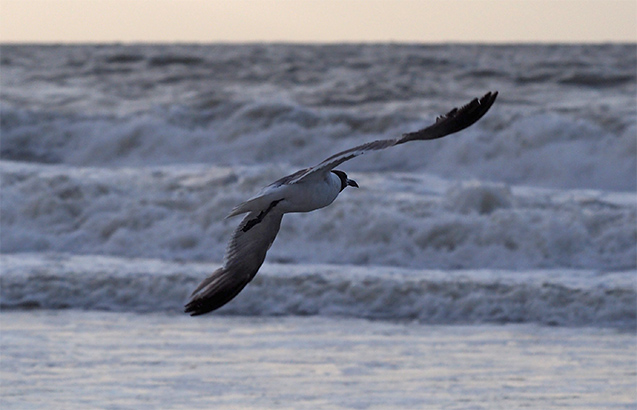
I've always wanted to capture a decent pelican shot, and for this sequence I waded out into the water until the waves prevented me going further. Fortunately this guy swooped in fairly close and the 600mm equivalent focal length was enough to capture a fair amount of detail (the above GIF images are cropped in a good bit, but three of the original images are available in our gallery). I also managed to get a sequence of him diving and feeding but it was a bit underexposed as his speed accelerated enormously on the hunting dive and this lens is fairly dim at maximum telephoto. This shot would likely be better taken with a higher-end OM-D that has robust weather-sealing, but I was careful to have a safety strap and steer clear of the worst waves. Next time I'll try and tote the 40-150mm (80-300mm eq.) Pro lens, or perhaps we'll soon get lucky and receive a sample unit of the highly anticipated M.Zuiko 300mm f/4!
Olympus E-M10 II - Capturing wildlife |
 |
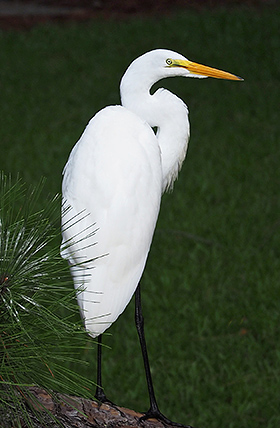
| 1/500s / f/6.7 / ISO 400 / 600mm eq. / M.Zuiko 75-300mm lens This darter (Anhinga) looks almost prehistoric to me, casually drying his/her wings in the sun. They're similar in appearance to -- and often mistaken for -- cormorants (a.k.a. "shags"). |
 |
| 1/1,000s / f/5 / ISO 800 / 80mm eq. / M.Zuiko 12-40mm f/2.8 Pro lens I needed ISO 800 here for the 1/1000s shutter speed while keeping it stopped down to f/5 for some focus depth. The image appears more noisy than it actually is, as it was a dim and foggy morning. Not prehistoric looking like the cormorant, but I do love these as well! (Note to readers who love birds -- I'm struggling in identifying the exact species- - believe it's a type of gull or skimmer -- please advise in the comments section below if you can help me out there!) |
 |
| 1/500s / f/6.3 / -1.3 EV / ISO 1250 / 416mm eq. / M.Zuiko 75-300mm lens It's better to have a good bit of zoom reach for one of these. |
Silent Shutter Mode

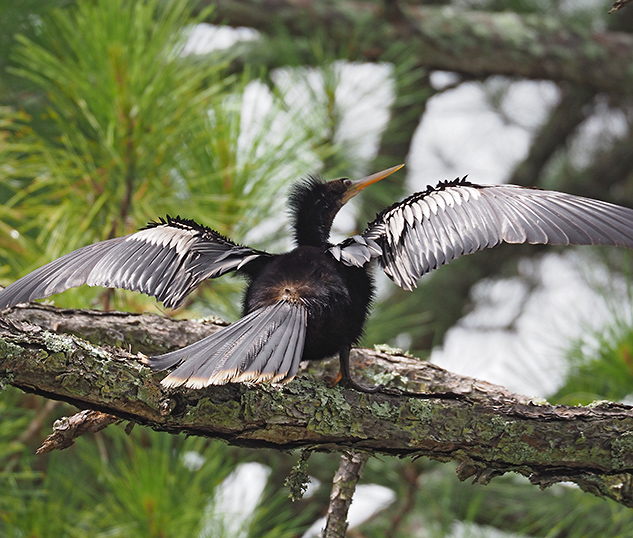
The new "Silent Shutter" mode is a welcome addition to the OM-D family, and I was almost stunned by how well it works. Turning all sounds off on the Stylus 1 for instance still results in the faintest little "click" that can be heard, but Silent Shutter is, well.... silent! It's a real help when trying to sneak up on an alligator (not that I didn't notice him noticing me.... "Never Smile at a Crocodile" as they say) and even more help when trying to approach certain birds, like the egret or darter above. You can use silent shutter in any drive mode from still to sequential to self-timer, and you can also disable it from the drive menu if not needed, as it can take up quite a bit of menu real estate and add to your scrolling.
While we're on the subject of menus I'd like to add another gripe to this report, and that's some of the oddities found within Olympus menu systems in general. On a positive note they have the "Super Control Panel" and were the first company that I'm aware of to employ a now often copied single menu page where you can access many of the most common settings (shown below). Unfortunately, as you dive deeper in the menus there are some things that get a bit confusing, even to those of us who use these a lot. For one thing, I don't understand why so many of the menus have lists with spelled words, and then suddenly an icon instead of words. Virtually every menu panel has a series of words, then an icon randomly thrown in. It's confusing and I'm just not sure the point of the mix-and-match style here. It's almost like the menu system has a split personality.
 |
 |
Ups and downs of the menu system: The Super Control Panel found on all mid-level and higher-end Olympus cameras over the past few years (left image above) is both user-friendly and easily understood, but the menu configurations which employ a blend of words and icons within the same list seem confusing and unnecessary to me. This is not at all a deal breaker, but it does involve a learning curve for shooters not familiar with Olympus menus, and is something I hope their designers fix at some point soon. |
|
The Smaller Side of Life
For those of you interested in macro imagery, below is a shot of a "writing spider" (Argiope aurantia) known for creating a web that resembles writing or zig-zag sewing. This was taken with the (excellent) Olympus M.Zuiko 60mm f/2.8 macro lens.
Olympus E-M10 II - Macro photography |
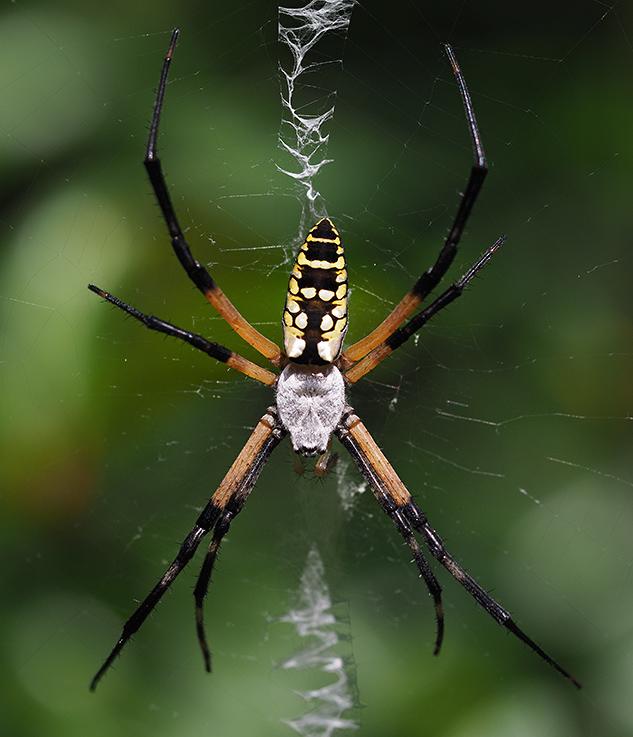 |
| 1/1,000s / f/3.5 / -1.0 EV / ISO 200 / 120mm eq. / M.Zuiko 60mm f/2.8 lens |
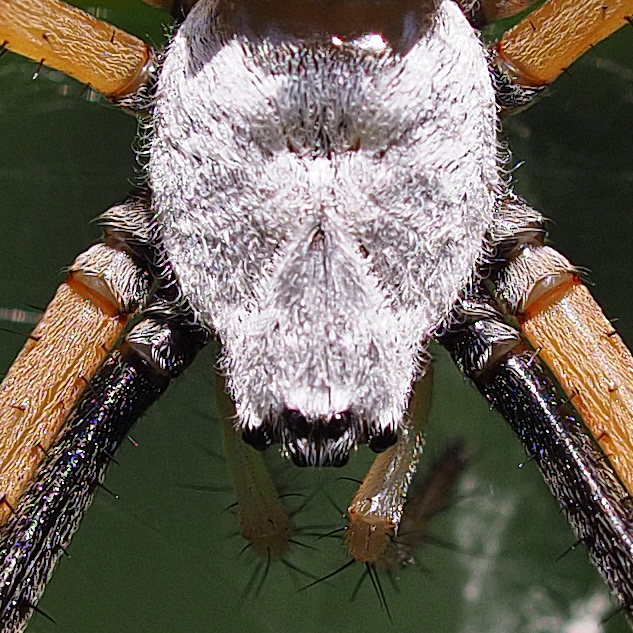 |
[1:1 crop from above image] [Clicking the first image above will access the unedited image; the second will access the edited version.] |
Dramatic Tone ("sssh!")
Being a website dedicated to the enthusiast photographers of the world, one might expect us to publicly denounce creative filters as mere folly, but I can't help myself when it comes to the Olympus filter called "Dramatic Tone" (found by flipping the mode switch to the "ART" setting and then scrolling to it). Obviously, as with any creative tool it should be employed sparingly and only when called for, but there are instances that I find it quite fun. You can also add the effect with the Olympus Viewer software after the fact, but I like the instant gratification of seeing it live in the field, and my kids tend to love it, so it certainly suits to have it on your primary "family vacation camera".
Below are a few images that I found warranted the treatment, and to you photography purists out there I do apologize. If it makes you feel any better, my colleagues routinely give me quite a pranging for using this filter, and even more abuse for actually posting images into a Field Test! Alas, I wish I could curb the addiction, but I fear there's no hope for me on that one.
Olympus E-M10 II - Dramatic Tone |
 |
| 1/800s / f/7.1 / ISO 200 / 24mm eq. / M.Zuiko 12-40mm f/2.8 Pro lens |
 |
| 1/100s / f/3.5 / ISO 200 / 38mm eq. / M.Zuiko 12-40mm f/2.8 Pro lens |
 |
| 1/60s / f/2.8 / ISO 250 / 24mm eq. / M.Zuiko 12-40mm f/2.8 Pro lens |
The coolest filter: Yes, it is to be used sparingly, but when needed for bringing flair to shots like these I hereby grant you permission to use this filter without feeling guilty. |
Summary
To wrap up Part I of this Field Test I can say for certain that I'm rather smitten with this little camera. It is ergonomically excellent to me, feels great in the hands, balances nicely with a wide variety of lenses and is highly customizable. It has terrific autofocus, even very dependable continuous AF while in "sequential low" burst mode, and is capable of delivering stunning images. I had a few minor gripes like the lack of a dedicated drive button and some odd irregularities with the traditional Olympus menus systems, but overall thus far I've simply had a ball with the E-M10 II.
Have I found the "ideal family vacation camera"...? Well, there's more shooting to be done, especially in low light as well as exploration on the video front, both of which will be needed in determining just how well the five-axis image stabilization works in those departments. But so far this little camera is hitting the key bases and knocking the ball right out of the ballpark.
 |
 |
 |
 |
 |
 |
 |
We're expecting a full production E-M10 II sample shortly plus the kit lens, and we'll pen a Field Test Part II with that one, where we'll explore video, flash, 4k timelapse video and more, so check back with us often. In the meantime head to our E-M10 II gallery page for many more images from this first report.
Olympus E-M10 II Overview • Gallery
Lab Samples • E-M10 vs E-M10 II
 Fujifilm GFX 50S Review
 Fujifilm X-T3 Review
 Olympus E-M5 III Review

Follow Imaging Resource